3 Examples of Address Autofill Forms to Collect Shipping and Payment Addresses
Address forms with autofill to collect postal addresses
Join the DZone community and get the full member experience.
Join For FreeBusinesses often use forms to collect information about their customers. The most important information is often the address. Companies that ship goods or brochures to users obviously need an accurate shipping address. There are many other businesses (like banks) that also require users to provide their addresses for regulatory purposes and other various reasons.
The Difficulty of Collecting Verified User Addresses
We’ve established that addresses are necessary and sometimes an essential part of a business model. Despite their importance, many businesses have difficulty collecting and verifying addresses.
Collecting a verified address can be difficult for multiple reasons. For example, there may be new addresses that aren’t yet added to geolocation databases. Also, there may be multiple streets or cities with the same.
Webmasters often use a custom field that matches the user’s input with verified addresses. This is one way to verify a user's address. The problem is that these input fields are not flexible. New addresses are sometimes not added to the database, so users can’t select them.
You can solve this problem by letting users select an address, even if it is not verified. And check the address later to make sure that it's correct.
We'll show you how!
Overview of 3 Address Collection Forms
In this article, we will review three easy ways users can provide their addresses in a friendly way. We use @geoapify/geocoder-autocomplete library in our code snippets. This library lets you develop autocomplete forms for Free using Geoapify's autocomplete service.
1. Select an Address and Specify the Location by Placing a Marker on a Map - JSFiddle
There are constantly new roads and units being developed that aren’t added to geolocation databases. There isn’t a concrete reference to these places.
A great solution is to let users select their location on a map so you get the exact coordinates of the address. Let users select their location on the map to capture their location.
You can integrate the Address Autocomplete input with a map and use Reverse Geolocation to let users click on any point of the map to select a location:
Here’s a step-by-step breakdown of how to implement this feature using plain JavaScript code:
Create an Input Field With Autocomplete Functionality
Needless to say, HTML elements, by default, do not have autocomplete functionality.
Geoapify provides an autocomplete interface that allows you to create an input field with address autocomplete functionality.
We simply create a variable and use autocomplete.GeocoderAutocomplete() constructor to create a ‘smart’ input field. It takes three parameters:
- Reference to the container for the input field
- Key for Geoapify API, which you can get by signing up on Geoapify's website
- Autocomplete options. You can see the whole settings list on @geoapify/geocoder-autocomplete page.
In our JSFiddle live demo, the code looks like this:
<div id="autocomplete" class="autocomplete-container"></div>const autocompleteInput = new autocomplete.GeocoderAutocomplete(
document.getElementById("autocomplete"),
myAPIKey, {
lang: 'en',
allowNonVerifiedHouseNumber: true,
allowNonVerifiedStreet: true,
skipDetails: true
});Now that we created an input field with address autocomplete, we need to specify what happens when the user selects an address from the field:
autocompleteInput.on('select', (location) => {
  selectLocation(location);
});

function selectLocation(location) {
  console.log(location);
  // later - show the location on the map
}
Create a Clickable Map and Marker for Selecting a Point on the Map
We use the Leaflet map library for this code sample. Let's create a map:
<div id="address-map" class="map-container"></div>// Create a Leaflet map
const map = L.map('address-map').setView([50, 10], 5);
// Retina displays require different mat tiles quality
const isRetina = L.Browser.retina;
// you can use differrent map style from https://apidocs.geoapify.com/docs/maps/map-tiles/
const baseUrl = "https://maps.geoapify.com/v1/tile/osm-bright/{z}/{x}/{y}.png?apiKey={apiKey}";
const retinaUrl = "https://maps.geoapify.com/v1/tile/osm-bright/{z}/{x}/{y}@2x.png?apiKey={apiKey}";
// add Geoapify attribution
map.attributionControl.setPrefix('Powered by <a href="https://www.geoapify.com/" target="_blank">Geoapify</a>')
// Add map tiles layer. Set 20 as the maximal zoom and provide map data attribution.
L.tileLayer(isRetina ? retinaUrl : baseUrl, {
attribution: '<a href="https://openmaptiles.org/" target="_blank">© OpenMapTiles</a> <a href="https://www.openstreetmap.org/copyright" target="_blank">© OpenStreetMap</a> contributors',
apiKey: myAPIKey,
maxZoom: 20,
id: 'osm-bright',
}).addTo(map);When users select an address, the event handler calls the selectLocation() function with one argument - the user's selected location. Let's update its code to show a location on the map:
let selectedLocation;
let locationNeedToBeClarified;
let suggestedLocation;
let locationMarker;

function selectLocation(location) {
  cleanUp();

  // check selected location here
  selectedLocation = location;

  if (location) {
    locationNeedToBeClarified = (location.properties.nonVerifiedParts && location.properties.nonVerifiedParts.length) || !location.properties.housenumber;
  }

  zoomMap();
  showLocationMarker();
}

function cleanUp() {
  if (locationMarker) {
    locationMarker.remove();
    locationMarker = null;
  }

  locationNeedToBeClarified = false;
  suggestedLocation = false;
}

function zoomMap(location) {
  if (selectedLocation) {
    let zoom = selectedLocation.properties.street ? 17 : 12;
    zoom = Math.max(map.getZoom(), zoom);
    map.flyTo([selectedLocation.properties.lat, selectedLocation.properties.lon], zoom, {
      duration: 0.1
    })
  }
}

// add a marker with icon generated by Geoapify Marker Icon API
// https://apidocs.geoapify.com/playground/icon/
const markerWarningIcon = L.icon({
  iconUrl: `https://api.geoapify.com/v1/icon/?type=awesome&color=%23ffd14e&size=large&icon=question&noWhiteCircle&scaleFactor=2&apiKey=${myAPIKey}`,
  iconSize: [38, 56], // size of the icon
  iconAnchor: [18, 51], // point of the icon which will correspond to marker's location
  popupAnchor: [0, -57] // point from which the popup should open relative to the iconAnchor
});

const markerOkIcon = L.icon({
  iconUrl: `https://api.geoapify.com/v1/icon/?type=awesome&color=%2330e970&size=large&icon=check&noWhiteCircle&scaleFactor=2&apiKey=${myAPIKey}`,
  iconSize: [38, 56], // size of the icon
  iconAnchor: [18, 51], // point of the icon which will correspond to marker's location
  popupAnchor: [0, -57] // point from which the popup should open relative to the iconAnchor
});

function showLocationMarker() {
  if (!selectedLocation) return;

  locationMarker = L.marker([selectedLocation.properties.lat, selectedLocation.properties.lon], {
    icon: locationNeedToBeClarified ? markerWarningIcon : markerOkIcon,
    draggable: locationNeedToBeClarified
  }).addTo(map);

  if (locationNeedToBeClarified) {
    // You can also use a tap event with a timeout for touch devices - https://stackoverflow.com/a/56427428
    locationMarker.on('dragend', (event) => {
      getAddressByLatLon(locationMarker.getLatLng().lat, locationMarker.getLatLng().lng).then(address => {
        suggestedLocation = address;
        updateAddressInfo();
      });
    })
  }
}
First, it calls the cleanUp() function to reset the map and previous results.
Next, it checks if the location is a real value (not null, 0, empty string, or other ‘falsy’ values) and sets the value of locationNeedToBeClarified variable to the outcome of the following condition:
locationNeedToBeClarified = (location.properties.nonVerifiedParts && location.properties.nonVerifiedParts.length) || !location.properties.housenumber;So if the user selects a location that has nonVerifiedParts, and there is at least one non-verified part, locationNeedToBeClarified will be set to true. Or if the location is missing a house number value, locationNeedToBeClarified will be set to true.
Next, the selectLocation() function calls the zoomMap() function to zoom closer to the user's selected address.
It also calls the showLocationMarker() function, which looks at the value of locationNeedToBeClarified and displays a yellow marker if the location needs to be clarified, and a green marker if the user's initial selection is fine.
When the location needs to be clarified, we make the marker draggable and add the "dragend" event handler to update the location:
locationMarker.on('dragend', (event) => {
  getAddressByLatLon(locationMarker.getLatLng().lat, locationMarker.getLatLng().lng).then(address => {
    suggestedLocation = address;
  });
})
We call the getAddressByLatLon() function, which uses Reverse Geocoding API to return the address for the latitude/longitude coordinates:
function getAddressByLatLon(lat, lon) {
  return fetch(`https://api.geoapify.com/v1/geocode/reverse?lat=${lat}&lon=${lon}&apiKey=${myAPIKey}`).then(result => result.json()).then(result => {
    if (result && result.features && result.features.length) {
      return result.features[0];
    }

    return null;
  });
}
If you go to a live demo, you’ll see that users can select an address simply by clicking on the map.
To do this, we define the event handler for click events on the map:
map.on('click', (event) => {
  if (!selectedLocation || locationNeedToBeClarified) {
    getAddressByLatLon(event.latlng.lat, event.latlng.lng).then(location => {
      if (selectedLocation) {
        if (locationMarker) {
          locationMarker.setLatLng(event.latlng);
        }
        suggestedLocation = location;
        updateAddressInfo();
      } else {
      	if (location) {
        	autocompleteInput.setValue(location.properties.formatted);
        	selectLocation(location);
        }
      }
    });
  }
});
Clicking on a map will select a location as long as the location isn’t already selected (!selectedLocation) or if it needs to be clarified (locationNeedToBeClarified).
If this condition is satisfied, we pass the coordinates of the point where the user clicks on the getAddressByLatLon() function.
2. Autofill Structured Address From a Postcode - JSFiddle
Our second address form example shows how to collect structured addresses starting from ZIP or postcode:
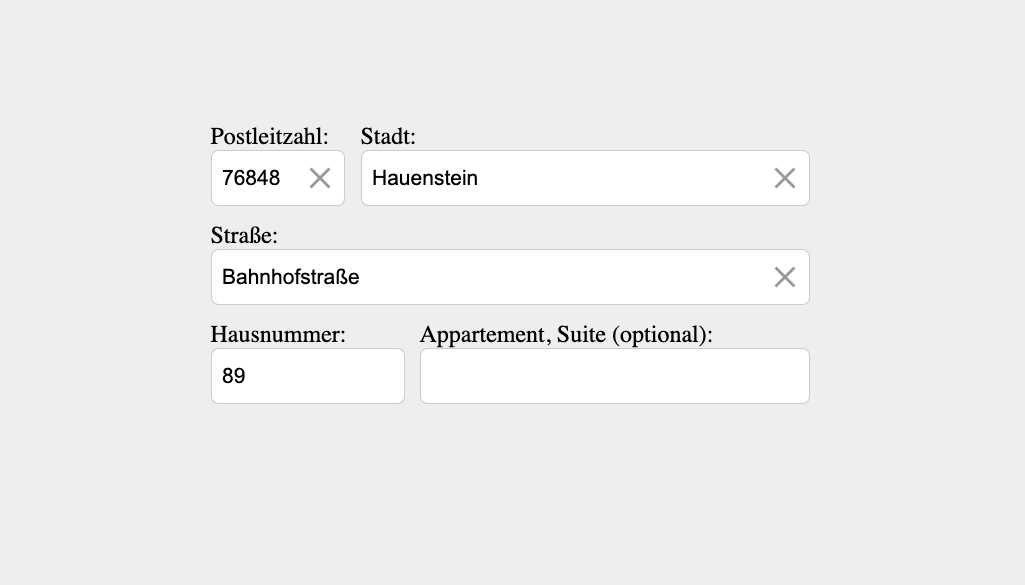
Create Address Input Fields
Similar to the previous code sample, we create address inputs with autocomplete functionality. But for this form, we will create separate fields for postcode, city, and street:
<div class="address-row">
  <div class="address-field-with-label margin-right">
    <label for="postcode">Postleitzahl:</label><br>
    <div id="postcode" class="address-field autocomplete-container small-input"></div>
  </div>
  <div class="address-field-with-label main-part">
    <label for="city">Stadt:</label><br>
    <div id="city" class="address-field autocomplete-container"></div>
  </div>
</div>
<div class="address-row">
 <div class="address-field-with-label main-part">
    <label for="street">Straße:</label><br>
    <div id="street" class="address-field autocomplete-container"></div>
  </div>
</div>// set a country code here
const country = 'de';
const lang = "de";
const postcodeInput = new autocomplete.GeocoderAutocomplete(
document.getElementById("postcode"),
myAPIKey, {
lang: lang,
type: "postcode",
skipDetails: true,
placeholder: "XXXXX",
skipIcons: true,
filter: {
countrycode: [country]
}
});
const cityInput = new autocomplete.GeocoderAutocomplete(
document.getElementById("city"),
myAPIKey, {
lang: lang,
type: "city",
skipDetails: true,
skipIcons: true,
placeholder: " ",
filter: {
countrycode: [country]
}
});
const streetInput = new autocomplete.GeocoderAutocomplete(
document.getElementById("street"),
myAPIKey, {
lang: lang,
type: "street",
skipDetails: true,
skipIcons: true,
placeholder: " ",
filter: {
countrycode: [country]
}
});
postcodeInput.setPostprocessHook((feature) => {
// show only postcode in the dropdown
return feature.properties.postcode;
});This code sample shows you how to search addresses in a specific country and get results in the specified language. In this case, the country is Germany (‘de’), so filters will not allow users to select Austrian or French addresses, for example.
In our example, we also call setProcessHook() on postcodeInput, so autocomplete in this field only suggests postcode values.
Next, we define handlers for the ‘select’ event:
postcodeInput.on('select', (postcode) => {
  postcodeData = postcode;

  // When you select a specific postcode, the input can be filled out automatically for many countries.
  if (postcode && !cityData && postcode.properties.city) {
    cityInput.setValue(postcode.properties.city);
  }

  updateFilters();
});


cityInput.on('select', (city) => {
  cityData = city;

  if (city) {
    cityInput.setValue(city.properties.city || '');
  }

  if (city && city.properties.postcode) {
    postcodeInput.setValue(city.properties.postcode);
  }

  updateFilters();
});

streetInput.on('select', (street) => {
  if (street) {
    streetInput.setValue(street.properties.street);
  }

  if (street && !postcodeData && street.properties.postcode) {
  	postcodeInput.setValue(street.properties.postcode);
  }

  if (street && !cityData && street.properties.city) {
  	cityInput.setValue(street.properties.city);
  }
});
When selecting a postcode, we also autofill the city input when it's present. Event handlers for cityInput and streetInput follow the same principle.
At the end of every event handler, we call the updateFilters() function, which updates the filters. As a result, Geoapify autocomplete will only suggest address values compatible with that specific ZIP code or a city value:
function updateFilters() {
  // update city filters
  if (postcodeData) {
    cityInput.addFilterByPlace(postcodeData.properties.place_id);
  } else {
    // set original filters
    cityInput.clearFilters();
    cityInput.addFilterByCountry([country]);
  }

  // update street filters
  if (postcodeData) {
    streetInput.addFilterByPlace(postcodeData.properties.place_id);
  } else if (cityData) {
    streetInput.addFilterByPlace(cityData.properties.place_id);
  } else {
    // set original filters
    streetInput.clearFilters();
    streetInput.addFilterByCountry([country]);
  }
}
For example, if the user has selected a postcode, Geoapify will filter its autocomplete suggestions to streets and cities associated with that zip code, not from around the world.
Verify User-Entered Address
Now we have an address-filling form that allows you to enter addresses in a very flexible way. However, we recommend that you verify addresses before submitting them. You can do this with Geoapify's Geocoding API by sending it a structured address as input:
function checkAddress() {
  const postcode= postcodeInput.getValue();
  const city = cityInput.getValue();
  const street = streetInput.getValue();
  const housenumber = document.getElementById("housenumber").value;
  const message = document.getElementById("message");
  message.textContent = "";

  // Check the address with Geoapify Geocoding API
  // You may use it for internal information only. Please note that house numbers might be missing for new buildings and non-mapped buildings. So consider that most addresses with verified streets and cities are correct.
  fetch(`https://api.geoapify.com/v1/geocode/search?housenumber=${encodeURIComponent(housenumber)}&street=${encodeURIComponent(street)}&postcode=${encodeURIComponent(postcode)}&city=${encodeURIComponent(city)}&filter=countrycode:de&lang=${lang}&apiKey=${myAPIKey}`).then(result => result.json()).then((result) => {
  	let features = result.features || [];

    // To find a confidence level that works for you, try experimenting with different levels
    const confidenceLevelToAccept = 0.25;
    features = features.filter(feature => feature.properties.rank.confidence >= confidenceLevelToAccept);
    if (features.length) {
	  const foundAddress = features[0];
      if (foundAddress.properties.rank.confidence === 1) {
        message.textContent = `We verified the address you entered. The formatted address is: ${foundAddress.properties.formatted}`;
      } else if (foundAddress.properties.rank.confidence > 0.5 && foundAddress.properties.rank.confidence_street_level === 1) {
        message.textContent = `We have some doubts about the accuracy of the address: ${foundAddress.properties.formatted}`
      } else if (foundAddress.properties.rank.confidence_street_level === 1) {
        message.textContent = `We can confirm the address up to street level: ${foundAddress.properties.formatted}`
      } else {
        message.textContent = `We can only verify your address partially. The address we found is ${foundAddress.properties.formatted}`
      }
    } else {
    	message.textContent = "We cannot find your address. Please check if you provided the correct address."
    }
  });
}
The API call response will contain the address and a confidence score that measures the validity of the address:
| confidence | The confidence value takes values from 0 to 1. |
| confidence_city_level | City-level confidence takes values from 0 to 1. Evaluates if the city is correct. |
| confidence_street_level | Street-level confidence takes values from 0 to 1. Evaluates if the street is correct. |
We set the confidence level threshold and filter the features array to remove items that do not meet the criteria. In this case, we set the confidenceLevelToAccept variable to 0.25, which is totally customizable. You can set it to 0.5 and reject more vague addresses with unverified parts. Or you can set it to 0.2 and accept even more vague addresses.
variable to 0.25, which is totally customizable. You can set it to 0.5 and reject more vague addresses with unverified parts. Or you can set it to 0.2 and accept even more vague addresses.
You can customize error messages as well as conditions for displaying them. For example, you can have two messages: one for addresses with an acceptable confidence score (0.25 to 1, in this case) and another for the case when there are no addresses with an acceptable confidence score.
3. Autofill Structured Address From a Street Name - JSFiddle
In the last example, we’ll show you how to autocomplete multiple address components (city, state, street, postcode, etc.) as long as users provide their street address.
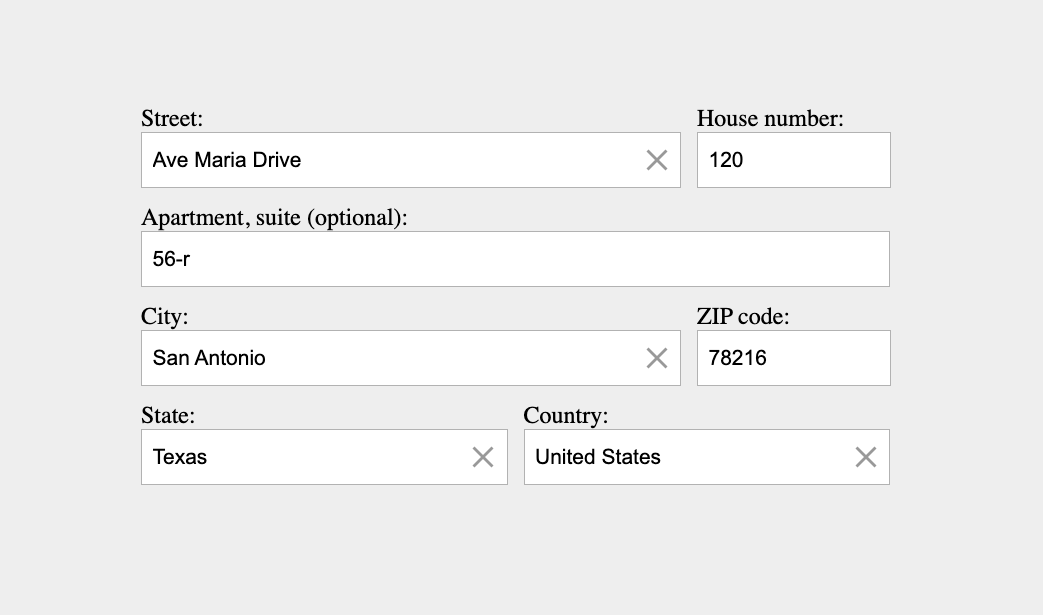
This address form is very similar to the previous one, but there are a few differences. In this example, we start filling in an address with the street name. And this variant has a significant advantage over others - it suggests addresses that exist, and when the user chooses one, we can autofill the rest of the address fields.
Create Address Input Fields
First, we need to create input fields with autocomplete functionality:
const streetInput = new autocomplete.GeocoderAutocomplete(
  document.getElementById("street"),
  myAPIKey, {
    allowNonVerifiedHouseNumber: true,
    allowNonVerifiedStreet: true,
    skipDetails: true,
    skipIcons: true,
    placeholder: " "
  });

const stateInput = new autocomplete.GeocoderAutocomplete(
  document.getElementById("state"),
  myAPIKey, {
    type: "state",
    skipDetails: true,
    placeholder: " ",
    skipIcons: true
  });

const cityInput = new autocomplete.GeocoderAutocomplete(
  document.getElementById("city"),
  myAPIKey, {
    type: "city",
    skipDetails: true,
    skipIcons: true,
    placeholder: " "
  });


const countryInput = new autocomplete.GeocoderAutocomplete(
  document.getElementById("country"),
  myAPIKey, {
    type: "country",
    skipDetails: true,
    placeholder: " ",
    skipIcons: true
  });
We use allowNonVerifiedHouseNumber and allowNonVerifiedStreet parameters to let users enter addresses that are missing in geo databases.
Whenever a user selects a street, autocomplete API returns information for that street, as well as the country, city, state, and postcode of that street’s location.
Let’s look at the event handler for ‘select’ events. It checks if there are postcode, city, state or country values for a specific street address and updates the value of respective fields:
streetInput.on('select', (street) => {
  if (street) {
    streetInput.setValue(street.properties.street || '');
  }

  if (street && street.properties.housenumber) {
    housenumberElement.value = street.properties.housenumber;
  }

  if (street && street.properties.postcode) {
    postcodeElement.value = street.properties.postcode;
  }

  if (street && street.properties.city) {
    cityInput.setValue(street.properties.city);
  }

  if (street && street.properties.state) {
    stateInput.setValue(street.properties.state);
  }

  if (street && street.properties.country) {
    countryInput.setValue(street.properties.country);
  }
});

cityInput.on('select', (city) => {

  if (city) {
    cityInput.setValue(city.properties.city || '');
  }

  if (city && city.properties.postcode) {
    postcodeElement.value = city.properties.postcode;
  }

  if (city && city.properties.state) {
    stateInput.setValue(city.properties.state);
  }

  if (city && city.properties.country) {
    countryInput.setValue(city.properties.country);
  }
});

stateInput.on('select', (state) => {

  if (state) {
    stateInput.setValue(state.properties.state || '');
  }

  if (state && state.properties.country) {
    countryInput.setValue(state.properties.country);
  }
});
Verify User-Entered Address
This form also allows you to verify addresses before submitting them to databases with checkAddress() function. This function works similarly to the one from the previous example.
Conclusion
In conclusion, address input forms are crucial for businesses that require shipping information from their customers. The three examples of address input forms discussed in the article showcase different approaches to collecting this information and highlight the importance of clear and concise design. By understanding the user's needs and designing the form in a way that makes entering information as simple and efficient as possible, businesses can ensure that the shipping process runs smoothly and accurately.
Opinions expressed by DZone contributors are their own.
Comments