A Guide to Implement Instagram-Like Filters in React Native
We have created a step-by-step guide on how to integrate image editing, and filters like Instagram in react native.
Join the DZone community and get the full member experience.
Join For FreeOn Instagram, you can apply filters easily and get the desired result quickly. It has great functionality to modify photos with better output. Some clients may demand similar functionality in their custom react native applications. They required Instagram-like filters in the custom app.
In context to the situation, we have created a step-by-step guide on how to integrate image editing, and filters like Instagram in react native.
Our developers have done extensive research on various libraries for filters in React Native that is available on the web but haven't found the desired result. So, they have come up with a special guide for building image filters in React Native.
Steps mentioned within the blog can simplify the things that can ease the integration process.
Let's Get Started!
Pre-requisite
Nothing much is required here; just make sure that React Native is installed and the project is already created.
Installing React Native and setting it up is a different and simple process. You can get more information at this link.
Libraries Required to Install
There are three major functions one needs in the application; Cropping, Filtering, and Downloading. To perform these functions, our developers have selected the three best libraries to support filters in react native that you need to install.
1. Image Cropping
The image cropping allows us to crop the image as per the selected dimensions options and free-form self-adjustable cropping mechanism. It is an interesting part of any mobile app development. We have used Crop Picker Library to get better output. This library also offers video editing functionality.
2. Image Filter Creation
We have selected React Native Image Filter Kit to perform the image filter function within the application. Based on the kit, we have created a special code to generate more than 20 filters.
3. Image Downloading
To share the modified image with the world, one needs to download it to a mobile. This function can be taken care of by React Native Cameraroll Library. Using this library, developers can generate a smooth functionality to save filtered images in iOS and Android photo libraries.
Core Function Development Guide
Once the libraries are installed, it is time to step ahead and build core functionality. So, let's step into the coding part and achieve the given milestone.
This is the folder structure we have created to make our work easy to understand.
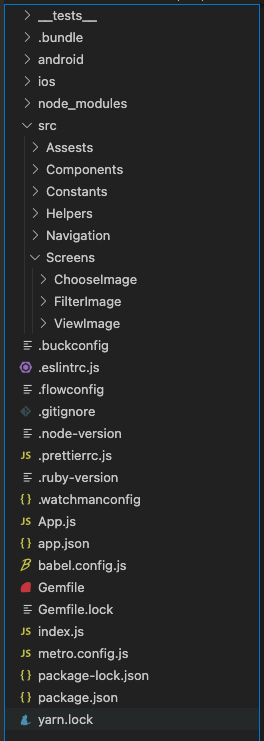
Step 1: Phone Gallery Call
Now create a folder "ChooseImage". Next, add 'index.jsx' file. To get the image from the phone gallery, add the below-mentioned code in the 'index.jsx' file.
import React, { useState } from 'react';

import {

  Image,

  Alert,

  SafeAreaView,

  StyleSheet,

  Text,

  TouchableOpacity,

  View,

} from 'react-native';

import { launchImageLibrary } from 'react-native-image-picker';

import {

  widthPercentageToDP as wp,

  heightPercentageToDP as hp,

} from 'react-native-responsive-screen';

import Constants from '../../Constants/Constants';

import Button from '../../Components/Button';

import Loader from '../../Components/Loader';

import ImagePicker from 'react-native-image-crop-picker';


const CreatePost = ({ navigation }) => {


  const [thumbnail, setThumbnail] = useState({});

  const [loaderVisible, setLoaderVisible] = useState(false);


  const onChooseImage = async (selectionType) => {


    const options = {

      cameraType: 'back',

      mediaType: selectionType,

      includeBase64: true,

    };

    const result = await launchImageLibrary(options);

    if (!result.didCancel && result.assets) {

      if (selectionType === 'photo') {

        const photoData = {

          uri: result.assets[0].uri,

          type: result.assets[0].type,

          name: result.assets[0].fileName,

        };

        setThumbnail(photoData);

      }

    }

    if (result.errorMessage) console.log('error');

  };


  const handleNextStepClick = async () => {

    if (!thumbnail.length) {

      setLoaderVisible(false);

      if (!Object.keys(thumbnail).length) {

        Alert.alert('Please add thumbnail image');

        return;

      } else {

        return ImagePicker.openCropper({

          includeBase64: true,

          path: thumbnail,

          cropping: false,

          freeStyleCropEnabled: true,

          compressImageQuality: 0.8,

          showCropFrame: true,

          mediaType: 'photo',

        }).then(image => {

          navigation.navigate('FilterScreen', { imageData: image });

        })

      }

    }

  };


  return (

    <SafeAreaView

      style={styles.safeView}>

      <View

        style={styles.imageView}>

        {Object.keys(thumbnail).length ? (

          <>

            <View

              style={styles.insideView}>

              <Image

                source={{ uri: thumbnail?.uri }}

                style={styles.thumbImage}

                resizeMode={'contain'}

              />

            </View>

            <View

              style={styles.editView}>

              <TouchableOpacity

                activeOpacity={0.6}

                onPress={() => onChooseImage('photo')}

                style={{

                  ...styles.addLessonBtnContainer,

                  marginEnd: 7,

                }}>

                <Image

                  source={require('../../Assests/icon_edit.png')}

                  resizeMode="contain"

                  style={styles.editImage}

                />

              </TouchableOpacity>

              <TouchableOpacity

                activeOpacity={0.6}

                onPress={() => setThumbnail({})}

                style={styles.addLessonBtnContainer}>

                <Image

                  source={require('../../Assests/delete.png')}

                  resizeMode="contain"

                  style={styles.editImage}

                />

              </TouchableOpacity>

            </View>

          </>

        ) : (

          <>

            <View style={{ ...styles.pickContainer, }}>

              <TouchableOpacity

                onPress={() => onChooseImage('photo')}

                activeOpacity={0.7}>

                <View style={styles.galleryView}>

                  <Image

                    source={require('../../Assests/Pick.png')}

                    style={styles.galleryImg}

                    resizeMode="contain"

                  />

                </View>

              </TouchableOpacity>

            </View>

            <View

              style={styles.postTextView}>

              <Text style={styles.introText}>

                {Constants.create_post_story}

              </Text>

            </View>

          </>

        )}

      </View>

      <View style={styles.buttonView}>

        <Button

          title={Constants.next}

          onclick={handleNextStepClick}

          style={styles.button_next}

        />

      </View>

      <Loader titleText={''} visible={loaderVisible} />

    </SafeAreaView>

  );

};


const styles = StyleSheet.create({

  button_next: {

    textTransform: 'uppercase',

    fontSize: wp('5%'),

    color: 'white',

    marginHorizontal: wp('7%')

  },

  editView: {

    justifyContent: 'flex-end',

    alignItems: 'center',

    marginTop: wp('5%'),

    alignSelf: 'flex-end',

    display: 'flex',

    flexDirection: 'row',

  },

  imageView: {

    paddingHorizontal: wp('5%'),

    paddingVertical: wp('10%'),

    backgroundColor: '#FFFFFF',

    marginTop: wp('5%'),

    width: wp('100%'),

  },

  insideView: {

    width: '100%',

    justifyContent: 'center',

    alignItems: 'center',

  },

  thumbImage: {

    width: wp('100%'),

    height: wp('80%'),

  },

  editImage: {

    width: wp('4.5%'),

    height: wp('4.5%'),

    tintColor: '#FFFFFF',

  },

  galleryView: {

    height: wp('20%'),

    width: wp('20%'),

    backgroundColor: '#FF701F',

    borderRadius: 40,

    justifyContent: 'center',

    alignItems: 'center'

  },

  galleryImg: {

    height: wp('7%'),

    width: wp('7%'),

    tintColor: 'white'

  },

  postTextView: {

    marginTop: wp('5%'),

  },

  safeView: {

    flex: 1,

    backgroundColor: '#fff',

  },

  buttonView: {

    marginTop: wp('7%'),

    marginBottom: wp('3%')

  },

  pickContainer: {

    borderWidth: 1,

    borderColor: '#DFDFDF',

    marginTop: hp('10%'),

    justifyContent: 'center',

    alignItems: 'center',

    borderStyle: 'dashed',

    width: '100%',

    paddingVertical: wp('7%'),

  },

  addLessonBtnContainer: {

    backgroundColor: '#FF701F',

    borderRadius: 4,

    paddingHorizontal: wp('3%'),

    paddingVertical: wp('2%'),

  },

  introText: {

    textTransform: 'uppercase',

    textAlign: 'center',

    textAlignVertical: 'center',

    color: '#1F1F1F',

    fontSize: wp('5%'),

  },

});


export default CreatePost;
Output
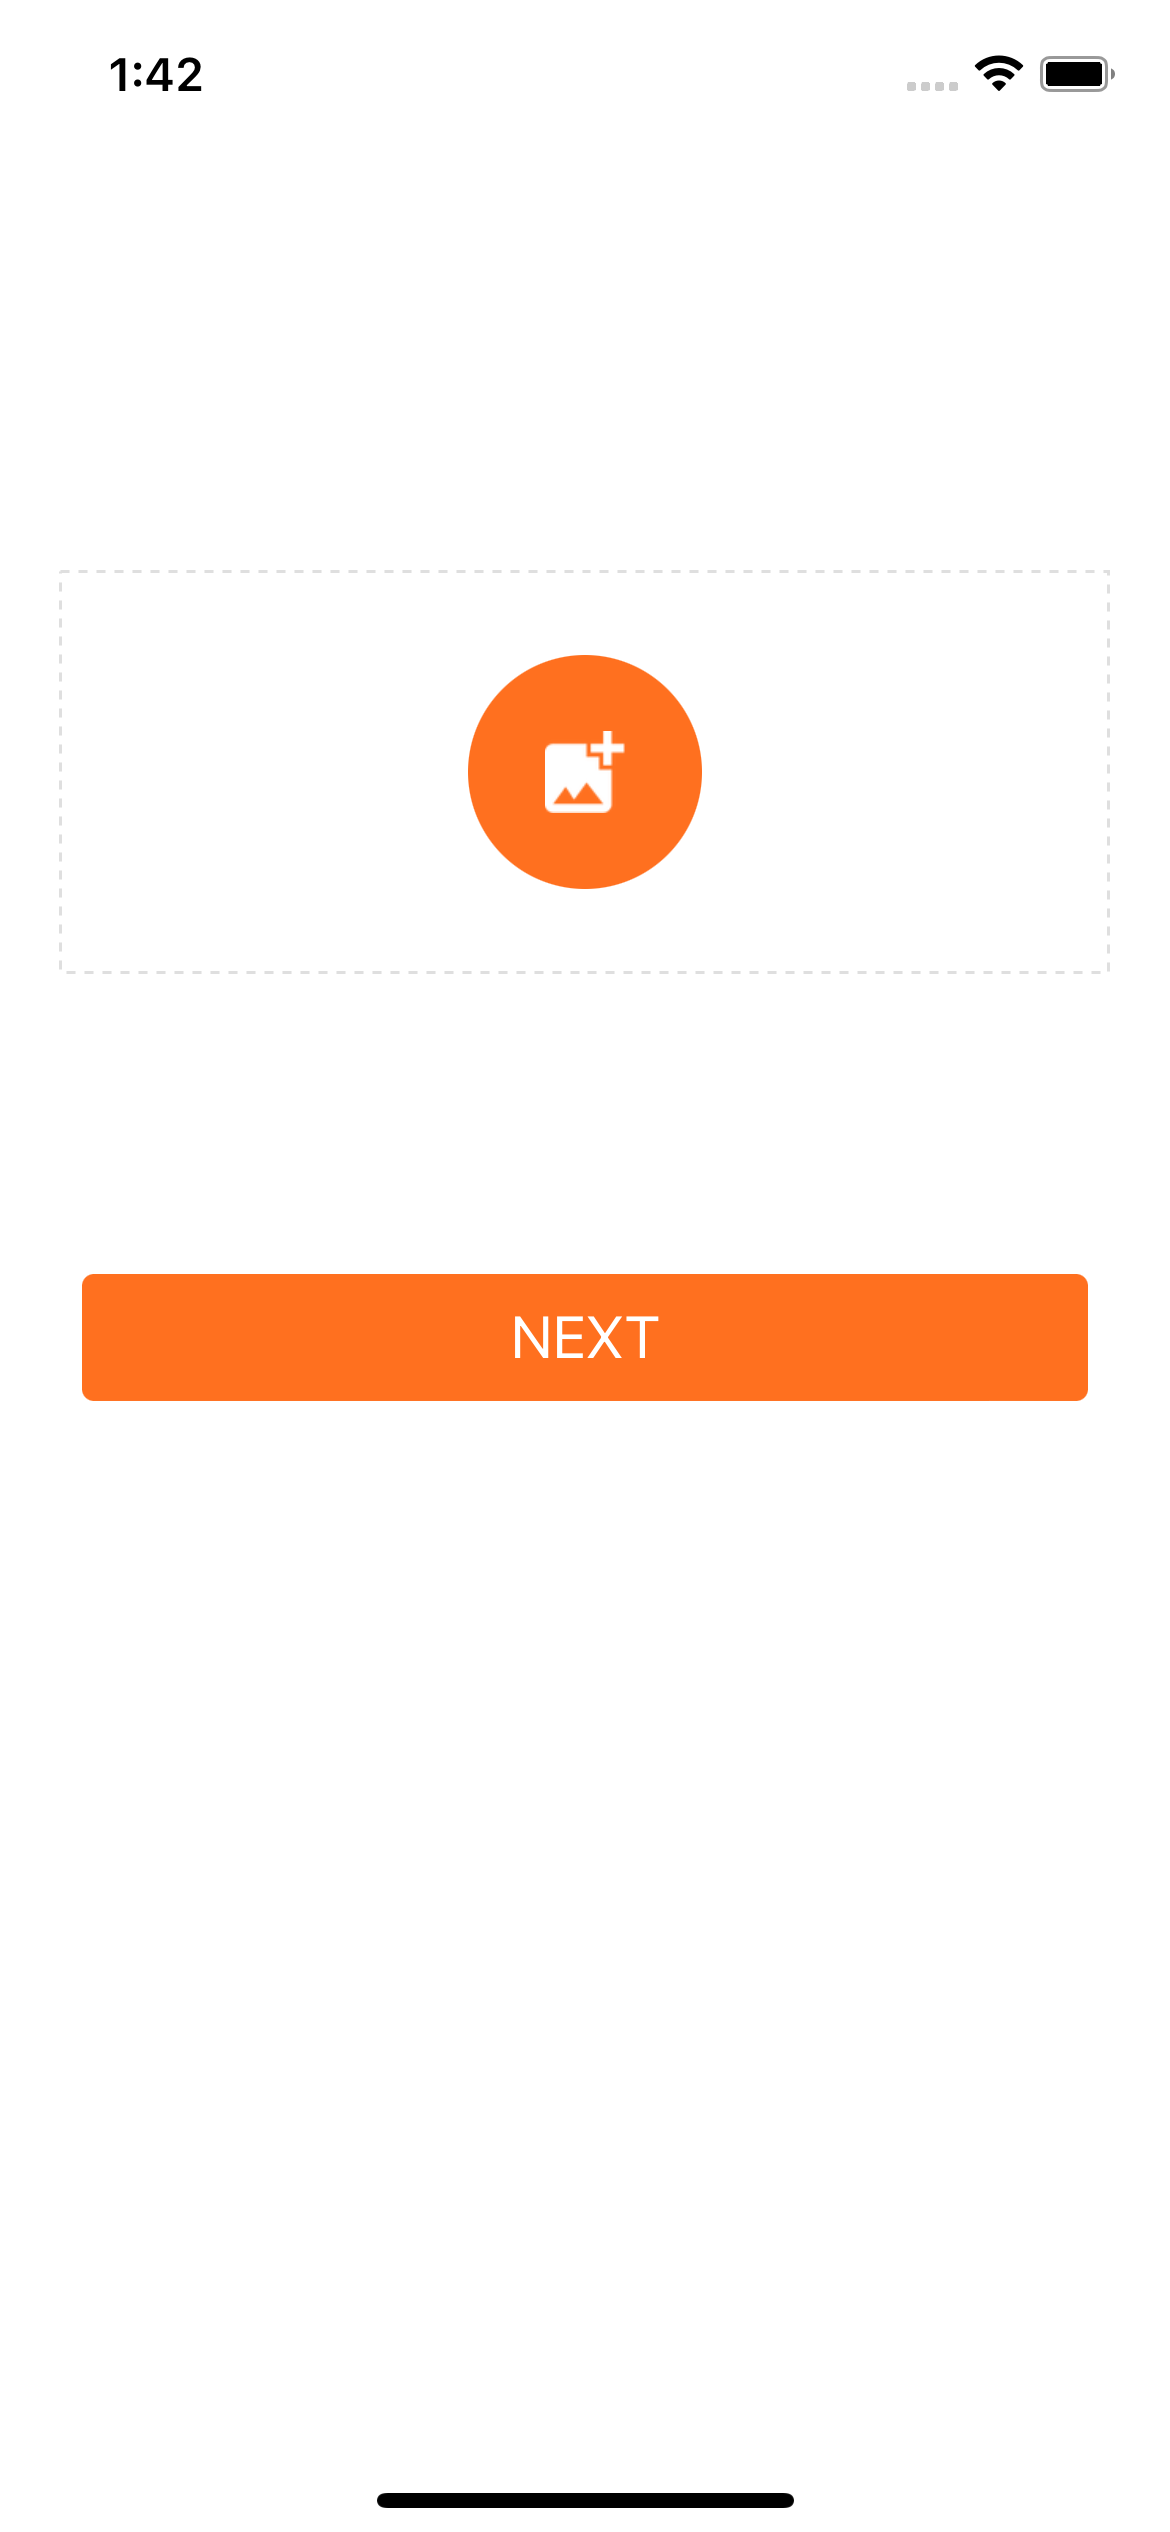
Once you add the code mentioned above to the 'index.jsx', you can able to see the output as per the screenshot below.
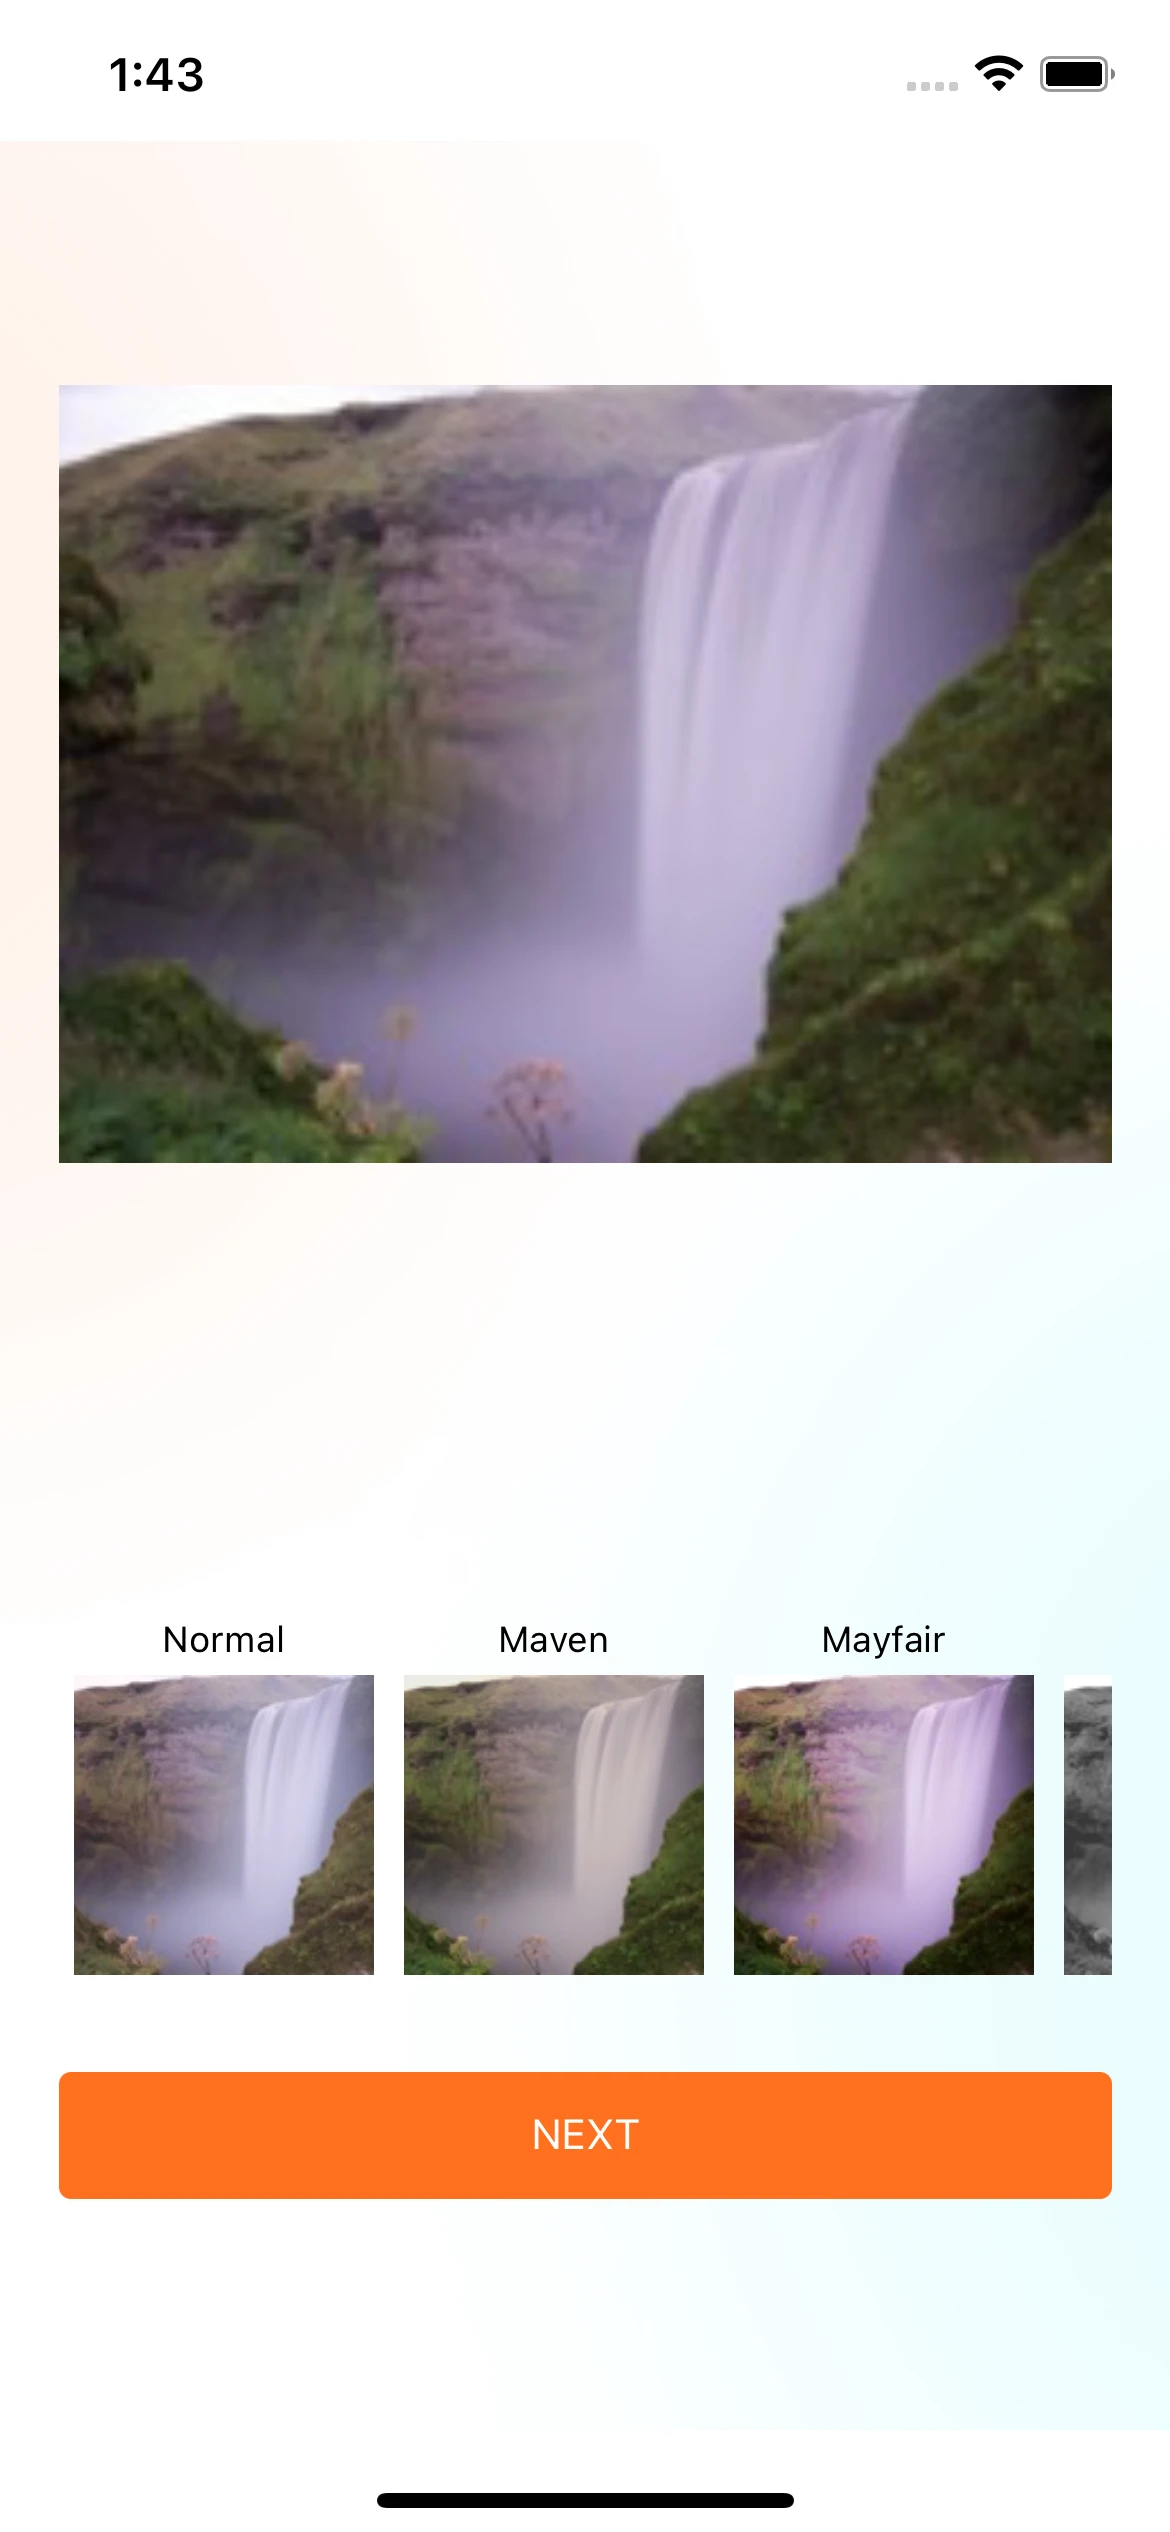
Step 2: Image Cropping and Resizing
We already added a code on the "Next" button in step one. So, when you click on the next crop picker library opens up its UI. And one can resize the image as per their choice as well as can rotate it.
The picker offers various image ratio options for users to pick from. Once the user clicks on the options button, an action sheet view appears. Now the user can select a predefined ratio for cropping.
Step 3: Image Filters Creation
Now the selection and cropping functionality is ready with us. Next, it's time to add image filter functionality. Now let's create a new folder and name it "Filter Image". Once again, create a file "index.jsx" and add the below-mentioned code:
import React, { useRef, useState, useEffect } from 'react';

import {

  widthPercentageToDP as wp,

  heightPercentageToDP as hp,

} from 'react-native-responsive-screen';

import {

  FlatList,

  Image,

  SafeAreaView,

  StyleSheet,

  Text,

  TouchableOpacity,

  ImageBackground,

  View,

} from 'react-native';

import { FILTERS } from '../../Helpers/Filters';

import Button from '../../Components/Button';

import Constants from '../../Constants/Constants';

import { KeyboardAwareScrollView } from 'react-native-keyboard-aware-scroll-view';


const FilterScreen = ({ navigation, route }) => {


  const [selectedFilterIndex, setIndex] = useState(0);

  const [image, SetImage] = useState('')

  const [thumbnail, setThumbnail] = useState({});


  useEffect(() => {

    getImageFromNavigation()

  })


  const getImageFromNavigation = () => {

    if (route?.params?.imageData) {

      setThumbnail(route?.params?.imageData)

    }

  }


  const onExtractImage = ({ nativeEvent }) => {

    SetImage(nativeEvent.uri)

    extractedUri.current = nativeEvent.uri;

  };


  const onSelectFilter = selectedIndex => {

    setIndex(selectedIndex);

  };


  const extractedUri = useRef(thumbnail?.path);


  const handleNextStepClick = async () => {

    if (selectedFilterIndex === 0) {

      navigation.navigate('ViewImage', { imageString: thumbnail })

    } else {

      console.log('goinfFromHere');

      navigation.navigate('ViewImage', { imageString: image })

    }

  };


  const renderFilterComponent = ({ item, index }) => {

    const FilterComponent = item.filterComponent;

    const image = (

      <Image

        style={styles.filterSelector}

        source={{ uri: thumbnail?.path }}

        defaultSource={require('../../Assests/Pick.png')}

      />

    );

    return (

      <TouchableOpacity onPress={() => onSelectFilter(index)}>

        <Text style={styles.filterTitle}>{item.title}</Text>

        <FilterComponent image={image} />

      </TouchableOpacity>

    );

  };


  const SelectedFilterComponent = FILTERS[selectedFilterIndex].filterComponent;


  return (

    <>

      <SafeAreaView

        style={styles.safeView}>

        <ImageBackground

          source={require('../../Assests/image_background.png')}

          style={styles.container}>


          <KeyboardAwareScrollView

            contentContainerStyle={styles.keyboardContainer}

            resetScrollToCoords={{ x: 0, y: 0 }}>


            {selectedFilterIndex === 0 ? (

              <Image

                style={styles.default_Img}

                source={{ uri: thumbnail?.path }}

                resizeMode='contain'

              />

            ) : Object.keys(thumbnail).length && (

              <SelectedFilterComponent

                onExtractImage={onExtractImage}

                extractImageEnabled={true}

                image={

                  <Image

                    style={styles.default_Img}

                    source={{ uri: thumbnail?.path }}

                    resizeMode='contain'

                  />

                }

              />

            )}

            <FlatList

              data={FILTERS}

              keyExtractor={item => item.title}

              showsHorizontalScrollIndicator={false}

              horizontal={true}

              renderItem={renderFilterComponent}

            />

            <View style={styles.buttonView}>

              <Button

                title={Constants.next}

                onclick={handleNextStepClick}

                style={{ textTransform: 'uppercase' }}

              />

            </View>

          </KeyboardAwareScrollView>

        </ImageBackground>

      </SafeAreaView>

    </>

  );

};

const styles = StyleSheet.create({

  default_Img: {

    flex: 1,

    width: wp('100%'),

    height: hp('50%'),

    alignSelf: 'center',

    alignContent: 'center'

  },

  keyboardContainer: {

    width: wp('90%'),

  },

  buttonView: {

    marginTop: wp('7%'),

    marginBottom: wp('3%')

  },

  safeView: {

    flex: 1,

    backgroundColor: '#fff',

  },

  filterSelector: {

    width: 100,

    height: 100,

    margin: 5,

  },

  filterTitle: {

    marginTop: 70,

    fontSize: 12,

    textAlign: 'center',

  },

  container: {

    flex: 1,

    justifyContent: 'center',

    backgroundColor: '#FFFFFF',

    alignItems: 'center',

  },

});

export default FilterScreen;
Output
Now the application has all the filters visible that the user can select and process to the next step.
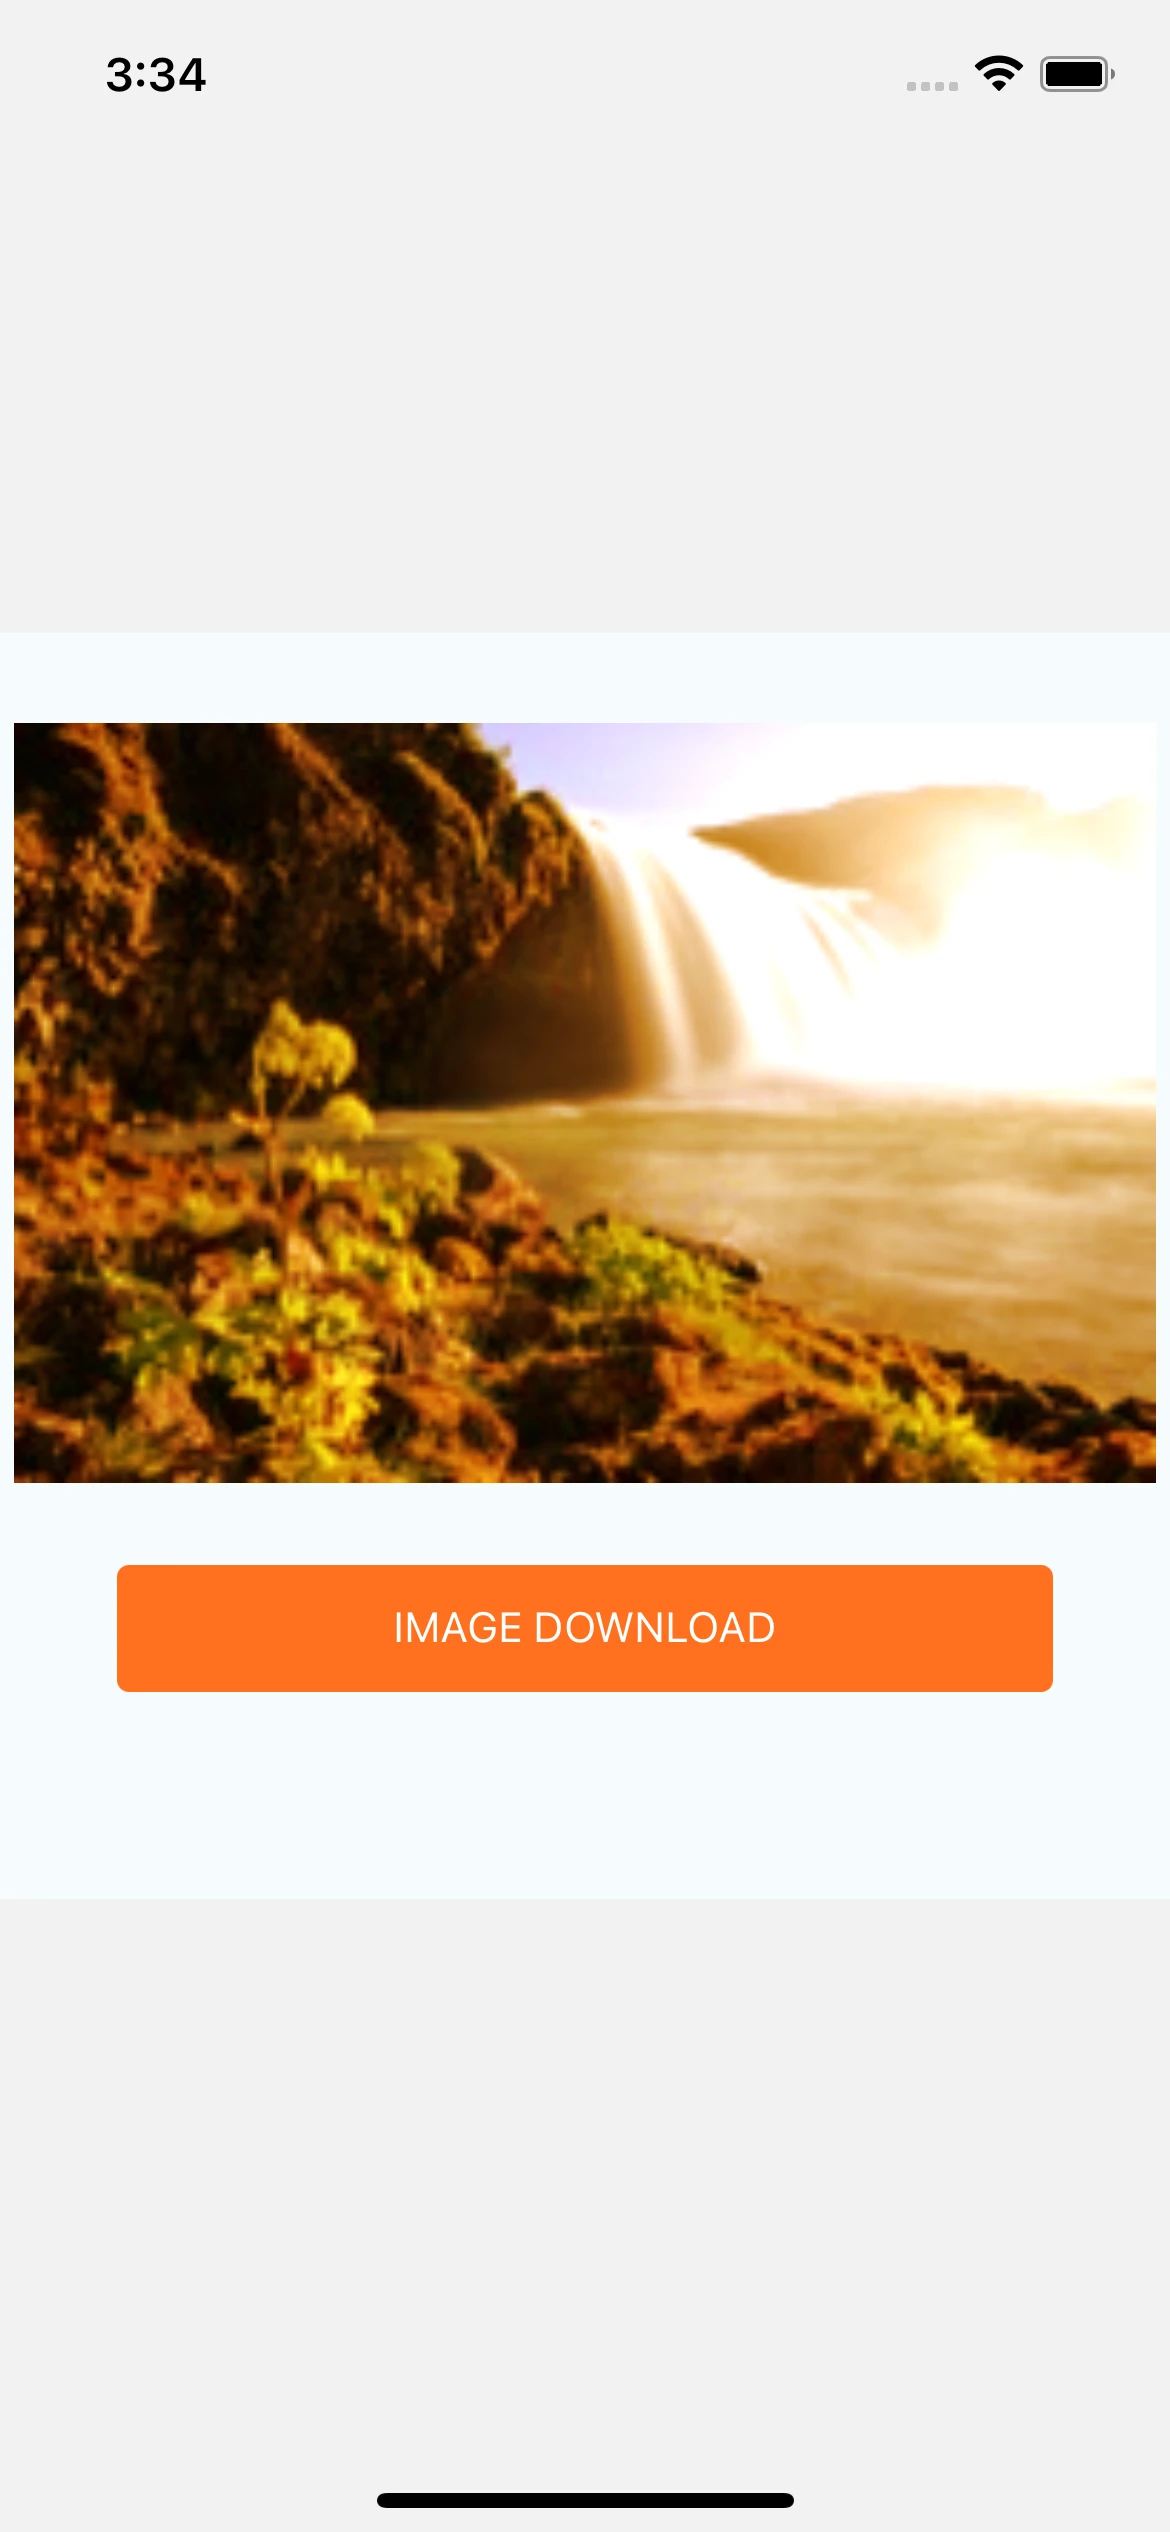
Step 4: Image Saving and Downloading
Without saving/downloading image functionality, your application has no use. As we have implemented all the filters in the previous step, now the time is to add download functionality.
Same as both previous steps, create a folder named "ViewImage" and add "index.jsx" having the below-mentioned code. After implementing this code user can able to save the customized image in the phone gallery.
import React, { useState, useEffect } from 'react';

import {

  View,

  StyleSheet,

  Image,

  Platform,

  PermissionsAndroid

} from 'react-native';

import { CameraRoll } from "@react-native-camera-roll/camera-roll";

import {

  widthPercentageToDP as wp,

  heightPercentageToDP as hp,

} from 'react-native-responsive-screen';

import Constants from '../../Constants/Constants';

import Button from '../../Components/Button';


const ViewImage = ({ route }) => {

  const [thumbnail, setThumbnail] = useState({});

  const [photos, setPhotos] = useState('');


  useEffect(() => {

    getImageFromNavigation()

  })


  const getImageFromNavigation = () => {

    if (route?.params?.imageString) {

      console.log('params-->', route?.params?.imageString);

      setThumbnail(route?.params?.imageString)

      setPhotos(route?.params?.imageString)

    }

  }

  async function hasAndroidPermission() {

    const permission = PermissionsAndroid.PERMISSIONS.WRITE_EXTERNAL_STORAGE;


    const hasPermission = await PermissionsAndroid.check(permission);

    if (hasPermission) {

      return true;

    }


    const status = await PermissionsAndroid.request(permission);

    return status === 'granted';

  }


  async function savePicture() {

    if (Platform.OS === "android" && !(await hasAndroidPermission())) {

      return;

    }

    CameraRoll.save(photos, { type: 'photo' })

  };

  return (

    <View style={styles.container}>

      <Image

        source={{ uri: photos !== '' ? photos : thumbnail?.path }}

        style={styles.imgView}

      />

      <View style={styles.buttonView}>

        <Button

          title={Constants.image_download}

          onclick={savePicture}

          style={{ textTransform: 'uppercase' }}

        />

      </View>

    </View>

  );

};


const styles = StyleSheet.create({

  imgView: {

    width: wp('100%'),

    height: hp('30%'),

    resizeMode: 'contain'

  },

  container: {

    flex: 1,

    alignItems: 'center',

    backgroundColor: '#F5FCFF',

    paddingTop: 30,

    marginVertical: hp('25%')

  },

  buttonView: {

    marginTop: wp('7%'),

    marginBottom: wp('3%'),

    width: wp('80%'),

  },

});


export default ViewImage;
Output
Final Words
You're done with the code.
This article is based on extensive research done by our authors. They have good experience in react native. In addition, they are enthusiastic and aggressive learners to get new things done.
Published at DZone with permission of Kiran Beladiya. See the original article here.
Opinions expressed by DZone contributors are their own.
Comments