Aggregate and Index Data into Elasticsearch Using Logstash and JDBC
Some of the shortcomings of Elasticsearch can be overcome using some Logstash plugins. Check out how to use them to aggregate and index data into Elasticsearch.
Join the DZone community and get the full member experience.
Join For FreeIn my previous posts (here and here), I showed you how to index data into Elasticsearch from a SQL DB using JDBC and Elasticsearch JDBC importer library. In the first article, I mentioned some of the shortcomings of using the importer library, which I have copied here:
- No support for ES version 5 and above.
- There is a possibility of duplicate objects in the array of nested objects, but de-duplication can be handled at the application layer.
- There can be a possibility of delay in support for latest ES versions.
All the above shortcomings can be overcome by using Logstash and its following plugins:
JDBC Input plugin for reading the data from SQL DB using JDBC.
Aggregate Filter plugin for aggregating the rows from SQL DB into nested objects.
Creating Elasticsearch Index
I will be using the latest ES version, 5.63, which can be downloaded from the Elasticsearch website here. We will create an index world_v2 using the mapping available here.
$ curl -XPUT --header "Content-Type: application/json"
    http://localhost:9200/world_v2 -d @world-index.json
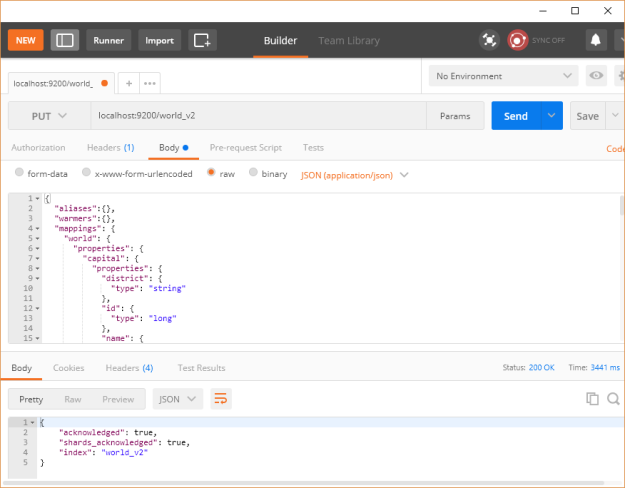
Or using the Postman REST client, as shown below:
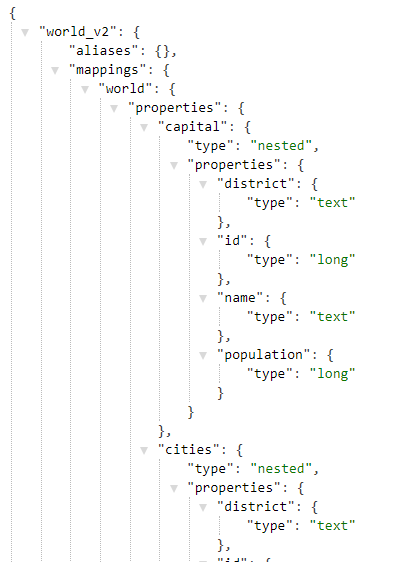
To confirm that the index has been created successfully, open the URL http://localhost:9200/world_v2 in the browser to get something similar to the code shown below:
Creating Logstash Configuration File
We should be picking the equivalent Logstash version, which would be 5.6.3, and it can be downloaded from here. Then, we need to install the JDBC input plugin, Aggregate filter plugin, and Elasticsearch output plugin using the following commands:
bin/logstash-plugin install logstash-input-jdbc
bin/logstash-plugin install logstash-filter-aggregate
bin/logstash-plugin install logstash-output-elasticsearch
We need to copy the following into the bin directory to be able to run our configuration which we will define next:
- Download the MySQL JDBC jar from here.
- Download the file containing the SQL query for fetching the data from here.
We will copy the above into Logstash's bin directory or any directory where you will have the Logstash configuration file. This is because we are referring to these two files in the configuration using their relative paths. Below is the Logstash configuration file:
input {
  jdbc {
    jdbc_connection_string => "jdbc:mysql://localhost:3306/world"
    jdbc_user => "root"
    jdbc_password => "mohamed"
    # The path to downloaded jdbc driver
    jdbc_driver_library => "mysql-connector-java-5.1.6.jar"
    jdbc_driver_class => "Java::com.mysql.jdbc.Driver"
    # The path to the file containing the query
    statement_filepath => "world-logstash.sql"
  }
}
filter {
  aggregate {
    task_id => "%{code}"
    code => "
      map['code'] = event.get('code')
      map['name'] = event.get('name')
      map['continent'] = event.get('continent')
      map['region'] = event.get('region')
      map['surface_area'] = event.get('surface_area')
      map['year_of_independence'] = event.get('year_of_independence')
      map['population'] = event.get('population')
      map['life_expectancy'] = event.get('life_expectancy')
      map['government_form'] = event.get('government_form')
      map['iso_code'] = event.get('iso_code')

      map['capital'] = {
        'id' => event.get('capital_id'),
        'name' => event.get('capital_name'),
        'district' => event.get('capital_district'),
        'population' => event.get('capital_population')
      }

      map['cities_list'] ||= []
      map['cities'] ||= []
      if (event.get('cities_id') != nil)
        if !( map['cities_list'].include? event.get('cities_id') )
          map['cities_list'] << event.get('cities_id')

          map['cities'] << {
            'id' => event.get('cities_id'),
            'name' => event.get('cities_name'),
            'district' => event.get('cities_district'),
            'population' => event.get('cities_population')
          }
        end
      end

      map['languages_list'] ||= []
      map['languages'] ||= []
      if (event.get('languages_language') != nil)
        if !( map['languages_list'].include? event.get('languages_language') )
          map['languages_list'] << event.get('languages_language')

          map['languages'] << {
            'language' => event.get('languages_language'),
            'official' => event.get('languages_official'),
            'percentage' => event.get('languages_percentage')
          }
        end
      end
      event.cancel()
    "
    push_previous_map_as_event => true
    timeout => 5
  }
  mutate {
    remove_field => ["cities_list", "languages_list"]
  }
}
output {
  elasticsearch {
    document_id => "%{code}"
    document_type => "world"
    index => "world_v2"
    codec => "json"
    hosts => ["127.0.0.1:9200"]
  }
}
We place the configuration file in the Logstash's bin directory. We run the Logstash pipeline using the following command:
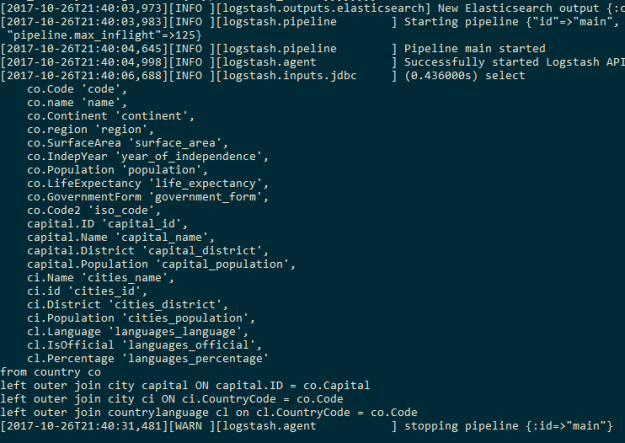
$ logstash -w 1 -f world-logstash.confWe are using one worker because multiple workers can break the aggregations, as aggregation happens based on the sequence of events having a common country code. We will see the following output on successful completion of the Logstash pipeline:
Open the URL http://localhost:9200/world_v2/world/IND to view the information for India indexed in Elasticsearch, as shown below:
And that's it!
Published at DZone with permission of Mohamed Sanaulla, DZone MVB. See the original article here.
Opinions expressed by DZone contributors are their own.


Comments