Aggregate Functions in Stargate’s GraphQL API
Get started with aggregate functions in Stargate using its GraphQL API.
Join the DZone community and get the full member experience.
Join For FreeA new release of Stargate.io was applied to Astra DB that includes an exciting new feature: aggregate functions! If you’re not familiar with aggregate functions, they are functions that look at the data as a whole and perform a function like min(), max(), sum(), count() and avg().
Until now, aggregate functions were only available using cqlsh (the CQL Shell). However, with the Stargate 1.0.25 release they are now also available using the GraphQL API. In this blog entry, I’ll walk you through the process to get early access to this exciting new functionality in Stargate, and how to setup everything you need to test your own aggregate queries.
Using cqlsh to perform an aggregate query is pretty straightforward. Assuming you have an employee table with the following sales data:
╔════╦═════════╦══════╦══════════════════════════╗
║ id ║  name   ║ sale ║          rtime           ║
╠════╬═════════╬══════╬══════════════════════════╣
║  1 ║ John    ║ 1000 ║ 2019-01-12T09:48:31.020Z ║
║  2 ║ Mustafa ║ 2000 ║ 2019-02-12T09:48:31.020Z ║
║  3 ║ Krishna ║ 2500 ║ 2019-01-12T09:48:31.020Z ║
║  1 ║ John    ║ 2200 ║ 2020-01-12T09:48:31.020Z ║
║  1 ║ John    ║ 2350 ║ 2021-01-12T09:48:31.020Z ║
║  2 ║ Mustafa ║ 3000 ║ 2020-02-12T09:48:31.020Z ║
║  2 ║ Mustafa ║  300 ║ 2021-02-12T09:48:31.020Z ║
║  3 ║ Krishna ║ 1500 ║ 2020-01-12T09:48:31.020Z ║
║  3 ║ Krishna ║ 3600 ║ 2021-01-12T09:48:31.020Z ║
╚════╩═════════╩══════╩══════════════════════════╝
Now we want to find the highest sale number for employee 1, John. Our cqlsh query would look like the following:
select id, name, max(sale) as highest_sale from employee where id = 1 and name = “John”;Would return a single record:
id name highest_sale
1 John 2350
Prerequisites
This blog tutorial assumes that you already have Docker and curl installed and configured on your machine. Alternatively, if you have an Astra account (they’re free) you can do your testing there.
Getting Stargate
If you are using Astra DB, you can skip this part and go to the next section.
The main repository for the Stargate source code is on GitHub at https://github.com/stargate/stargate. However, I recommend just using the Docker container that is already configured for testing. Assuming you have Docker installed already, just run this command:
docker run -d — name stargate \
-p 8080:8080 \
-p 8081:8081 \
-p 8082:8082 \
-p 9042:9042 \
stargateio/stargate-dse-68:v1.0.25 \
--developer-mode — cluster-name test \
--cluster-version 6.8 --dse --enable-auth
Your Docker instance of Stargate will load and start executing.
Preparing Your Test Environment
Next, we need to create our keyspace and table. Then we will load our test table with test data. While it is possible to do almost all of this using GraphQL, I did most of it using the REST API since that is the API with which I’m most familiar.
Note: All of these URLs are designed for the Docker container running locally on your machine. If you are using Astra, adjust the URLs accordingly.
Once the Docker image is fully up and running, you will need to get authentication credentials for the Cassandra instance it contains. Use this curl command to get the authentication token:
curl -L -X POST 'http://localhost:8081/v1/auth' \
-H 'Content-Type: application/json' \
--data-raw '{ "username": "cassandra", "password": "cassandra" }'
Set the auth token as an environment variable for easy reuse
export authToken=”The token returned in the previous step”Now run the following command to get a list of existing keyspaces. This is a good test to ensure you’ve set your authToken environment variable correctly:
curl -L -X GET 'localhost:8082/v1/keyspaces' \
--header 'accept: application/json' \
--header ‘content-type: application/json’ \
--header “X-Cassandra-Token: $authToken”
You should see the following output from the command:
[“data_endpoint_auth”,”system”,”system_auth”,”system_backups”,”system_distributed”,”system_schema”,”system_traces”]Next, we need to create our keyspace for our database. The following command will create the test keyspace:
curl -L -X POST 'localhost:8082/v2/schemas/keyspaces' \
--header 'accept: application/json' \
--header 'content-type: application/json' \
--header "X-Cassandra-Token: $authToken" \
-d '{ "name": "test", "replicas": 1}'
Now we need to create our employee table in the test keyspace. This command is rather lengthy for a blog post so I recommend getting the create_table.sh file from the GitHub repository at https://github.com/jdavies/blogs/blob/master/20210602_aggregate_stargate/create_table.sh
Now it’s time to load some data into our table. The easiest way to do this is to download the load_data.sh file from my GutHub repository (another blog-unfriendly script) and execute it via the command:
./load_data.shIt contains the curl commands to load the records into your Docker database.
Once the data is loaded, let’s run a quick query to ensure that everything is as we expect. Execute the following command:
curl -L -X GET
‘localhost:8082/v1/keyspaces/test/tables/employee/rows’ \
--header ‘accept: application/json’ \
--header ‘content-type: application/json’ \
--header “X-Cassandra-Token: $authToken”
You should get all 9 rows of data back. They can be a little hard to read from the terminal. If you want to see a prettier version I suggest copying the resulting text and pasting it into an online JSON browser like jsonbeautifier.org. You should see the following 9 rows:
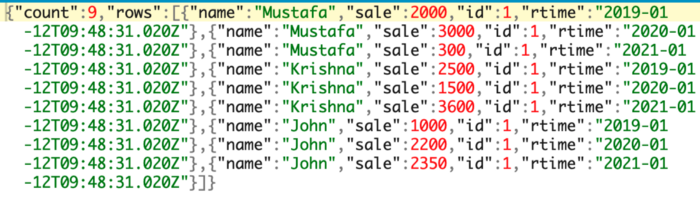
Now we are ready to get down to business!
Using Aggregate Queries
Since I’m new to GraphQL, it seems strange to me. However, once you get used to its way of doing things (like omitting commas in a JSON-esque data format) it’s pretty straightforward. Here is the curl command that will retrieve the highest sales year for employee 1, named John:
curl 'http://localhost:8080/graphql/test' \
-H 'Accept-Encoding: gzip, deflate, br' \
-H 'Content-Type: application/json' \
-H 'Accept: application/json' \
-H 'Connection: keep-alive' \
-H 'DNT: 1' \
-H 'Origin: http://localhost:8080' \
-H "x-cassandra-token: $authToken" \
--data-binary '{"query":"query maxJohnSales {\n  employee(value: { \n    id: 1, \n    name: \"John\" }) {\n    values {\n      id\n      name\n      rtime\n      highest_sale: _int_function(name: \"max\", args: [\"sale\"])\n }\n  }\n}"}' --compressed
The payload is a little hard to read on the command line, so here it is in GraphQL format:
query maxJohnSales {
   employee(value: {
      id: 1,
      name: “John” })
   {
      values {
         id
         name
         rtime
         highest_sale: _int_function(name: “max”, args: [“sale”])
   }
}
If you examine the command, you will see how we included the max() aggregate command (named as “highest_sale”). Just like a cqlsh version of the call, the max() function is applied to the return values, not the select criteria. Your output should match the following:
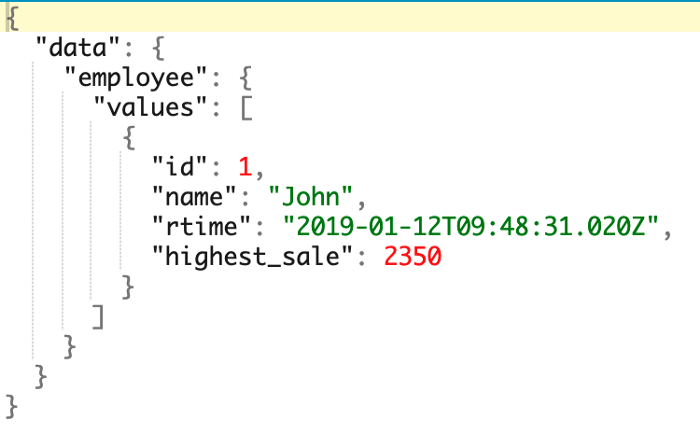
How about searching for the highest sale of all time? Here’s how you do it:
curl 'http://localhost:8080/graphql/test' \
-H 'Accept-Encoding: gzip, deflate, br' \
-H 'Content-Type: application/json' \
-H 'Accept: application/json' \
-H 'Connection: keep-alive' \
-H 'DNT: 1' \
-H 'Origin: http://localhost:8080' \
-H "x-cassandra-token: $authToken" \
--data-binary '{"query":"query maxJohnSales {\n  employee {\n    values {\n      id\n      name\n      rtime\n      highest_sale: _int_function(name: \"max\", args: [\"sale\"])\n }\n  }\n}"}' --compressed
By removing the “where” clause from the GraphQL statement (traditionally in the parenthesis after the table name), you can search the entire table, across all partitions. In cqlsh this is the equivalent of adding ALLOW FILTERING, which in general is regarded as a “bad thing” since it forces a full table scan across all partitions, which can be very slow. However, since aggregate functions are often used for reporting, it might be acceptable to do this for a few special queries.
ALLOW FILTERING isn’t necessarily a “bad thing”, but you have to understand what it does and use it sparingly if you want to keep your database performing at max speed! ALLOW FILTERING can come in very handy when we’re invoking a SELECT operation on a single partition (i.e. providing the full partition keys at the very minimum which is “id” in this “test.employee” table’s case).
Conclusion
That’s all there is to using aggregate functions in GraphQL using Stargate. Bear in mind this is GraphQL API-specific. It won’t work with the REST or Document APIs.
Published at DZone with permission of Jeff Davies. See the original article here.
Opinions expressed by DZone contributors are their own.
Comments