Angular Logging and Log-Back
Join the DZone community and get the full member experience.
Join For FreeIn this article, we will see how to do Client-Side Logging and Server Side Log-back in an Angular application. We all enable logging in our application to understand the behavior of the application and to debug unexpected issues or simply tracking events. In the production environment, we can't debug issues without proper log files, as they become the only source of information to debug some intermittent or unexpected errors.
Advantages of Using Loggers
- Information at Class Level.
- What timestamp.
- Which user.
- Filename.
- Separate log files for different components.
- Log levels (like DEBUG, ERROR, WARN, INFO), which can be very handy when you want to track the path followed by your program or log queries, etc.
In this article, we are going to use ngxLogger to achieve logging and log-back in an Angular application. First, we need to install the ngxLogger by running the below command at the root of our Angular application.
xxxxxxxxxx
npm install ngx-logger --save
Once installed, we need to do the configuration of the ngxLogger in our application. For that, we will be doing the below entries in the app.module.ts file:
xxxxxxxxxx
@NgModule({
declarations: [AppComponent, ],
imports: [
LoggerModule.forRoot({serverLoggingUrl: '/api/logs', level: NgxLoggerLevel.DEBUG, serverLogLevel: NgxLoggerLevel.ERROR}),
],
bootstrap: [AppComponent]
})
export class AppModule {
}
Here, we will cover the configuration part necessary to enable logging in our application. Let us understand the meaning of each configuration for ngxLogging.
- LoggerModule.forRoot - We have added the logger module at the root of our application. Now, every exported class, components, services, etc. are available throughout the application.
- serverLoggingUrl - This is needed to specify the endpoint where we need to post the logs from the Angular application. It can be a URL, or if you are using a proxy, then it can be the endpoint as well.
- level - The level defines the logs configuration level we need to print on the browser's console. This level can be DEBUG, ERROR, WARN, INFO, etc. If the value is set as OFF, it will disable the browser's console logs.
- serverLogLevel - This level defines the log configuration level which we need to post to the backend service or any API which is consuming the logging information. This level can be DEBUG, ERROR, WARN, INFO, etc. If the value is set as OFF, it will disable the server level logs.
NgxLoggerLevels: TRACE|DEBUG|INFO|LOG|WARN|ERROR|FATAL|OFF
Now, we will see the usage of the Logger at the component level.
xxxxxxxxxx
import { Component } from '@angular/core';
import { NGXLogger } from 'ngx-logger';
@Component({
selector: 'your-component',
templateUrl: './your.component.html',
styleUrls: ['your.component.scss']
})
export class YourComponent {
constructor(private logger: NGXLogger) {
this.logger.debug('Your log message goes here');
this.logger.debug('Multiple', 'Argument', 'support');
}
}
Here, we have injected the NGXLogger in the component. This service class provides us different methods by which we can generate the logs and update the logging configurations. Whenever this component will get loaded, it will simply log the information in the browser's console. Additionally, it can post the logging information to the backend server.
Updating Configuration
We can also change the configuration at the component or service level with the help of the updateConfig method of NGXLogger. This will help us to do some configuration change other than the root level and help us to achieve the dynamic behavior of the logging.
xxxxxxxxxx
this.logger.updateConfig({ level: NgxLoggerLevel.ERROR });
Request Payload
The payload body of the request is of type NGXLogInterface.
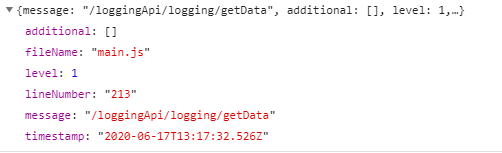
Logs at the Browser's Console

Logging Using Interceptor
We can also achieve the logging at Interceptor so that whenever there is any request or response coming from the backend server, we can trace that as well and this will help us to identify the flow of the user's request.
xxxxxxxxxx
import { Injectable } from '@angular/core';
import { HttpRequest, HttpHandler, HttpEvent, HttpInterceptor}
from '@angular/common/http';
import { Observable } from 'rxjs';
import { NGXLogger } from 'ngx-logger';
@Injectable()
export class LoggingInterceptor implements HttpInterceptor {
constructor(private logger: NGXLogger) { }
intercept(request: HttpRequest<unknown>, next: HttpHandler): Observable<HttpEvent<unknown>> {
this.logger.debug(request);
this.logger.error('Any message can be logged');
return next.handle(request);
}
}
With the above code block, we can achieve the logging at the interceptor and keep a track of all the requests and response if needed.
A working example of this code is available at this GitHub repository.
Opinions expressed by DZone contributors are their own.
Comments