Login With Google in Angular Firebase Application
Create a sample application to login with Google in the Angular Firebase application. Firebase has different login options to make user authentication quick.
Join the DZone community and get the full member experience.
Join For FreeIn this article, we will create a sample application to log in with Google in the Angular Firebase application. Firebase provides different login options for making the user authentication process quick.
Firebase Sign-In Providers
- Email/password
- Phone
- Play games
- Game Center (beta)
- GitHub
- Yahoo
- Microsoft
- Apple
- Anonymous
In this tutorial, we will mainly focus on Firebase's Google login. If you don't have an understanding of the connection of the Angular app, read my previous article on Firebase.
Now I assume you have created an Angular app and also connected it to Firebase.
Let's Get Started
Step 1: Create Needed Components
Run the below commands one by one to create login and dashboard components:
ng g component log-inng g component dashboard
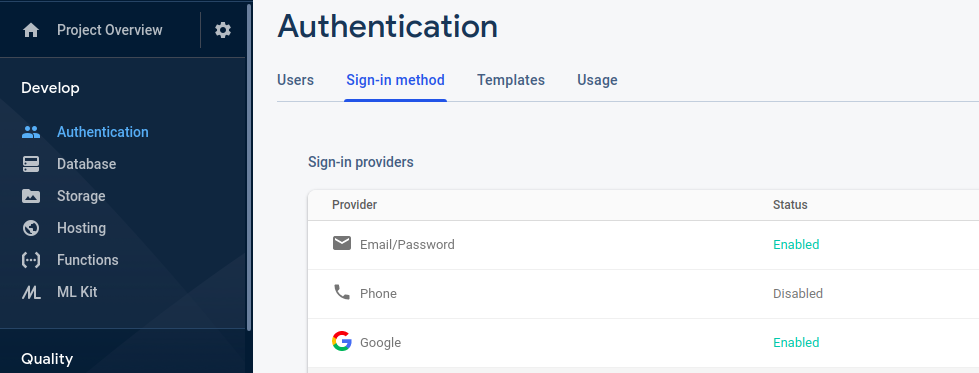
Step 2: Enable the Firebase Sign-In Provider
For enabling Google sign-in, we need to enable a sign-in provider in the Firebase app.
On the Firebase console, click on the authentication tab available at left and then click on the sign-in method and enable the sign-in provider and enter your project support email id.
Step 3: Create Angular 8/9 Firebase Authentication Service
Now create a separate auth service and a user class file for main logic to authenticate in Angular application using Firebase Google sign-in method.
Create a user interface with the below command: ng g i shared/user.
Add the below code in the user.ts file under the shared folder.
export interface User {
  uid: string;
  email: string;
  displayName: string;
  photoURL: string;
  emailVerified: boolean;
}
Now create a service file with this command: ng g s shared/aut
Add the below code in the service file created with the above command.
import { Injectable, NgZone } from '@angular/core';
import { auth } from 'firebase/app';
import { User } from "./user";
import { Router } from "@angular/router";
import { AngularFireAuth } from "@angular/fire/auth";

@Injectable({
  providedIn: 'root'
})

export class AuthService {
  user: User;

  constructor(
    public router: Router,
    public ngZone: NgZone,
   public afAuth: AngularFireAuth,
    private angularFireAuth: AngularFireAuth
  ) {
    this.afAuth.authState.subscribe(user => {
      this.user = user;
    })
  }

// Firebase SignInWithPopup
  OAuthProvider(provider) {
    return this.afAuth.auth.signInWithPopup(provider)
    .then((res) => {
    this.ngZone.run(() => {
    this.router.navigate(['dashboard']);
  })
  }).catch((error) => {
    window.alert(error)
  })
}

// Firebase Google Sign-in
  SigninWithGoogle() {
    return this.OAuthProvider(new auth.GoogleAuthProvider())
    .then(res => {
    console.log('Successfully logged in!')
    }).catch(error => {
    console.log(error)
   });
}

// Firebase Logout
  SignOut() {
    return this.afAuth.auth.signOut().then(() => {
    this.router.navigate(['login']);
  })
}

}
Step 4: Update the Login Component
import { Component, OnInit } from '@angular/core';
import { AuthService } from 'src/app/shared/auth.service';

@Component({
selector: 'app-log-in',
templateUrl: './log-in.component.html',
styleUrls: ['./log-in.component.css']
})
export class LogInComponent implements OnInit {

constructor(private authService: AuthService) { }

ngOnInit() {
}

}
In the above code, the auth service file is injected.
Add the code below in the login component HTML file.
<div class="flex-container">
  <div class="row">
    <div class="login-wrapper">
      <button type="button" class="large-button" (click)="authService.SigninWithGoogle()">
      <span class="large-button__text">Sign in with Google</span>
     </button>
    </div>
  </div>
</div>
After injecting authService in the login component TS file, the SigninWithGoogle() method can be directly used as in the above file.
Step 5: Enable Routing
Update app-routing.module.ts file to different route work.
import { NgModule } from '@angular/core';
import { Routes, RouterModule } from '@angular/router';
import { LogInComponent } from './log-in/log-in.component';
import { DashboardComponent } from './dashboard/dashboard.component';

const routes: Routes = [
{ path: '', pathMatch: 'full', redirectTo: 'login' },
{ path: 'login', component: LogInComponent },
{ path: 'dashboard', component: DashboardComponent }
];

@NgModule({
imports: [RouterModule.forRoot(routes)],
exports: [RouterModule]
})

export class AppRoutingModule { }
Conclusion
In this Angular Firebase tutorial, we’ve created a demo app to authenticate using the base Google sign-in method.
Opinions expressed by DZone contributors are their own.
Comments