API Authentication Using Azure AD in IBM API Connect
API authentication is necessary to secure API access from any unauthorized user. Learn the steps to implement the OAuth authorization for the API.
Join the DZone community and get the full member experience.
Join For FreeAPI authentication is necessary to secure API access from any unauthorized user. There are several ways to secure APIs. OAuth token validation is used to authenticate the user. One of the methods is to use Azure AD as an OAuth provider to secure an API invocation. The Azure AD provides an authentication token when the user sends a request to the login URL with a valid client_id and client_secret to the microsoftonline.com login.
Architecture
The below sequence diagram shows the design of the OAuth authentication process when Azure AD is used as an OAuth provider to authenticate REST API access implemented in IBM API Connect. 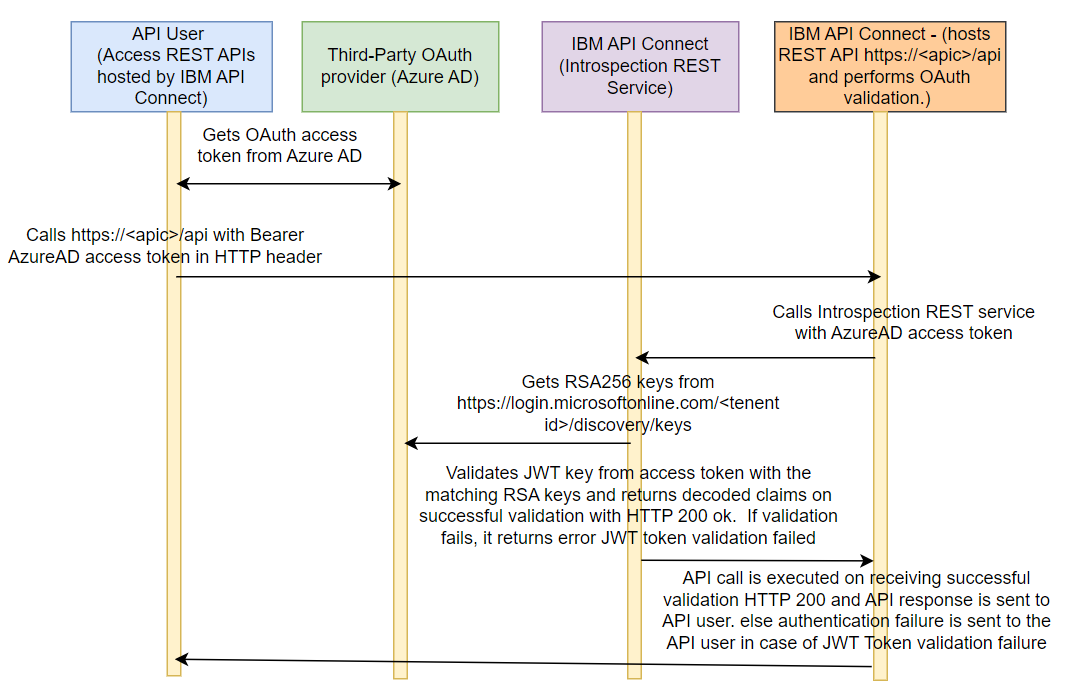
Figure 1: Azure AD authorization sequence diagram in IBM API Connect
The sequence diagram is self-explanatory.
The Azure AD doesn't provide an introspection URL out of the box. The introspection URL needs to be implemented in API Connect. This article provides the steps to create an Introspection REST service in IBM API Connect in the above sequence diagram. It provides steps to implement the introspection URL in IBM API Connect and steps to use the implemented introspection URL in API Connect OAuth Provider configuration to enable Azure AD as an OAuth provider for API authentication implemented in IBM API Connect.
Implementation
Following are the steps to configure and setup the OAuth2 provider authentication:
1. Introspect URL Creation
To create 3rd Party OAuth provider configuration in IBM API Connect, we need an introspection URL. This REST service must introspect the authentication token sent by the client and generate a valid JWT token if the introspection is successful. Otherwise, it should reject the introspection request.
The REST service is created in API Connect to introspect the authorization token provided by the user and validate if the kid is matching. If there is any matching kid, then return the kid as a JWT token.
- https://<APIEndpoint URL>/jwtvalidation
The REST API could be implemented using the below gateway implementation and published to the respective gateways.

Figure 2: Gateway Script
1.1 GatewayScript: Step 1
Get the authorization from the request query parameters and set it into a token variable. This token variable will be used in the Gatewayscript-Step2. Also, set the token variable into message.headers.Authorization variable.
var apim = require('apim'); console.log("======== step1 =========");

var token=apim.getvariable('request.parameters.token'); apim.setvariable('message.headers.Authorization', token);

context.set('token1',token);
1.2 Invoke
Get the discovery key from Microsoft online URL for your tenant id and store it into rsa256-key. Use the Get method.
- https://login.microsoftonline.com/<Tenant id >/discovery/keys
1.3 GatewayScript: Step 2
- Get the authorization token stored in step 1.
- Split the authorization token from the first dot (.) and store the left part of the token before the dot into a variable.
- Decode this token using the Base64 algorithm.
- Parse the token using JSON parser and store kid into a variable.
- Compare the above kid with the list of kids discovered in the
rsa256-keyvariable set in the previous discovery invoke call output. If there is any matching kid between the token kid and discovered kids then set the matching kid into ajwt_keyvariable.
var apim = require('apim');
var ctxAuth = context.get('token1');
// =====start step 3==========
// get bearer token from request
var token = ctxAuth;
context.set('myctx.bearerToken', token);
//decode and parse the token to find the key id (kid)
var base64Payload = token.split('.')[0];
var base64 = base64Payload.replace(/-/g, '+').replace(/_/g, '/');
var payload = Buffer.from(base64, 'base64');
var oppayload = JSON.parse(payload.toString());
var kidInToken = oppayload.kid
session.output.write(kidInToken);
// search in rsa256 Keys
var jwt_keys1 = context.get('rsa256-key.body');
var jwt_keys = JSON.parse(jwt_keys1);
session.output.write(jwt_keys);
//identify the key to provide for validation from the keys list
var jwt_key;
for(var i=0;i<jwt_keys.keys.length;i++){
    if(kidInToken == jwt_keys.keys[i].kid){
        jwt_key = jwt_keys.keys[i];
        break;
    }

}
session.output.write(jwt_key);
apim.setvariable('jwk-key', JSON.stringify(jwt_key));
context.message.body.write(jwt_keys);
1.4 Validate JWT
Use the “Validate JWT” security node to validate the JWT key by passing the message.headers.authorization and jwk-key.
1.5. GatewayScript: Step 3
Get the ‘decoded.claims’ into the resp variable and create a message.body with the resp variable.
var apim = require('apim');

var resp=apim.getvariable('decoded.claims');

resp.active=true;

resp.token_type='bearer';

apim.setvariable('message.body', resp);
2. Add the OAuth Provider Into the Resources
2.1 Title
- Go to Resources -> OAuth providers --> add --> Third Party OAuth provider.
- Write the Title as "AzureAD."

Figure 3: OAuth provider's configuration
2.2. Supported Grant Type
- Give third-party provider name under Title --> "AzureAD."
- Select the supported grant type as Application.
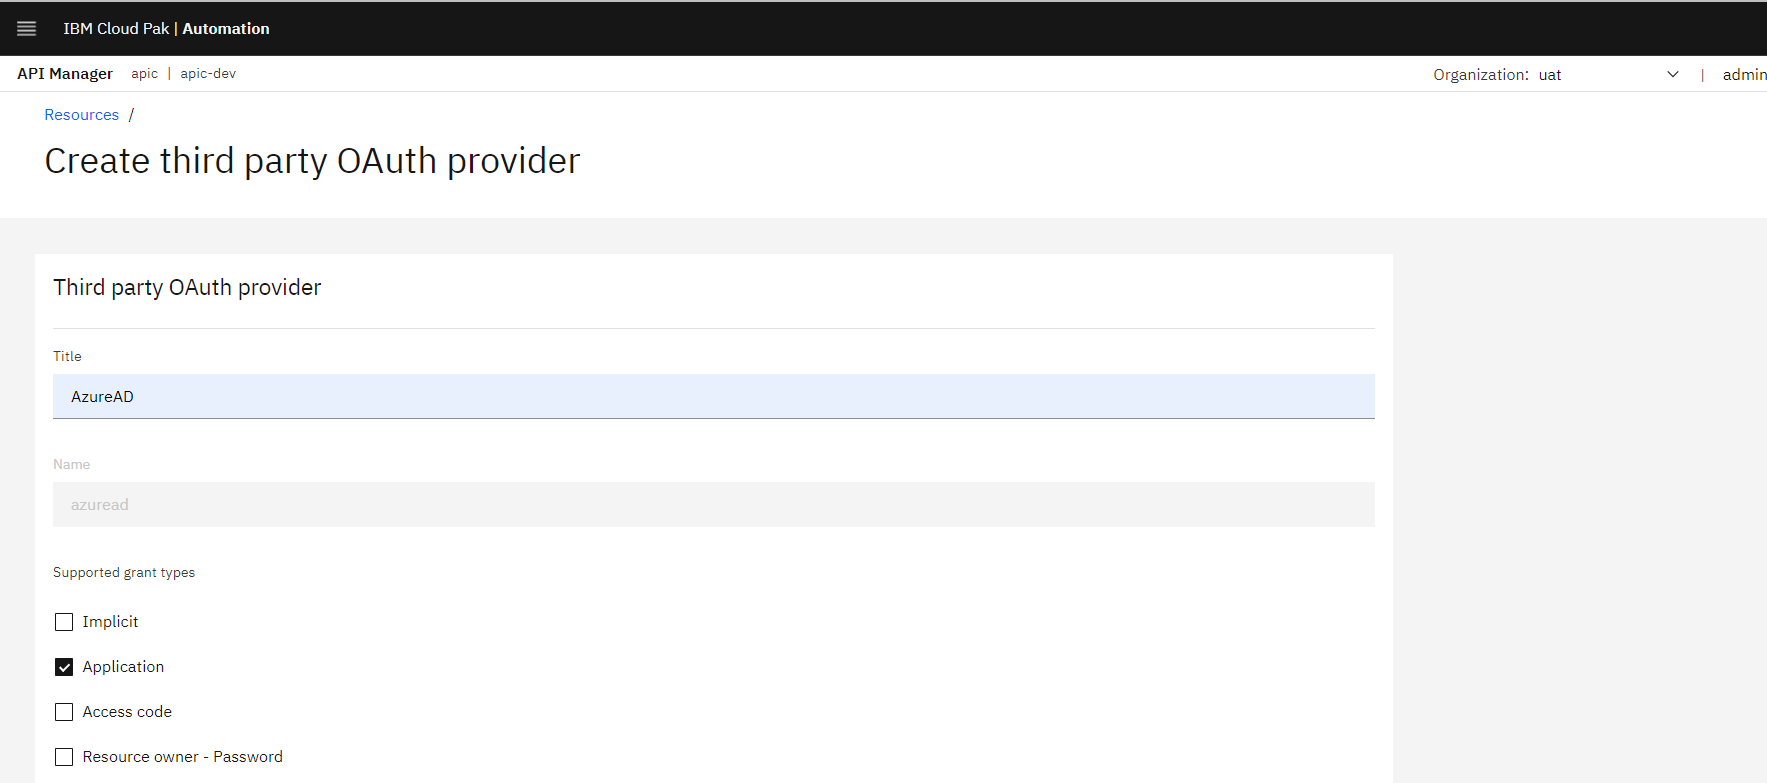
Figure 4: OAuth provider's configuration
2.3. Validate the Token
Configure endpoints to authorize and validate the token. 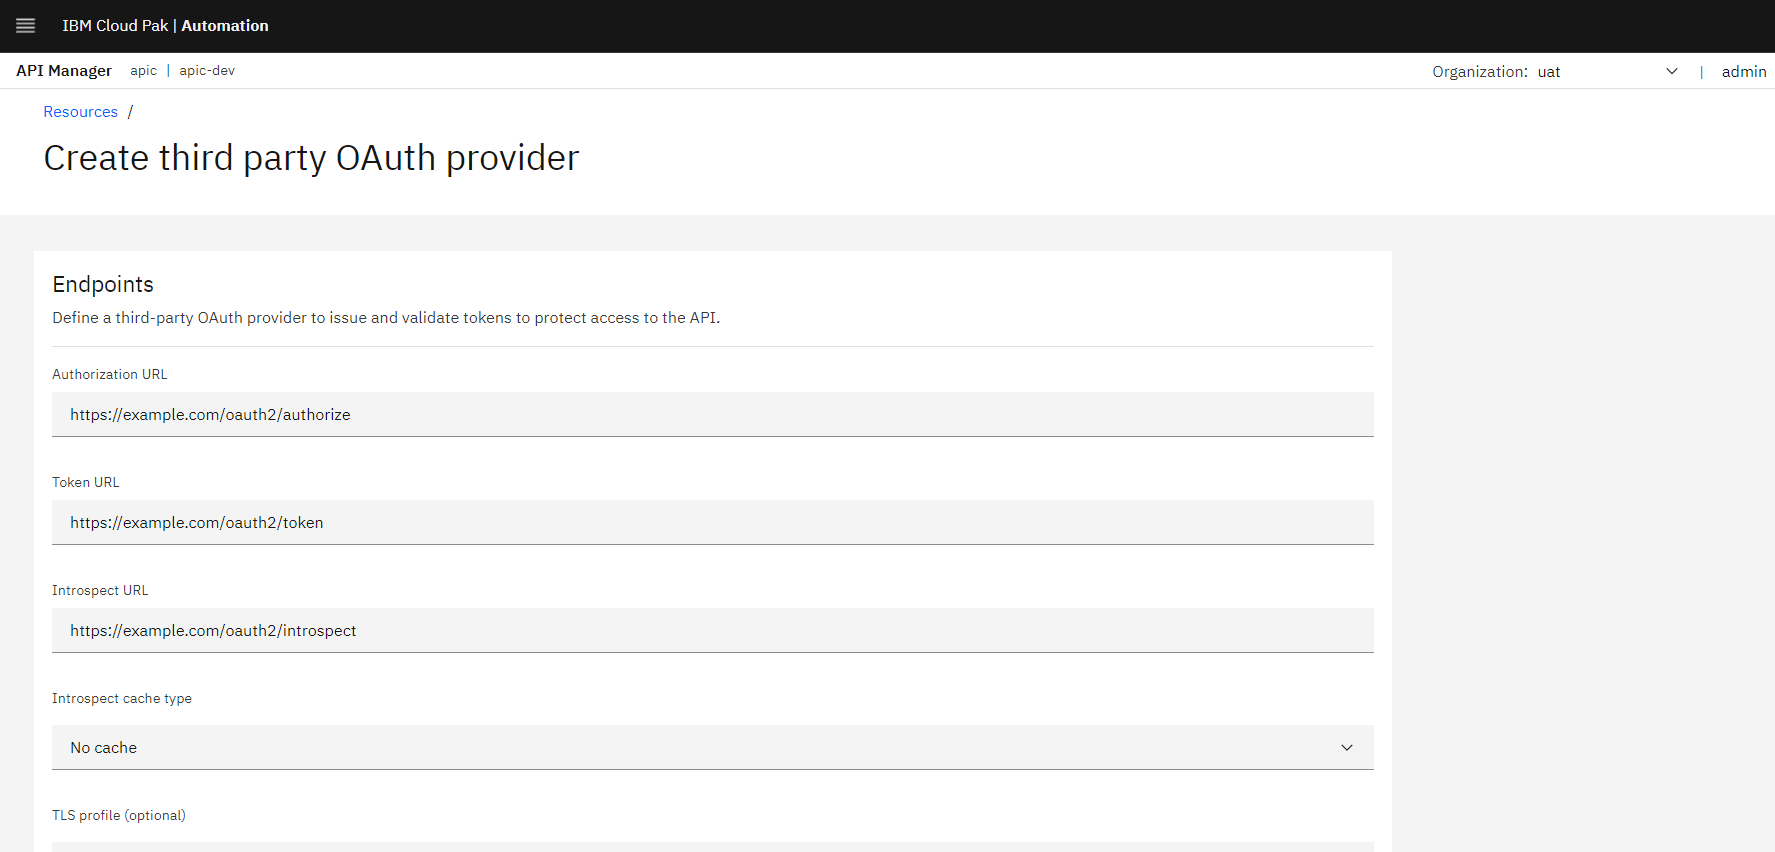
Figure 5: OAuth provider's configuration
- Define a third-party OAuth provider to issue and validate tokens to protect access to the API.
- Authorization URL: https://login.microsoftonline.com/<Tenant ID>/oauth2/authorize
- Invoke Token URL to get OAuth token.
- https://login.microsoftonline.com/<Tenant ID>/oauth2/token
- Provide the Introspect URL which is developed in step1 as REST API.
- https://<APIEndpoint URL>/jwtvalidation
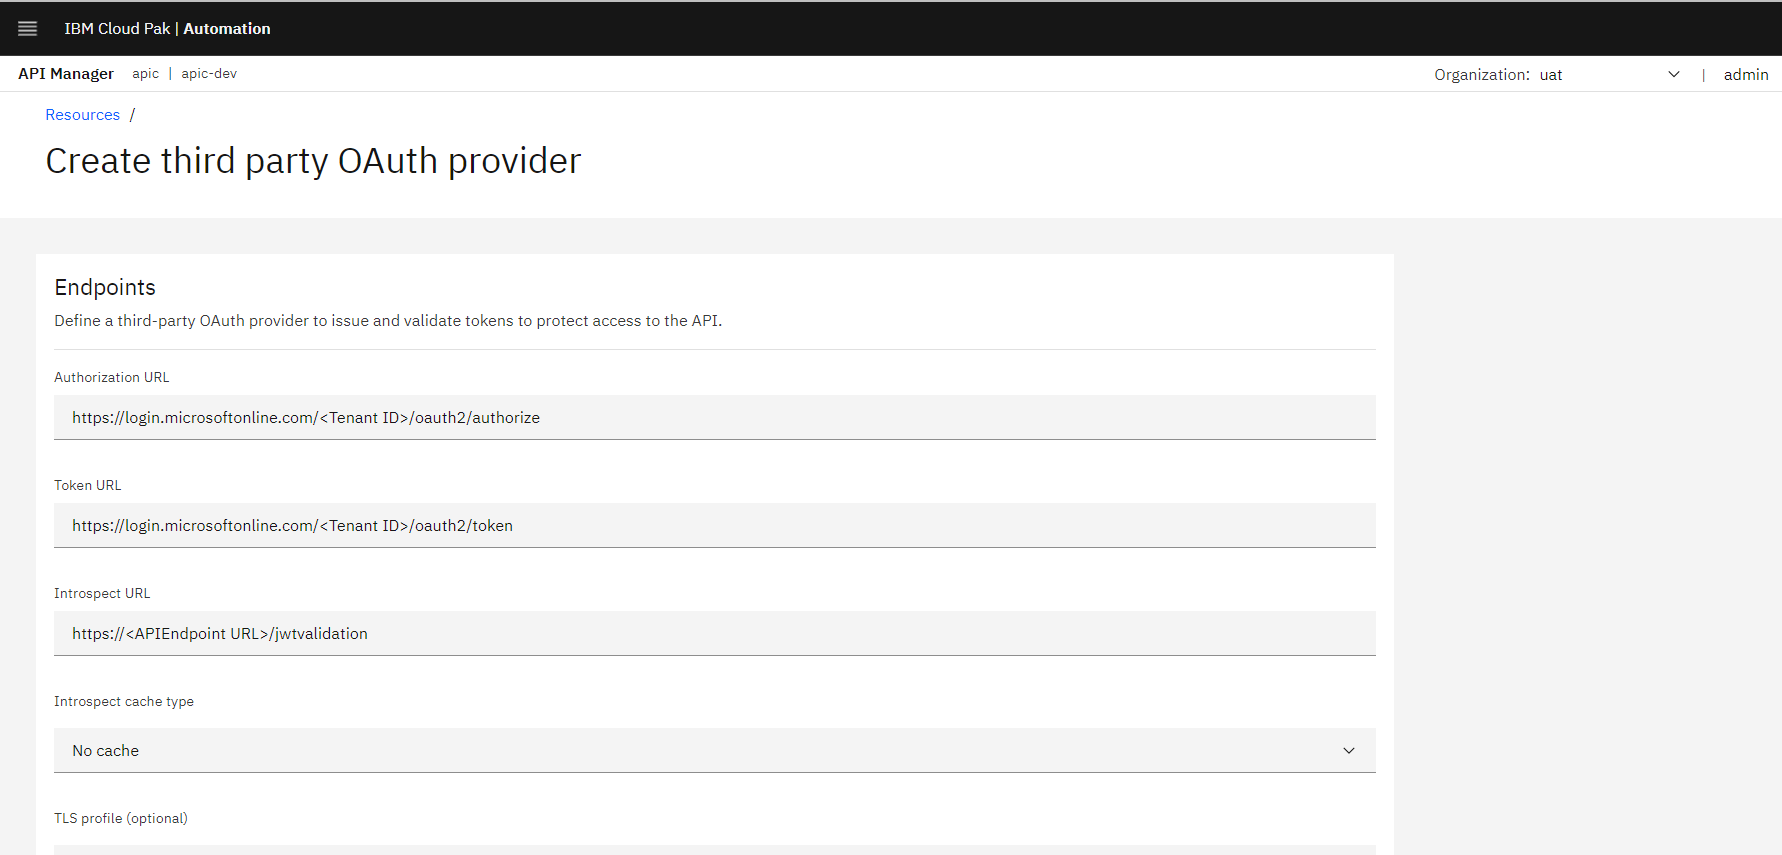
Figure 6: OAuth provider endpoints configuration
3. Configure Catalog To Use OAuth provider
1. Go to Manager --> Select <catalog> --> catalog settings --> OAuth Providers --> Edit and select the OAuth Provider check box.
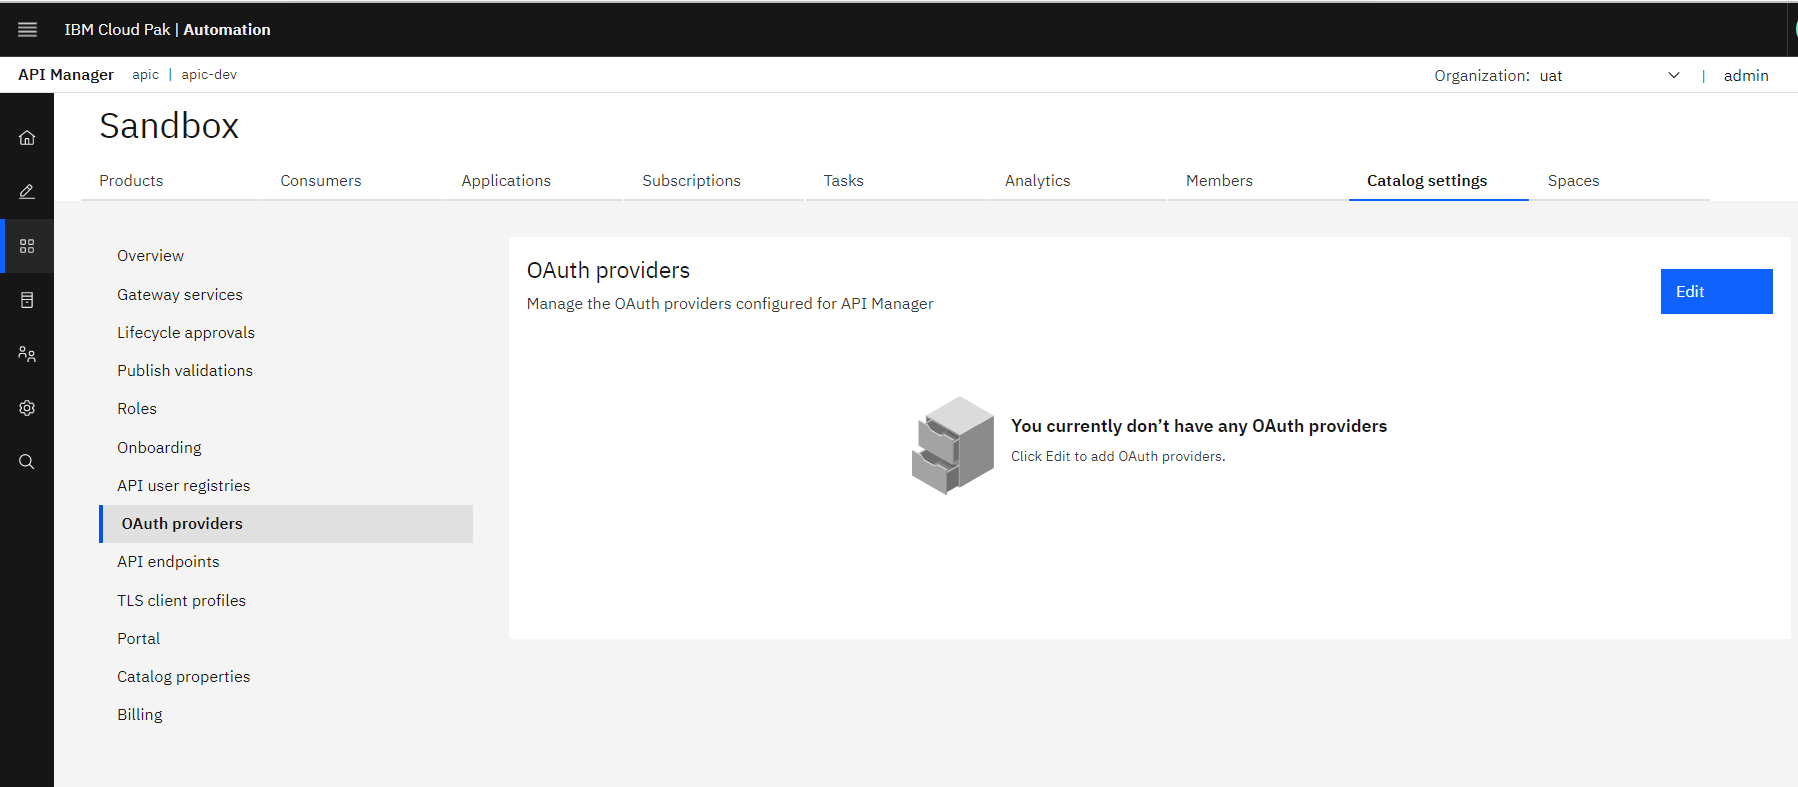
Figure 7: Select OAuth Provider for catalog
2. Select the Third-party OAuth provider “AzureAD” by clicking on the checkbox.

Figure 8: Select and Save OAuth provider for API use
Conclusion
This article explains the steps to implement the OAuth authorization for the API. Here OAuth provider is Azure. More details about the steps will be published in the next version of this article.
References
- OAuth provider concept: OAuth concepts for API Connect - IBM Documentation
- JWT Token parsing: JSON Web Tokens
Opinions expressed by DZone contributors are their own.
Comments