Apigee Shared Flow
Here's a tutorial for creating a shared flow in Apigee Edge. It's easy — if you know how to create an API proxy, you can create a shared flow.
Join the DZone community and get the full member experience.
Join For FreeIn this blog, I'll be talking about Apigee Shared Flow. For those who are not very familiar with what Apigee is, let me give a brief description. You can also read more on this at the links provided later.
Apigee Edge is a platform that helps in creating and managing API proxies. You can consider an API proxy to be a face for your backend services. Rather than directly exposing your service endpoints, you can create an API proxy and provide that to the client who wants to utilize your application's functionality.
An API proxy not only acts as an intermediate layer between the client (e.g., an app, a web page, etc.) and your service, but also makes it easy to add certain features like authentication, traffic management, and logging, which are otherwise difficult to add on the service level. To read more about an API proxy, how it works, and how to create one, you can check here.
Now, let's think of a scenario where you have some number of API proxies for your backend services and you want to add a feature which is common to all or may be used in more than one proxy. (In terms of Apigee, a feature can be a condition/policy attached to the flows of the proxy.) Now, if we go on to add that feature in each of our proxies, that is definitely a redundant effort.
Don't worry; Apigee is here to help us in such a scenario by providing a feature called shared flow.
As the name says, "shared flow" is a reusable component that can be created in one place, and can be used by multiple proxies during their execution flow — as long as the proxies and shared flow lie in the same environment.
The best part is, it's very simple to create a shared flow. Those who know how to create an API proxy can easily create a shared flow. A shared flow is similar to an API proxy — except for the fact that it is not an endpoint. It can be called either from an API proxy or from other shared flows, but not from outside.
How to Create a Shared Flow
1. Log in to your Apigee Edge account.
2. Go to the Develop > Shared Flow tab.
3. On the top-right, you will see a +Shared Flow button, click on it to start creating one.
4. There are two options to build a shared flow: Creating an empty shared flow OR Importing an existing shared flow from a zip archive. Select one.
5. The next step is to provide the name and description of the shared flow. If you have selected the import option, then browse through your system and upload the zip.
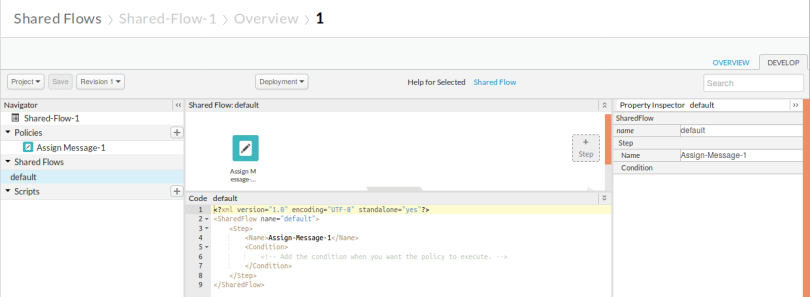
6. Your empty shared flow is created, you can now attach the policies to it, just like you do with a proxy by moving to the Develop option on the right. Or if you have imported the shared flow, then the policies are already set.
Your shared flow will look something like this:
<?xml version="1.0" encoding="UTF-8" standalone="yes"?>
<SharedFlow name="default">
  <Step>
    <!-- You can add any policy in these steps -->
    <Name>Assign-Message-1</Name>
    <Condition>
      <!-- Add the condition when you want the policy to execute -->
    </Condition>
  </Step>
</SharedFlow>
7. Select the environment in which you want to deploy your shared flow, and now you are ready to start using the shared flow.
How to Use a Shared Flow
There are two ways in which you can use a shared flow:
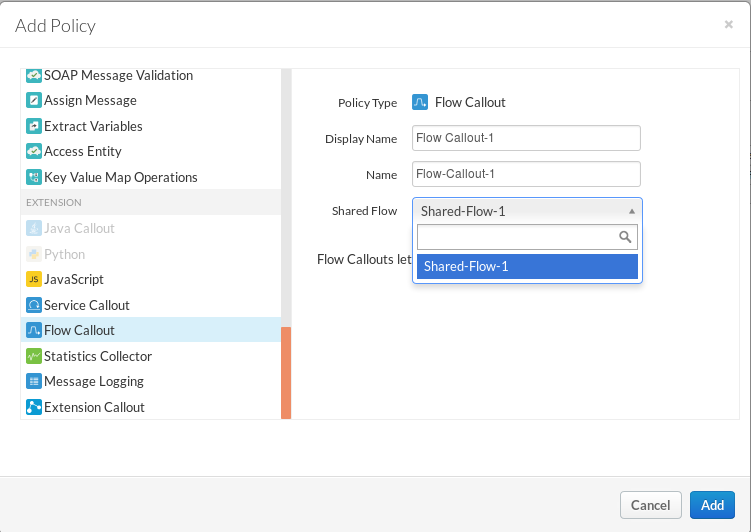
1. Using FlowCallout Policy
You can add a shared flow via Flow Callout Policy in your proxy or another shared flow, and attach it to the proxy execution flow.

Adding a step in your proxy flow (PreFlow, PostFlow, etc.) will look like this:
<Step>
  <Name>FlowCallout.SharedFlow1</Name>
<Step>
2. Attaching It Using Flow Hook
If you want a shared flow to run before processing request, or after receiving the response for every proxy in an environment, then attaching the shared flow using a flow hook is the best option.
To attach a shared flow to a flow hook, you must be an organization admin.
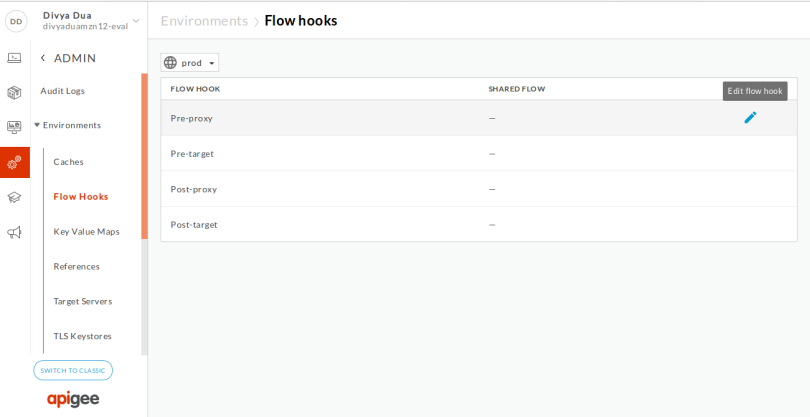
Flow hooks let you execute shared flows for all proxies in an environment and there are 4 flow hooks:
- Pre-proxy Flow Hook: executes the attached shared flow before calling the proxy endpoint.
- Pre-target Flow Hook: executes the attached shared flow before sending the request to the target server.
- Post-target Flow Hook: executes the attached shared flow after receiving the response from the target server.
- Post-proxy Flow Hook: executes the attached shared flow after the proxy endpoint and before sending the response to the client.
Go to the Admin > Environments > Flow Hooks and add "shared flow" to any of the 4 flow hooks.

Point to remember: You can attach at most one shared flow to a particular Flow Hook. You can, however, attach the same shared flow to multiple flow hooks.
How to Determine Whether the Shared Flow is Executed or Not
You don't have the option of tracing in a shared flow. So, to check whether the shared flow is working, start tracing the proxy endpoint where you have attached your shared flow.
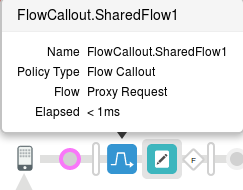
Within the transaction map, check if the FlowCallout policy is executed or not. You will see something like this for your shared flow:

The grey box contains the steps of your shared flow.
That's about all there is to it for shared flows.
Now you can start building your own shared flow. Let me know whether this blog helped you by writing in the comments section below.
References
Happy blogging! :)
This article was first published on the Knoldus blog.
Published at DZone with permission of Divya Dua, DZone MVB. See the original article here.
Opinions expressed by DZone contributors are their own.


Comments