Augmenting the Client With Vue.js
In this post, the author takes their first steps in augmenting an SSR app with Vue. In the next post, they will implement the same features with Alpine.js.
Join the DZone community and get the full member experience.
Join For FreeIn my previous post, I laid the ground to build upon. Now is the time to start "for real".
I heard a lot of Vue.js. Additionally, a friend who transitioned from developer to manager told me good things about Vue, which further piqued my interest. I decided to take a look at it. It will be the first "lightweight" JavaScript framework I'll study — from the point of view of a newbie, which I am.
Laying out the Work
I explained WebJars and Thymeleaf in the last post. Here's the setup, server- and client-side.
Server-Side
Here is how I integrate both in the POM:
<dependencies>
    <dependency>
        <groupId>org.springframework.boot</groupId>
        <artifactId>spring-boot-starter-web</artifactId>       <!--1-->
    </dependency>
    <dependency>
        <groupId>org.springframework.boot</groupId>
        <artifactId>spring-boot-starter-thymeleaf</artifactId> <!--2-->
    </dependency>
    <dependency>
        <groupId>org.webjars</groupId>
        <artifactId>webjars-locator</artifactId>               <!--3-->
        <version>0.52</version>
    </dependency>
    <dependency>
        <groupId>org.webjars.npm</groupId>
        <artifactId>vue</artifactId>                           <!--4-->
        <version>3.4.34</version>
    </dependency>
</dependencies>- Spring Boot itself; I decided on the regular, non-reactive approach
- Spring Boot Thymeleaf integration
- WebJars locator, to avoid specifying the Vue version on the client-side
- Vue, finally!
I'm using the Kotlin Router and Bean DSLs on the Spring Boot side:
fun vue(todos: List<Todo>) = router {                                    //1
    GET("/vue") {
        ok().render("vue", mapOf("title" to "Vue.js", "todos" to todos)) //2-3
    }
}- Pass a static list of
Todoobjects - See below
- Pass the model to Thymeleaf
If you're used to developing APIs, you're familiar with the body() function; it returns the payload directly, probably in JSON format. The render() passes the flow to the view technology, in this case, Thymeleaf. It accepts two parameters:
- The view's name. By default, the path is
/templatesand the prefix is.html; in this case, Thymeleaf expects a view at/templates/vue.html - A model map of key-value pairs
Client-Side
Here's the code on the HTML side:
<script th:src="@{/webjars/axios/dist/axios.js}" src="https://cdn.jsdelivr.net/npm/[email protected]/dist/axios.min.js"></script> <!--1-->
<script th:src="@{/webjars/vue/dist/vue.global.js}" src="https://cdn.jsdelivr.net/npm/vue@3/dist/vue.global.js"></script> <!--2-->
<script th:src="@{/vue.js}" src="../static/vue.js"></script> <!--3-->
<script th:inline="javascript">
/*<![CDATA[*/
window.vueData = { <!--4-->
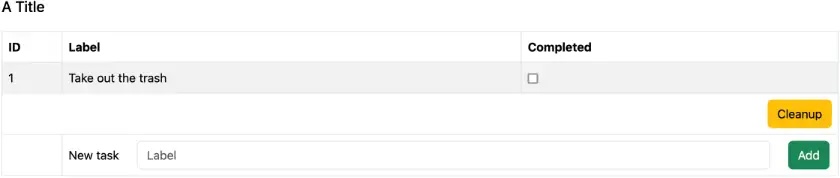
title: /*[[${ title }]]*/ 'A Title',
todos: /*[[${ todos }]]*/ [{ 'id': 1, 'label': 'Take out the trash', 'completed': false }]
};
/*]]>*/
</script>- Axios helps making HTTP requests
- Vue itself
- Our client-side code
- Set the data
As explained in last week's article, one of Thymeleaf's benefits is that it allows both static file rendering and server-side rendering. To make the magic work, I specify a client-side path, i.e., src, and a server-side path, i.e., th:src.
The Vue Code
Now, let's dive into the Vue code.
We want to implement several features:
- After the page load, the page should display all
Todoitems - When clicking on a
Todocompleted checkbox, it should set/unset thecompletedattribute - When clicking on the Cleanup button, it deletes all completed
Todo - When clicking on the Add button, it should add a
Todoto the list ofTodowith the following values:id: Server-side computed ID as the max of all other IDs plus 1label: value of the Label field forlabelcompleted: set tofalse
Our First Steps Into Vue
The first step is to bootstrap the framework. We have already set up the reference for our custom vue.js file above.
document.addEventListener('DOMContentLoaded', () => {                    //1
  // The next JavaScript code snippets will be inside the block
}- Run the block when the DOM has finished loading
The next step is to let Vue manage part of the page. On the HTML side, we must decide which top-level part Vue manages. We can choose an arbitrary <div> and change it later if need be.
<div id="app">
</div>
On the JavaScript side, we create an app, passing the CSS selector of the previous HTML <div>.
Vue.createApp({}).mount('#app');At this point, we launch Vue when the page loads, but nothing visible happens.
The next step is to create a Vue template. A Vue template is a regular HTML `` managed by Vue. You can define Vue in Javascript, but I prefer to do it on the HTML page.
Let's start with a root template that can display the title.
<template id="todos-app">                                                <!--1-->
  <h1>{{ title }}</h1>                                                   <!--2-->
</template>- Set the ID for easy binding
- Use the
titleproperty; it remains to be set up
On the JavaScript side, we must create the managing code.
const TodosApp = {
    props: ['title'],                                                    //1
    template: document.getElementById('todos-app').innerHTML,
}- Declare the
titleproperty, the one used in the HTML template
Finally, we must pass this object when we create the app:
Vue.createApp({
    components: { TodosApp },                                            //1
    render() {                                                           //2
        return Vue.h(TodosApp, {                                         //3
            title: window.vueData.title,                                 //4
        })
    }
}).mount('#app');- Configure the component
- Vue expects the
render()function h()for hyperscript creates a virtual node out of the object and its properties- Initialize the
titleproperty with the value generated server-side
At this point, Vue displays the title.
Basic Interactions
At this point, we can implement the action when the user clicks on a checkbox: it needs to be updated in the server-side state.
First, I added a new nested Vue template for the table that displays the Todo. To avoid lengthening the post, I'll avoid describing it in detail. If you're interested, have a look at the source code.
Here's the starting line template's code, respectively JavaScript and HTML:
const TodoLine = {
    props: ['todo'],
    template: document.getElementById('todo-line').innerHTML
}<template id="todo-line">
<tr>
<td>{{ todo.id }}</td> <!--1-->
<td>{{ todo.label }}</td> <!--2-->
<td>
<label>
<input type="checkbox" :checked="todo.completed" />
</label>
</td>
</tr>
</template>- Display the
Todoid - Display the
Todolabel - Check the box if its
completedattribute istrue
Vue allows event handling via the @ syntax.
<input type="checkbox" :checked="todo.completed" @click="check" />Vue calls the template's check() function when the user clicks on the line. We define this function in a setup() parameter:
const TodoLine = {
    props: ['todo'],
    template: document.getElementById('todo-line').innerHTML,
    setup(props) {                                                                 //1
        const check = function (event) {                                           //2
            const { todo } = props
            axios.patch(                                                           //3
                `/api/todo/${todo.id}`,                                            //4
                { checked: event.target.checked }                                  //5
            )
        }
        return { check }                                                           //6
    }
}- Accept the
propsarray, so we can later access it - Vue passes the
eventthat triggered the call - Axios is a JavaScript lib that simplifies HTTP calls
- The server-side must provide an API; it's outside the scope of this post, but feel free to check the source code.
- JSON payload
- We return all defined functions to make them accessible from HTML
Client-Side Model
In the previous section, I made two mistakes:
- I didn't manage any local model
- I didn't use the HTTP response's call method
We will do that by implementing the next feature, which is the cleanup of completed tasks.
We now know how to handle events via Vue:
<button class="btn btn-warning" @click="cleanup">Cleanup</button>On the TodosApp object, we add a function of the same name:
const TodosApp = {
    props: ['title', 'todos'],
    components: { TodoLine },
    template: document.getElementById('todos-app').innerHTML,
    setup() {
        const cleanup = function() {                                               //1
            axios.delete('/api/todo:cleanup').then(response => {                   //1
                state.value.todos = response.data                                  //2-3
            })
        }
        return { cleanup }                                                         //1
    }
}- As above
- Axios offers automated JSON conversion of the HTTP call
stateis where we store the model
In Vue's semantics, the Vue model is a wrapper around data that we want to be reactive. Reactive means two-way binding between the view and the model. We can make an existing value reactive by passing it to the ref() method:
In Composition API, the recommended way to declare reactive state is using the
ref()function.
ref()takes the argument and returns it wrapped within a ref object with a .value property.To access refs in a component's template, declare and return them from a component's
setup()function.
Let's do it:
const state = ref({
    title: window.vueData.title,                                         //1-2
    todos: window.vueData.todos,                                         //1
})

createApp({
    components: { TodosApp },
    setup() {
        return { ...state.value }                                        //3-4
    },
    render() {
        return h(TodosApp, {
            todos: state.value.todos,                                    //5
            title: state.value.title,                                    //5
        })
    }
}).mount('#app');- Get the data set in the HTML page, via Thymeleaf, as explained above
- We change the way we set the
title. It's not necessary since there's no two-way binding - we don't update the title client-side, but I prefer to keep the handling coherent across all values - Return the refs, as per Vue's expectations
- Look, ma, I'm using the JavaScript spread operator
- Configure the object's attributed from the
state
At this point, we have a reactive client-side model.
On the HTML side, we use the relevant Vue attributes:
<tbody>
  <tr is="vue:todo-line" v-for="todo in todos" :key="todo.id" :todo="todo"></tr> <!--1-2-->
</tbody>- Loop over the list of
Todoobjects - The
isattribute is crucial to cope with the way the browser parses HTML. See Vue documentation for more details
I've described the corresponding template above.
Updating the Model
We can now implement a new feature: add a new Todo from the client. When clicking on the Add button, we read the Label field value, send the data to the API, and refresh the model with the response.
Here's the updated code:
const TodosApp = {
    props: ['title', 'todos'],
    components: { TodoLine },
    template: document.getElementById('todos-app').innerHTML,
    setup() {
        const label = ref('')                                            //1
        const create = function() {                                      //2
            axios.post('/api/todo', { label: label.value }).then(response => {
                state.value.todos.push(response.data)                    //3
            }).then(() => {
                label.value = ''                                         //4
            })
        }
        const cleanup = function() {
            axios.delete('/api/todo:cleanup').then(response => {
                state.value.todos = response.data                        //5
            })
        }
        return { label, create, cleanup }
    }
}- Create a reactive wrapper around the title whose scope is limited to the function
- The
create()function proper - Append the new JSON object returned by the API call to the list of
Todo - Reset the field's value
- Replace the whole list when deleting; the mechanism is the same
On the HTML side, we add a button and bind to the create() function. Likewise, we add the Label field and bind it to the model.
<form>
    <div class="form-group row">
        <label for="new-todo-label" class="col-auto col-form-label">New task</label>
        <div class="col-10">
            <input type="text" id="new-todo-label" placeholder="Label" class="form-control" v-model="label" /> <!--1-2-->
        </div>
        <div class="col-auto">
            <button type="button" class="btn btn-success" @click="create">Add</button> <!--3-->
        </div>
    </div>
</form>
Vue binds the create() function to the HTML button. It does call it asynchronously and refreshes the reactive Todo list with the new item returned by the call. We do the same for the Cleanup button, to remove checked Todo objects.
Note that I didn't intentionally implement any error-handling code to avoid making the code more complex than necessary. I'll stop here as we gained enough insights for a first experience.
Conclusion
In this post, I took my first steps in augmenting an SSR app with Vue. It was pretty straightforward. The biggest issue I encountered was for Vue to replace the line template: I didn't read the documentation extensively and missed the is attribute.
However, I had to write quite a few lines of JavaScript, though I used Axios to help me with HTTP calls and didn't manage errors.
In the next post, I'll implement the same features with Alpine.js.
The complete source code for this post can be found on GitHub.
Go Further
Published at DZone with permission of Nicolas Fränkel. See the original article here.
Opinions expressed by DZone contributors are their own.
Comments