Backbone.js: Getting Started
Backbone.js is a JS library that provides models with key-value bindings and custom events, views with declarative event handling, and collections with an API.
Join the DZone community and get the full member experience.
Join For FreeBackbone.js is a JavaScript library that provides models with key-value bindings and custom events, views with declarative event handling, and collections with an abundant API of enumerable functions. Currently, Backbone.js has over 25,000 stars on GitHub. Backbone.js gives your web applications structure. In this tutorial, I'll show you how to build a web application with Backbone.js and. Check out the repo to get the code.
Backbone.js is a JavaScript library, built by Jeremy Ashkenas and maintained by a team of contributors. It is an open source component of DocumentCloud. It was initially released in 2010. Since then, it has undergone tremendous growth and adoption in the developer community. Over the past 2 years, the use of Backbone has declined due to new libraries and frameworks like Reac.js, Vue.js, and Angular. The latest stable release is 1.3.3 and it was tagged on April 5, 2016. Actively used open source projects and libraries tag releases very often, which signifies growth. However, BackboneJS has been stagnant for over a year now!
Furthermore, there are many web platforms that use Backbone.js to build their front-ends. Such platforms include Trello, Bitbucket, Foursquare, SeatGeek, and more. The documentation is very comprehensive.
Understanding Key Concepts in Backbone.js
Backbone.js has a philosophy: Keep Business logic separate from User Interface. When the two are entangled, change is hard. The key concepts needed to understand how Backbone.js works are:
- Models
- Views
- Collections
- Events
I'll give a basic overview of these concepts to nourish your understanding of Backbone.js.
Models
A Model is a layer that transforms and syncs data with a persistence layer (mostly RESTful API interacting with a database). They contain all the helpful functions needed to manipulate some piece of data from the persistence layer. When any of its data is modified, Models trigger change events.
Consider a Model as a sort of manipulator. Instead of directly interacting with the data from your API, it serves as a layer that allows you easily manipulate every tiny piece of data in a very friendly and fantastic way.
Here's a simple case study: Imagine we are in charge of a gift shop and we need to build a database of the gifts that we sell. We need to keep track of the stock of those gifts. Details like the price, brand, stock, and type.
var Shop = Backbone.Model.extend({

});
Now, we can create an instance of the Shop model and populate it like so:
var Shop = Backbone.Model.extend({
  brand: 'Rolex',
  type: 'Wrist Watch',
  price: 900
  stock: 8
});
We can also add default attributes to the Model like below:
var Shop = Backbone.Model.extend({
  defaults: {
    brand: '',
    type: '',
    price: 900
    stock: 0
  }
});
Now, we can call get and set methods on an instance of the Shop model. If we want to fetch the brand of the gift, we will retrieve it with this:
var firstShop = new Shop({
  brand: 'Rolex',
  type: 'Wrist Watch',
  price: 900
  stock: 8
});

var secondShop = new Shop({
  brand: 'Michael Korrs',
  type: 'Wrist Watch',
  price: 400
  stock: 16
});


firstShop.get('brand');
// Rolex
secondShop.get('brand');
// Michael Korrs
Let's look at another practical case. If we need to create a new user on the backend, we can instantiate a new User Model and call the save method.
var UserModel = Backbone.Model.extend({
    urlRoot: '/user',
    defaults: {
      name: '',
      email: ''
    }
});

var user = new UserModel();
// Notice that we haven't set an `id`
var userDetails = {
    name: 'Prosper',
    email: '[email protected]'
};

// Because we have not set a `id` the server will call
// POST /user with a payload of { name:'Prosper', email: '[email protected]'}
// The server should save the data and return a response containing the new `id`
user.save(userDetails, {
    success: function (user) {
        alert(JSON.stringify(user));
    }
});
We can fetch the details of a user that has been created with an id with the code below:
var user = new UserModel({id: 1});

// The fetch below will perform GET /user/1
// The server should return the id, name and email from the database
user.fetch({
    success: function (user) {
        alert(JSON.stringify(user));
    }
});
Updating the User Model will look like this:
...
...
user.save({name: 'Goodness'}, {
  success: function (model) {
    alert(JSON.stringify(user));
  }
});
Collections
Collections are ordered sets of models. You can bind some events to be notified when any model in the collection has been modified. Events such as change, add, remove.
Let's create a Backbone collection and add models to it.
var ShopCollection = Backbone.Collection.extend({

});
Now, we can set the Shop model to our collection like this:
var ShopCollection = Backbone.Collection.extend({
  model: Shop
});
The next thing will be to instantiate the Collection and the instances of our models like this:
var ShopCollection = new ShopCollection;
ShopCollection.add(firstShop);
ShopCollection.add(secondShop);
To access the models in the collection, you can use each, one of the Underscore methods available to loop over the collection and present the data to the screen. During the iteration, you can perform model methods like get/set on each model.
ShopCollection.each((shop) => {
   ...
   shop.get('brand');
   shop.get('stock');
   ...
});
Other popular methods you can use on a collection are toJSON and sync.
Views
Backbone views can be used with any JavaScript templating library. It is unopinionated about the process used to render View objects and their subviews into UI. The views handle user input and interactivity, renders data from the model, and also sends captured input back to the model.
The views listen to the model "change" events and react or re-render themselves appropriately.
Note: Templates allow us to render the User Interface as an alternative to direct DOM manipulation.
var PersonView = Backbone.View.extend({

   tagName: 'li',

   initialize: function(){
     this.render();
   },

   render: function(){
     this.$el.html( this.model.get('name') + ' (' + this.model.get('age') + ') - ' + this.model.get('occupation') );
  }
});
Now, let's use a template
var Person = Backbone.Model.extend({
    defaults: {
        name: 'Prosper Otemuyiwa',
        age: 23,
        occupation: 'Evangelist'
    }
});

var PersonView = Backbone.View.extend({
    tagName: 'li',

    my_template: _.template("<strong><%= name %></strong> (<%= age %>) - <%= occupation %>"),

    initialize: function(){
        this.render();
    },

    render: function(){
        this.$el.html( this.my_template(this.model.toJSON()));
    }
});
Events
Events is a module that can be mixed into any object, giving the object the ability to bind and trigger custom named events.
var object = {};
_.extend(object, Backbone.Events);
object.on("alert", function(msg) { alert("Triggered " + msg); });
object.trigger("alert", "an event");
In the code above, we copied all of Backbone's events to a JavaScript object using the extend functionality of underscore. So we listen on alert Backbone event and then trigger the event.
Let's try something more practical. Say we have a UserModel.
var UserModel = Backbone.Model.extend({

    initialize: function(){
        this.on('change',this.someChange,this);
    },

    defaults : {
      name : '',
      email : ''
    },

    someChange: function(model,options) {
      alert(‘something has changed’);
    }

});
var newUser = new UserModel({ name:’Raymond Igoladebayi’, email: '[email protected]'});
newUser.set(‘email’, '[email protected]’); // this will trigger the `change` eventIn the code above, the user model will now listen to change events on itself. Once you set the name to another value, it triggers the change event that calls the someChange function.
In Backbone, you can also listen to just a specific attribute change. For example, we can listen to only title attribute change. How? We simply chain it with a colon like so: change:title.
...
this.on('change:title', this.someChange, this);
...
The change event is only triggered whenever the title changes. And then calls the someChange function.
We also have built-in events that occur on collections. Check out the catalog of built-in Backbone events.
Our App: Address Book
The app we will build today is an Address Book. This app simply manages the address of employees in an organization. We won't make use of any backend but will take advantage of Backbone Collections. I'll leave you to persist it to a backend or use local Storage.
Build the App With Backbone.js
We'll need three main dependencies, Backbone.js, Underscore, and jQuery. Go ahead and create your app directory.
In the root directory, create an index.html file. Also, create css, and js folders within the directory.
Inside the js directory, go ahead and create the collections, models and views directories.
Populate the index.html file with the following code:
<!DOCTYPE html>
<html lang="en">
  <head>
    <meta charset="utf-8">
    <meta http-equiv="X-UA-Compatible" content="IE=edge">
    <meta name="viewport" content="width=device-width, initial-scale=1">
    <title>Address Book</title>
    <link href="https://maxcdn.bootstrapcdn.com/bootstrap/3.3.7/css/bootstrap.min.css" rel="stylesheet">
    <link href="app/css/main.css" rel="stylesheet">
  </head>
  <body>
    <header class="bs-header">
      <div class="container">
        <h1>Address Book</h1>
      </div>
    </header>
    <div class="container">
      <div class="row">
        <div class="col-xs-12 main-container">
        </div>
      </div>
    </div>

    <script type="text/template" id="tpl-contacts">
      <h2 class="page-header text-center">List of Employees</h2>
      <p class="text-center">
        <a href="#employees/new" class="btn btn-lg btn-outline">Add Employee</a>
      </p>
      <ul class="media-list row contacts-container"></ul>
    </script>

    <script type="text/template" id="tpl-contact">
      <div class="thumbnail">
        <img class="media-object" src="http://svgavatars.com/style/svg/<%- avatar %>">
      </div>
      <div class="media-heading">
        <h3>
          <%- name %>
          <small>
            <a href="#employees/edit/<%- id %>"><span class="glyphicon glyphicon-pencil"></span></a>
            <a href="#employees/delete/<%- id %>" class="delete-employee">
              <span class="glyphicon glyphicon-trash"></span>
            </a>
          </small>
        </h3>
      </div>
      <div class="media-body">
        <dl>
          <dt>Phone Number:</dt>
          <dd><%- tel %></dd>
          <dt>Email:</dt>
          <dd><%- email %></dd>
        </dl>
      </div>
      <hr>
    </script>

    <script type="text/template" id="tpl-new-contact">
      <h2 class="page-header text-center"><%= isNew ? 'Create' : 'Edit' %> Employee </h2>
      <form role="form" class="form-horizontal employee-form">
        <div class="form-group">
          <label class="col-sm-4 control-label">Full name:</label>
          <div class="col-sm-6">
            <input type="text" class="form-control employee-name-input" value="<%- name %>" required>
          </div>
        </div>
        <div class="form-group">
          <label class="col-sm-4 control-label">Email address:</label>
          <div class="col-sm-6">
            <input type="email" class="form-control employee-email-input" value="<%- email %>" required>
          </div>
        </div>
        <div class="form-group">
          <label class="col-sm-4 control-label">Telephone number:</label>
          <div class="col-sm-6">
            <input type="tel" class="form-control employee-tel-input" value="<%- tel %>" required>
          </div>
        </div>
        <div class="form-group">
          <div class="col-sm-offset-4 col-sm-3">
            <button type="submit" class="btn btn-outline btn-lg btn-block">Submit</button>
          </div>
          <div class="col-sm-3">
            <a href="#employees" class="btn btn-outline btn-lg btn-block">Cancel</a>
          </div>
        </div>
      </form>
    </script>

    <script src="https://cdnjs.cloudflare.com/ajax/libs/jquery/3.2.1/jquery.min.js"></script>
    <script src="https://cdnjs.cloudflare.com/ajax/libs/underscore.js/1.8.3/underscore-min.js"></script>
    <script src="https://cdnjs.cloudflare.com/ajax/libs/backbone.js/1.3.3/backbone-min.js"></script>
    <script src="https://cdn.auth0.com/js/auth0/8.8/auth0.min.js"></script>

    <script src="app/js/app.js"></script>
    <script src="app/js/models/employee.js"></script>
    <script src="app/js/collections/employees.js"></script>
    <script src="app/js/views/employee.js"></script>
    <script src="app/js/views/employees.js"></script>
    <script src="app/js/views/employeeForm.js"></script>
    <script src="app/js/router.js"></script>

    <script>
      $(function() {
        EmployeeManager.start({
          employees: [
            {
              id: 1,
              name : 'Christian Nwamba',
              avatar: '11.svg',
              tel: '651-603-1723',
              email: '[email protected]'
            },
            {
              id: 2,
              name : 'Bukola Ayodeji',
              avatar: '20.svg',
              tel: '513-307-5859',
              email: '[email protected]'
            },
            {
              id: 3,
              name : 'Rick Ross',
              avatar: '17.svg',
              tel: '918-774-0199',
              email: '[email protected]'
            },
            {
              id: 4,
              name : 'Godson Ukpere',
              avatar: '19.svg',
              tel: '702-989-5145',
              email: '[email protected]'
            },
            {
              id: 5,
              name : 'John I. Wilson',
              avatar: '01.svg',
              tel: '318-292-6700',
              email: '[email protected]'
            },
            {
              id: 6,
              name : 'Goodnes Tejufona',
              avatar: '05.svg',
              tel: '803-557-9815',
              email: '[email protected]'
            }
          ]
        });
      });
    </script>
  </body>
</html>
Let's analyze the code above. We have three template-type scripts. One for displaying the list of employees, another for editing and creating new employees and one for displaying the link for creating new employees.
Furthermore, we referenced jQuery, Underscore, and Backbone libraries. We also linked some views and script files that do not exist yet. We'll create them soon.
Finally, there is a startup function, EmployeeManager.start(), that takes in an array of employees for display when the app is started. You'll understand how this works in a couple of minutes.
Next, open up the models directory and create an employee.js file.
employee.js
EmployeeManager.Models.Employee = Backbone.Model.extend({
  defaults: {
    name: null,
    tel: null,
    email: null,
    avatar: null
  }
});
We just set the defaults of our model attributes to null. In our app, we are not persisting anything so our model will be very simple.
Next, create an employees.js file in the collections directory and add the following code to it:
collections/employees.js
EmployeeManager.Collections.Employees = Backbone.Collection.extend({
  model: EmployeeManager.Models.Employee
});
``

Earlier I mentioned that collections work with models.

## Create The Views

We'll have three views. One view for handling the list of employees, one view for the details of each employee and one view for adding employees.

Let's get started. Go ahead and open up the `js/views` directory. Create a file, `employee.js`.

_js/views/employee.js_
EmployeeManager.Views.Employee = Backbone.View.extend({
tagName: 'li',
className: 'media col-md-6 col-lg-4',
template: _.template($('#tpl-contact').html()),
events: {
'click .delete-employee': 'onClickDelete'
},
initialize: function() {
this.listenTo(this.model, 'remove', this.remove);
},
render: function() {
var html = this.template(this.model.toJSON());
this.$el.append(html);
return this;
},
onClickDelete: function(e) {
e.preventDefault();
this.model.collection.remove(this.model);
}
});
``
`This is the view that handles the details of each employee. In the code above, we have the HTML tag, <li> that is assigned a class. This is the element that houses the employee detail. The render function ensures that the right data is appended to the template and displays on the page. The onClickDelete function is for removing the data from the model and collection.
The events object simply maps the onClickDelete function to the click event of the delete-employee button.
Next, create the add employee form view. Create a file, employeeForm.js in the js/views directory.
js/views/employeeForm.js
EmployeeManager.Views.EmployeeForm = Backbone.View.extend({
  template: _.template($('#tpl-new-contact').html()),

  events: {
    'submit .employee-form': 'onFormSubmit'
  },

  render: function() {
    var html = this.template(_.extend(this.model.toJSON(), {
      isNew: this.model.isNew()
    }));
    this.$el.append(html);
    return this;
  },

  onFormSubmit: function(e) {
    e.preventDefault();

    this.trigger('form:submitted', {
      name: this.$('.employee-name-input').val(),
      tel: this.$('.employee-tel-input').val(),
      email: this.$('.employee-email-input').val(),
      avatar: '13.svg'
    });
  }
});
In the code above, the onFormSubmit function is called when we submit the form. And this function is called whenever the submit event is fired. The render function assigns the model to the template.
Finally, create a file, employees.js in the js/views directory.
js/views/employees.js
EmployeeManager.Views.Employees = Backbone.View.extend({
  template: _.template($('#tpl-contacts').html()),

  renderOne: function(employee) {
    var itemView = new EmployeeManager.Views.Employee({model: employee});
    this.$('.contacts-container').append(itemView.render().$el);
  },

  render: function() {
    var html = this.template();
    this.$el.html(html);

    this.collection.each(this.renderOne, this);

    return this;
  }
});
This view is responsible for the list of employees on the page.
Create the Router
This is a single page application, we need to make use of some routing capabilities. In the js directory, create a router.js file and add the code below:
js/router.js
EmployeeManager.Router = Backbone.Router.extend({
  routes: {
    '': 'home',
    'employees': 'showEmployees',
    'employees/new': 'newEmployee',
    'employees/edit/:id': 'editEmployee',
  }
});
In the code above, whenever each of the routes on the left is visited, the names of the actions on the right are fired as events, so the router can listen on it like:
router.on('route:showEmployees', function() {
  ...
});
Create the App Logic
Let's go ahead and create the js/app.js file. This is the file that houses the functionalities that happen whenever each route is visited. Add the code below to it:
window.EmployeeManager = {
  Models: {},
  Collections: {},
  Views: {},

  start: function(data) {
    var employees = new EmployeeManager.Collections.Employees(data.employees),
        router = new EmployeeManager.Router();

    router.on('route:home', function() {
      router.navigate('employees', {
        trigger: true,
        replace: true
      });
    });

    router.on('route:showEmployees', function() {
      var employeesView = new EmployeeManager.Views.Employees({
        collection: employees
      });

      $('.main-container').html(employeesView.render().$el);
    });

    router.on('route:newEmployee', function() {
      var newEmployeeForm = new EmployeeManager.Views.EmployeeForm({
        model: new EmployeeManager.Models.Employee()
      });

      newEmployeeForm.on('form:submitted', function(attrs) {
        attrs.id = employees.isEmpty() ? 1 : (_.max(employees.pluck('id')) + 1);
        employees.add(attrs);
        router.navigate('employees', true);
      });

      $('.main-container').html(newEmployeeForm.render().$el);
    });

    router.on('route:editEmployee', function(id) {
      var employee = employees.get(id),
          editEmployeeForm;

      if (employee) {
        editEmployeeForm = new EmployeeManager.Views.EmployeeForm({
            model: employee
        });

        editEmployeeForm.on('form:submitted', function(attrs) {
          employee.set(attrs);
          router.navigate('employees', true);
        });

        $('.main-container').html(editEmployeeForm.render().$el);
      } else {
        router.navigate('employees', true);
      }
    });


    Backbone.history.start();
  }
};
Remember the EmployeeManager.start() function that was called in the index.html file? The function houses the events that the router listens on.
- Whenever the user launches the app, the router listens on the
homeevent, and triggers a redirect to theemployeesroute. - Whenever the user hits the
#employeesroute, it listens on theshowEmployeesevent and renders the list of employees. - Whenever the user hits the
#employee/newroute, it listens on thenewEmployeeevent, renders the form for adding new employees, and handles the form submission. - Whenever the user hits the
#employees/edit/:idroute, it listens on theeditEmployeeevent, and renders the edit form.
Backbone.history.start() is used to allow the use of hashbangs for the routes.
Run Your App
Now, launch your app. It should start up like so:
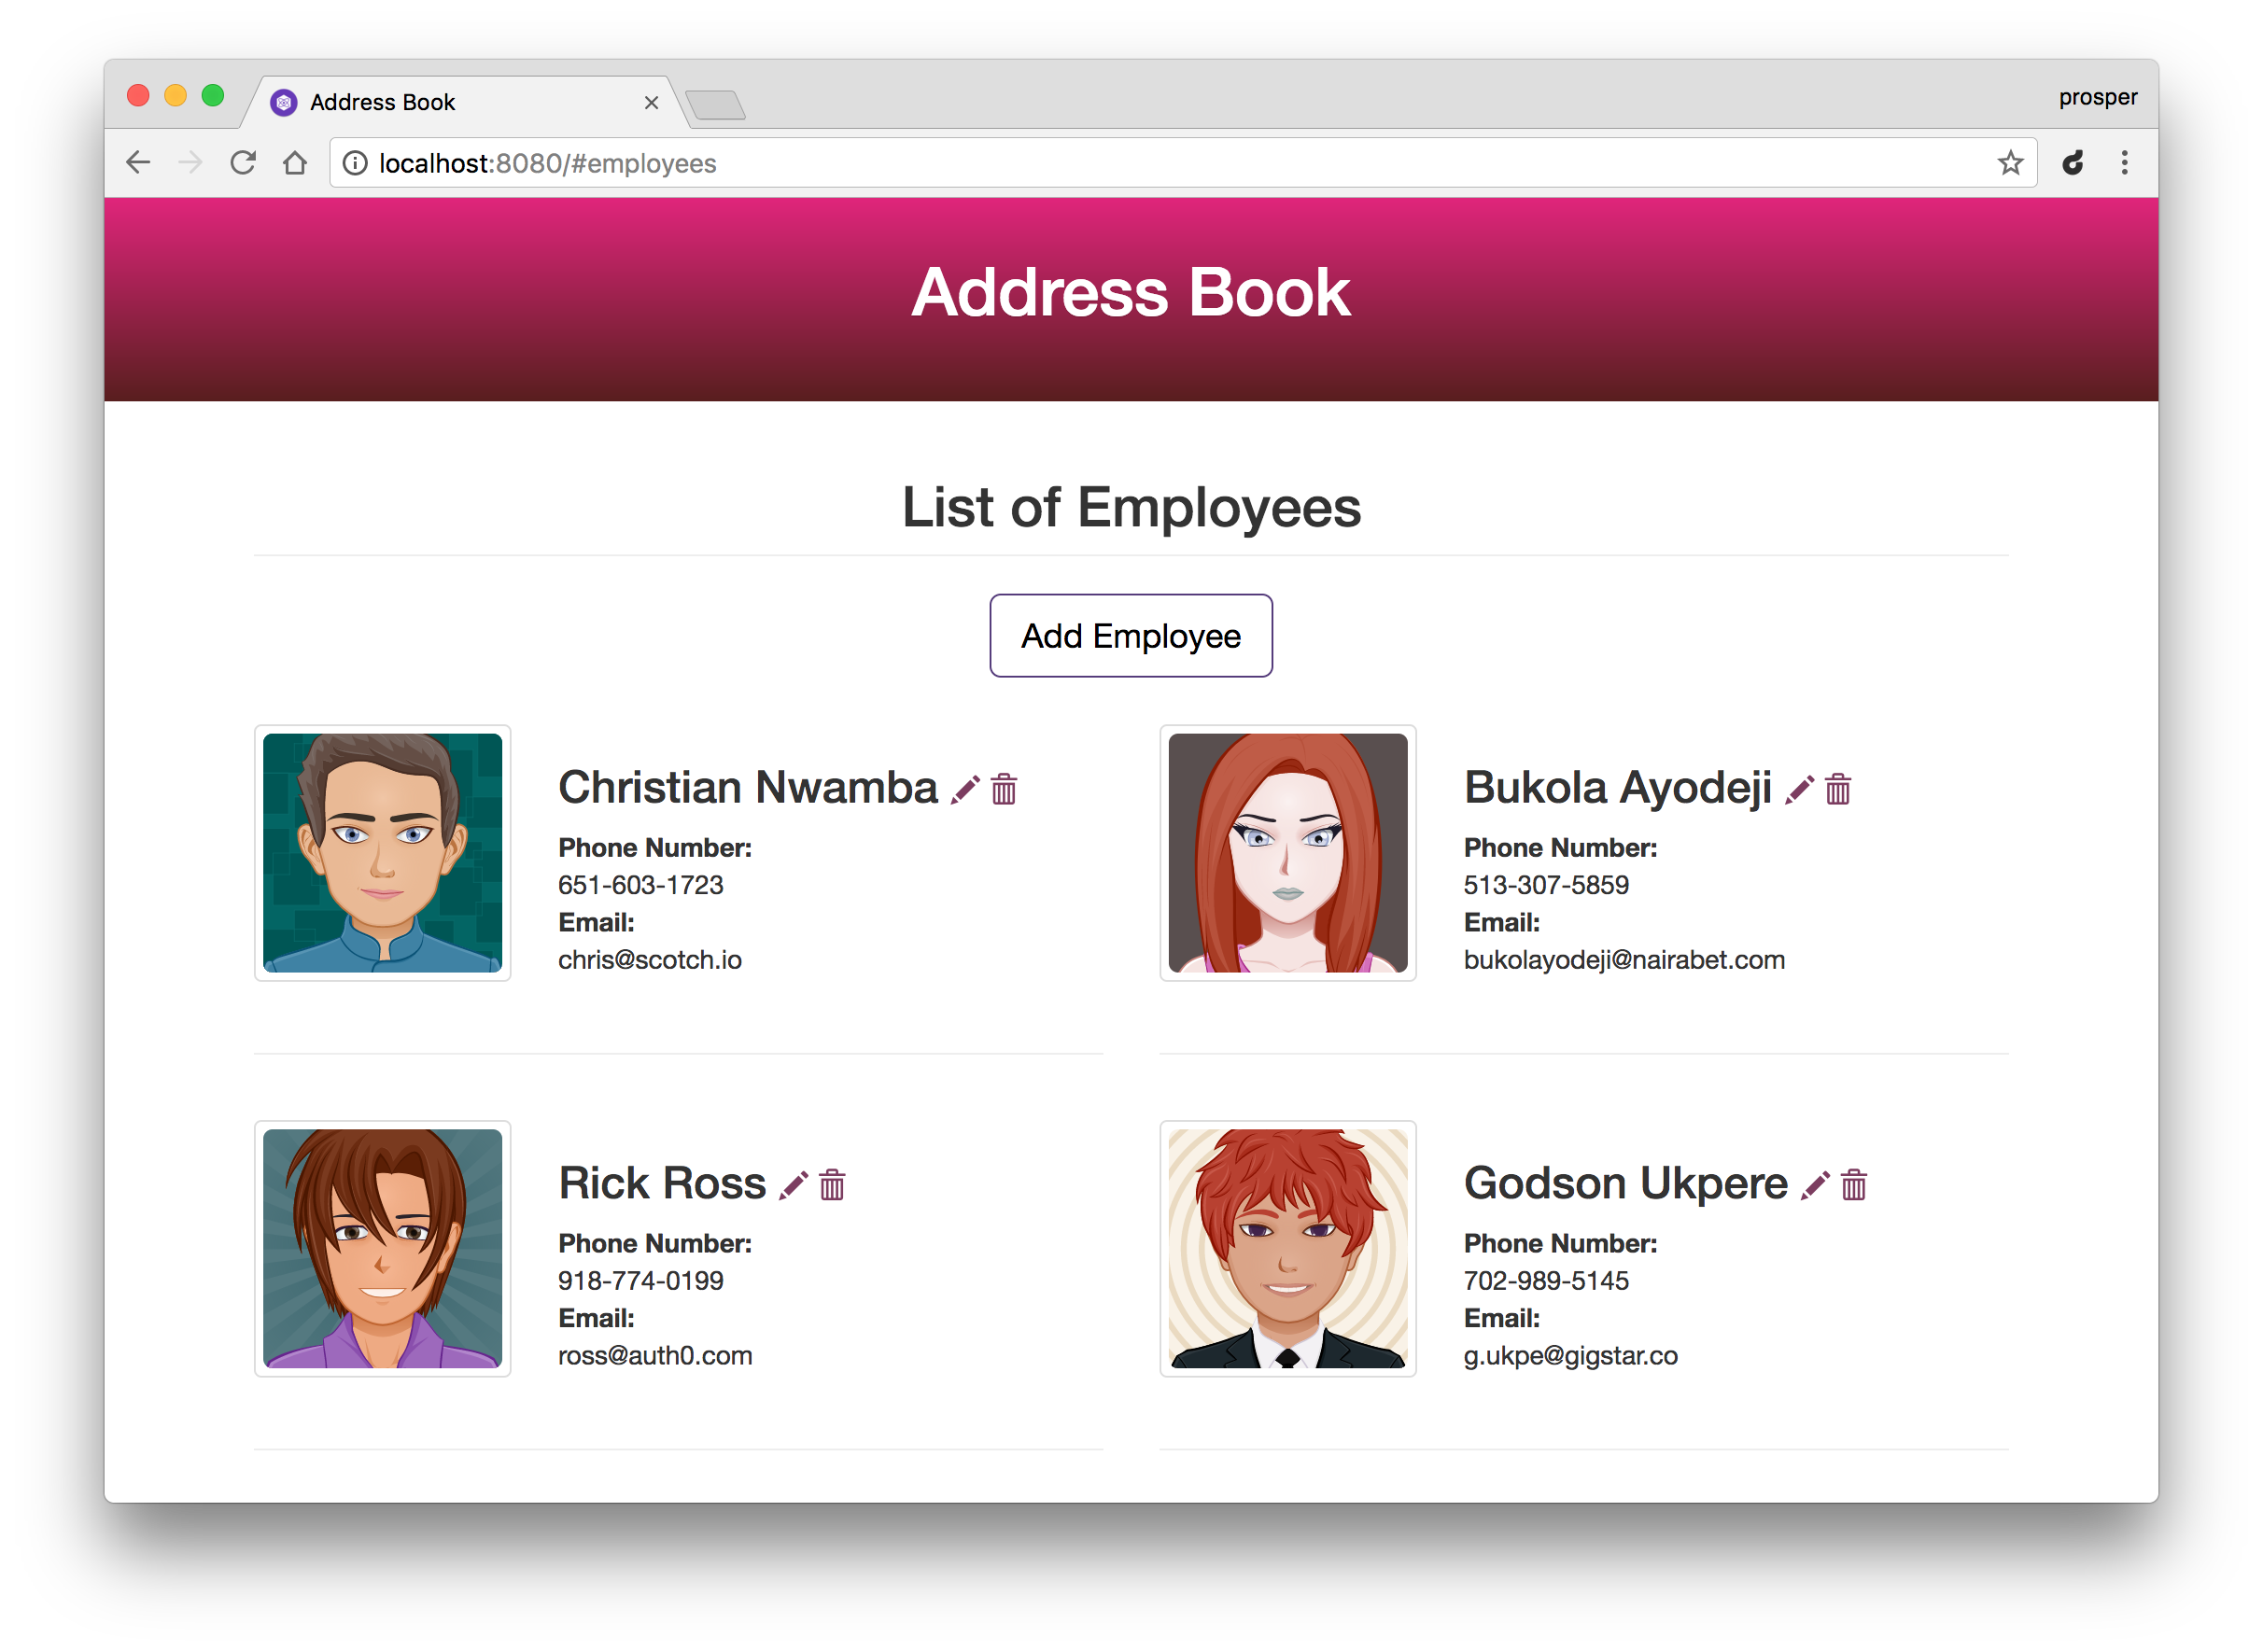 Launching the app
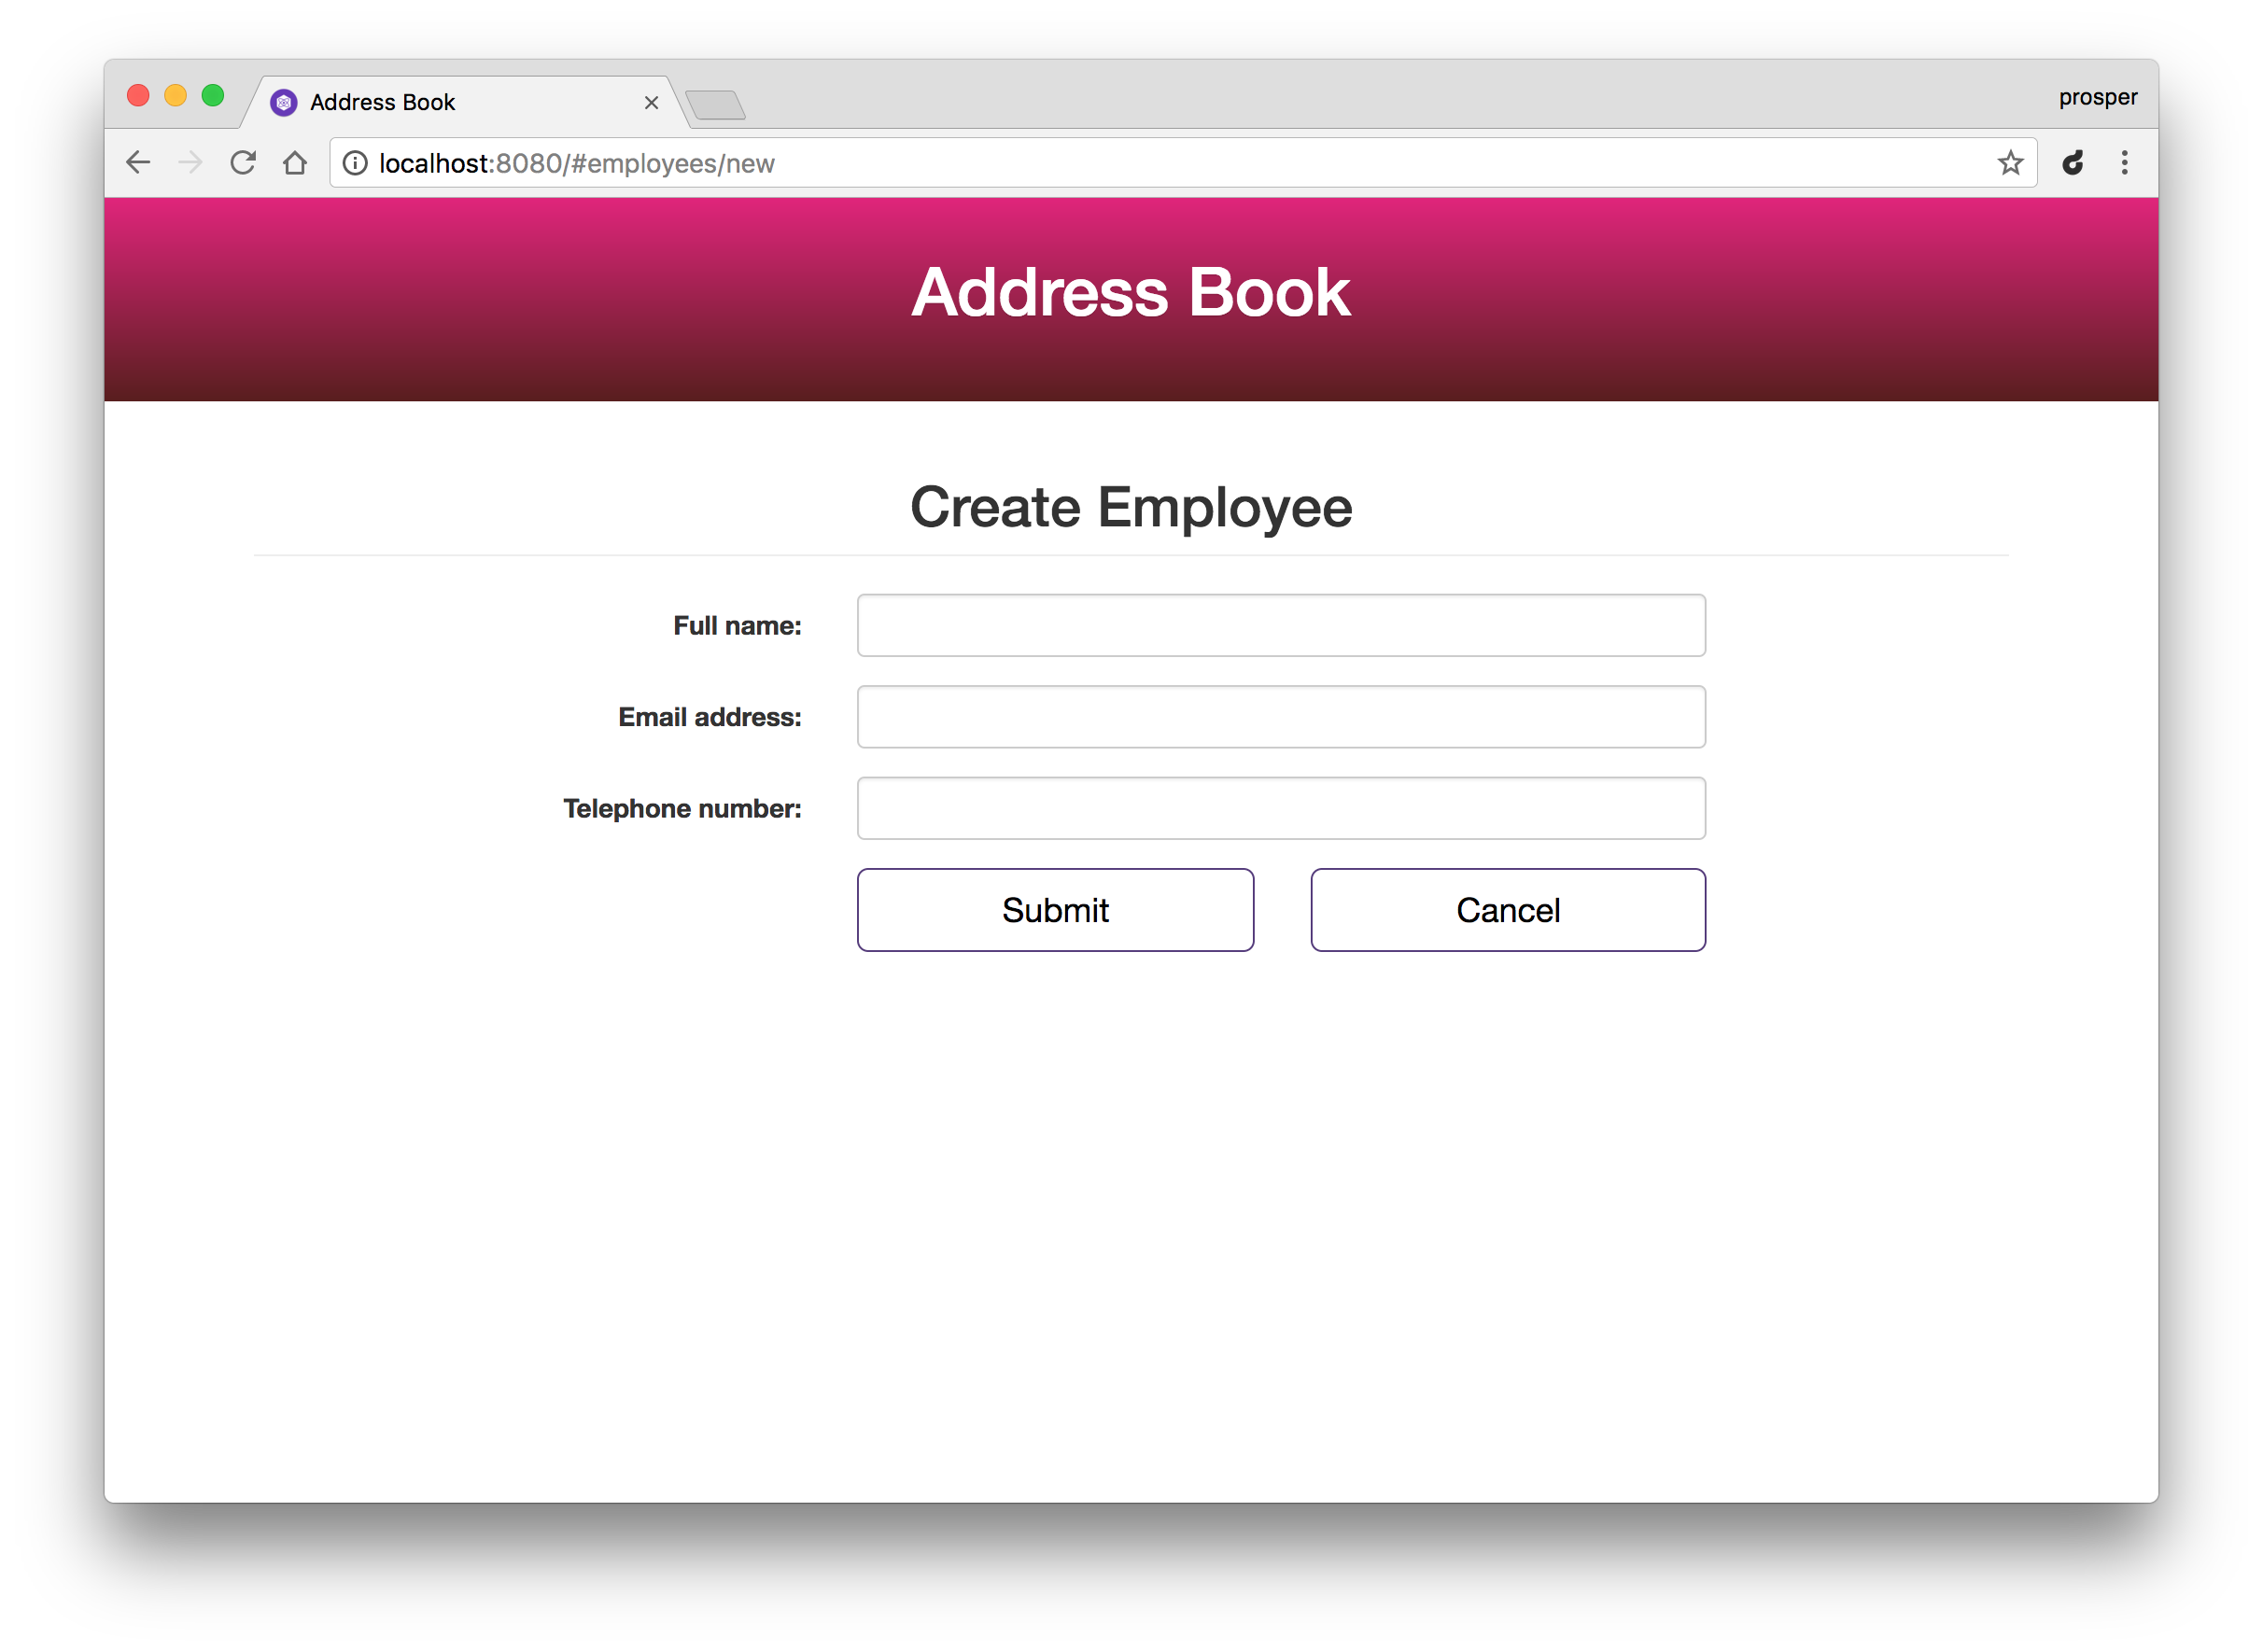 Creating a new employee
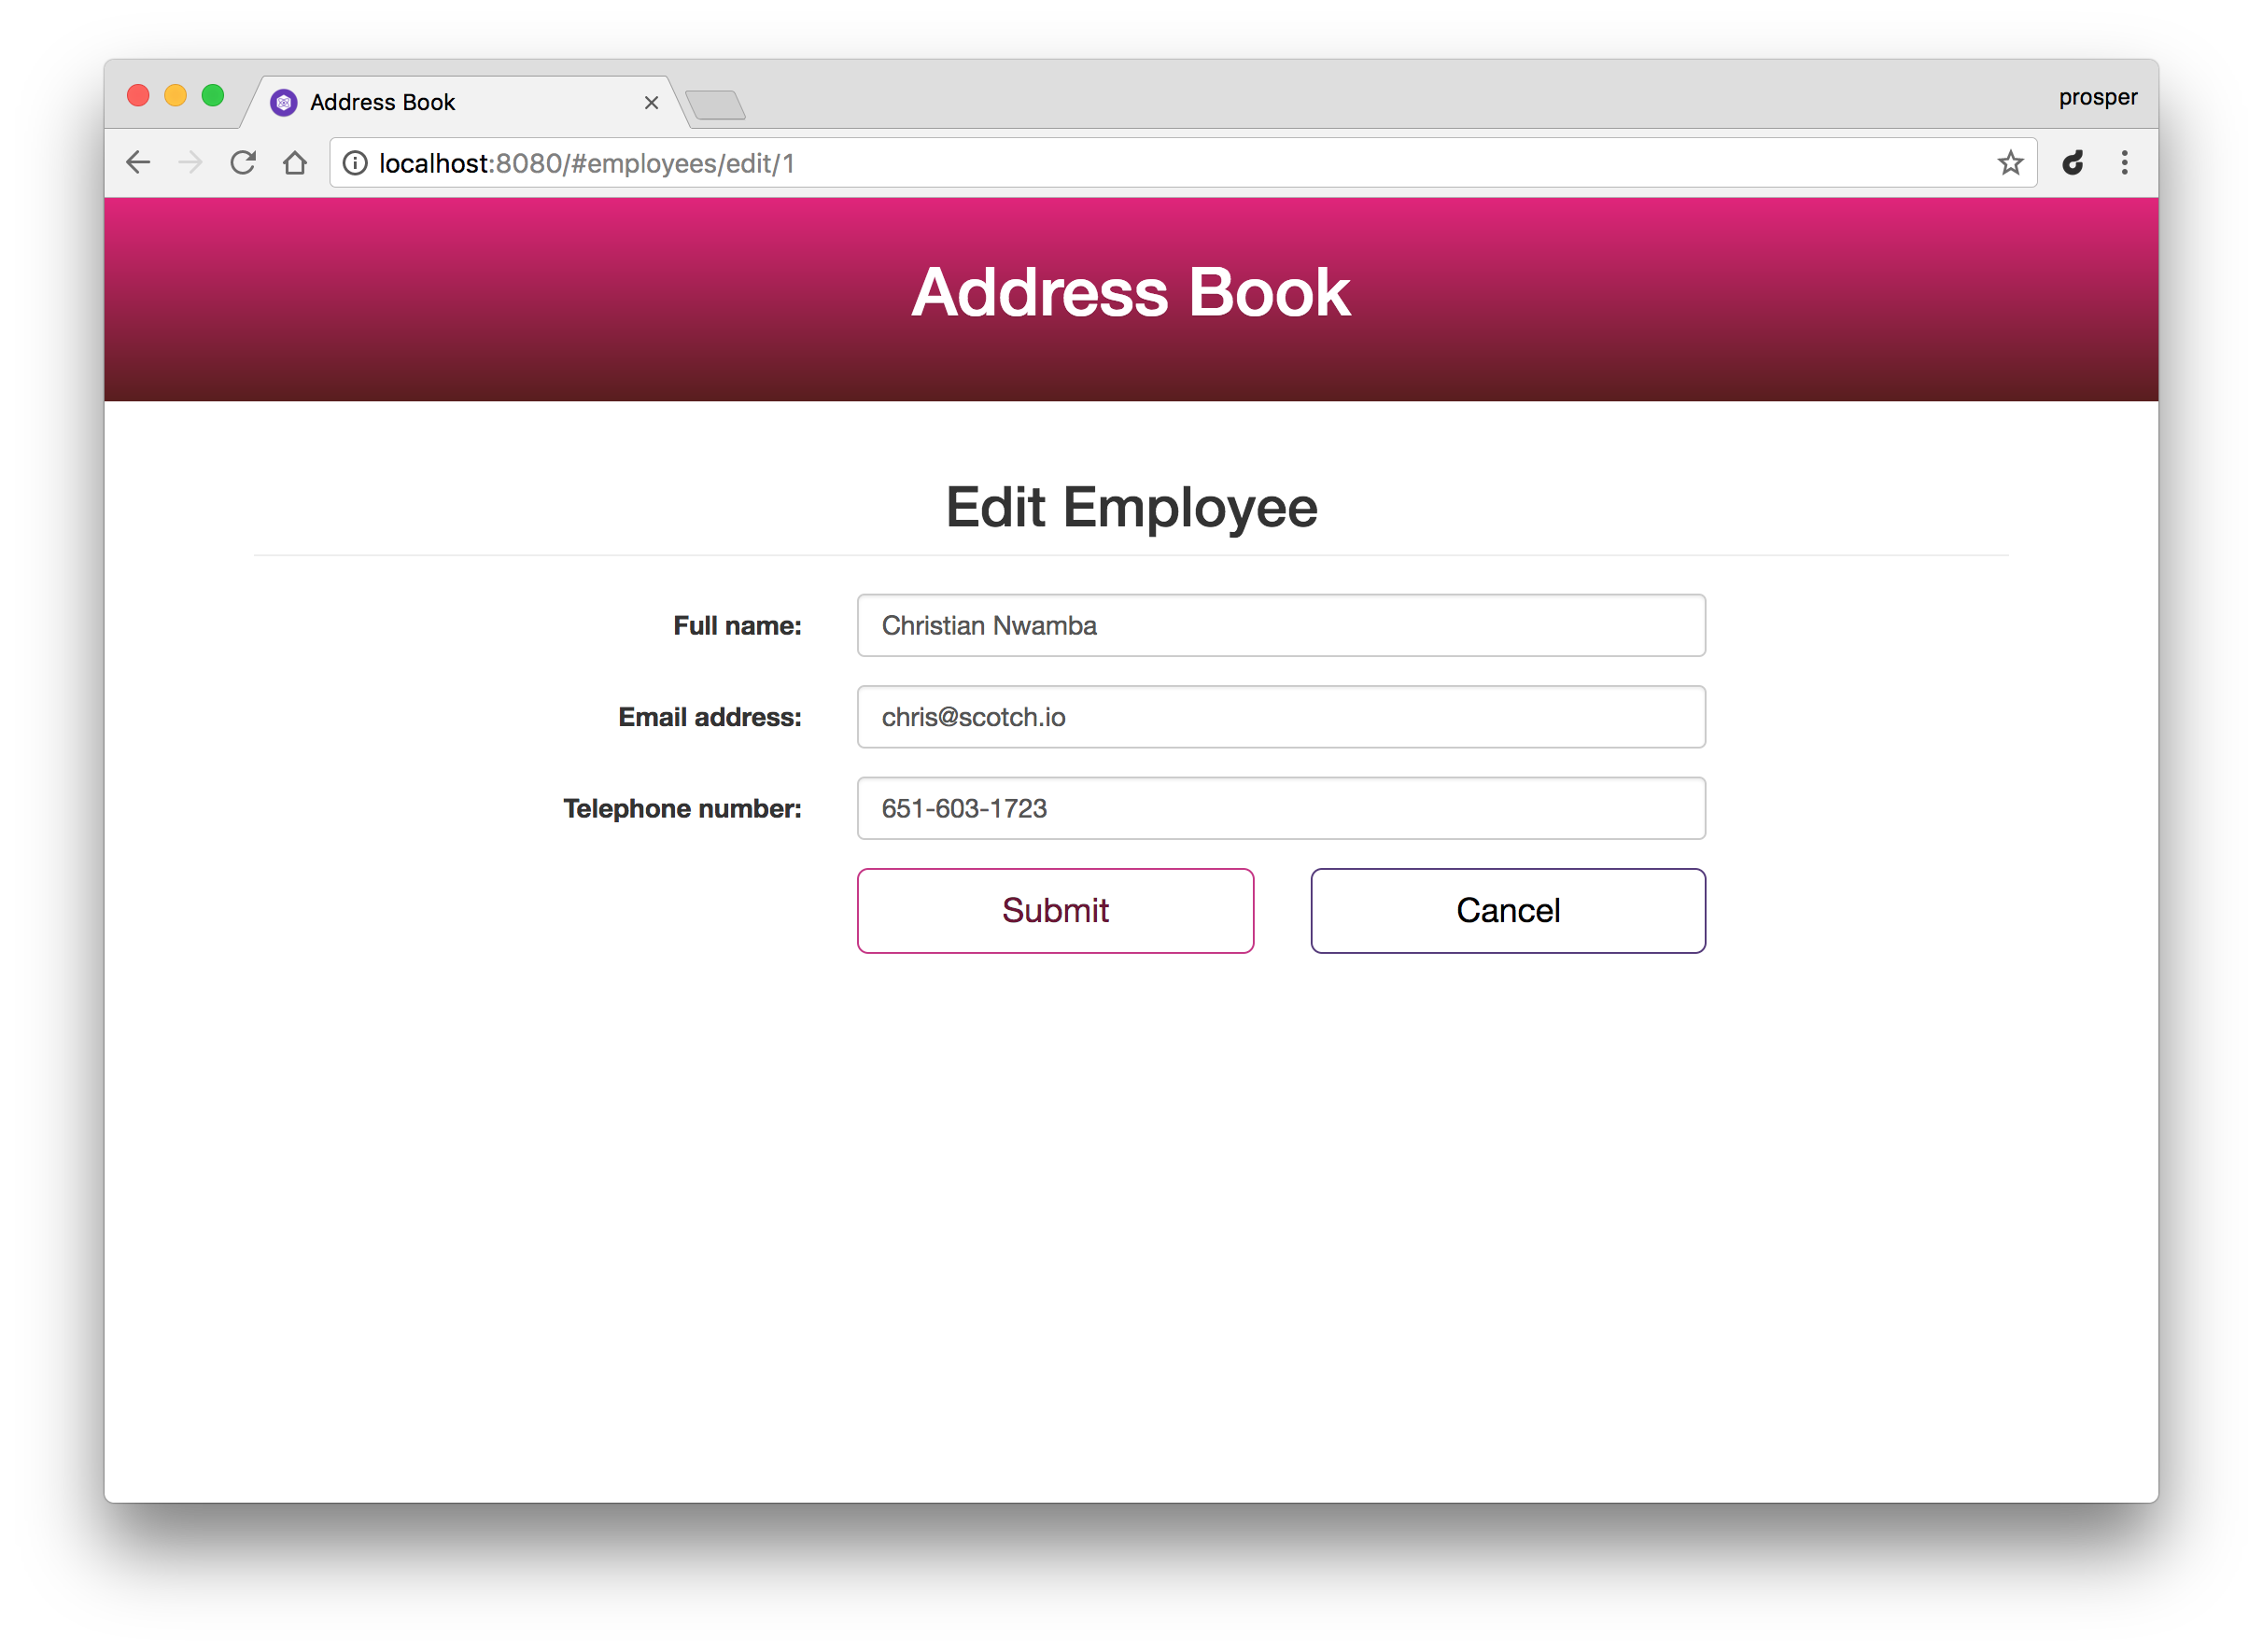 Editing an employee's details
Published at DZone with permission of Prosper Otemuyiwa. See the original article here.
Opinions expressed by DZone contributors are their own.
Comments