Getting Started With Bloomreach Headless Experience Manager (Part 2)
This step-by-step comprehensive guide helps new developers get started developing websites with Bloomreach Headless Experience Manager.
Join the DZone community and get the full member experience.
Join For FreeWelcome to Bloomreach Headless Experience Manager, a headless content management system with the APIs and flexibility to power any front end while retaining powerful personalization and authoring capabilities!
This guide helps new developers get started with the platform. Step-by-step through a series of milestones, you’ll learn the first steps of developing websites using Headless Experience Manager.
For this part, we will cover milestones 3 and 4.
- Milestone 3: Set up a Development Project
- Milestone 4: Create a Component
Milestone 3: Set up a Development Project
In this milestone, you will prepare the frontend app you created in the previous milestone for use in a preview context in the Experience manager, then create a development project in Headless Experience manager and configure it to use your local frontend app for the channel preview.
A project is a set of related channel configuration and content changes that are developed in isolation from the live site. The changes contained within a project, once reviewed and ready, can be “merged” into the “core” (i.e. the live site).
A development project is a special project in which developers can make site configuration changes and use a local development version of their frontend app in the Experience manager preview.
A site configuration is a collection of configuration items required to deliver a site, such as page layouts and components.
Prepare the Frontend App
Before you can use your frontend app to render the channel preview in the Experience manager application, you need to make one small change.
In src/App.js, add the path property to the BrPage element as in the following code snippet:
This ensures that any request parameters in the site URL are passed on to the Delivery API’s Pages endpoint. This is required for the preview in the Experience manager application to work correctly.
Create a Development Project
You are now ready to create your development project. Watch a short demonstration before you start:
In the Headless Experience Manager, open the Projects application:
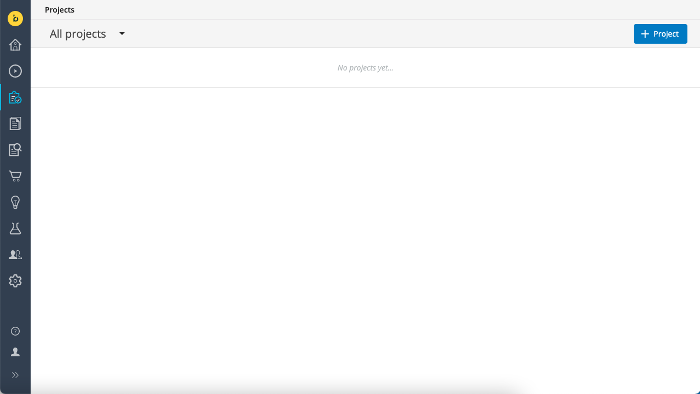
Click on the + Project button in the top right to create a new project.
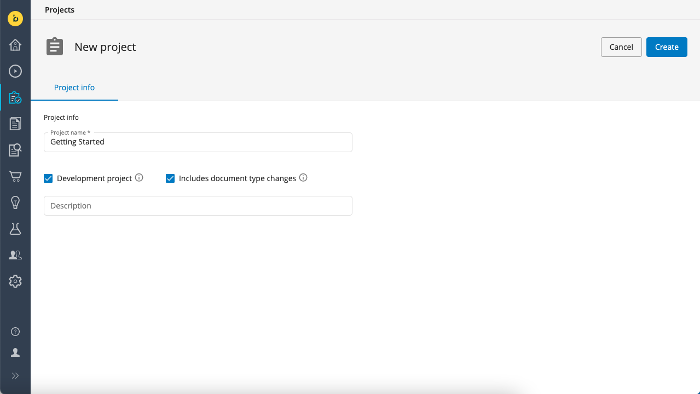
Give your project a name (for example, “Getting Started”) and make sure to check the checkboxes for both the Development project and Includes document type changes:
A document type defines the data structure and the editing template for a class of documents used to manage content in a channel.
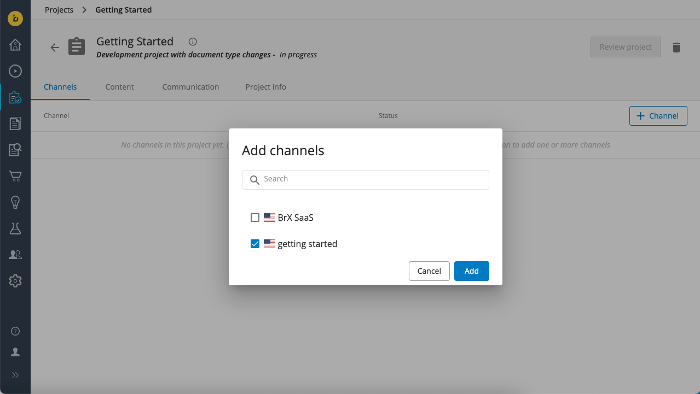
Once the development project is created, click on the + Channel button, select the “getting started” channel you created in milestone 1, and click Add:
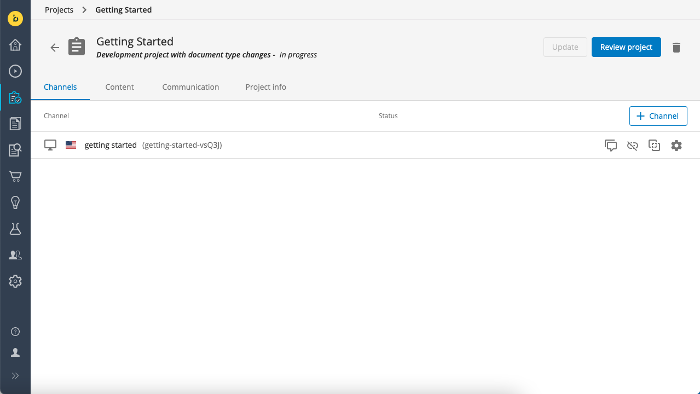
You will see the channel listed in the project with a unique identifier between parentheses (“getting-started-vsQ3J” in the screenshot below). When you added the channel to the project, a branch of the channel’s configuration was created, similar to how code can be branched in a version control system like Git. The unique identifier refers to that branch and you will use it in the next milestone to perform operations on the site configuration using the Site Management API.
The next step is to configure your project to use your local frontend app to render the preview in the Experience manager app.
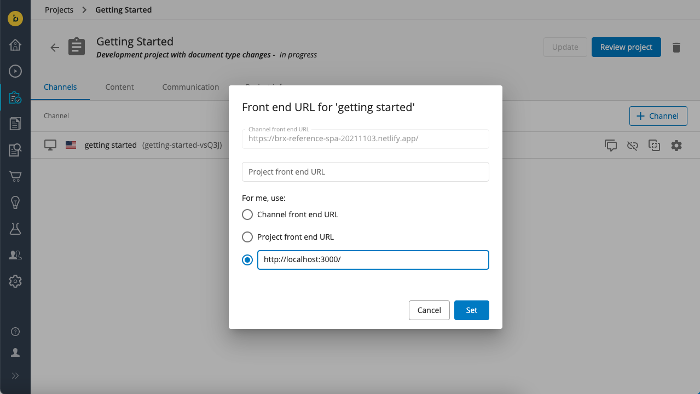
Click on the cogwheel icon (at the far right) for your channel. In the dialog that pops up, you can see the Channel front end URL is set to the standard placeholder frontend app provided by Bloomreach.
You can either set the frontend URL for the project for all users or just for yourself.
For now, under For me, use, select the 3rd radio button, enter “http://localhost:3000/" in the text box, and click Set:
Now click on the channel to open it in the Experience manager app.
You should see the channel preview as rendered by your own frontend app. Also, note that your development project is selected in For project at the top:
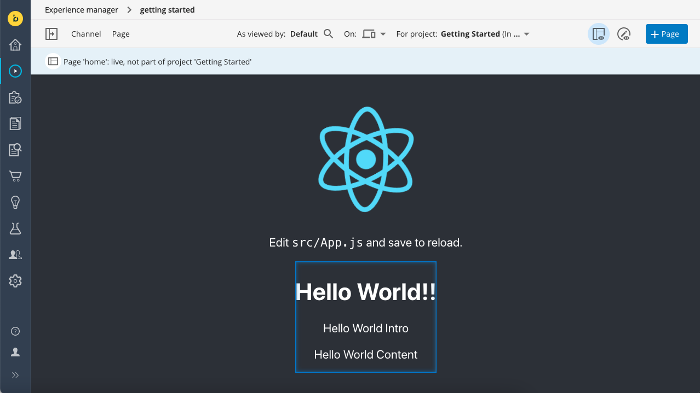
To see the difference with the “live site”, use the For project selector to switch to “core”, then back to your project.
Your development project is now set up and you are ready to start development!
Full Code
Find the complete code for milestone 3 in React, Angular, and Vue in Github:
https://github.com/bloomreach/content-getting-started/tree/Milestone_3_Set_up_a_Development_Project
Milestone 4: Create a Component
In this milestone, you will configure a new component for your channel using the Site Management API (or the pre-release Site Development web app) and implement the frontend code to render that component. It will be a very minimalistic component with only one string property and no content.
In the video below, you can see a short demonstration of configuring a component through the Site Management API using Postman:
To simplify things for your first time configuring a component, you’ll be using the Site Development web app, a pre-release version of a UI layer on top of the Site Management API that is currently being developed by Bloomreach and will be integrated into a future release of Headless Experience Manager.
Obtain an API Authorization Token
Before you can use the Site Management API, you need to obtain an API authorization token.
- In Headless Experience Manager, navigate to Setup > brXM API token management.
- Click on the + API token button in the top right.
- Fill in a Token name, choose an Expiration date (up to 1 month in the future), check the Read and Write checkboxes next to Site Management API, and click on Create.
- Copy the token to the clipboard or write it down. This is the only time it will be displayed.
See API authorization for more information and detailed instructions with screenshots.
Configure the Component Properties and Parameters
The pre-release Site Development web app is available at the following URL:
https://bloomreach-content-tools.netlify.app/
Point your browser to the above URL to load the web app.
Select the Settings tab and enter your Headless Experience Manager account name (for example “trials-1234abcd”) in the namespace field and your API authorization token in the apiKey field.
Click on Test connection to verify you entered the correct information. If you see a Connection Successful message, click on Save.
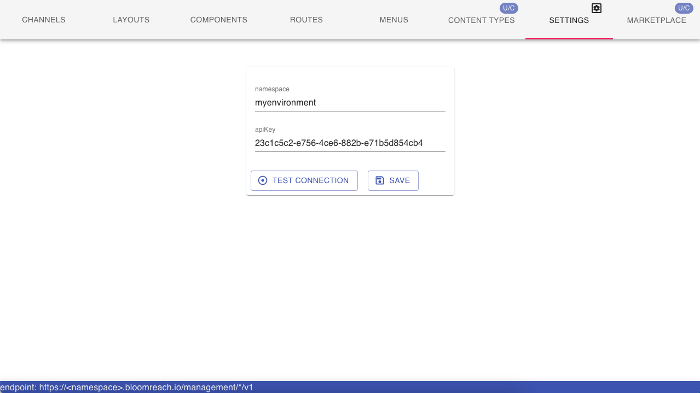
You are now ready to make configuration changes.
Select the Components tab and verify that your project/channel is selected in the dropdown (getting-started-vsQ3J in the screenshot below).
Open the sample group:
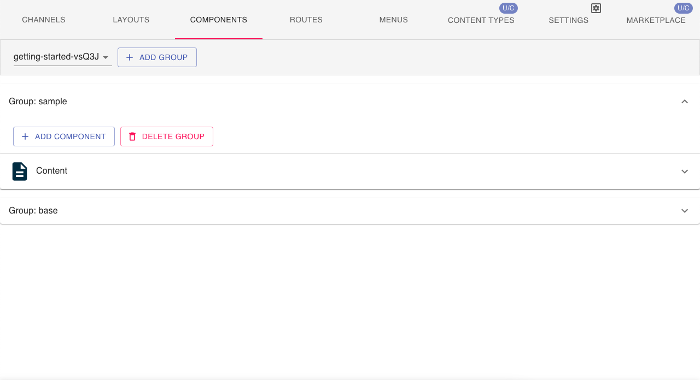
Click on Add component and enter the following values:
- extends: “base/component”
- label: “My Component”
- ctype: “MyComponent”
You can leave the other fields blank.
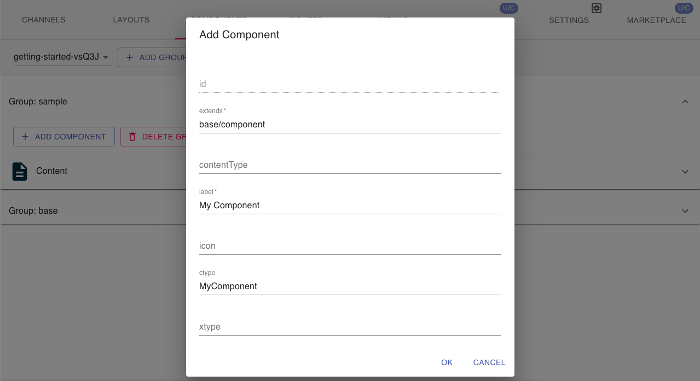
Click OK to add the component.
Select My Component.
Click on the + and choose Add Simple Parameter.
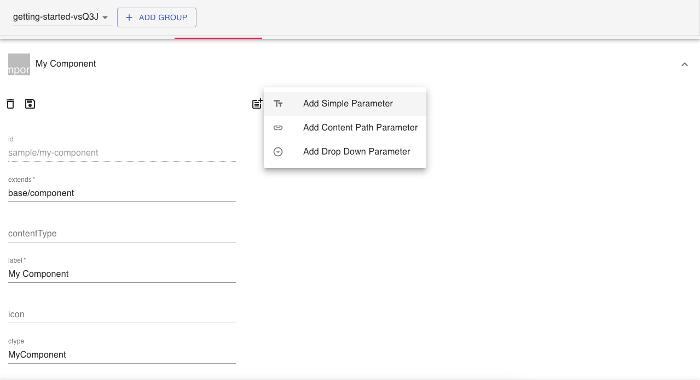
A new string parameter will be added. Click on the pencil icon to edit the parameter,
Change the name to “title” and enter “My First Component!” for defaultValue.
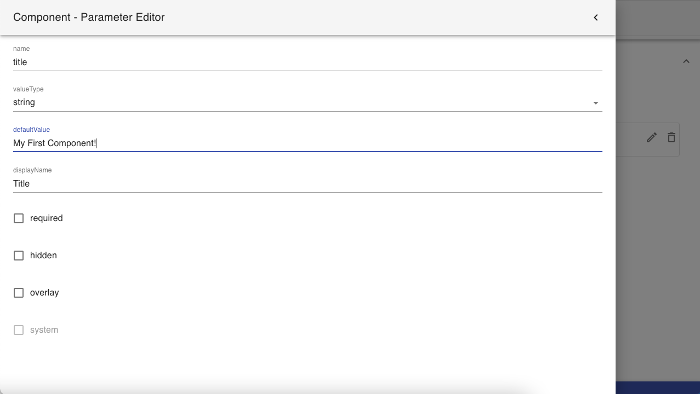
Click on < to return to the main component editor and click on the disk icon to save your component.
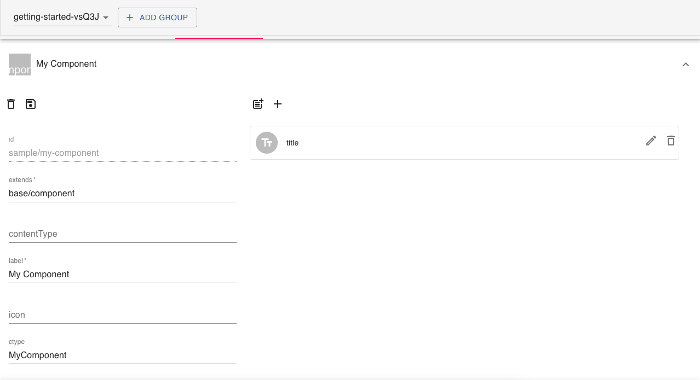
Alternatively...
If you prefer to use the Site Management API directly instead of the Site Development web app, you can use the Channel Component endpoint with a PUT request of the following URL:
PUT https://[account_name].bloomreach.io/management/site/v1/channels/getting-started-vpAcR/component_groups/sample/components/my-componentUse the following payload:
{ "id":"sample/my-component", "extends":"base/component", "hidden":false, "system":false, "xtype":null, "ctype":"MyComponent", "contentType":null, "label":"My Component", "icon":null, "parameters":[ { "name":"title", "valueType":"string", "required":false, "hidden":false, "overlay":false, "defaultValue":"My First Component!", "system":false, "config":null } ], "fieldGroups":[ ]}Add the Component to the Page
Now that you have configured the component, you can already add it to the page in your channel.
Open your channel in the Experience manager and make sure you have selected your development project in For project.
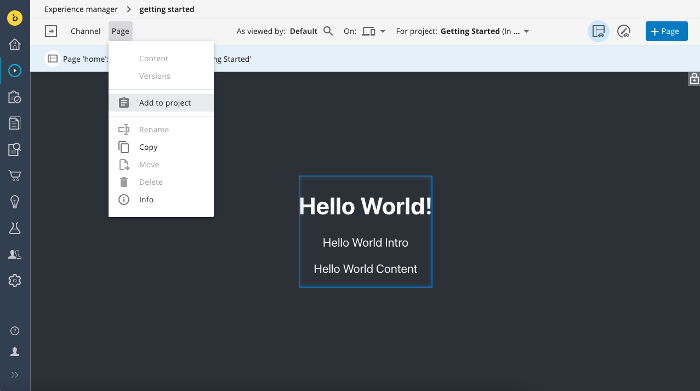
Before you can make changes to the page, it must be added to the development project. Open the Page menu and choose: Add to project:
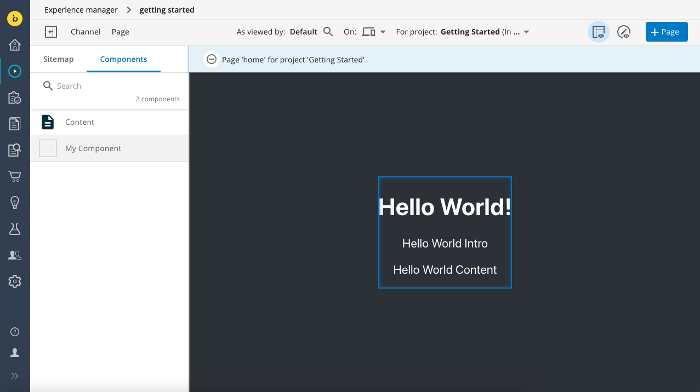
Open the left drawer and select the Components tab. “My Component” should be available in the library:
Click on My Component to select it, then click inside the container on the page to add the component. Because you did not yet implement the component in your frontend app, you will see a text Component “My Component” is not defined:
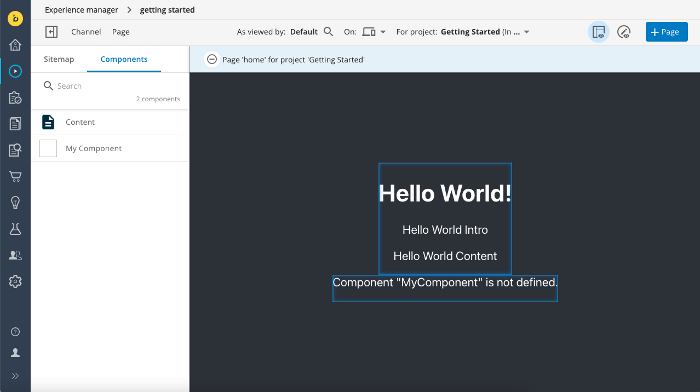
Everything in the backend is now in place and you can move on to implementing the component in your frontend app.
Implement the Frontend Code for the Component
In your frontend app, create a file src/components/MyComponent.jsx and implement the component as in the code below:
src/components/MyComponent.jsx
export function MyComponent({ component, page }) { const { title, showTitle } = component.getParameters(); return ( <div> <p>Title here below:</p> <h2>{showTitle && title}</h2> </div> );}In src/App.js, import MyComponent:
import {MyComponent} from "./components/MyComponent";And add MyComponent to the mapping property of the BrPage element:
}} mapping={{ Content, MyComponent }}>Return to the Experience manager. You should now see the component’s title property displayed. Click on the component to open the right drawer and edit the component properties. Try changing the title property to see the preview update automatically.
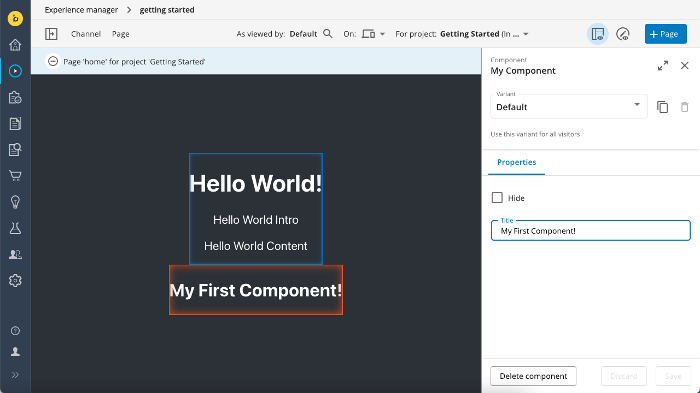
Congratulations, you developed your first component for Headless Experience Manager!
Full Code
Find the complete code for milestone 4 in React, Angular, and Vue in Github:
https://github.com/bloomreach/content-getting-started/tree/Milestone_4_Create_a_Component
Published at DZone with permission of Kenan Salic. See the original article here.
Opinions expressed by DZone contributors are their own.

Comments