Build End-To-End RAG Applications Using Airbyte and Snowflake Cortex
In this article, create a dedicated vector store directly within Snowflake — with no coding required — as the basis for AI applications.
Join the DZone community and get the full member experience.
Join For FreeAs a practical example, this article shows how to build an AI Product assistant — an AI chatbot capable of answering product-related questions using data from multiple sources. With the AI Product Assistant, you can ask questions across all your company’s data in one place.
You can utilize the Snowflake Cortex destination to load vector data into Snowflake, followed by leveraging Snowflake’s Cortex functions to perform Retrieval-Augmented Generation (RAG). Cortex offers general-purpose ML functions and LLM-specific functions, along with vector functions for semantic search, each backed by multiple models, all without needing to manage or host the underlying models or infrastructure.
With Airbyte’s newly launched Snowflake Cortex destination, users can create their own dedicated vector store directly within Snowflake — with no coding required! Creating a new pipeline with Snowflake Cortex takes only a few minutes, allowing you to load any of the 300-plus data sources into your new Snowflake-backed vector store.
We will use the following three data sources specific to Airbyte:
- Airbyte’s official documentation for the Snowflake Cortex destination
- GitHub issues, documenting planned features, known bugs, and work in progress.
- Zendesk tickets comprising customer details and inquiries/requests
RAG Overview
LLMs are general-purpose tools trained on an enormous corpus of data, allowing them to answer questions on almost any topic. However, if you are looking to extract information from your proprietary data, LLMs fall short, leading to potential inaccuracies and hallucinations. This is where RAG becomes super relevant. RAG addresses this limitation by enabling LLMs to access relevant and up-to-date data from any data source. The LLM can then use this information to answer relevant questions about your proprietary data.

Prerequisites
To follow through the whole process, you will need the following accounts. You can also work with your own custom sources or work with a single source:
- Airbyte cloud instance
- Snowflake account with Cortex functions enabled
- Open AI
- Source-specific: Google Drive, GitHub and Zendesk
Step 1: Set up Snowflake Cortex Destination
To select a destination in Airbyte Cloud, click on the Destinations tab on the left, select “New Destination” and filter for the destination you are looking for.

Configure the Snowflake Cortex destination in Airbyte:
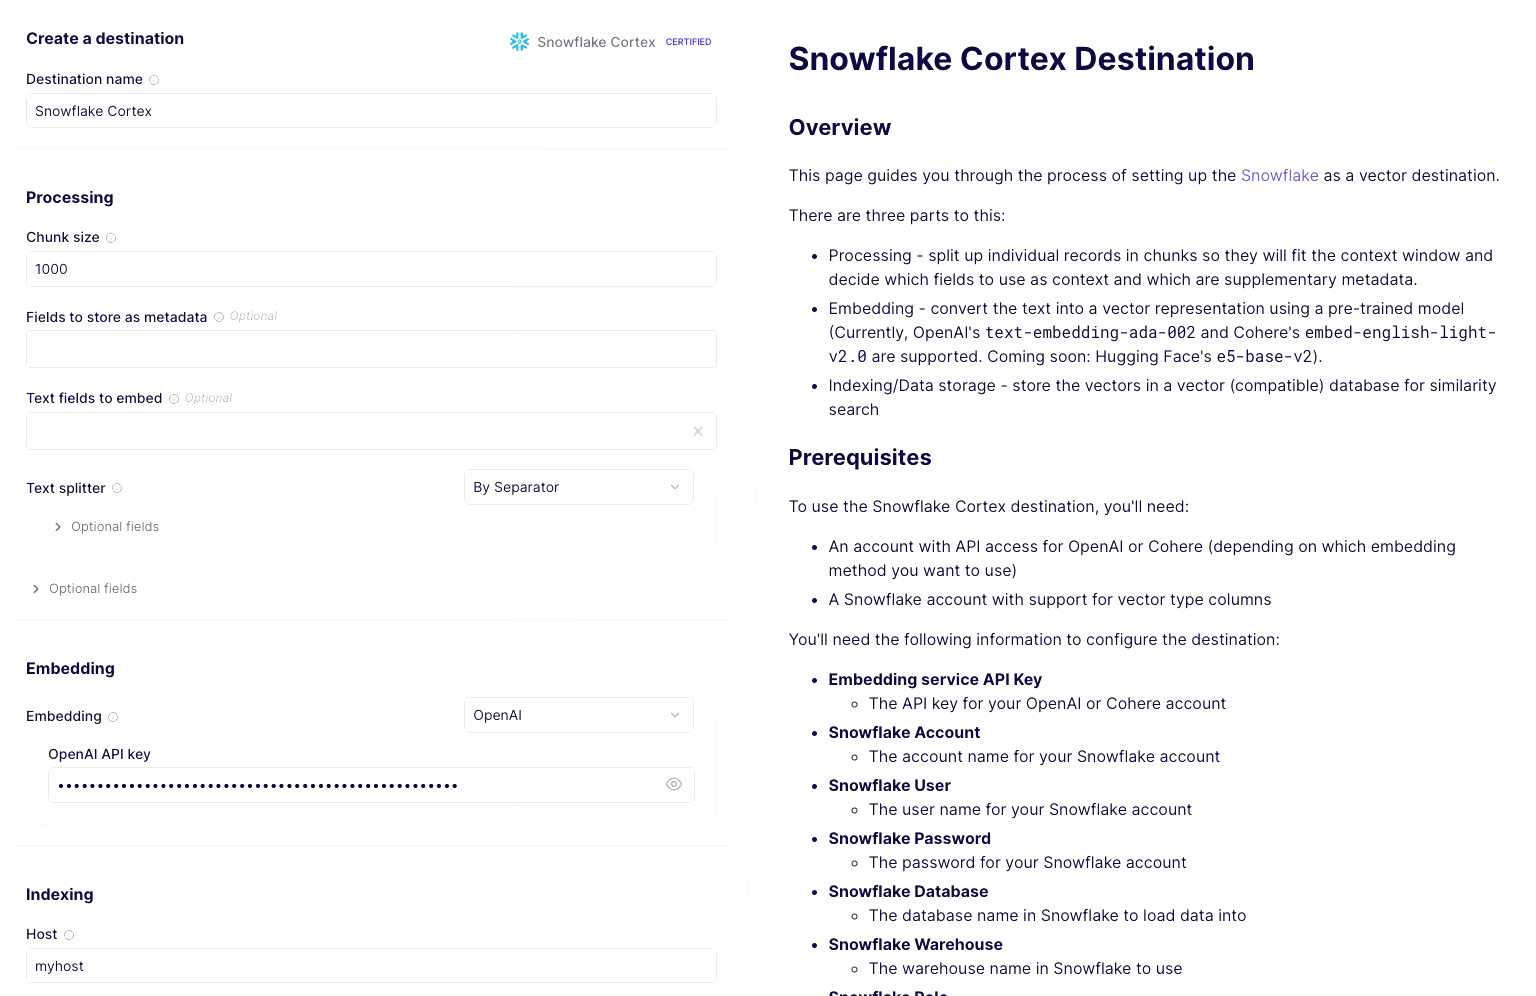
- Destination name: Provide a friendly name.
- Processing: Set chunk size to 1000 (the size refers to the number of tokens, not characters, so this is roughly 4KB of text. The best chunking is dependent on the data you are dealing with). You can leave other options empty. You would usually set the metadata and text fields to limit the reading of records to specific columns in a given stream.
- Embedding: Select OpenAI from the dropdown and provide your OpenAI API key for powering the embedding service. You can use any other available models also. Just remember to embed the questions you ask the product assistant with the same model.
- Indexing: Provide credentials for connecting to your Snowflake instance.
Step 2: Set up Google Drive, GitHub, and Zendesk Sources
To select a source, click on the sources tab on the left, select “New Source” and filter for the source you are looking for.
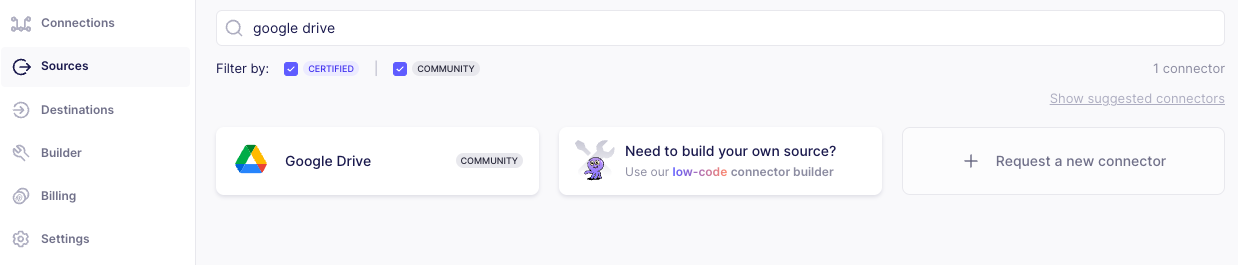
Google Drive
Select Google Drive on the sources page and configure the Google Drive source. You will need to authenticate and provide the following:
- Folder URL: Provide a link to your Google Drive folder. For this tutorial, you can move the snowflake-cortex.md file from here over to your Google Drive. Alternatively, you can use your own file. Refer to the accompanying documentation to learn about valid file formats.
- The list of streams to sync
- Format: Set the format dropdown to “Document File Type Format”
- Name: Provide a stream name.
GitHub
Select GitHub on the sources page and configure the GitHub source. You will need to authenticate with your GitHub account and provide the following:
- GitHub repositories: You can use the repo:
airbytehq/PyAirbyteor provide your own.
Zendesk
Optional: Select Zendesk on the sources pages and configure the Zendesk source. You will be able to authenticate using OAuth, or API token, and provide the following:
- Sub-domain name: if your Zendesk account URL is https://MY_SUBDOMAIN.zendesk.com/, then
MY_SUBDOMAINis your subdomain.
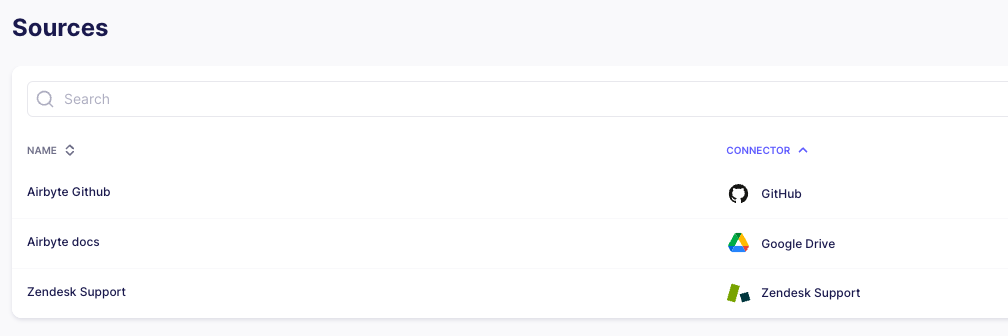
After you have set up all sources, this is what your source screen will look like:
Step 3: Set up All Connections
Next, we will set up the following connections:
- Google Drive → Snowflake Cortex
- Github → Snowflake Cortex
- Zendesk → Snowflake Cortex
Google Drive → Snowflake Cortex
Select the Connections tab on the left navigation in Airbyte Cloud; then click on “New connection” on the top right.
- In the configuration flow, pick the existing Google Drive source and Snowflake Cortex as the destination.
- On the select streams screen, select
Full Refresh|Overwriteas the sync mode. - On the configure connection, select the Schedule type to every 24 hours. Optionally provide a stream prefix for your table. In our case we prefix airbyte_ to all streams.
- Click on Finish and Sync.
- If everything went well, there should be a connection now synching data from Google Drive to Snowflake Cortex destination. Give the sync a few minutes to run. Once the first run has been completed, you can check Snowflake to confirm data sync. The data should be synched under a table named “[optional prefix][stream name]”
Github → Snowflake Cortex
Select the Connections tab on the left navigation in Airbyte Cloud; then click on “New connection” on the top right.
- In the configuration flow, pick the existing Github source and Snowflake Cortex as the destination.
- On the select streams screen, make sure all streams except
issuesare unchecked. Also, set the sync mode toFull Refresh|Overwrite. - On the configure connection screen, select the Schedule type every 24 hours. Optionally provide a stream prefix for your table. In our case, we prefix airbyte_ to all streams.
- Click on Finish and Sync.
- If everything goes well, there should be a connection now synching data from GitHub to the Snowflake Cortex destination. Give the sync a few minutes to complete. Once the first run has been completed, you can check Snowflake to confirm data sync. The data should be synched under a table named “[optional prefix]issues”
Zendesk → Snowflake Cortex
Select the Connections tab on the left navigation in Airbyte Cloud; then click on “New connection” on the top right.
- In the configuration flow, pick the existing Zendesk source and Snowflake Cortex as the destination.
- On the select streams screen, make sure all streams except
ticketsandusersare unchecked. Also, set the sync mode toFull Refresh | Overwrite. - On the configure connection screen, select the Schedule type to every 24 hours. Optionally provide a stream prefix for your table. In our case, we prefix
airbyte_to all streams. - Click on Finish and Sync.
- If everything goes well, there should be a connection now synching data from Zendesk to the Snowflake Cortex destination. Give the sync a few minutes to complete. Once the first run has been completed, you can check Snowflake to confirm data sync. The data should be synched under a table named “[optional prefix]tickets” and ““[optional prefix]tickets”
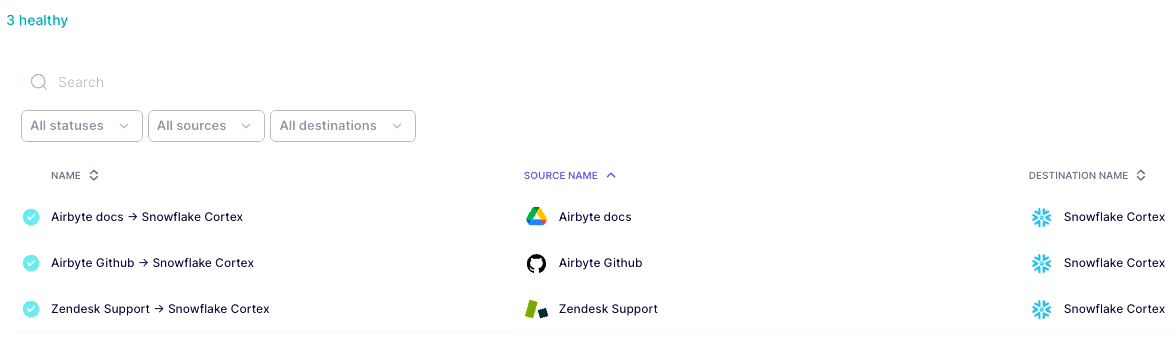
Once all the three connections are set, the Connections screen should look like this.
Step 4: Explore Data in Snowflake
You should see the following tables in Snowflake. Depending on your stream prefix, your table names might be different.
- Google Drive related:
airbyte_docs - GitHub related:
airbyte_github_issues - Zendesk related:
airbyte_zendesk_tickets,airbyte_zendesk_users
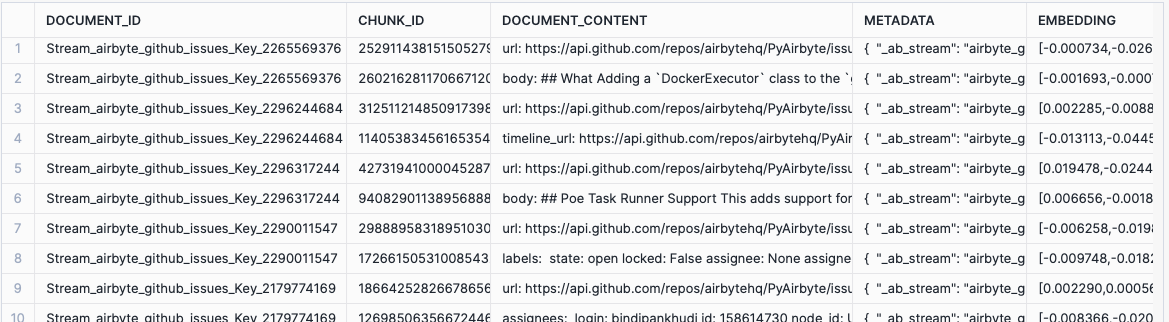
All tables have the following columns
DOCUMENT_ID: Unique based on primary keyCHUNK_ID: Randomly generated uuidDOCUMENT_CONTENT: Text context from sourceMETADATA: Metadata from sourceEMBEDDING: Vector representation of the document_content
Results from one of these tables should look like the following:
Step 5: RAG Building Blocks
In this section, we'll go over the essential building blocks of a Retrieval-Augmented Generation (RAG) system. This involves embedding the user's question, retrieving matching document chunks, and using a language model to generate the final answer. The first step is done using OpenAI, and the second and third steps are achieved using Snowflake’s Cortex functions. Let's break down these steps:
5.1 Embedding User’s Question
When a user asks a question, it's crucial to transform the question into a vector representation using the same model employed for generating vectors in the vector database. In this example, we use Langchain to access and use OpenAI's embedding model. This step ensures that the question is represented in a format that can be effectively compared with document vectors.

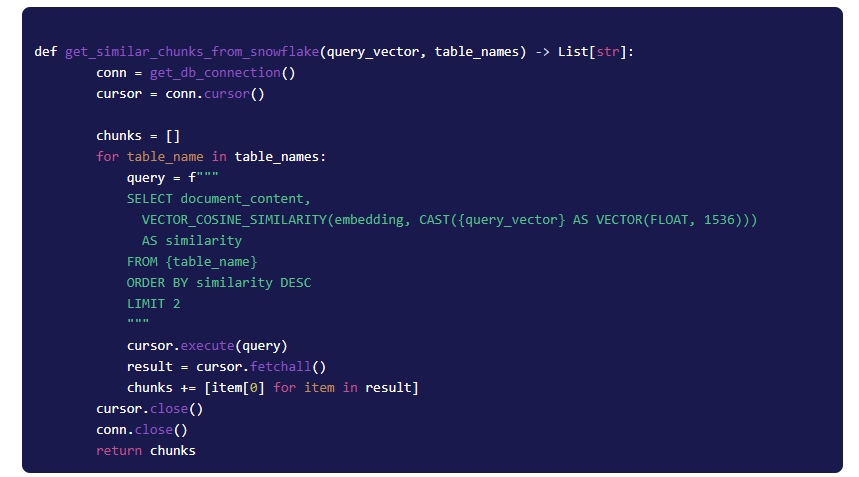
5.2 Retrieving Matching Chunks
The embedded question is then sent to Snowflake, where document chunks with similar vector representations are retrieved. All relevant chunks are returned.
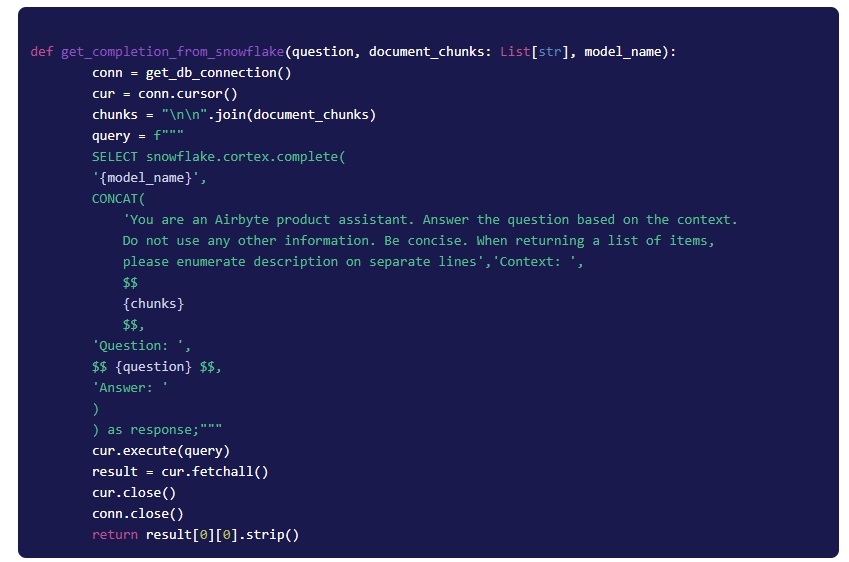
5.3 Passing Chunks to LLM for a Final Answer
All the chunks are concatenated into a single string and sent to the Snowflake (using Snowflake Python Connector) along with a prompt (set of instructions) and the user’s question.
Step 6: Putting It All Together
Google Colab
For convenience, we have integrated everything into a Google Collab notebook. Explore the fully functional RAG code in Google Colab.
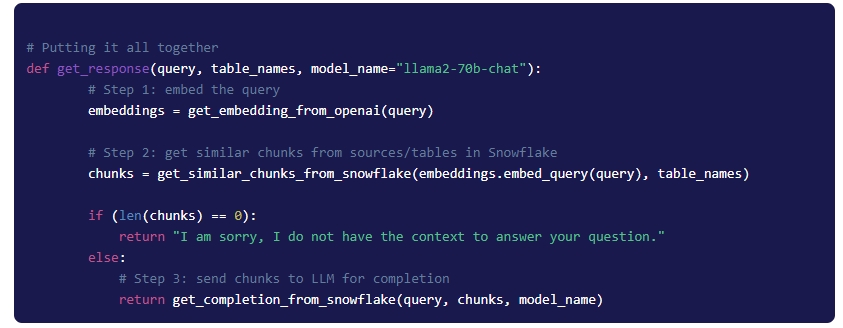
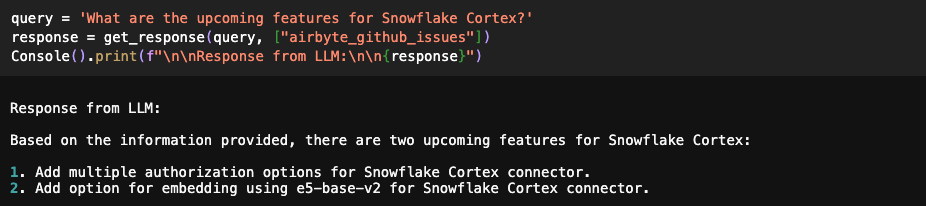
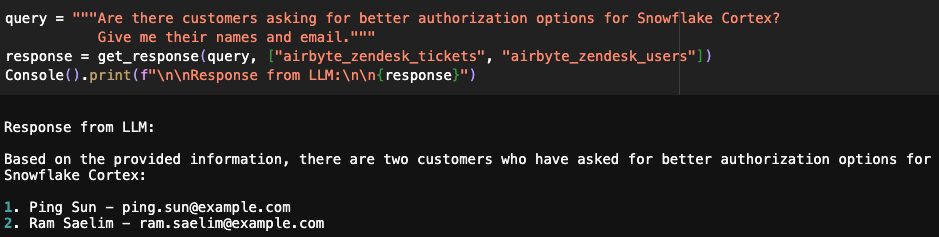
Every time a question is asked, we pass the list of relevant tables and models. For the first question below, the answer is retrieved from Airbyte docs only, whereas, for the second question, the answer is retrieved from GitHub issues.

You can also provide multiple tables as input, and the resulting response will be a combination of data from both sources.
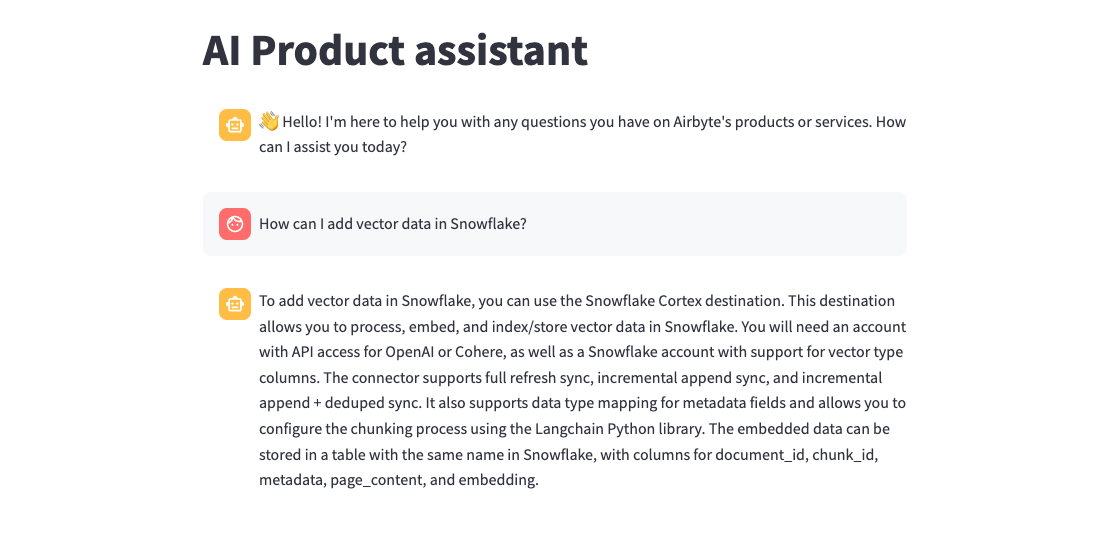
Streamlit App
We have also integrated the above RAG functionality into a Streamlit chat app. Explore the fully functional code on GitHub.
Conclusion
Using the LLM capabilities of Snowflake Cortex in combination with Airbyte’s catalog of 300-plus connectors, you can build an insightful AI assistant to answer questions across a number of data sources. We have kept things simple here, but as your number of sources increases, consider integrating an AI agent to interpret user intent and retrieve answers from the appropriate source.
Published at DZone with permission of John Lafleur. See the original article here.
Opinions expressed by DZone contributors are their own.
Comments