Build Reactive REST APIs With Spring WebFlux
See how to Build Reactive REST APIs with Spring WebFlux. This explains the advantages we get with Reactive APIs and the reactive specification.
Join the DZone community and get the full member experience.
Join For FreeIn this article, we will see how to build reactive REST APIs with Spring WebFlux. Before jumping into the reactive APIs, let us see how the systems evolved, what problems we see with the traditional REST implementations, and the demands from modern APIs.
If you look at the expectations from legacy systems to modern systems described below,
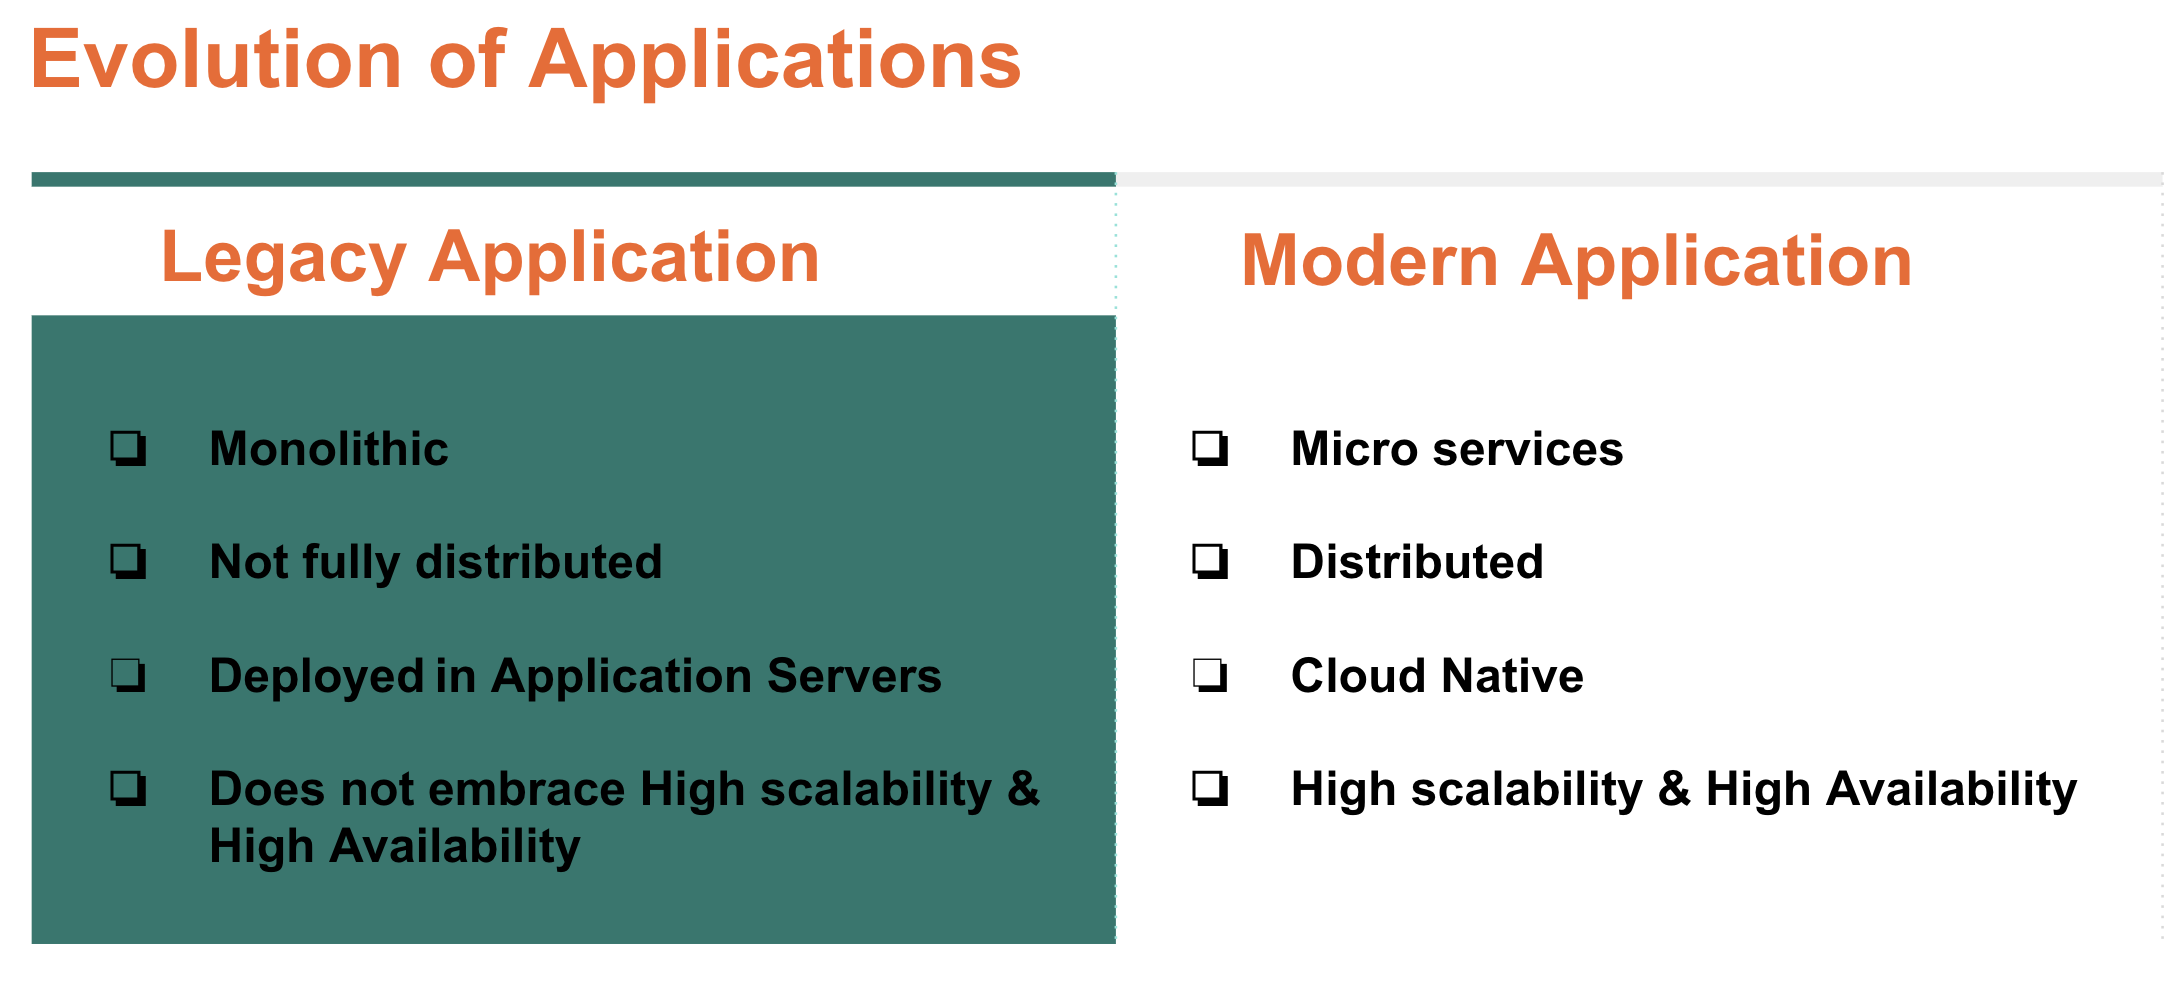
The expectations from the modern systems are: the applications should be distributed, Cloud Native, embracing for high availability, and scalability. So the efficient usage of system resources is essential. Before jumping into Why reactive programming to build REST APIs? Let us see how the traditional REST APIs request processing works.
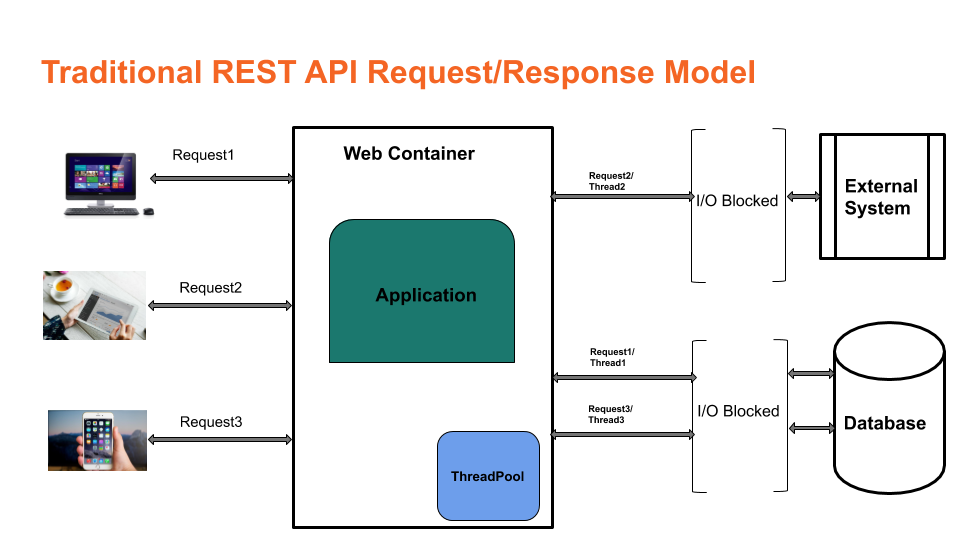
Below are the issues what we have with the traditional REST APIs,
- Blocking and Synchronous → The request is blocking and synchronous. The request thread will be waiting for any blocking I/O and the thread is not freed to return the response to the caller until the I/O wait is over.
- Thread per request → The web container uses a thread-per-request model. This limits the number of concurrent requests to handle. Beyond certain requests, the container queues the requests that eventually impact the performance of the APIs.
- Limitations to handle high concurrent users → As the web container uses a thread-per-request model, we cannot handle high concurrent requests.
- No better utilization of system resources → The threads will be blocking for I/O and sitting idle. But, the web container cannot accept more requests. During this scenario, we are not able to utilize the system resources efficiently.
- No backpressure support → We cannot apply backpressure from the client or the server. If there is a sudden surge of requests the server or client outages may happen. After that, the application will not be accessible to the users. If we have backpressure support, the application should sustain during the heavy load rather than the unavailability.
Let us see how we can solve the above issues using reactive programming. Below are the advantages we will get with reactive APIs.
- Asynchronous and Non-Blocking → Reactive programming gives the flexibility to write asynchronous and Non-Blocking applications.
- Event/Message Driven→ The system will generate events or messages for any activity. For example, the data coming from the database is treated as a stream of events.
- Support for backpressure → Gracefully we can handle the pressure from one system to on to the other system by applying back pressure to avoid denial of service.
- Predictable application response time → As the threads are asynchronous and non-blocking, the application response time is predictable under the load.
- Better utilization of system resources → As the threads are asynchronous and non-blocking, the threads will not be hogged for the I/O. With fewer threads, we could able to support more user requests.
- Scale based on the load
- Move away from thread per request → With the reactive APIs, we are moving away from thread per request model as the threads are asynchronous and non-blocking. Once the request is made, it creates an event with the server and the request thread will be released to handle other requests.
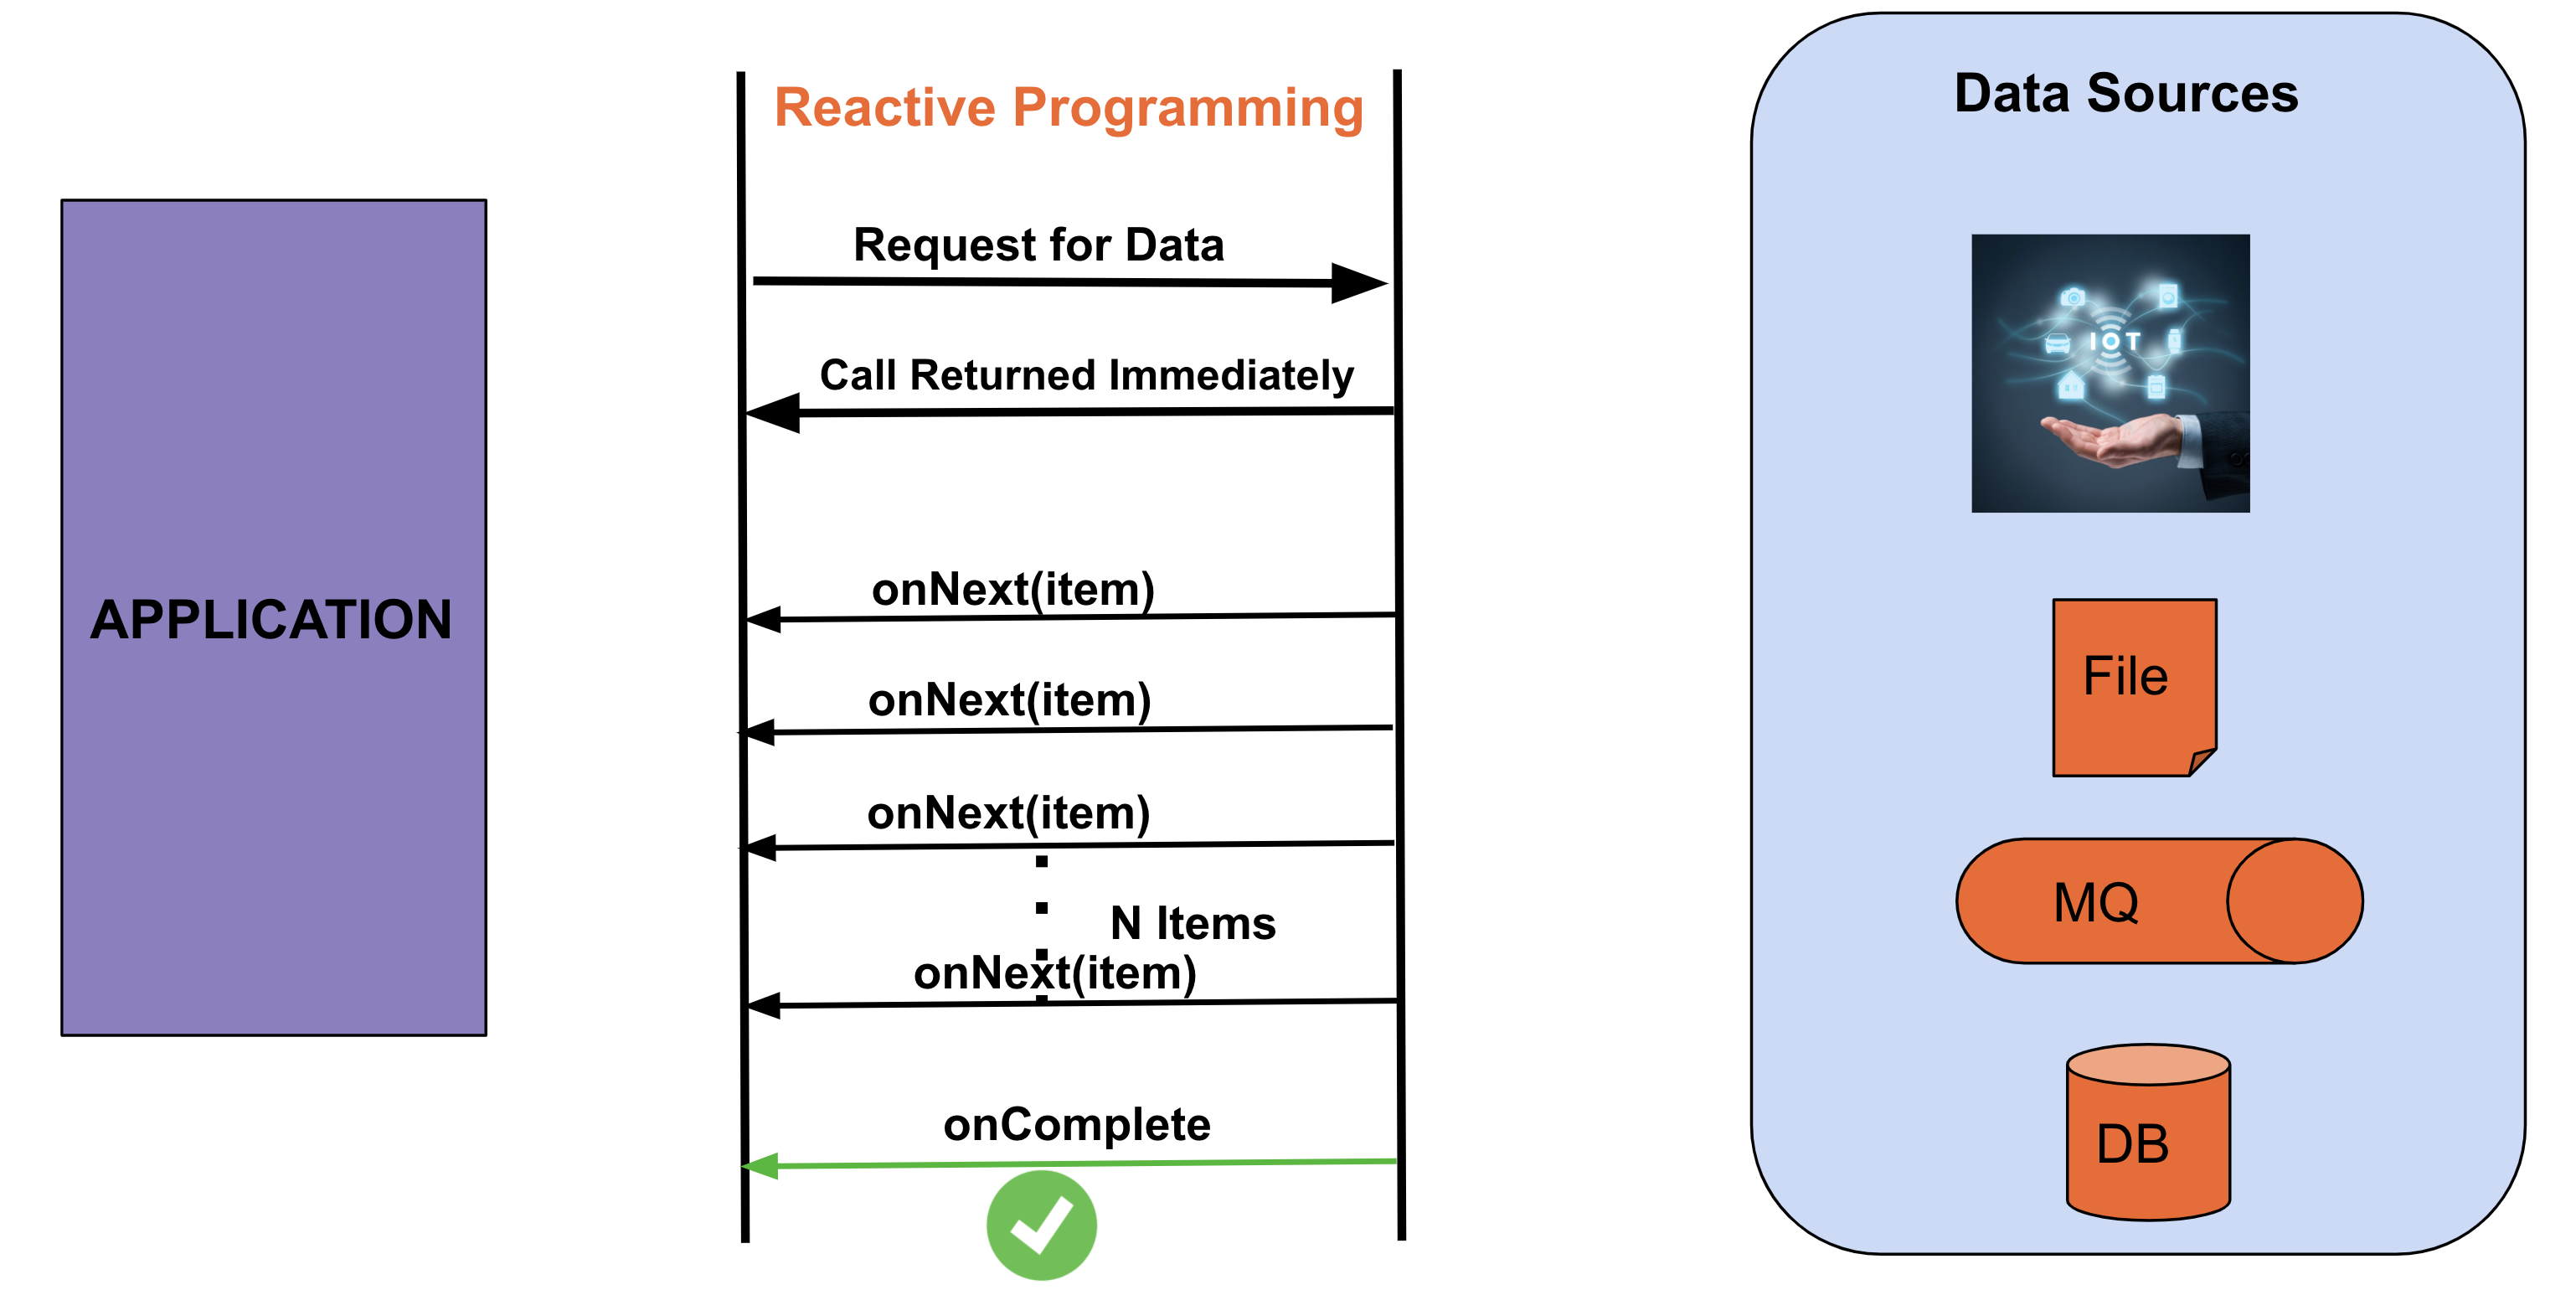
Now, let us see how Reactive Programming works. In the below example, once the application makes a call to get the data from a data source, the thread will be returned immediately, and the data from the data source will come as a data/event stream. Here, the application is a subscriber, and the data source is a publisher. Upon the completion of the data stream, the onComplete event will be triggered.
Below is another scenario where the publisher will trigger an onError event if any exception happens. 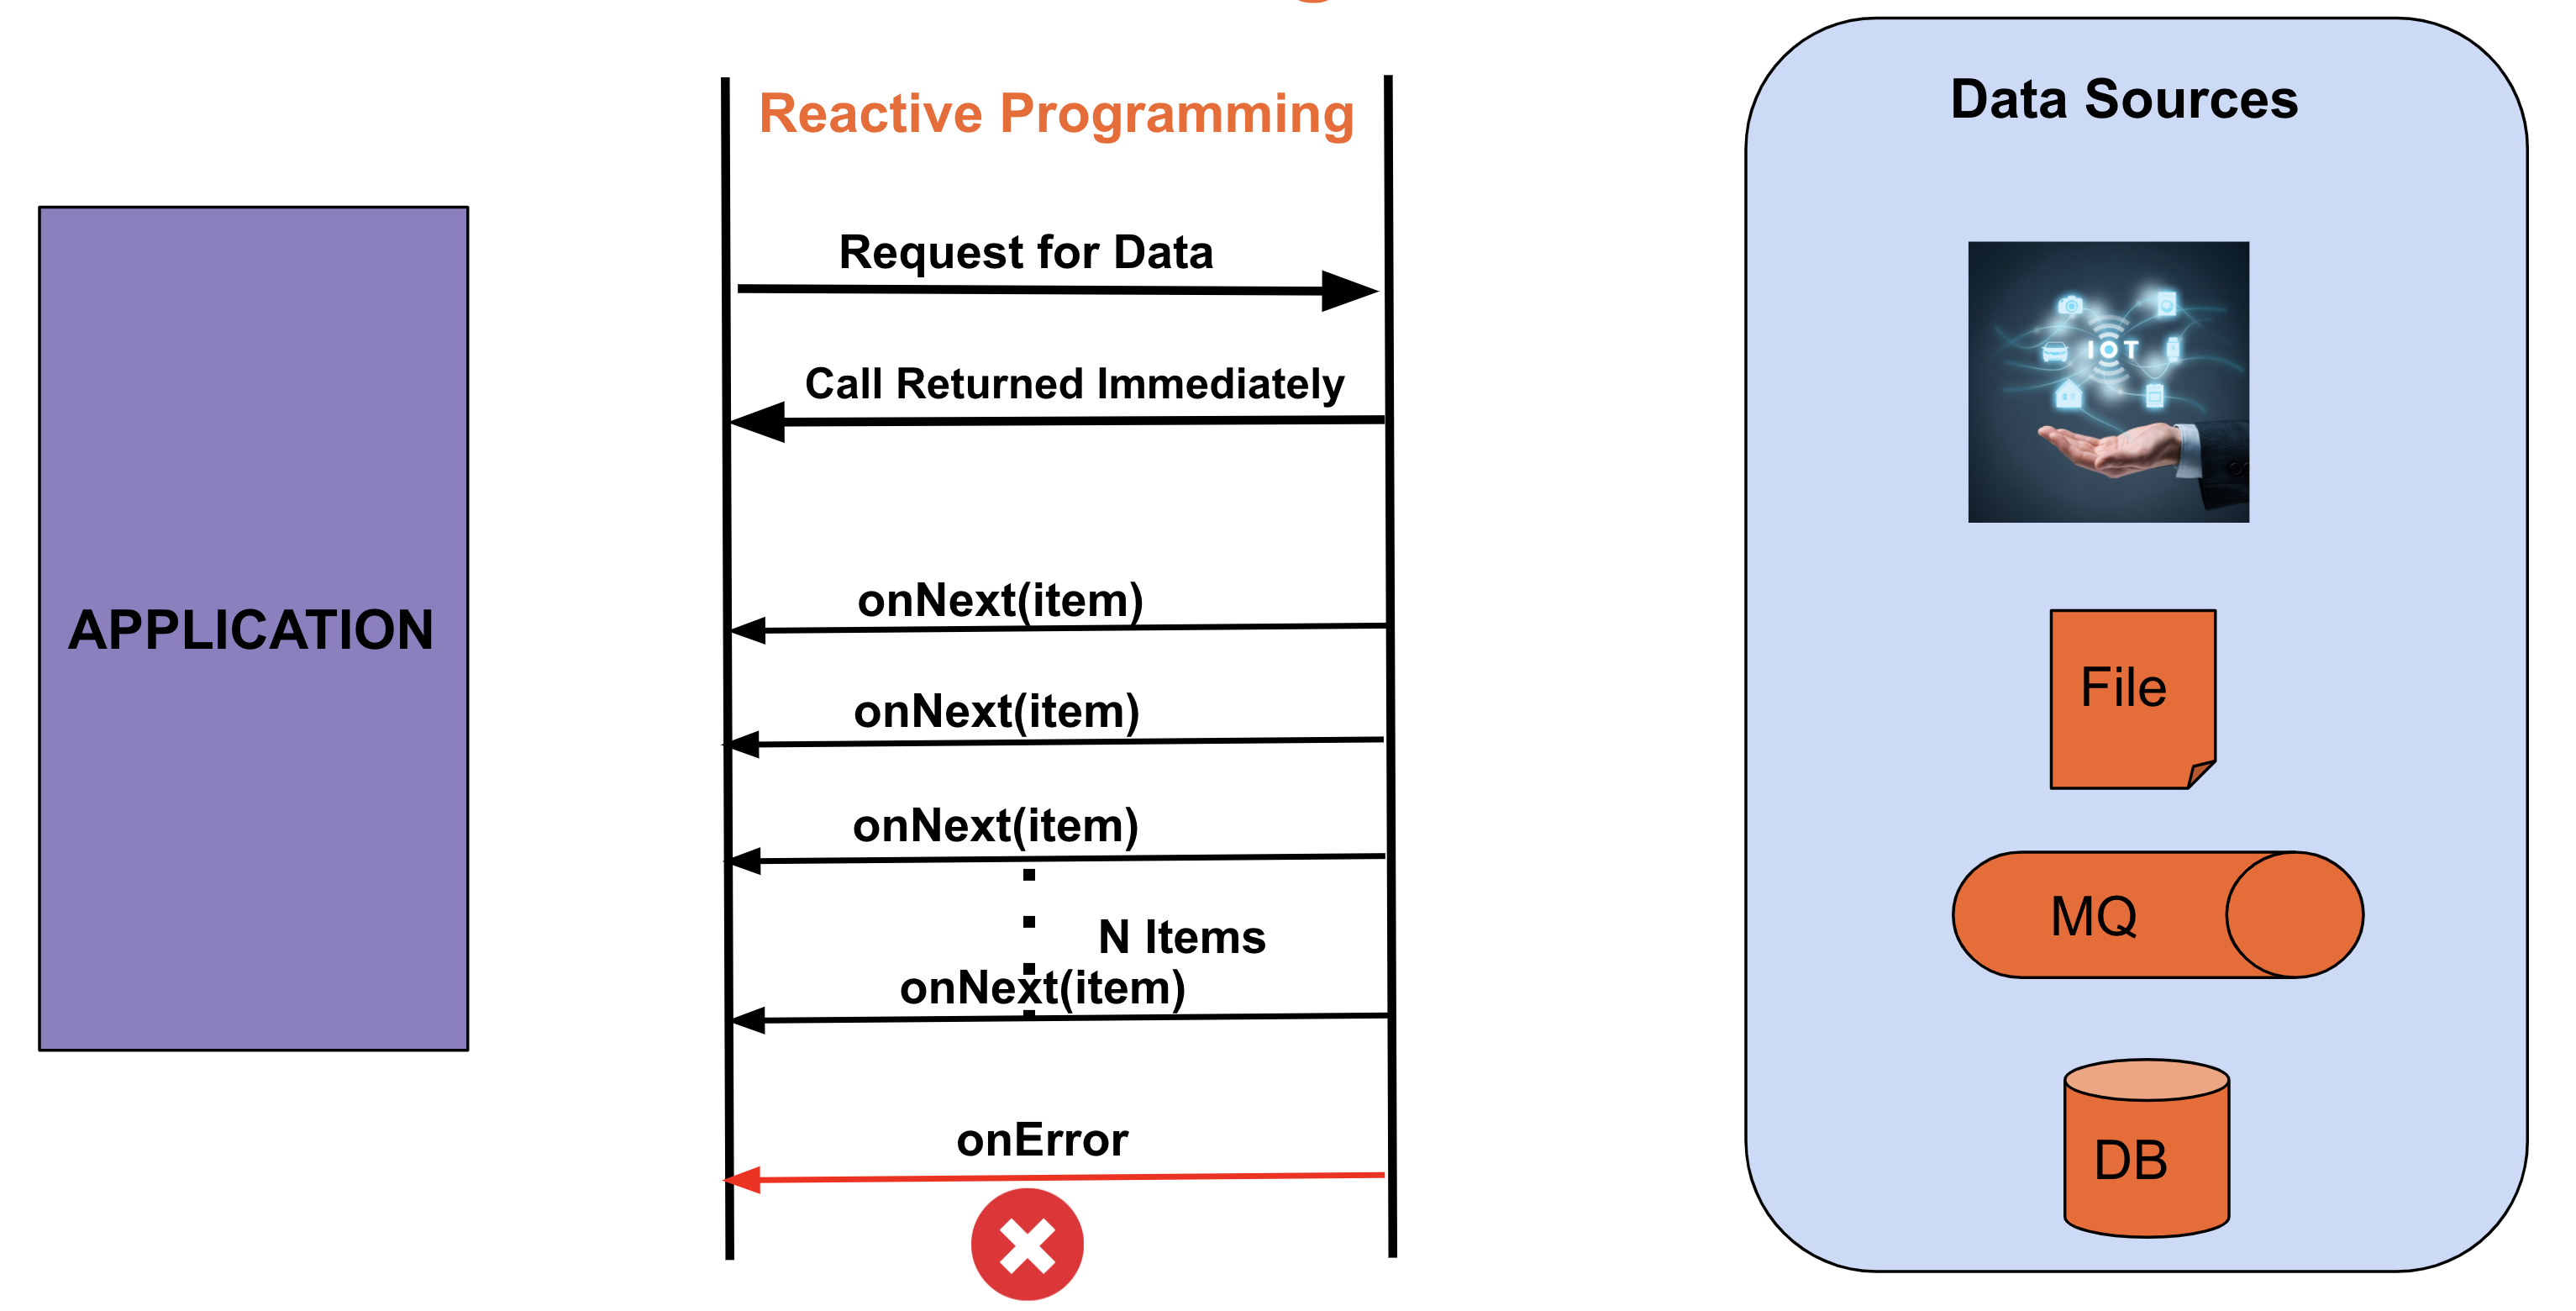
In some cases, there might not be any items to deliver from the publisher. For example, deleting an item from the database. In that case, the publisher will trigger the onComplete/onError event immediately without calling onNext event, as there is no data to return.
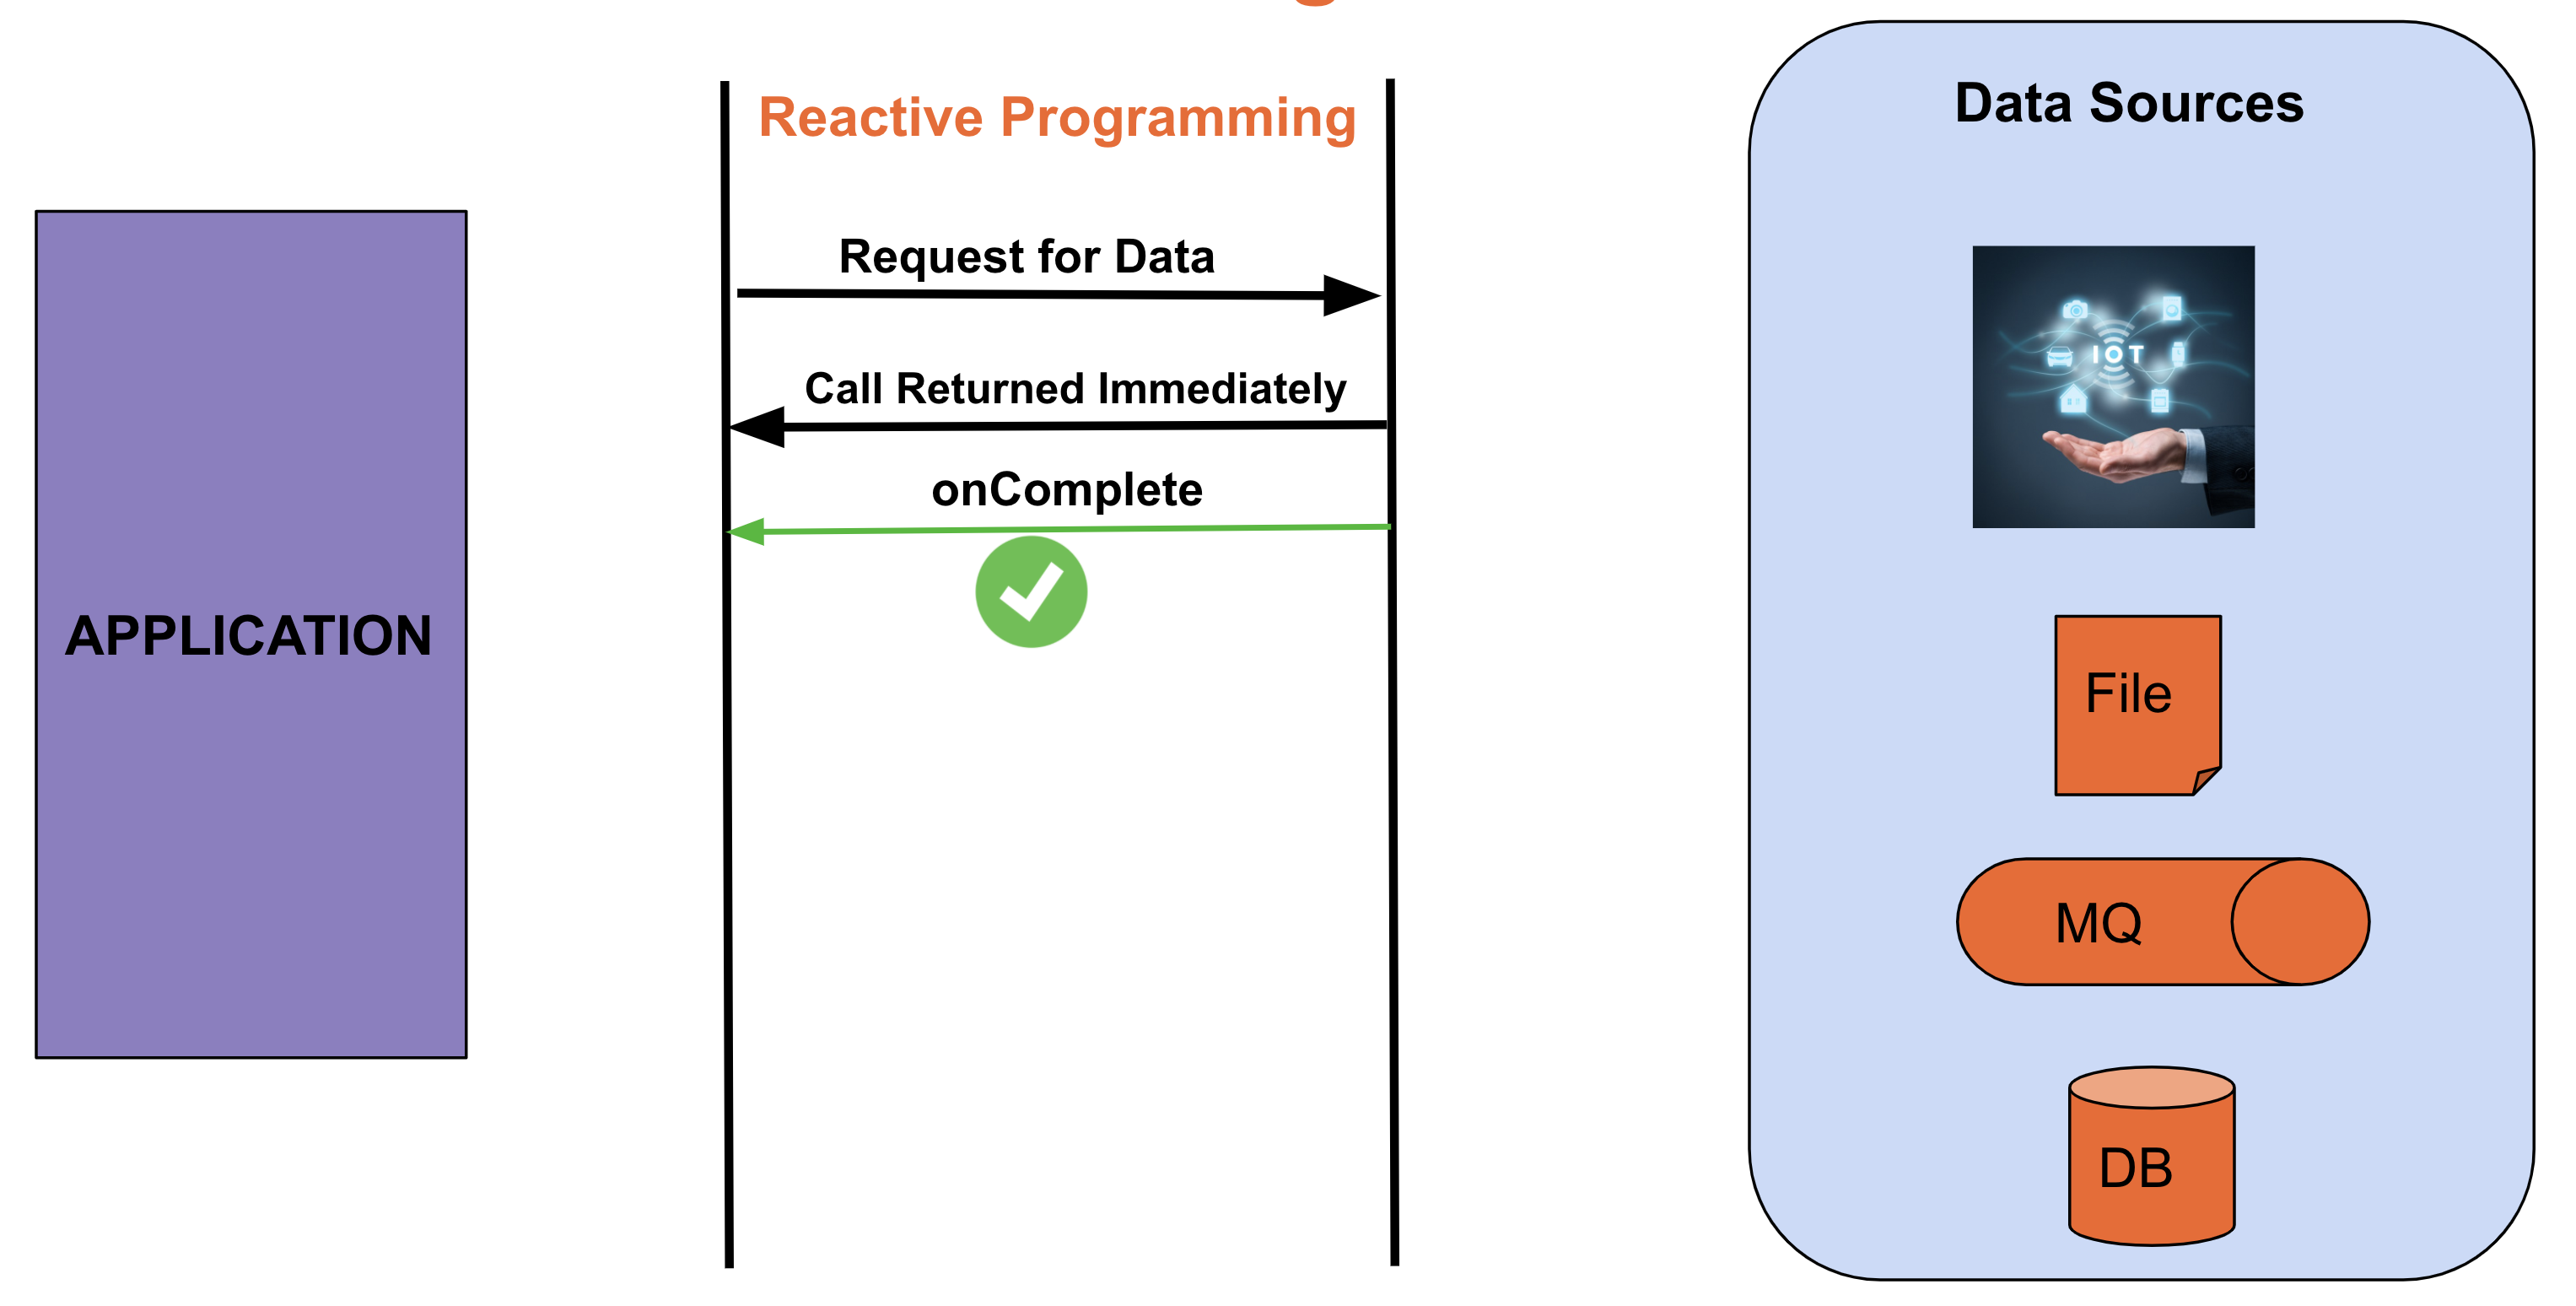
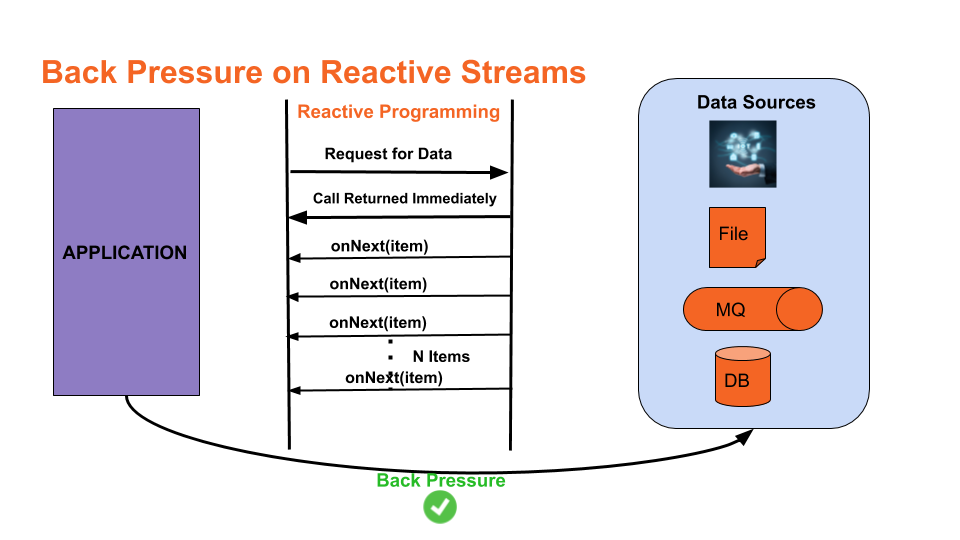
Now, let us see what is backpressure and how we can apply backpressure to the reactive streams. For example, we have a client application that is requesting data from another service. The service is able to publish the events at the rate of 1000TPS but the client application is able to process the events at the rate of 200TPS.
In this case, the client application should buffer the rest of the data to process. Over the subsequent calls, the client application may buffer more data and eventually run out of memory. This causes the cascading effect on the other applications which depends on the client application. To avoid this the client application can ask the service to buffer the events at their end and push the events at the rate of the client application. This is called backpressure. The below diagram depicts the same.
Now, We will see the reactive streams specification and one of its implementation called Project Reactor. Reactive Streams specification has the following interfaces defined. Let us see the details of those interfaces.
Publisher → A Publisher is a provider of a potentially unlimited number of sequenced elements, publishing them as requested by its Subscriber(s)
public interface Publisher<T> {
public void subscribe(Subscriber<? super T> s);
}
Subscriber → A Subscriber is a consumer of a potentially unbounded number of sequenced elements.
xxxxxxxxxx
public interface Subscriber<T> {
public void onSubscribe(Subscription s);
public void onNext(T t);
public void onError(Throwable t);
public void onComplete();
}
Subscription → A Subscription represents a one-to-one lifecycle of a Subscriber subscribing to a Publisher.
xxxxxxxxxx
public interface Subscription {
public void request(long n);
public void cancel();
}
Processor → A Processor represents a processing stage — which is both a Subscriber and a Publisher and obeys the contracts of both.
The class diagram of the reactive streams specification is given below. 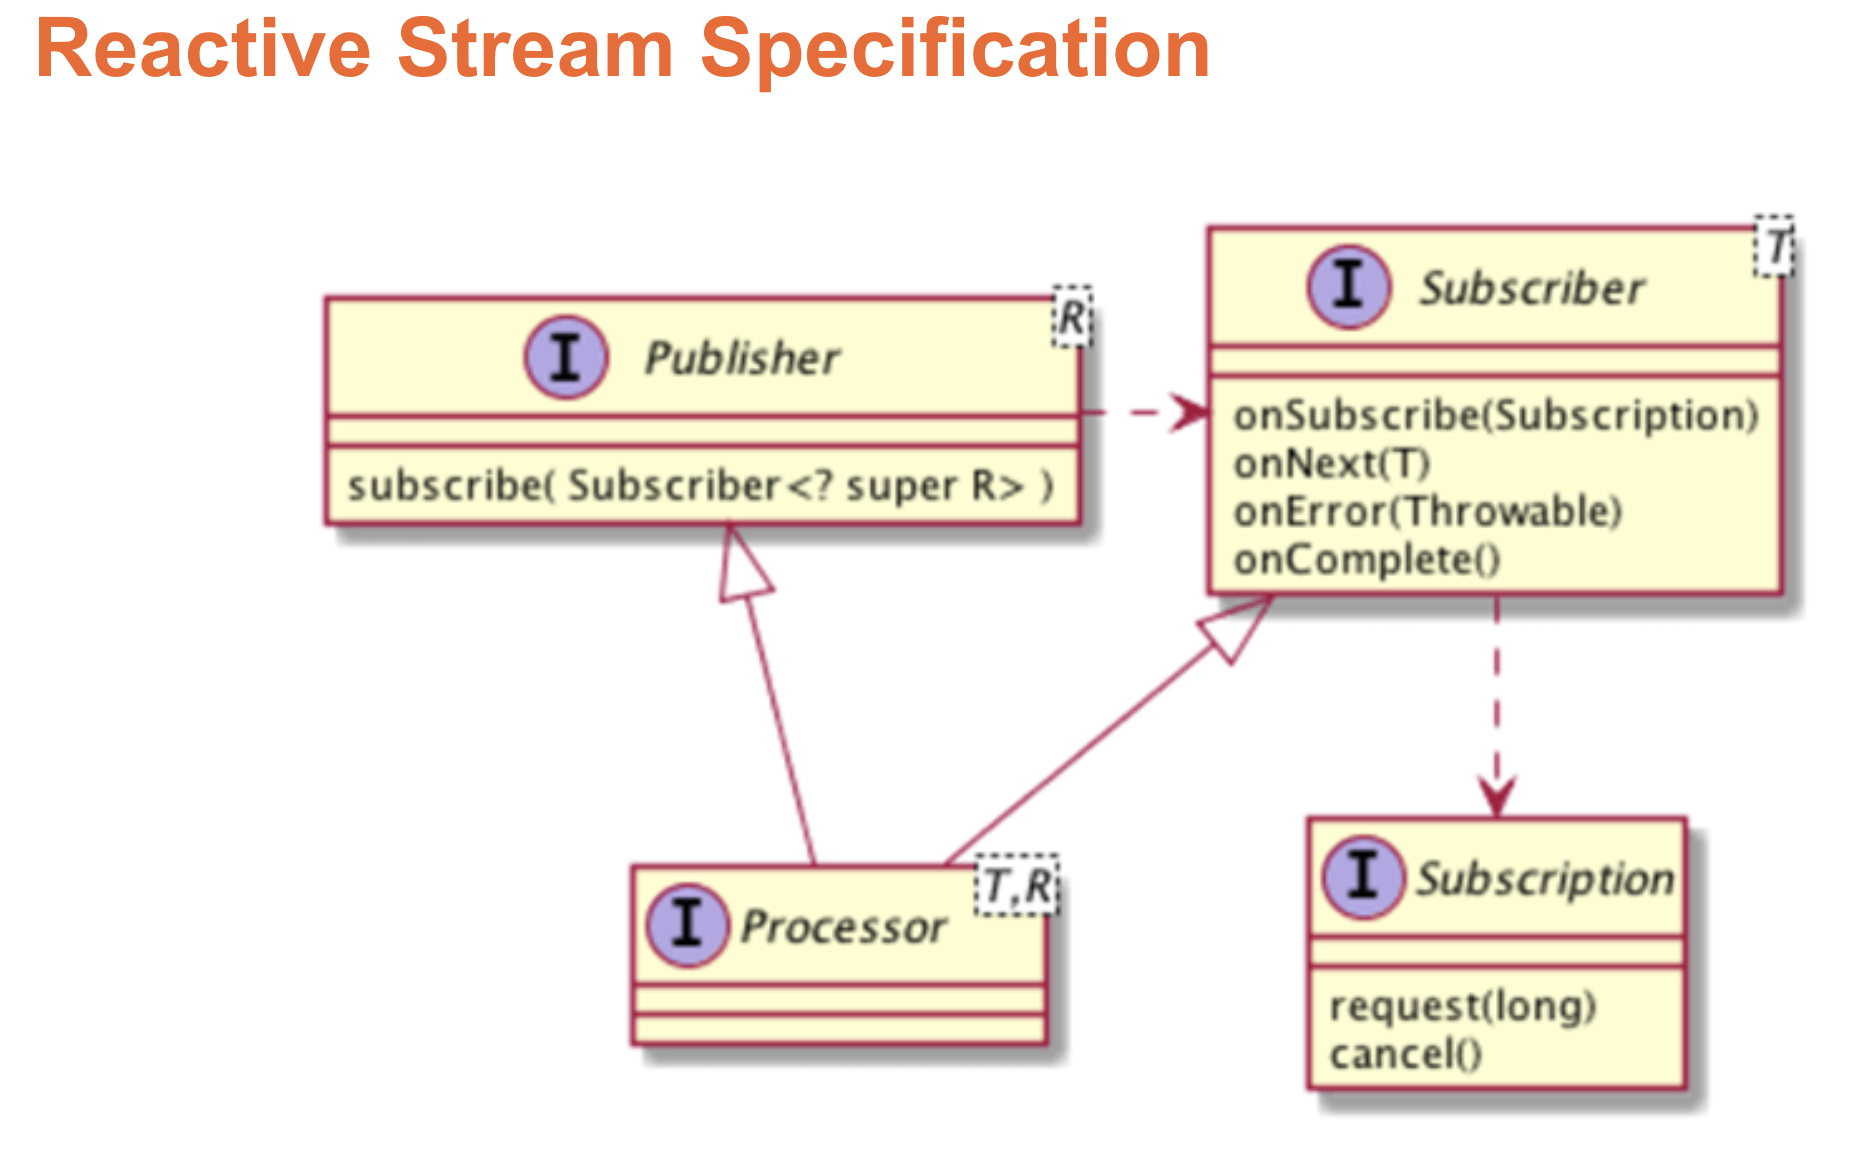
The reactive streams specification has many implementations. Project Reactor is one of the implementations. The Reactor is fully non-blocking and provides efficient demand management. The Reactor offers two reactive and composable APIs, Flux [N], and Mono [0|1], which extensively implement Reactive Extensions. Reactor offers Non-Blocking, backpressure-ready network engines for HTTP (including Websockets), TCP, and UDP. It is well-suited for a microservices architecture.
Flux → It is a Reactive Streams Publisher with rx operators that emits 0 to N elements, and then complete (successfully or with an error). The marble diagram of the Flux is represented below.
 Image Credit: https://projectreactor.io
- Mono→ It is a Reactive Streams
Publisherwith basic rx operators that completes successfully by emitting 0 to 1 element, or with an error. The marble diagram of the Mono is represented below.

As Spring 5.x comes with Reactor implementation, if we want to build REST APIs using imperative style programming with Spring servlet stack, it still supports. Below is the diagram which explains how Spring supports both reactive and servlet stack implementations.

Now, we will see an application to expose reactive REST APIs. In this application, we used:
- Spring Boot with WebFlux
- Spring Data for Cassandra with Reactive Support
- Cassandra Database
Below is the high-level architecture of the application. 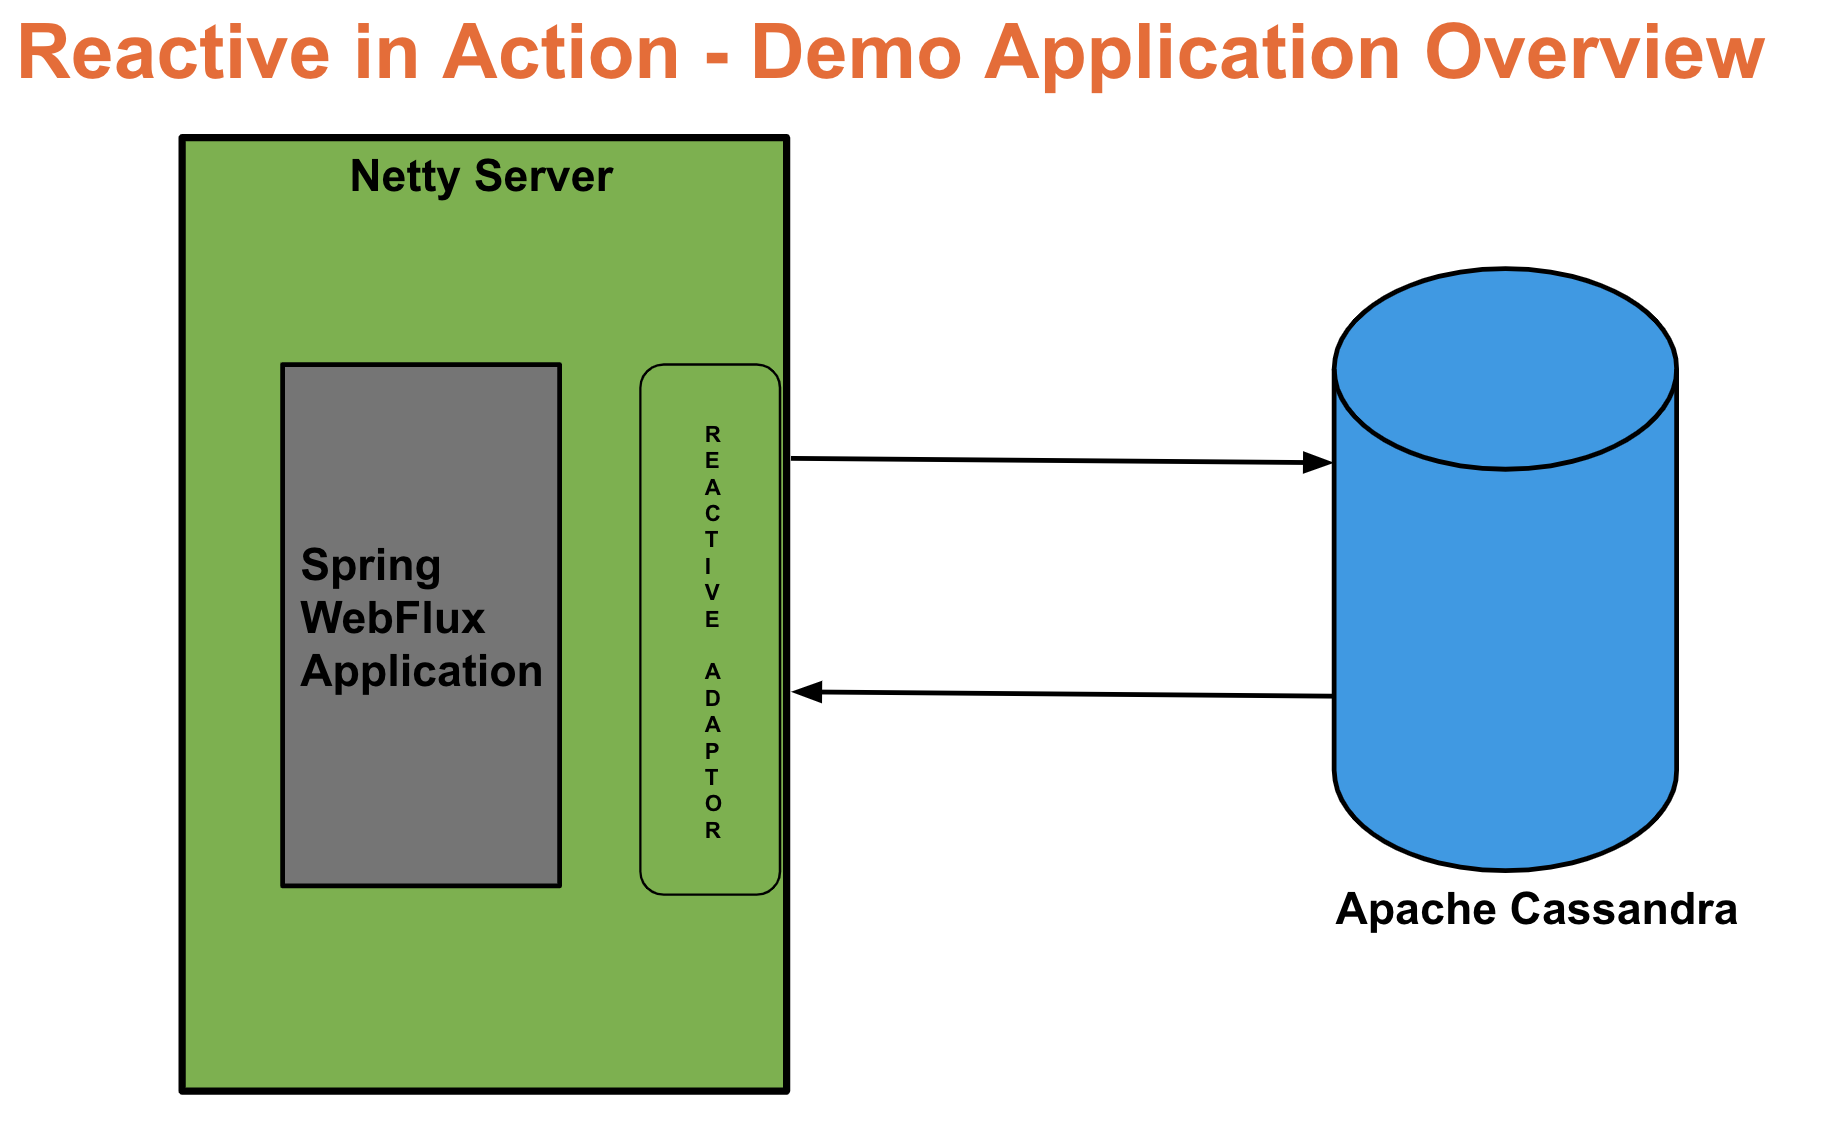
Let us look at the build.gradle file to see what dependencies are included to work with the Spring WebFlux.
xxxxxxxxxx
plugins {
id 'org.springframework.boot' version '2.2.6.RELEASE'
id 'io.spring.dependency-management' version '1.0.9.RELEASE'
id 'java'
}
group = 'org.smarttechie'
version = '0.0.1-SNAPSHOT'
sourceCompatibility = '1.8'
repositories {
mavenCentral()
}
dependencies {
implementation 'org.springframework.boot:spring-boot-starter-data-cassandra-reactive'
implementation 'org.springframework.boot:spring-boot-starter-webflux'
testImplementation('org.springframework.boot:spring-boot-starter-test') {
exclude group: 'org.junit.vintage', module: 'junit-vintage-engine'
}
testImplementation 'io.projectreactor:reactor-test'
}
test {
useJUnitPlatform()
}
In this application, I have exposed the below mentioned APIs. You can download the source code from GitHub.
| Endpoint | URI | Response |
| Create a Product | /product | Created product as Mono |
| All products | /products | returns all products as Flux |
| Delate a product | /product/{id} | Mono |
| Update a product | /product/{id} | Updated product as Mono |
xxxxxxxxxx
package org.smarttechie.controller;
import org.smarttechie.model.Product;
import org.smarttechie.repository.ProductRepository;
import org.smarttechie.service.ProductService;
import org.springframework.beans.factory.annotation.Autowired;
import org.springframework.http.HttpStatus;
import org.springframework.http.MediaType;
import org.springframework.http.ResponseEntity;
import org.springframework.web.bind.annotation.*;
import reactor.core.publisher.Flux;
import reactor.core.publisher.Mono;
public class ProductController {
private ProductService productService;
/**
* This endpoint allows to create a product.
* @param product - to create
* @return - the created product
*/
("/product")
(HttpStatus.CREATED)
public Mono<Product> createProduct( Product product){
return productService.save(product);
}
/**
* This endpoint gives all the products
* @return - the list of products available
*/
("/products")
public Flux<Product> getAllProducts(){
return productService.getAllProducts();
}
/**
* This endpoint allows to delete a product
* @param id - to delete
* @return
*/
("/product/{id}")
public Mono<Void> deleteProduct( int id){
return productService.deleteProduct(id);
}
/**
* This endpoint allows to update a product
* @param product - to update
* @return - the updated product
*/
("product/{id}")
public Mono<ResponseEntity<Product>> updateProduct( Product product){
return productService.update(product);
}
}
As we are building reactive APIs, we can build APIs with a functional style programming model without using RestController. In this case, we need to have a router and a handler component as shown below.
xxxxxxxxxx
package org.smarttechie.router;
import org.smarttechie.handler.ProductHandler;
import org.springframework.context.annotation.Bean;
import org.springframework.context.annotation.Configuration;
import org.springframework.http.MediaType;
import org.springframework.web.reactive.function.server.RouterFunction;
import org.springframework.web.reactive.function.server.RouterFunctions;
import org.springframework.web.reactive.function.server.ServerResponse;
import static org.springframework.web.reactive.function.server.RequestPredicates.*;
public class ProductRouter {
/**
* The router configuration for the product handler.
* @param productHandler
* @return
*/
public RouterFunction<ServerResponse> productsRoute(ProductHandler productHandler){
return RouterFunctions
.route(GET("/products").and(accept(MediaType.APPLICATION_JSON))
,productHandler::getAllProducts)
.andRoute(POST("/product").and(accept(MediaType.APPLICATION_JSON))
,productHandler::createProduct)
.andRoute(DELETE("/product/{id}").and(accept(MediaType.APPLICATION_JSON))
,productHandler::deleteProduct)
.andRoute(PUT("/product/{id}").and(accept(MediaType.APPLICATION_JSON))
,productHandler::updateProduct);
}
}
xxxxxxxxxx
package org.smarttechie.handler;
import org.smarttechie.model.Product;
import org.smarttechie.service.ProductService;
import org.springframework.beans.factory.annotation.Autowired;
import org.springframework.http.MediaType;
import org.springframework.stereotype.Component;
import org.springframework.web.reactive.function.server.ServerRequest;
import org.springframework.web.reactive.function.server.ServerResponse;
import reactor.core.publisher.Mono;
import static org.springframework.web.reactive.function.BodyInserters.fromObject;
public class ProductHandler {
private ProductService productService;
static Mono<ServerResponse> notFound = ServerResponse.notFound().build();
/**
* The handler to get all the available products.
* @param serverRequest
* @return - all the products info as part of ServerResponse
*/
public Mono<ServerResponse> getAllProducts(ServerRequest serverRequest) {
return ServerResponse.ok()
.contentType(MediaType.APPLICATION_JSON)
.body(productService.getAllProducts(), Product.class);
}
/**
* The handler to create a product
* @param serverRequest
* @return - return the created product as part of ServerResponse
*/
public Mono<ServerResponse> createProduct(ServerRequest serverRequest) {
Mono<Product> productToSave = serverRequest.bodyToMono(Product.class);
return productToSave.flatMap(product ->
ServerResponse.ok()
.contentType(MediaType.APPLICATION_JSON)
.body(productService.save(product), Product.class));
}
/**
* The handler to delete a product based on the product id.
* @param serverRequest
* @return - return the deleted product as part of ServerResponse
*/
public Mono<ServerResponse> deleteProduct(ServerRequest serverRequest) {
String id = serverRequest.pathVariable("id");
Mono<Void> deleteItem = productService.deleteProduct(Integer.parseInt(id));
return ServerResponse.ok()
.contentType(MediaType.APPLICATION_JSON)
.body(deleteItem, Void.class);
}
/**
* The handler to update a product.
* @param serverRequest
* @return - The updated product as part of ServerResponse
*/
public Mono<ServerResponse> updateProduct(ServerRequest serverRequest) {
return productService.update(serverRequest.bodyToMono(Product.class)).flatMap(product ->
ServerResponse.ok()
.contentType(MediaType.APPLICATION_JSON)
.body(fromObject(product)))
.switchIfEmpty(notFound);
}
}
So far, we have seen how to expose reactive REST APIs. With this implementation, I have done a simple benchmarking on reactive APIs versus the non-reactive APIs (built non-reactive APIs using Spring RestController) using Gatling. Below are the comparison metrics between the reactive and non-reactive APIs. This is not an extensive benchmarking. So, before adopting please make sure to do extensive benchmarking for your use case.
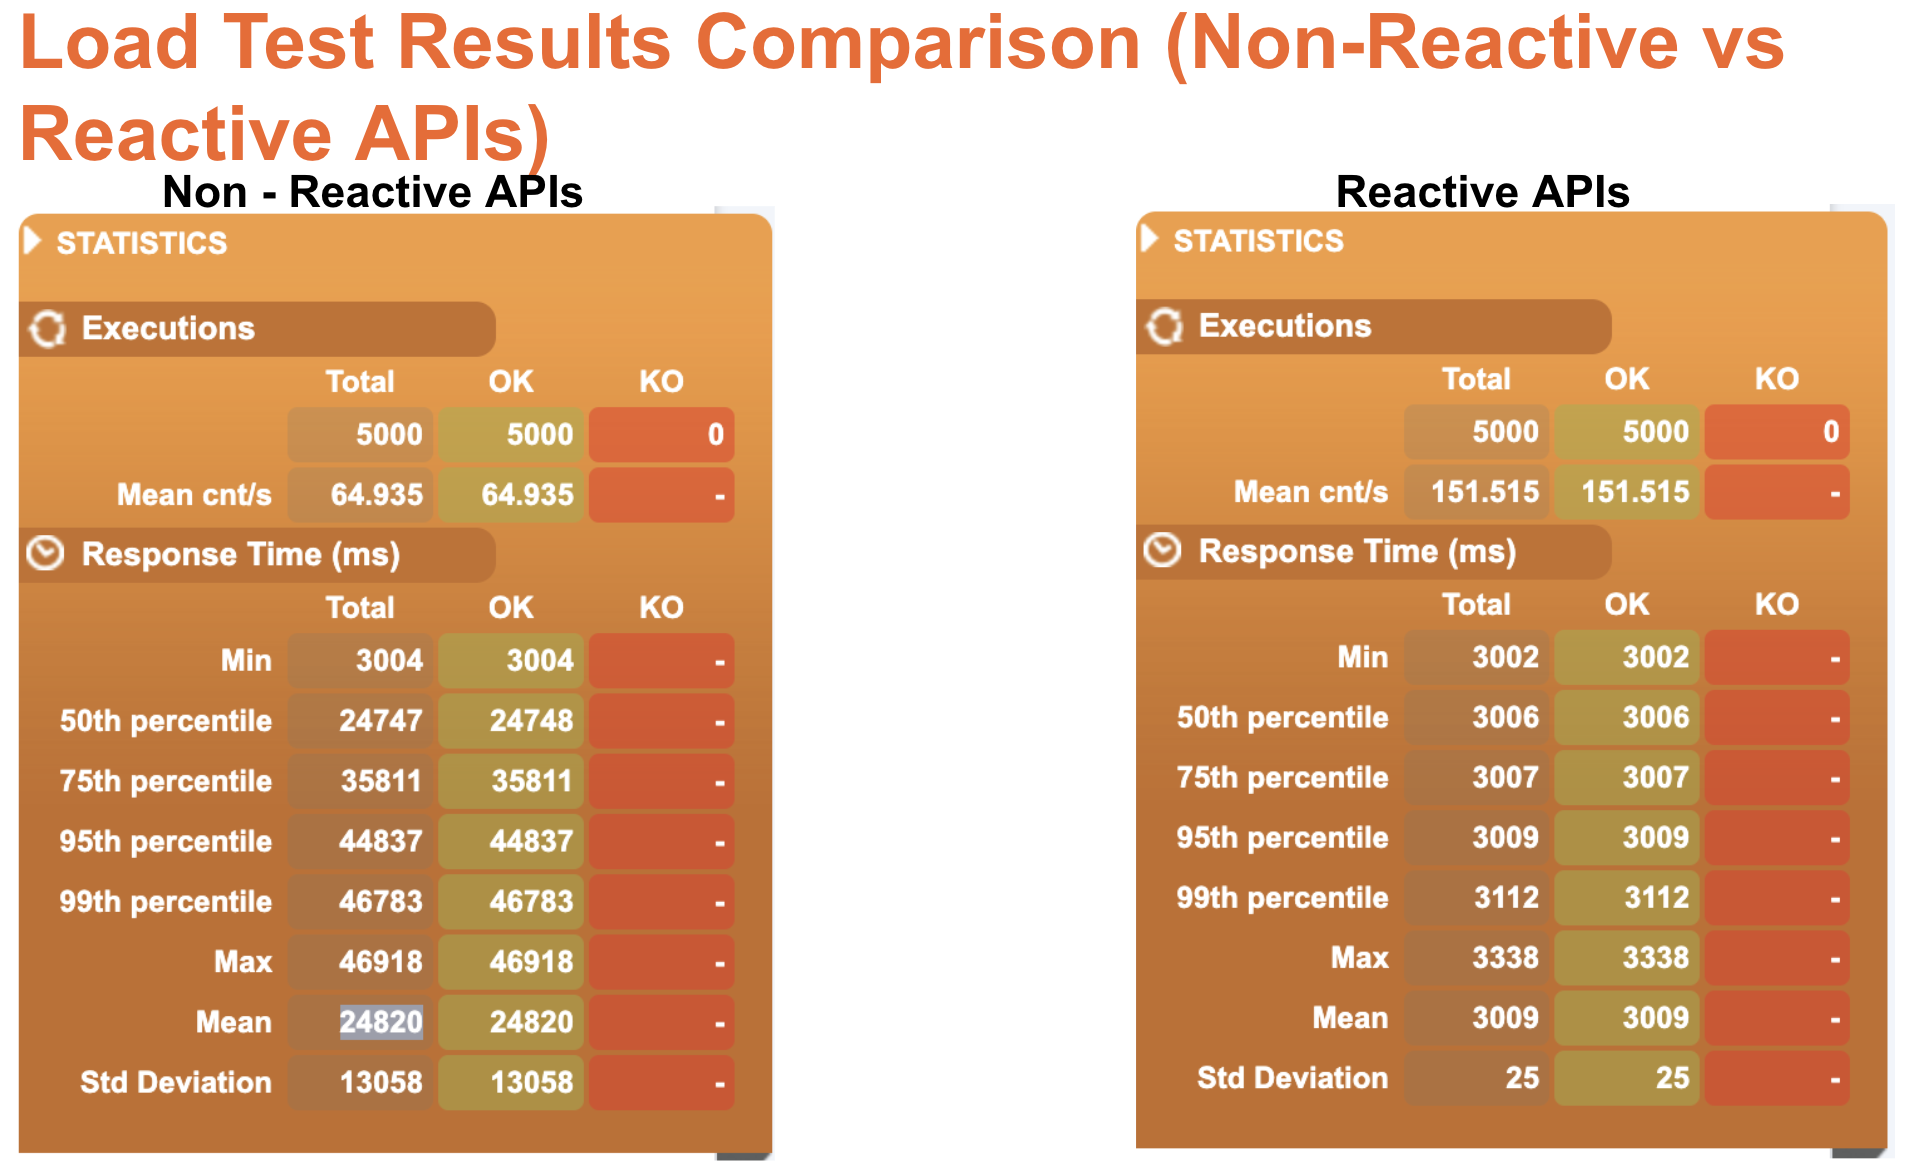
The Gatling load test scripts are also available on GitHub for your reference. With this, I conclude the article on “Build Reactive REST APIs with Spring WebFlux“. We will meet on another topic. Till then, Happy Learning!!
Opinions expressed by DZone contributors are their own.

Comments