Building Microservices Using Spring Boot and Securing Them With OAuth and OpenID - Part 1
In this walkthrough, learn how to easily configure and deploy microservices with Spring Boot, then secure them using OAuth and OpenID.
Join the DZone community and get the full member experience.
Join For FreeA microservice architecture is a software design pattern in which a larger application is composed of multiple smaller services, each with its own objective, that collaborate and communicate over a network in order to achieve a particular goal. Within a microservices architecture, each service runs in its own process and communicates with other processes using a lightweight mechanism such as HTTP/REST with JSON.
This is one of the reasons microservices have emerged as an alternative design pattern, delivering benefits for project engineering, scalability, and performance. Dividing a single application into various components means that each component can be developed and deployed concurrently yet separately.
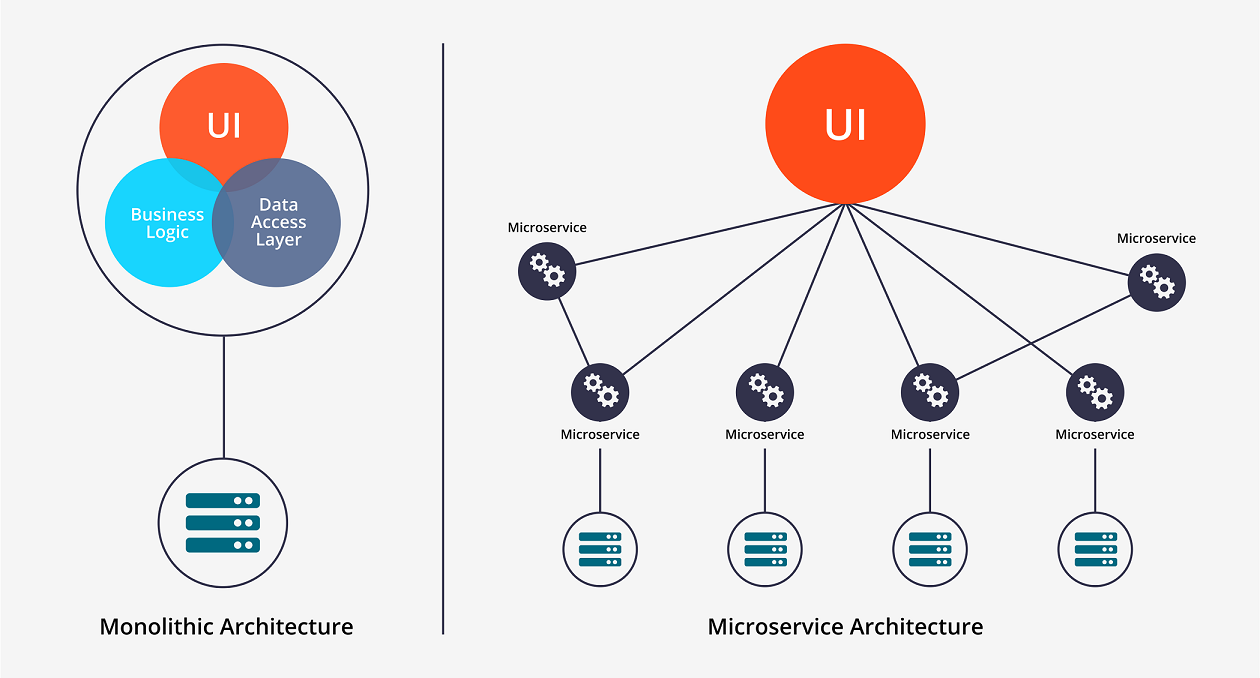
A microservices architecture makes more sense when we compare it with monolithic application design. In monolithic architectural design, we create a big cumbersome application with all modules tightly coupled inside a single executable, which is typically deployed on a web or application server.
A typical monolithic architecture application looks like this:
Example of Microservices:
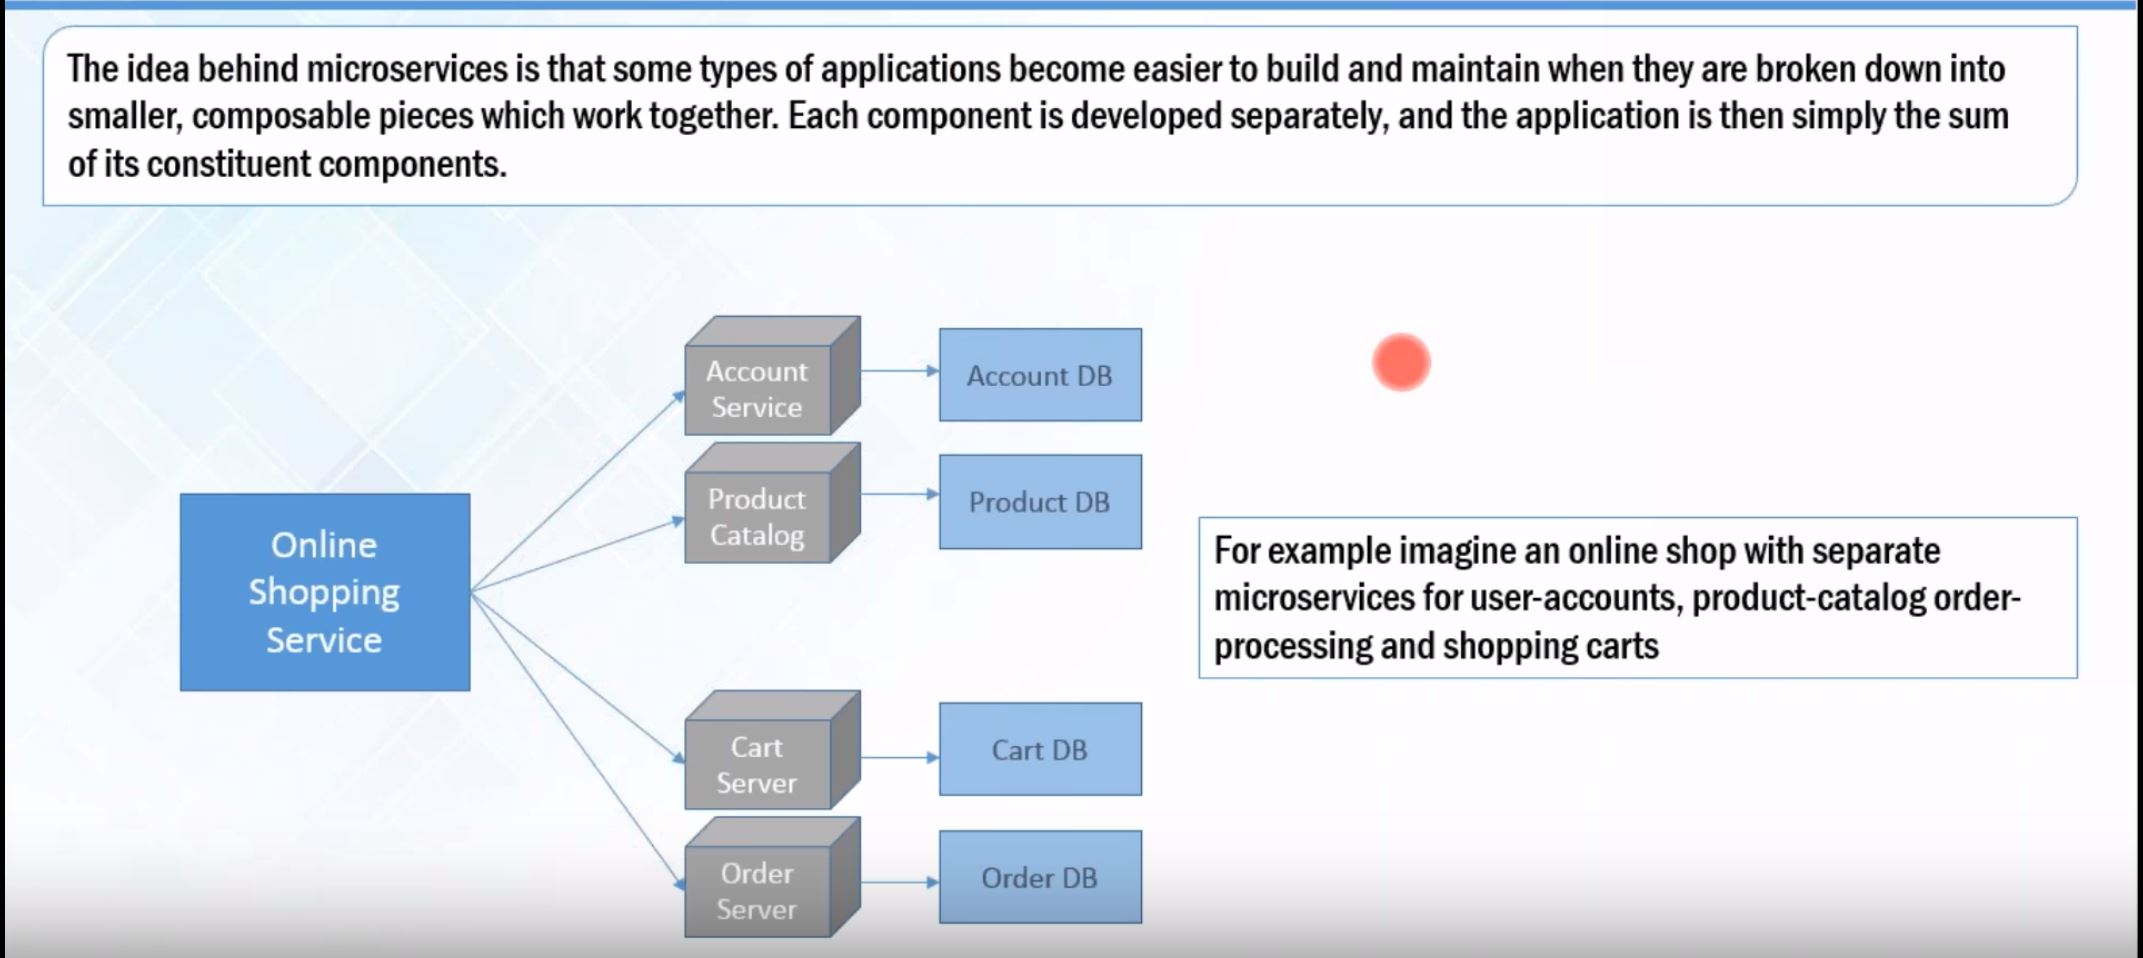
Key Guidelines for Designing Microservices
Loosely coupled, self-contained, and high performing
Independent scaling, deployment, monitoring, and management without impacting any other application or service
Single Responsibility Principle
Faster development and release cycles
Spring Boot Overview
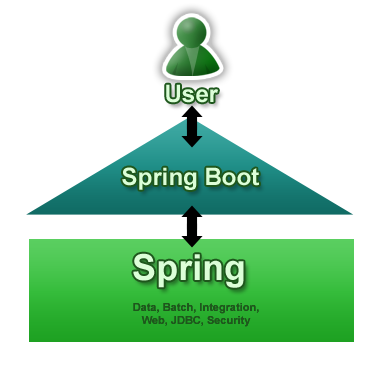
First of all, Spring Boot is not a framework, it is a way to easily create a stand-alone application with minimal or zero configurations. It is an approach to develop a spring based application with very less configuration. It provides defaults for code and annotation configuration to quick start new Spring projects within no time.
Why Spring Boot?
It is very easy to develop Spring-based applications with Java.
It reduces lots of development time and increases productivity.
It avoids writing lots of boilerplate code, annotations, and XML configuration.
It is very easy to integrate a Spring Boot application with its Spring ecosystem, like Spring JDBC, Spring ORM, Spring Data, Spring Security, etc.
It provides embedded HTTP servers like Tomcat and Jetty to develop and test web applications very easily.
Why Spring Boot for Microservices?
The first benefit is that Spring Boot dramatically simplifies application configuration by taking Convention over Configuration (CoC) in Spring applications to a whole new level. Spring Boot has a feature called auto-configuration that intelligently provides a set of default behaviors driven by what jars are on the classpath. As a result, it’s remarkably easy to get a new microservice up and running with little or no configuration while preserving the ability to customize your application.
The second benefit of Spring Boot is that it simplifies deployment by letting you package your application as an executable jar containing a pre-configured embedded web container (Tomcat or Jetty). This eliminates the need to install and configure Tomcat or Jetty on your servers. Instead, to run your micro-service you simply need to have Java installed. Moreover, the executable jar format provides a uniform and self-contained way of packaging and running JVM applications regardless of type, which simplifies operations.
One of the touted benefits of microservice architecture is the full independence of the services, so it shouldn’t matter what language or platform each is built and deployed in.
Why Secure Microservices?
When your project is moving from a monolith architecture to microservices architecture, security can be an important aspect. Microservices architectures are highly distributed by nature and characterized by an increased amount of network traffic. Usually, the business data are accessible via REST APIs and can easily be stolen if you don’t protect them properly. These calls should be protected against man-in-the-middle-attacks by using the HTTPS protocol, but the API endpoints have to be secured as well. The effort for the security checks should be well balanced with the effort to call a microservice API otherwise your architecture will never perform well. To protect the endpoint each microservice should get an identity and a set of permissions so that the API endpoint security component is able to verify both.
Spring Security Using OAuth 2.0
There’s a lot of confusion around what OAuth actually is.
Some people consider OAuth a login flow (like when you sign into an application with Google Login), and some people think of OAuth as a “security thing”, and don’t really know much more than that.
I’m going to walk you through what OAuth is, explain how OAuth works, and hopefully leave you with a sense of how and where Oauth can benefit your application.
What Is OAuth 2.0?
To begin at a high level, OAuth is not an API or a service: it is an open standard for authorization and any developer can implement it.
OAuth is a standard that applications can use to provide client applications with “secure delegated access.” OAuth works over HTTP and authorizes Devices, APIs, Servers and Applications with access tokens rather than credentials.
There are two versions of OAuth: OAuth 1.0 and OAuth 2.0. These specifications are completely different from one another, and cannot be used together: there is no backwards compatibility between them.
What Does OAuth 2.0 Do?
OAuth is basically a protocol that supports authorization workflows. What this means is that it gives you a way to ensure that a specific user has permissions to do something.
That’s it.
OAuth isn’t meant to do stuff like validate a user’s identity — that’s taken care of by an Authentication service. Authentication is when you validate a user’s identity (like asking for a username/password to log in), whereas authorization is when check to see what permissions an existing user already has.
Why OAuth 2.0?
Ease: A friend sends you a link to a funny picture or video and you want to leave a comment. The only problem is that you’ve never been to this site before and don’t have an account. While you take a few seconds to consider if it’s worth signing up for, you spot a “Sign in with your Twitter account” button. Success! You’re one of the hundreds of millions of Twitter users, so this is an incredibly easy OAuth alternative
Security: Since the advent of OAuth 2.0 – which is now the standard model – all OAuth data transfers must take place on SSL (Secure Sockets Layer) to ensure the most trusted cryptography industry protocols are being used to keep data as safe as possible.
Popularity: Most people don’t like jumping on beta tests for new software, so before acquiescing to yet another Web “standard” it always helps to know that a trend is already in motion and that a new service isn’t going to disappear in the future and be a waste of time. OAuth has already been adopted by Google, Facebook, Twitter, and Yahoo, so even if only a slice of their users have made the transition, that still equates to many millions of current users.
Time: Not only is it easy, but it’s incredibly time-saving in the long run. Whether it’s finding a new site online or returning to a favorite one, if the sites you frequent support OAuth then you only need to create one account for the majority of your online hangout spots. It’s the equivalent of going out to a new club at night and having a really cool friend walk you to the front of the line and having the bouncer lift the rope for you to bypass the long wait.
OAuth 2.0 Example
To understand a concept of OAuth 2.0, let’s take a general example:
- An external Guest A says to the reception desk that he wants to meet Employee B for business purposes.
- The reception desk notifies Employee B that Guest A has come to visit him.
- Employee B comes to the reception desk and identifies Guest A.
- Employee B records the business purpose and identity of Guest A at the reception desk.
- The reception desk issues a visitor card to Guest A.
- Employee B and Guest A go to the specified room to discuss their business.
I gave this example to help you understand the procedure of issuing OAuth and the authorization. The visitor card allows visitors to access pre-determined places only which means that a person with a "visitor card" cannot access all the places that a person with an "employee ID card" can access. In that way, a user who has directly logged into the service can do more than a user who has been authorized by OAuth.
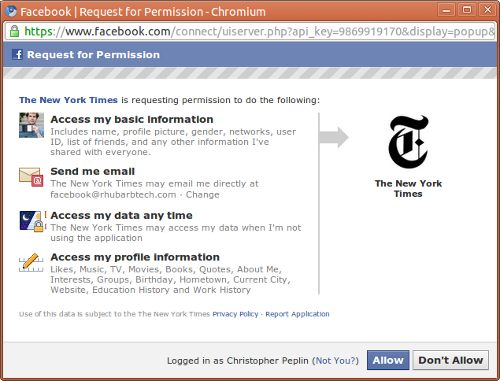
In OAuth, "Auth" means "Authorization" as well as "Authentication." Therefore, when authentication by OAuth is performed, the service provider (reception desk) asks whether a user (employee) wants to authorize the request of the third-party application (guest). The following figure shows how Facebook asks if you would like to grant access to a third-party application.
OAuth 2.0 - Key Concept
At a minimum, you should be aware of four key concepts in OAuth2:
- OAuth2 Roles
- OAuth2 Authorization Grant types
- OAuth2 Tokens
- OAuth2 Access Token Scope
Let’s go the key concept one by one.
OAuth 2.0 Roles
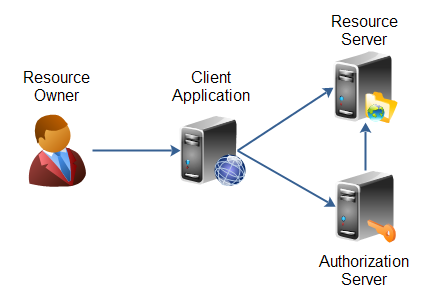
OAuth 2.0 defines four roles:
Resource Owner: Generally yourself. An entity capable of granting access to a protected resource. When a resource owner is a person, it is referred to as an end-user.
Resource Server: Server hosting protected data (for example Google hosting your profile and personal information or emails).
Client Application: Application requesting access to a resource server (it can be any website, app like javaworld.com, facebook.com etc).
Authorization Server: Server issuing access token to the client. This token will be used for the client to request the resource server.
OAuth 2.0 Authorization Grants:
An authorization grant is a credential representing the resource owner’s authorization (to access its protected resources) used by the client to obtain an access token. The specification defines four grant types:
Authorization code: It should be used as soon as the client is a web server. It allows you to obtain a long-lived access token since it can be renewed with a refresh token (if the authorization server enables it).
Implicit: It is typically used when the client is running in a browser using a scripting language such as Javascript. This grant type does not allow the issuance of a refresh token.
Resource owner password credentials: Password Credentials Grant’ is best suited when both the client and the servers are from same company as the trust is there, you don’t want to provide your credentials to a third party
Client credentials: This type of authorization is used when the client is himself the resource owner. There is no authorization to obtain from the end-user.
OAuth 2.0 Tokens
Tokens are random strings generated by the authorization server and are issued when the client requests them.
There are two types of token:
Access Token: This token is sent by the client as a parameter or as a header in the request to the resource server. It has a limited lifetime, which is defined by the authorization server. It must be kept confidential as soon as possible but we will see that this is not always possible, especially when the client is a web browser that sends requests to the resource server via Javascript.
Refresh Token: It merely serves to be sent to the authorization server for renewing the access token when it has expired. For security reasons, it is not always possible to obtain this token.
OAuth 2.0 Token Scope
A client can ask for the resource with specific access rights using scope [want to access feeds & photos of this user’s Facebook account], and authorization server in turn return scope showing what access rights were actually granted to the client [e.g. resource owner only allowed feeds access, no photos].
The access token can be sent in several ways to the resource server.
Request parameter (GET or POST):
Example using GET:
https://api.example.com/profile?access_token=MzJmNDc3M2VjMmQzN
Authorization header:
GET /profile HTTP/1.1
Host: api.example.com
Authorization: Bearer MzJmNDc3M2VjMmQzN
OAuth 2.0 Flow
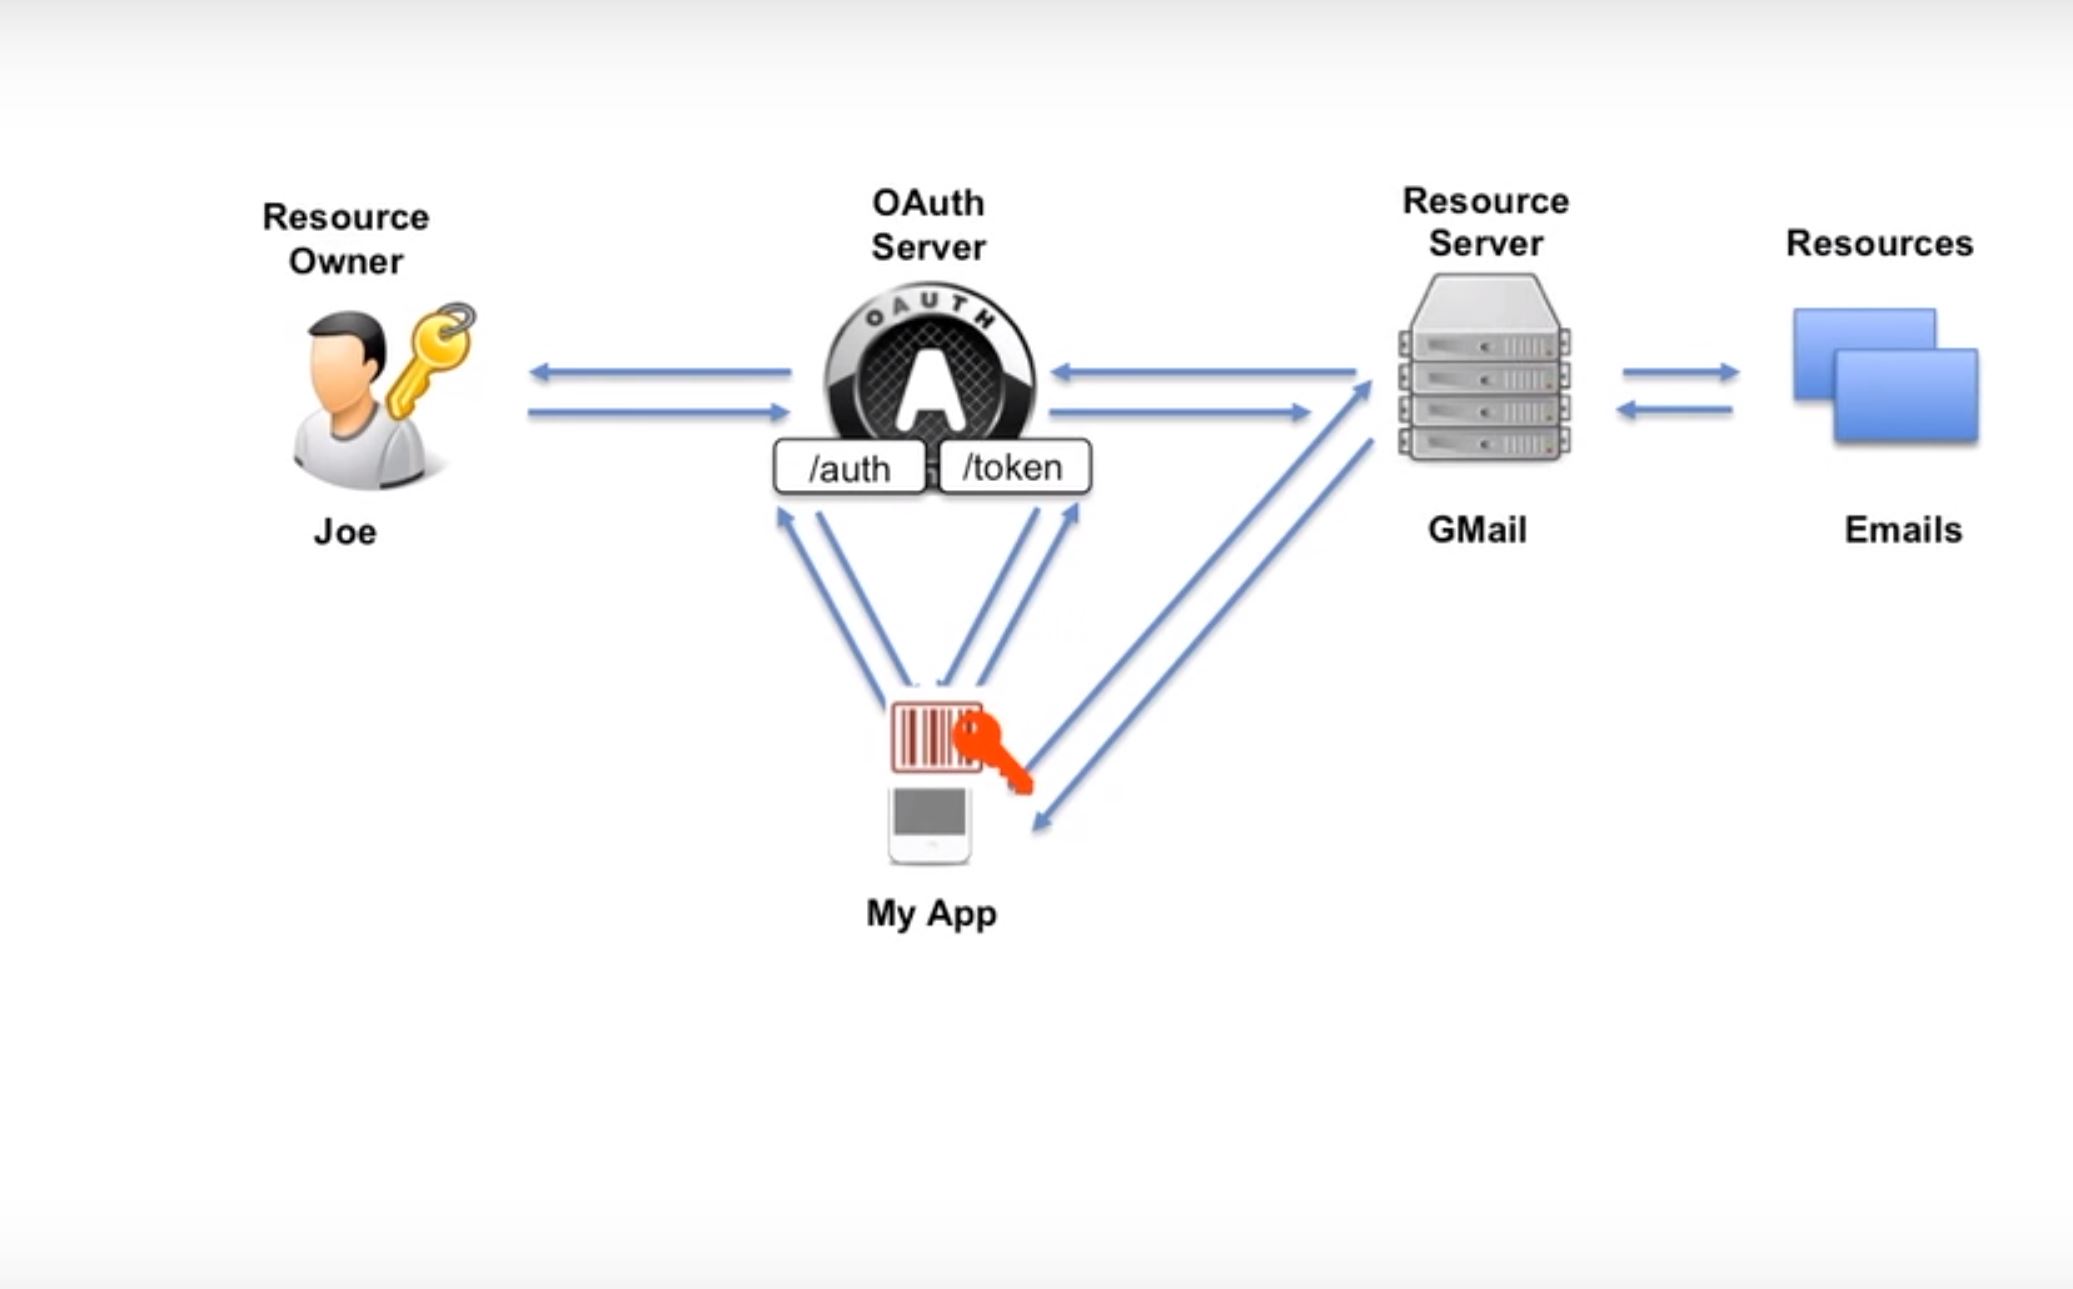
Here we have two endpoints:
- Authorization endpoint
- Token endpoint
And there is a resource owner, Joe.
So, two things must be there to achieve this OAuth:
- Joe should have an account with Gmail.
- My App should be registered with Google.
So, My App sends a request to Authorization Endpoint, and in this request, it just said that this is my client id. Here, it did not send the secret key. I would like to access the emails. It doesn’t say which email specifically. It just says the type of resource. So, OAuth validates that and when things are OK, it forwards the request to the resource owner and says, "Hey resource owner, first I would like you to authenticate." This happens by sending the login page to the resource owner. The resource owner authenticates himself by sending his user id and password to the auth server, and after it validates, another web page generates and tells the resource owner that the app called My App want to access your emails. It asks if you want to allow access to the emails. Typically, the user has options to click Yes or No on the screen. Mostly, the user says yes, and then the request comes back to the Auth server.
Thereafter, auth server generates Auth code and then it goes back to the app, My App. Now, it’s time for My App to authenticate. It means that now we want to validate the identity of the app. How can we do it? We do it with the red key. The red key is the client id and especially the client secret, which is only known to the app and the OAuth server. To validate, it sends the auth code, client id, and client secret to the token endpoint if the client id and client secret are same (if your redirect_uri matches). All these checks are done at the token endpoint.
If all is OK, then the access token is generated and sent back to the app, which is My App. Now, the access token needs to store it securely. Normally, there is a validity of the token. Now the app sends the access token to the resource server and says, "Here is the access token. I want to access the emails." Now, the resource server has to validate if the token is valid or not. In that case, the resource server sends the token to the OAuth server token endpoint and the server checks in the database if the token is valid or not, if it is expired, and if it contains right scope.
After all these checks, the result comes back to the resource server as valid or not valid. In case everything is valid, the resource server sends the request to the resource and gets the data and sends it to the app, My App.
OpenID Connect
OpenID Connect is a simple identity layer on top of the OAuth 2.0 protocol, which allows computing clients to verify the identity of an end-user based on the authentication performed by an authorization server, as well as to obtain basic profile information about the end-user.
OpenID vs. OAuth 2.0
OpenID is a standard protocol for authentication which also uses HTTP, just like OAuth. However, the purpose of OpenID is different from that of OAuth.
The main purpose of OpenID is authentication, while for OAuth it is authorization. Therefore, using OpenID is fundamentally identical to log-in. For OpenID, the OpenID Provider processes the user authentication process. Many parties who rely on Open ID delegate authentication to the OpenID Provider.
In addition to authorization, OAuth also has its authentication process. For example, when Facebook OAuth is used, Facebook Service Provider authenticates the Facebook user. However, the essential purpose of OAuth is to identify whether the user has the right to call the API to write on the user's wall or the API to get the friends list.
You can use OAuth for user authentication; however, note that its fundamental purpose is to authorize users. This is different from what OpenID aims to achieve.
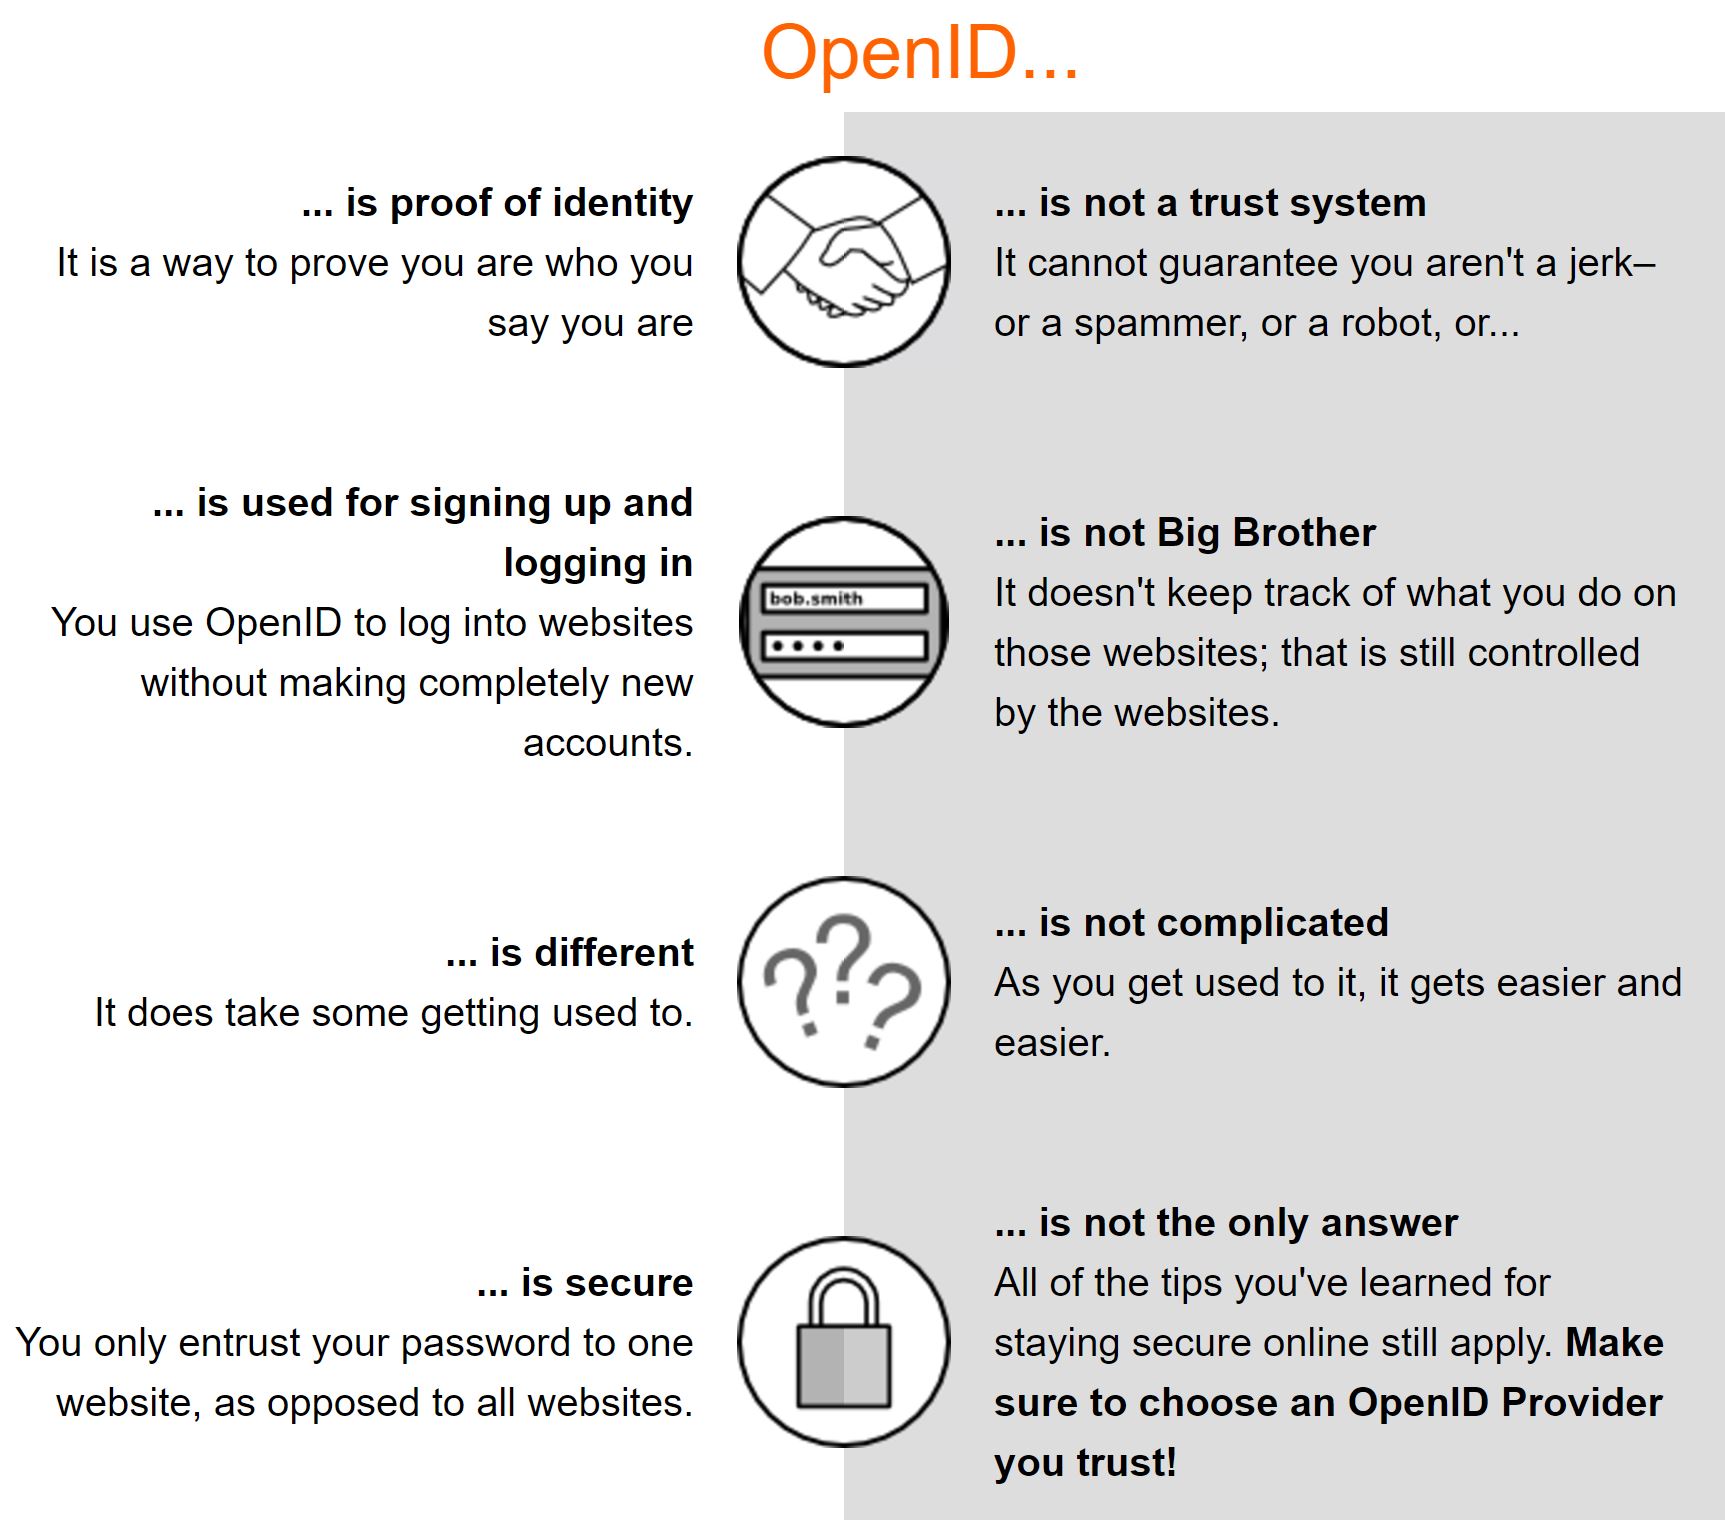
Why OpenID?
- Faster and easier to sign up
- Faster and easier to sign in
- Closer to a unified "web identity"
More on OpenID
We'll see the client registration with Google and some real example with coding in the next part.
Opinions expressed by DZone contributors are their own.

Comments