Building OAuth 2.0 Authorization Server
Have you ever been faced with building an OAuth 2.0 Authorization Server? Read this article to learn which building blocks are needed for that process.
Join the DZone community and get the full member experience.
Join For FreeTable of Contents
- OAuth 2.0 framework overview
- Authorization code flow
- PKCE
- Reference tokens vs self-contained
- Introspection endpoint
- JWT validation
- OAuth Authorization server frontend
/authorizepath and parameters
- OAuth Authorization server endpoints
/authorize/token
- OIDC and Authentication
- User sign-in and registration
1. OAuth 2.0 Framework Overview
“OAuth 2.0 is the industry-standard protocol for authorization.”
https://oauth.net
To start, I would like to draw your attention to the main goal of the OAuth framework: authorization delegation. It's very important to understand it to not be confused with the use cases it covers. The most common confusion about it is thinking of it as an authentication solution, but it is not. Looking ahead, authentication might be implemented on top of OAuth 2.0 with OpenID Connect, which is an additional identity layer.
What does OAuth do, and what does authorization delegation mean? In one sentence, it provides the possibility to applications to ask users registered in other applications to allow access to their resources on their behalf. In order to understand better, let's find out what applications are, users, their resources and other applications.
Roles
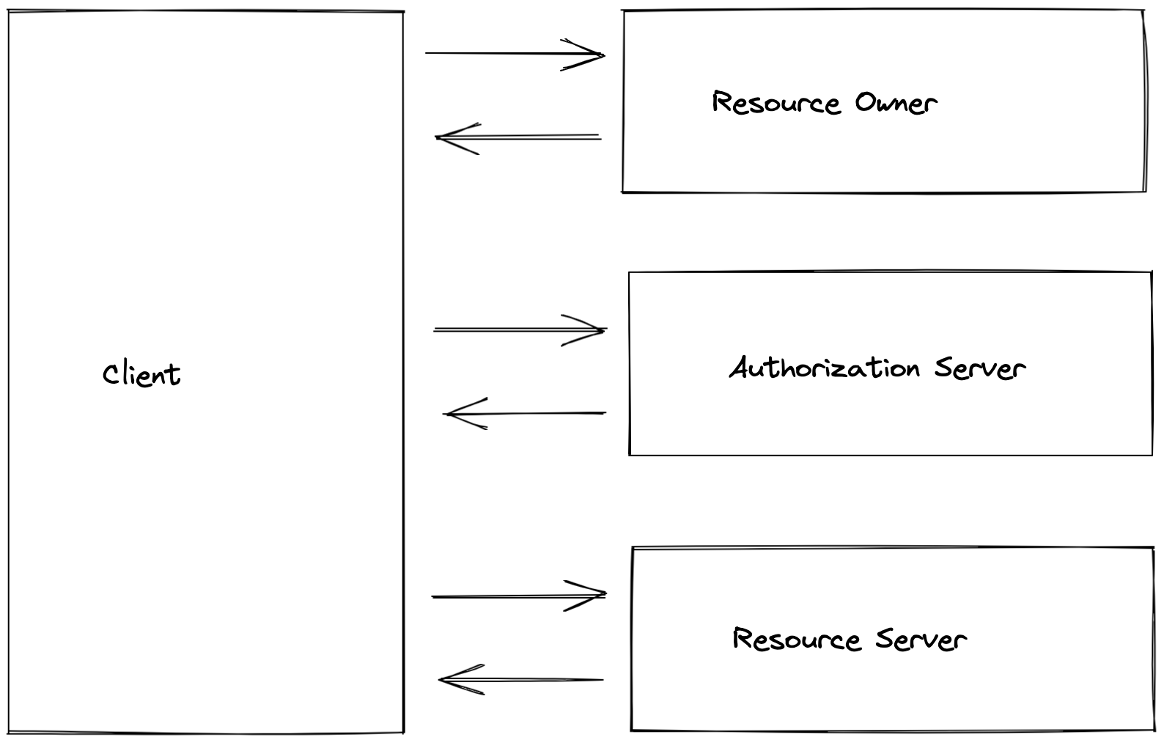
OAuth 2.0 framework describes the following roles:
- Resource Owner: Entity that can grant access to a protected resource. Typically, this is the end-user.
- Resource Server: Server hosting the protected resources. This is the API you want to access.
- Client: Application requesting access to a protected resource on behalf of the Resource Owner
- Authorization Server: Server that authenticates the Resource Owner and issues access tokens after getting proper authorization
At the very highest level, roles interact in the following way:
- A client (an application) asks resource owners (users) to allow access to their resources hosted on the resource server.
- Once resource owners agree to allow access, the client goes through a flow provided by the authorization server to get the access.
- Once the flow is passed, the client has the possibility to request the user's resources from the resource server on the user's behalf.
Now we know which roles exist, so let's get into details about what the flow they should pass looks like. Actually, there is more than one flow, but in order to get the idea, we will look at the most common one.
Authorization Code Flow
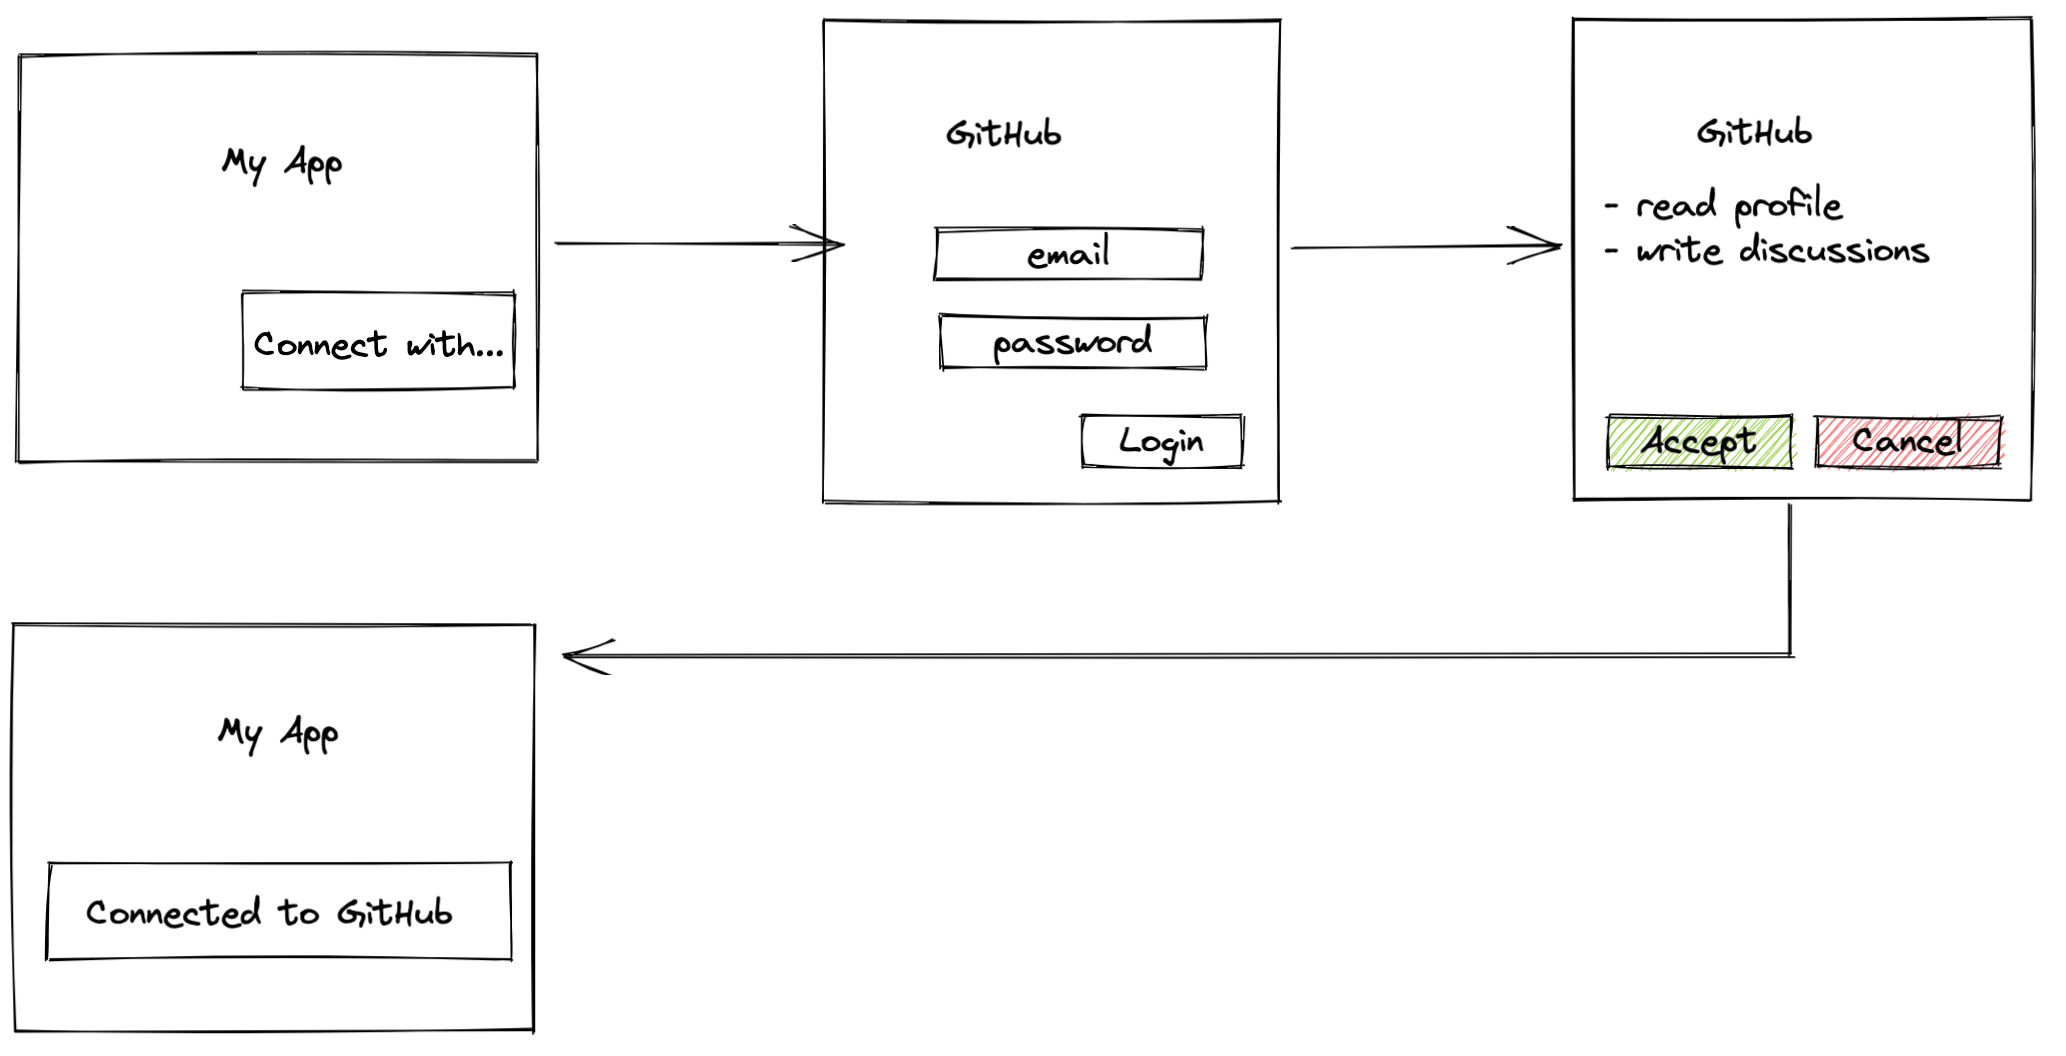
Let us imagine we're building an application that should consume GitHub API on behalf of a user registered in GitHub. Since GitHub provides OAuth 2.0 interface with authorization code flow, it would be a good example. From the user perspective it looks like the following:
- Users open our application, and in order to proceed, they are asked to "Connect with GitHub."
- Users click on the button and are redirected to the GitHub authorization page.
- Users authenticate with GitHub account.
- Users are asked whether they agree to allow our application to get access to their GitHub resources (like PRs, projects, or issues). Once users agree, they are redirected back to our application and can proceed to interact with it.
The very important thing here is that our application now is authorized to access the user's resources even without their action. For example, open PRs on the user's behalf or leave comments automatically: that's the whole point of OAuth, and it gives a very powerful tool which should be used in a very careful way to avoid unexpected manipulations with users' resources.
- Once users click on "Connect with," the front-end of our application should build a URL to the authorization server and redirect users to it.
- The authorization server should authorize users in any way; e.g., ask to enter email and password.
- The authorization server asks consent from users so they are informed about permissions that they delegate to our application.
- Users at this point might agree or disagree. Let's assume they give consent.
- The authorization server redirects the user back to our application with the authorization code in URL query params.
- Our application should exchange the authorization code for an access token. The request should be secured by API keys, so it would be better to perform the request from the backend.
- The authorization server returns the access token which allows managing users' resources on the resource server (not our application).
![authorization server returns the access token]()

Use-Case Example
For example, we've build a very cool GitHub UI which simplifies the user experience. The application should have full access to users' resources on GitHub to support all the features. In this case, we would implement OAuth authorization and request full access (all existing scopes) from GitHub authorization server. At the very first look, it seems like OAuth plays the authentication role here, but it does not. It authenticates users to GitHub but not to our application. Instead, it authorizes our application to manage users' resources on GitHub. The user is still not authenticated to our application since it does not have users' identification data and does not verify it.
PKCE
The Proof Key for Code Exchange (PKCE, pronounced pixie) extension describes a technique for public clients to mitigate the threat of having the authorization code intercepted.
https://oauth.net
In the previous example, the authorization code exchange for an access token was secured with API keys, which in order to perform, requires the exchange from the backend (for security reasons API keys should not be stored on frontend). The PKCE provides possibility to get rid of API keys and perform the exchange directly from frontend. Simply put, it requires the client to generate a secret first and then use it while authorizing code exchange.
Even if authorization code is intercepted, it's impossible to use it since code exchange requires the secret.
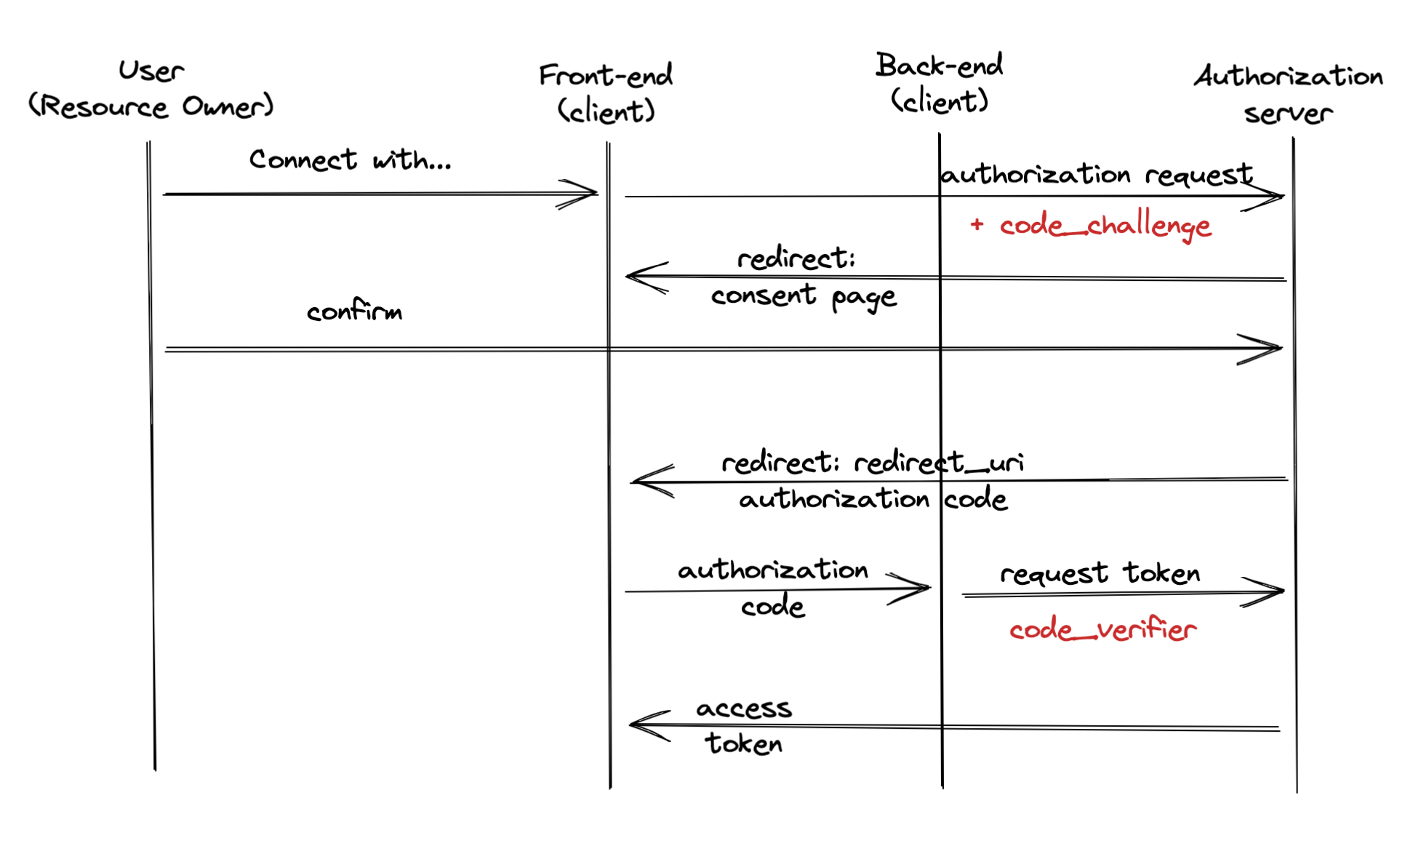
As you can see from the diagram below, there were changed authorization requests and authorization code exchanges as follows:
- At the very beginning, our application generates a secret.
- Authorization request now includes
code_challengeparameter which contains the hash sum of the secret generated before. - The authorization server stores the hash sum.
- The authorization code exchange request should contain the original secret in
code_verifierparam, so the server can calculate the hash sum and then compare it to the original one provided incode_challenge.![Authorization code exchange request]()
2. Reference Tokens vs Self-Contained
There are two types of access tokens: reference and self-contained. Let's take a look at possible examples of each one and compare them to each other.
Reference Tokens
Example: gho_16C7e42F292c6912E7710c838347Ae178B4a
Reference tokens are just unique strings which are stored to DB and in fact, are just keys that provide reference to some information the token should contain. Such tokens should be secure enough to avoid the possibility to guess them. In order to get any information referenced by the token, an application should request it either from DB (if it has access) or from a special token introspection endpoint (e.g.: /token_info).
The approach provides some benefits as well as challenges.
Benefits
First, since reference tokens do not encode any information, they are just lightweight strings that will not affect much HTTP header size.
Secondly, there is a very simple way to manage user sessions, because the token is tied to a record in DB which might contain session information. Each time token is validated, its data must be requested. So if, for example, the user session is terminated, that would be reflected in the response.
Challenges
As we identified above, the reference token validation requires sending an additional request to an API to get its information. Thus, it affects the overall execution time and performance. Let's imagine we have to validate the token from each request coming to our backend and average throughput is about 1k rps. Obviously it's very expensive to perform an additional request to validate the token each time.
Self-Contained
Example:
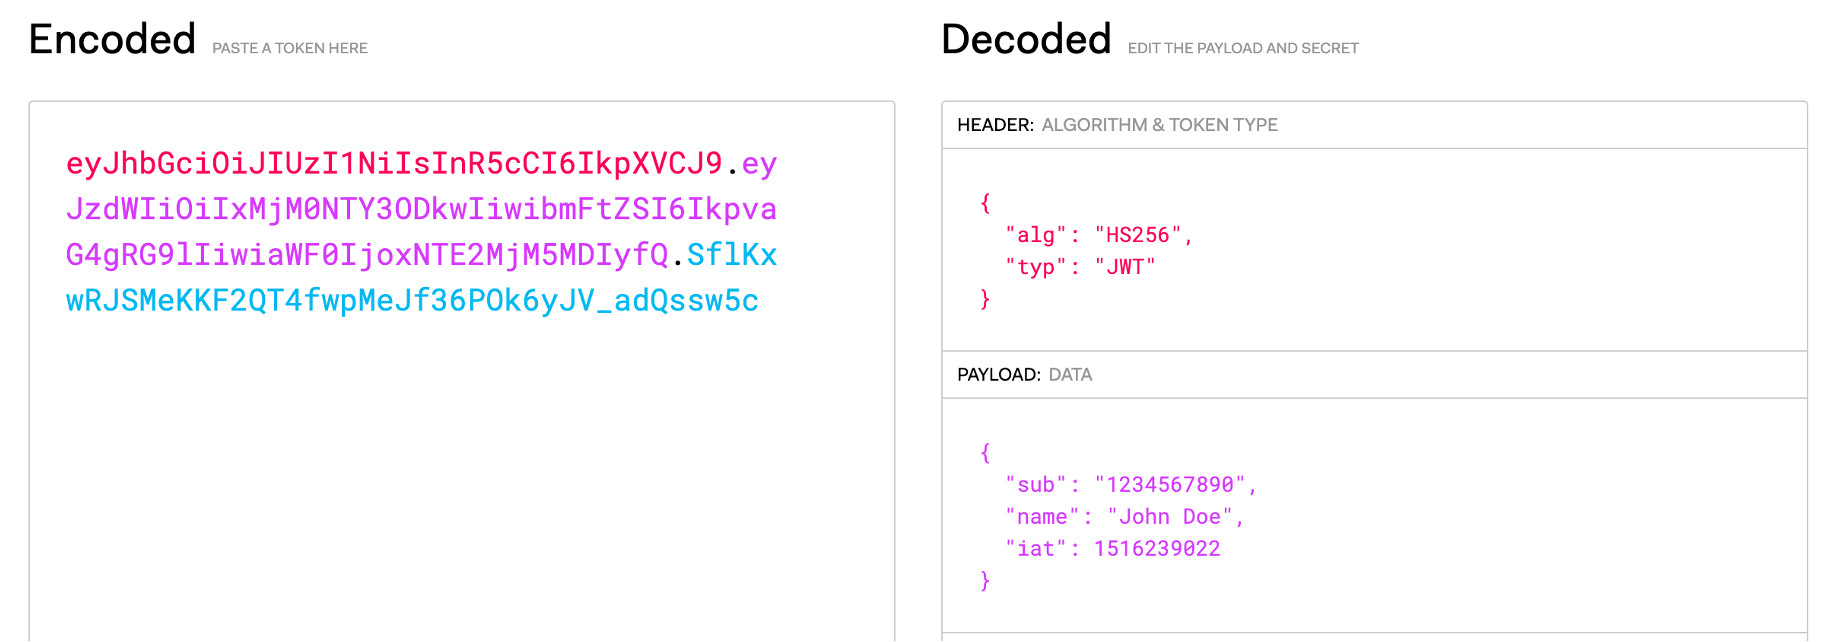
Self-contained tokens encode a payload with all the necessary information for token validation. The most common example is JWT. It is represented with a 3-part string delimited by dots:
- Header: Contains some metadata like token type and signature algorithm
- Body: Contains useful information like user id, permissions, expiry time, etc.
- Signature
It is important to keep in mind that each part of the token is just a base64, so it could be decoded without any secrets. However, the other part's signature guarantees the body was not changed. JWT token signature validation requires public key.
Benefits
Self-encoded token validation is autonomous and does not require any additional requests because all of the needed information is passed in token payload, which saves time and improves performance in comparison to reference tokens validation.
Challenges
Besides the fact that self-encoded token validation does not require additional requests, user session validation still requires it. Obviously there might be some sophisticated approaches applied with optimization, but it brings a lot of additional complexity.
3. OAuth Authorization Server Frontend
OAuth authorization server frontend consists of two main parts: authentication and consent.
Authentication
Authentication is a process of checking user identity. It might be implemented in any way and it is not covered by the OAuth 2.0 framework. The most common examples are the following:
- User identifier (name, nick-name, email...) and password
- Phone number and one-time password

Consent
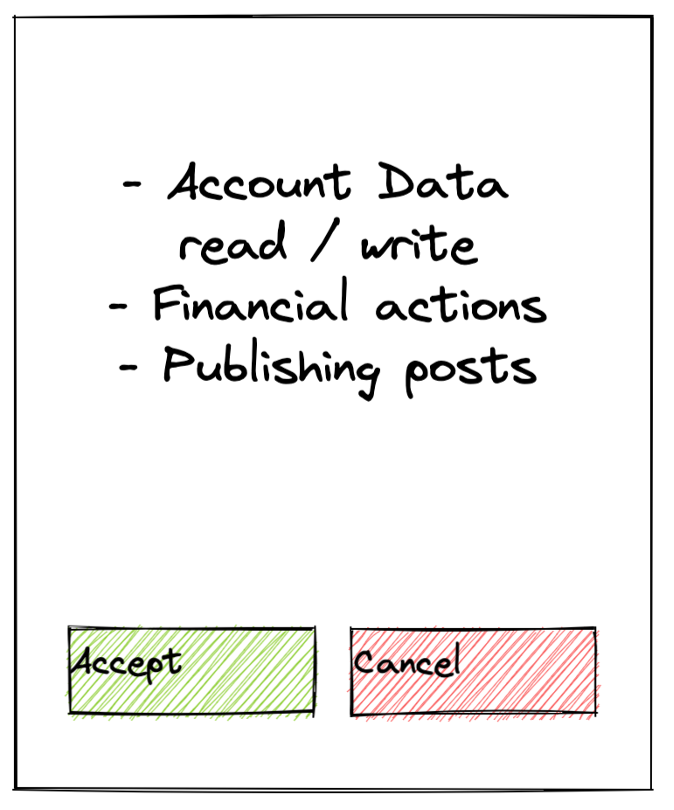
Once users are authenticated, they are asked to give a consent. This is a very important element that requires a lot of attention. The consent must as clearly as possible contain all of the scopes (you can think of them like permissions) that users delegate to an application. On the other hand, representation should be short enough to not overload users with a bunch of information (like usual privacy and policy agreement). Otherwise, users might allow other applications to manipulate their resources just because it's hard to review the consent and easier just to agree.
In the case users disagree, the flow should be interrupted and users should be redirected to back the application.
Once users agree, the authorization server proceeds with authorization request processing.
4. OAuth Authorization Server Endpoints
Authorization Request
Example:
/oauth/authorize
  ?client_id=a17c21ed
  &response_type=code
  &state=5ca75bd30
  &redirect_uri=https://example.com/cb
  &scope=photos
Once the authorization server receives the request it should perform the following steps:
- Verify user identity for example against access token. The request contains users' consent so it must be secured with user identity.
- Validate request parameters:
client_idshould be registered to authorization server with exactredirect_uriresponse_typespecifies which OAuth 2.0 flow is requested; for authorization code flow it should be equal tocodestatecontains a random string generated on the client to be verified against the one returned in response; they should be equalscopecontains a list of scopes requested by the client
- Generate authorization code: This should be a random string secure enough to not be guessed.
- Store in DB request data: The authorization code and user data (probably from token) to use them while token issuance
Authorization Response
Example:
https://example.com/cb
  ?state=txcSDMn3Q5bZ-w32
  &code=EVOcNHq7TBVaxVw
The authorization response is a redirect back to the client to the redirect_uri specified in the authorization request. The code parameter contains the authorization code and the state originally passed by the client.
Token Exchange Request
Example:
/token
  ?code=EVOcNHq7TBVaxVw
  &grant_type=code
  &redirect_uri=https://example.com/cb
  &client_id=a17c21ed
  &client_secret=ZGVmMjMz
The /token endpoint receives parameters needed to issue access token:
codecontains authorization code generated as a result of authorization request; it's a key by which authorization server should look for data in DB.grant_typespecifies which way the server should issue access tokens;codemeans the token should be issued based on the authorization code.client_idandclient_secret(orcode_verifierin case of using PKCE) are needed to authorize the request since just authorization code validation is not enough because it might be intercepted.- Get data from DB by the authorization code, the most important of which are user id and scopes requested. Therefore, the access token issued should represent the users and should be limited to scopes they confirmed giving consent.
- Issue tokens (most probably your would like to issue refresh token alongside with access one)
Token Exchange Response
Example:
{
  "token_type": "Bearer",
  "expires_in": 86400,
  "access_token": "sjmHG1EywNbSDAelt",
  "refresh_token": "Qb6kKM4BWPIwq"
}
The response is not strictly determined by OAuth 2.0 framework, but depends on tokens type and overall authorization approach that the authorization server implements. Most likely it will contain both refresh and access tokens, their type and expiry period.
Scopes
Scopes in OAuth 2.0 are like roles or permissions in common access management patterns. Basically, they specify scope of access delegated to client.
Implementation of authorization (scopes check) is not covered by the OAuth 2.0 framework itself and might be implemented in any way. In a very simple case, scopes might be verified just in place by resource server.
5. OIDC and Authentication
It's time for the most interesting question: how do you implement authentication on top of OAuth 2.0? The question became so common that there was a standardized approach to build one more layer called Open Id Connect (OIDC).
Before describing it, let me give you a better idea on which part it covers.
Authentication Comparison
First, let's compare possible authentication implementations:
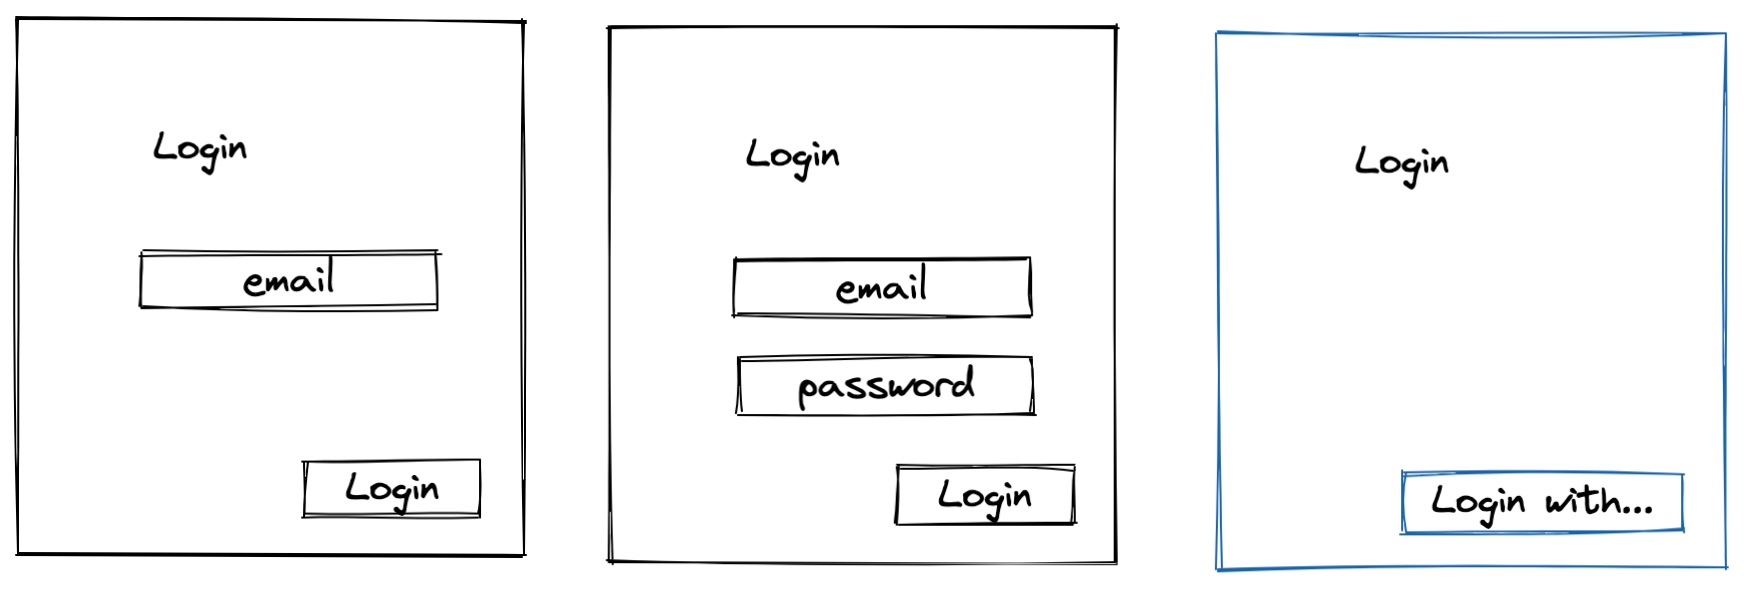
Naive Implementation
In a very simple case we can ask users "who they are," and just trust them. Therefore, the login form might contain just a singe field like email or user name. In this instance, we are not able to verify identity since a user might enter an identifier of another user. However, now we clearly understand the point: once we know users' identifiers, we could personalize their requests and authorize them to restrict access to resources.
Most Common Implementation
In the most common approach, we ask users to confirm their identity by entering a password. Obviously our assumption is the password is known only to users themselves. In this case, we still need to find a record in DB by user identifier to get all needed data, but only after password is validated successfully.
OIDC
Why do this step if we receive a user's identifier from a trusted source that confirms the user's identity? It's exactly the mechanism OIDC provides. The point is that OIDC enhances OAuth 2.0 flow and standardizes how to get users' data so that the client does not need to care about the password or another validation, but just use the identifier like in the naive implementation.
One more interesting point is that the registration process is not much different from signing in users. Besides additional users' data it requires users' identifiers to identify them while signing in. That means in some cases OIDC also might cover automated registration if users are signing in for the first time.
User Sign-In W/O OIDC
Let's take a look at the requests sequence when an application verifies user identity itself.
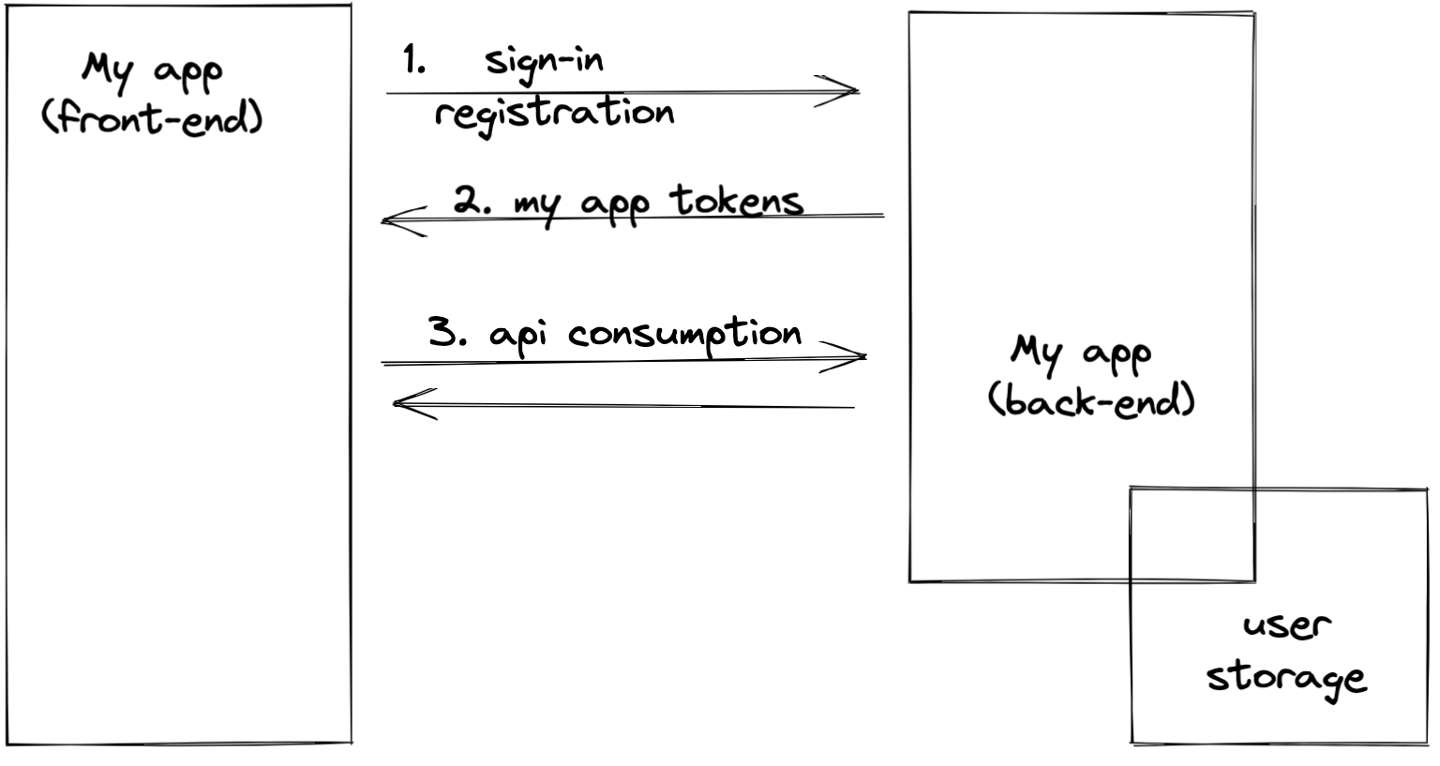
We can see that as a result of authenticate tokens are issues which should be included in further requests so those would be authorized.
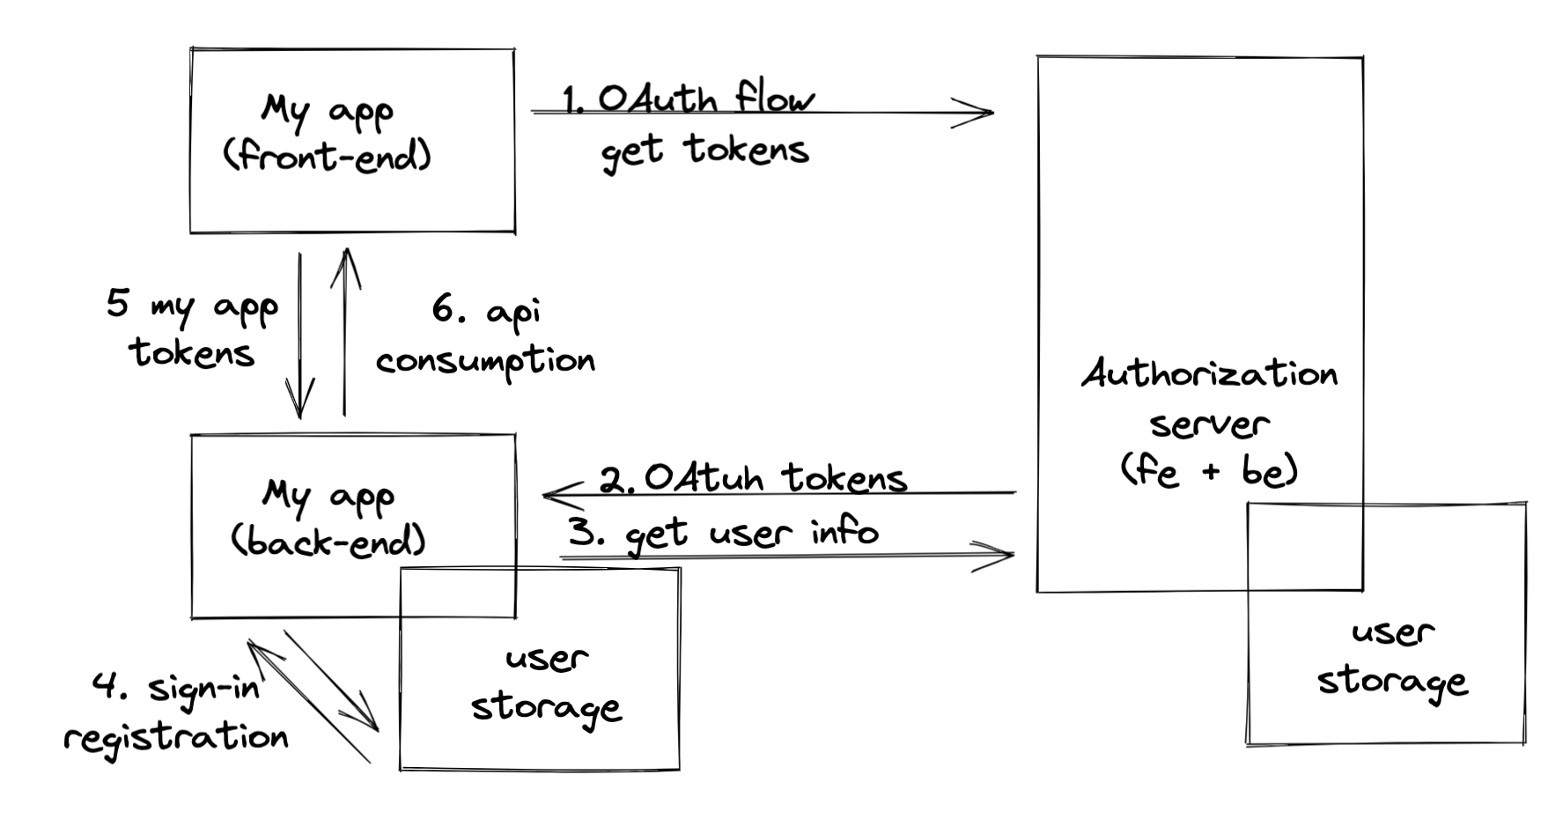
User Sign-in W/OIDC
In comparison with the previous approach, with OIDC authentication, this option is delegated, but does not change the whole picture much.
- Users pass OAuth flow.
- The client receives users' access token.
- The client asks for users' data using their access token.
- At this point, the client has a user identifier, so following the process is the same as usual: The client looks for users record in DB using the identifier. There is no need for additional identity verification since OAuth 2.0 authorization server already performed it.
- The application still needs to issue tokens so the frontend will be able to consume the backend API.
The most implicit point here for me was understanding that tokens issuance for the application itself is still needed as if the application performs authentication itself. So the only part delegated is identify verification. For sure it's still possible to configure our application to authorize tokens issued by OAuth server, but it would be a special case which ties our application to the OAuth server provider.
Summary
In this article, I've tried to explain how OAuth 2.0 authorization server works in simple words. I hope it will be a good entry point to the topic. When I've faced building a custom OAuth 2.0 server, there were a lot of points which were not so obvious for me and required a lot of research. That is why I wanted to share my experience with you.
Opinions expressed by DZone contributors are their own.
Comments