Configuring SSO Using WSO2 Identity Server
Single sign-on allows users to access more than one application with the same credentials. This article shows how we can configure SSO using the WSO2 Identity Server.
Join the DZone community and get the full member experience.
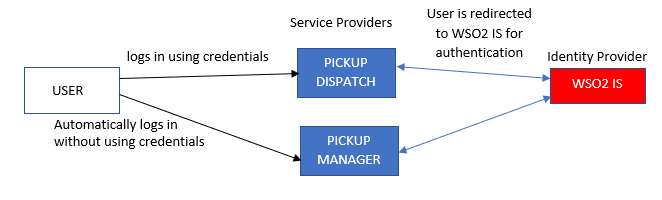
Join For FreeSingle sign-on is a feature that allows users to access more than one application with the same credentials. This article shows how we can configure SSO using the WSO2 Identity Server. There is a cab company called Pickup that has two web applications called pickup-manager and pickup-dispatch, which use WSO2 IS as their identity provider. After SSO configuration is done for both applications, the users need to provide credentials only for one application, and they can automatically log in to the other application. This article shows SSO implementation using two ways — SAML 2.0 and OpenID Connect/OAuth 2.0.
![apps]() Prerequisites
Prerequisites
 Prerequisites
- WSO2 Identity Server (IS) 5.11.0.
- Apache Tomcat 8.5.
- Download saml2-web-app-pickup-dispatch.com.war, saml2-web-app-pickup-manager.com.war and pickup-dispatch.war, pickup-manager.war from this repository.
Implementation Steps (SAML 2.0)
1. Start the WSO2 IS server by running wso2server.bat or wso2server.sh present under <WSO2IS_HOME>/bin.
2. Copy the saml2-web-app-pickup-dispatch.com.war and saml2-web-app-pickup-manager.com.war into <TOMCAT_HOME>/apache-tomcat-<version>/webapps.
3. Extract both the war files and open sso.properties file present under <application_name>/WEB-INF/classes and change the SAML2.AssertionConsumerURL hostname from “localhost.com” to “localhost.”
4. Start the Tomcat server and verify the apps here and here.
5. Login to the WSO2 IS management console with username and password as “admin” and navigate to Main->Identity->Service Providers and add 2 service providers with names saml2-web-app-pickup-dispatch and saml2-web-app-pickup-manager.
6. For both service providers, in the Inbound Authentication Configuration, click Configure under the SAML2 Web SSO Configuration and configure the below data and update.
a) Issuer:
c) Select the checkboxes à Enable Response Signing, Enable Single Logout, Enable Attribute Profile, Include Attributes in the Response Always, and Enable Signature Validation in Authentication Requests and Logout Requests.
NOTE: For the service provider saml2-web-app-pickup-manager, replace “saml2-web-app-pickup-dispatch” with “saml2-web-app-pickup-manager” in the above configurations.
7. Access this local host on any browser. Click Login, and you should be redirected to the WSO2 IS login page.
8. Enter any WSO2 IS user credentials and provide the required consent. You should be redirected to the home page of the Pickup Dispatch application.
9. Now, if you try to access this web manager and click on Login, the same user will automatically log in without any prompt for credentials.
Implementation Steps (OpenID Connect/OAuth 2.0)
1. Start the WSO2 IS server by running wso2server.bat or wso2server.sh present under <WSO2IS_HOME>/bin.
2. Log in to the WSO2 IS management console with username and password as “admin” and navigate to Main->Identity->Service Providers and add 2 service providers with names pickup-dispatch and pickup-manager.
3. For both service providers, in the Inbound Authentication Configuration, click Configure under the OAuth/OpenID Connect Configuration and configure the below data and update.
a) Callback URL: (This is the service provider URL that receives the authorization codes. On successful authentication, the browser will be redirected to this URL.)
NOTE: For the service provider pickup-manager, replace “pickup-dispatch” with “pickup-manager” in the above configurations.
4. Copy the pickup-dispatch.com.war and pickup-manager.com.war into <TOMCAT_HOME>/apache-tomcat-<version>/webapps.
5. Extract both the war files and open dispatch.properties file present under <application_name>/WEB-INF/classes and replace the consumerKey and consumerSecret values with the OAuth client key and OAuth client secret values of the respective service providers that were generated after the above step 3 configuration done in WSO2 IS management console. Also change the hostname from “localhost.com” to “localhost” for callBackUrl and post_logout_redirect_uri.
6. Start the Tomcat server and verify the apps here and here.
7. Access this pickup dispatch on your browser and click Login, and you will be redirected to the WSO2 IS login page.
8. Enter any WSO2 IS user credentials and provide the required consent. You should be redirected to the home page of the Pickup Dispatch application.
9. Now, if you try to access this pickup manager and click on Login, the same user will automatically log in without any prompt for credentials.
Note:
- When accessing the pickup-dispatch and pickup-manager applications, if you get an authentication request error after clicking Login, please replace the wso2carbon.jks file present under <TOMCAT_HOME>/apache-tomcat-<version>/webapps/<application_name>/WEB-INF/classes with the wso2carbon.jks file present in <WSO2IS_HOME>/repository/resources/security and then restart the Tomcat server.
- To integrate your own web app with WSO2 IS as the identity server, WSO2 provides several SDKs based on the technology/language (Java, .Net, Angular, etc.). You can use them to integrate your own webapps with WSO2 IS.
Opinions expressed by DZone contributors are their own.
Comments