Configuring Anypoint Platform as an Azure AD Service Provider SSO
The article will help you through basic knowledge for incorporating Azure AD as an external Identity Provider to the Anypoint platform.
Join the DZone community and get the full member experience.
Join For FreeConfigure Anypoint platform to use Azure AD as an external identity provider (IDP), including, Single Sign-on (SSO) and the mapping of Azure AD groups to Anypoint platform roles and role groups.
The article will help you through basic knowledge for incorporating Azure AD as an external identity provider to the Anypoint platform. It will also help to set the basic integration and SSO setup between Azure AD and the Anypoint platform.
Before we start, keep in mind that the Relying Party Trust will need to be created manually as we do not provide a metadata file (nor is its use supported).
Pre-Requisites:
• An Azure AD account
• An Anypoint Platform Account
Azure AD Configuration
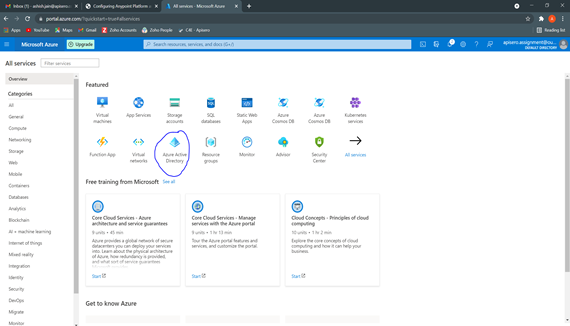
Step 1: In the Azure portal, select Azure Active Directory as below:
Step 2: Now go to Enterprise applications from the left menu. Select “+ New Application” and then select “+ create your own application”.


Step 3: From the add application screen on the right-hand side give it an identifying name and select the option “Integrate any other application you don't find in the gallery (Non-gallery)” and click “create”

Step 4: From the newly created application, head over to Single Sign-on and then select SAML as a Single sign-on method

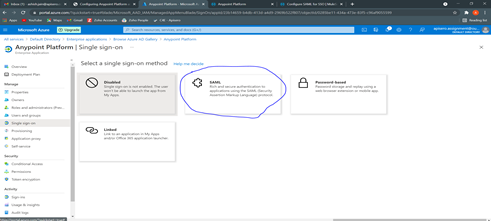
Step 5: From the “Set up Single Sign-On with SAML” Screen, configure the settings:
- Click on Edit in the “Basic SAML configuration” card
- Fill in the required details as below table :
Property |
Value |
Identifier (Entity ID) |
<Org domain>.anypoint.mulesoft.com, where is the Organization domain of your Anypoint Platform organization. Example: my-example-org.anypoint.mulesoft.com |
Reply URL |
https://anypoint.mulesoft.com/accounts/login/receive-id |
Sign-on URL |
<leave blank> |
Relay State |
<leave blank> |
Logout URL |
<leave blank> |

Step 6: Capture the User Access URL from Properties Tab. It will be used in Any Point platform Configuration. 
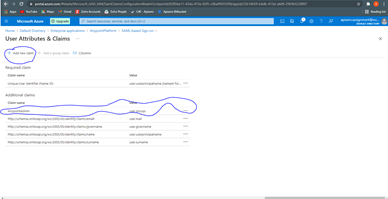
Step 7: Gather all required information from the “User Attributes and Claims” card. This information will be provided to the Anypoint platform to identify the user. You can also edit this information and capture using the “Edit” on this card.
Within User Attributes & Claims, an initial set of attributes are listed with default values are provided for each property. The attributes and claims listed here appear in the SAML 2.0 token which is sent to Anypoint Platform. The initial attributes can be changed, and new ones added or removed, as required by your organization. The SAML 2.0 IdP configuration within Anypoint Platform allows claims to be specified for the following attributes:
- Username (defaults to NameID if no value is provided)
- First Name
- Last Name
- Group (Anypoint Platform expects the claim specified here to list the user’s group memberships)
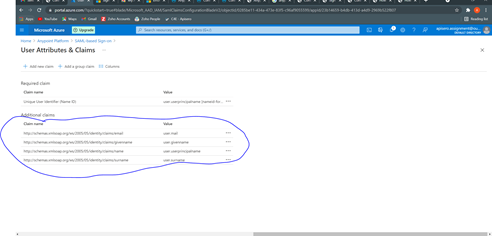
Capture the details/links like “Unique User Identifier (Name ID), user.givenname, user.userprincipalname, user.surname, user.emailaddress ”
Note: that by default, there is no claim specified in User Attributes & Claims for stating the user’s group memberships. If you intend to map Azure AD groups to platform roles and role groups as described above, a claim must be added here. This has the effect of groups to which the user belongs in the SAML token generated by Azure AD and sent to Anypoint Platform. Add a Group claim by following these steps:
- Click on the pencil icon to edit the User Attributes & Claims
- Select add a group claim
- Select the option to return either All groups or Groups assigned to the application in the claim (select the most appropriate of these two options for your organization)
- Select Group ID as the source attribute
- Click Save
- Click the Close (X) icon to return to the SAML-based Sign-on screen. Verify that there is a claim called Group listed in the User Attributes & Claims section.
Step 8: Download the Metadata XML from the “SAML Signing Certificate” card. This XML can be directly uploaded to the Anypoint Platform.

Anypoint Platform Configuration
Step 1: Log in to Anypoint Platform, select Access management and go to “Identity Providers”. Select “SAML 2.0” from the dropdown.

Step 2: Upload the Metadata XML downloaded from Azure AD setup into “Import IdP Metadata”. You will see the metadata is populated automatically. Now we need to change and fill few fields

Step 3: Configure the details corresponding to the below table:
Field |
Value |
Sign-On URL |
The value from the Enterprise app’s User access URL property. The previous section describes how to obtain this value in Azure Portal. This is Obtained in Step 6 of Azure AD Configuration |
Sign Off URL |
https://login.microsoftonline.com/common/wsfederation?wa=wsignout1.0. This URL can be used to send the Single Log-Out request to, so users both sign out of the Anypoint Platform and have their SAML user’s status set to sign out. |
Issuer |
<leave as Is> |
Public Key |
<leave as Is> |
Audience |
The value from the Identifier (Entity ID) field, displayed under “Basic SAML Configuration” for the Enterprise app in Azure Portal (created in Step 5 of Azure AD Configuration). Example: my-example-org.anypoint.mulesoft.com |
Username Attribute |
Copy the link for this attribute obtained from Step 7 in Azure AD Configuration. It should be a link for user.userprincipalname. Example: http://schemas.xmlsoap.org/ws/2005/05/identity/claims/name |
First Name Attribute |
Copy the link for this attribute obtained from Step 7 in Azure AD Configuration. It should be a link for user.givenname. Example: http://schemas.xmlsoap.org/ws/2005/05/identity/claims/givenname |
Last Name Attribute |
Copy the link for this attribute obtained from Step 7 in Azure AD Configuration. It should be a link for user.surname. Example: http://schemas.xmlsoap.org/ws/2005/05/identity/claims/surname |
Email Attribute |
Copy the link for this attribute obtained from Step 7 in Azure AD Configuration. It should be a link for user.mail. Example: http://schemas.xmlsoap.org/ws/2005/05/identity/claims/ emailaddress |
Group Attribute? |
View the SAML payload to identify the claim which holds the username. Copy and paste the claim into this attribute. Example: http://schemas.microsoft.com/ws/2008/06/identity/claims/groups |
Enable new non-SSO users |
Optional: check or uncheck the checkbox as required. Note that this has no effect on pre-existing non-SSO users. |
Require encrypted SAML assertions |
Optional: check or uncheck the checkbox as required. If you want to enforce that only encrypted SAML assertions are accepted, check this box, and configure SAML token encryption in Azure AD accordingly |
Test the Configuration
Save changes and test. The following approaches can be used to test –
- Use the test feature from within the Enterprise app in Azure Portal
- Access the User access URL (starts with https://myapps.microsoft.com/…). This is the URL obtained from the Enterprise application’s properties in the section above.
- Access https://anypoint.mulesoft.com/accounts/login/ where is the Organization domain as stated in your Anypoint Platform organization record (visible from within Access Management). Example: https://anypoint.mulesoft.com/accounts/login/my-example-org
Creating Groups and Mapping Roles
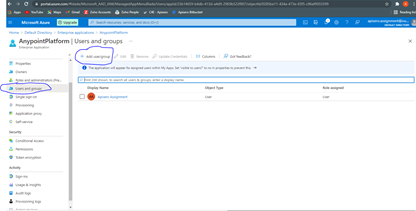
- Create a group in Azure Ad Users and Groups tab
![Azure Ad Users and Groups tab]()
- Add new Claim as groups and give the group Name
![New Claim as Groups]()
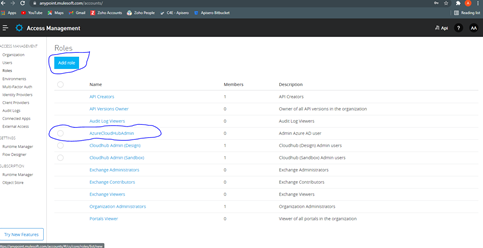
- Create a Role in the Anypoint platform
![Role in the Anypoint platform]()
- Go inside the Role and click on External Group mapping and add the group created from Azure AD
![External Group Mapping]()
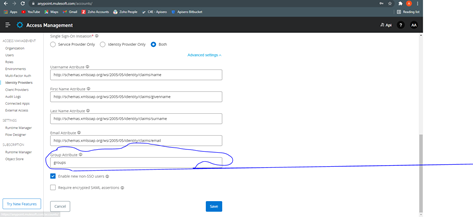
- Add the group to the Identity Provider tab in the Anypoint platform
![Identity Provider Tab]()

Test the setting and bingo!
Opinions expressed by DZone contributors are their own.
Comments