Building the Best Kubernetes Test Cluster on MacOS
Matthew Revell-Gordon explores building a local Kubernetes test cluster to mimic cloud-based deployments better using Colima, Kind, and MetalLB.
Join the DZone community and get the full member experience.
Join For FreeAs a platform engineer of many years now, Kubernetes has become one of those ubiquitous tools that are simply a must-have in many of our clients’ tech stacks. Considering that the big three cloud vendors (AWS, GCP, and Microsoft Azure) all now offer their own flavor of managed Kubernetes services, it is easy to see how it has become ever more prolific in the “cloud-native architecture” space.
Like all cloud-native technologies, Kubernetes can be a challenge to test locally. On many of our projects, developers often use Docker-compose instead of Kubernetes to test their applications locally, which inevitably causes some friction when deploying them to a cloud environment. Platform engineers also need to test their Kubernetes infrastructure and manifests and often resort to using dedicated cloud environments to do so, which can be quite expensive. What was needed was a way to get as close as possible to a cloud-based managed cluster on a laptop.
There are many ways of running Kubernetes locally. There is “the hard way,” where you have to configure VMs manually. There is Minikube, which creates each node as a VM. Or Docker Desktop’s built-in Kubernetes cluster, which is limited to a single node. There is also Kind (Kubernetes in Docker) which creates a Kubernetes cluster within Docker. It can be configured (amongst other things) to create a cluster with multiple control planes and/or worker nodes.
All of the above methods suffer from a few shortcomings, making it difficult to test a Kubernetes setup without modifying or circumventing part of the system to make it work. The two main problems I encountered frequently were a) running multiple nodes and b) using load balancers.
Running multiple nodes is important when you need to test rolling restarts, tolerances, affinity, etc., so your local setup should be able to support this. Apart from Kind, all of the above methods either do not support this, make it too fiddly, or consume excessive resources. So Kind was the starting point for my solution.
However, even with Kind, load balancer support is still an issue. Whether your production setup is based on AWS, GCP, or Azure, it will almost certainly use LoadBalancer objects which interface with the external cloud infrastructure to create a load balancer outside of the cluster. There is no built-in way to deal with this type of resource in a non-cloud-based setup.
Invariably your LoadBalancer objects will never resolve an external IP address. This means that in order to test your applications, you have to either do a lot of manual port-forwarding directly into pods and/or introduce “local-only” manifests to define ingress controllers. This isn’t great, as changing the structure of the application or circumventing a part of it means you never get a true experience when running locally.
However, with a bit of tinkering, this can also be overcome to create a local Kubernetes cluster that is as close as possible in structure and configuration to a cloud-based setup.
My original setup used Docker Desktop; however, due to licensing requirements, I recently had to find a license-free alternative.
I chose Colima as my replacement primarily because it is lightweight and, as I do not require a GUI, it is a command line only.
Prerequisites
This article assumes that we are running MacOS 12.6.5 or later, that Docker Desktop is not installed, and the following are already installed:
The Setup
This solution will install and configure the following components:
- Docker CLI client
- Colima container runtime
- Kind
- MetalLB
- A Kubernetes application with a load balancer to test
Docker CLI Client
If you previously used Docker Desktop, then the CLI tool would have been bundled with it. With Colima, we must install it ourselves.
Install the Docker CLI client with the following:
brew install dockerStart a Colima VM with the following:
colima start --network-addressOnce it has started, we can check it with the following:
colima list Figure 1: Displays the typical output of Colima’s `list` command
We now have a running Docker server to install our Kubernetes cluster onto.
Install Kind
Kind is the tool that will create our local Kubernetes cluster. It leverages specially created Docker images which allow it to do “unusual” things such as run systemd, nested containers, etc., which is where the magic is that allows it to work without needing full-on VMs for each node.
Install Kind with:
brew install kindCreate a Multi-Node Config for Kind
By default, Kind will create a single node cluster with a control plane role. In order to do anything more advanced, we need to add nodes explicitly. We can do this using a config file.
Save the following to a file called kind-config.yaml:
# 1 control plane node and 2 worker nodes
kind: Cluster
apiVersion: kind.x-k8s.io/v1alpha4
name:  kind-multi-node
nodes:
- role: control-plane
- role: worker
- role: worker
Click here for full configuration options.
Create a Kind Cluster With Config
Once we have the configuration file in place, we can create our cluster with the following:
kind create cluster --config=kind-config.yamlThis should produce output similar to the below in Figure 2.
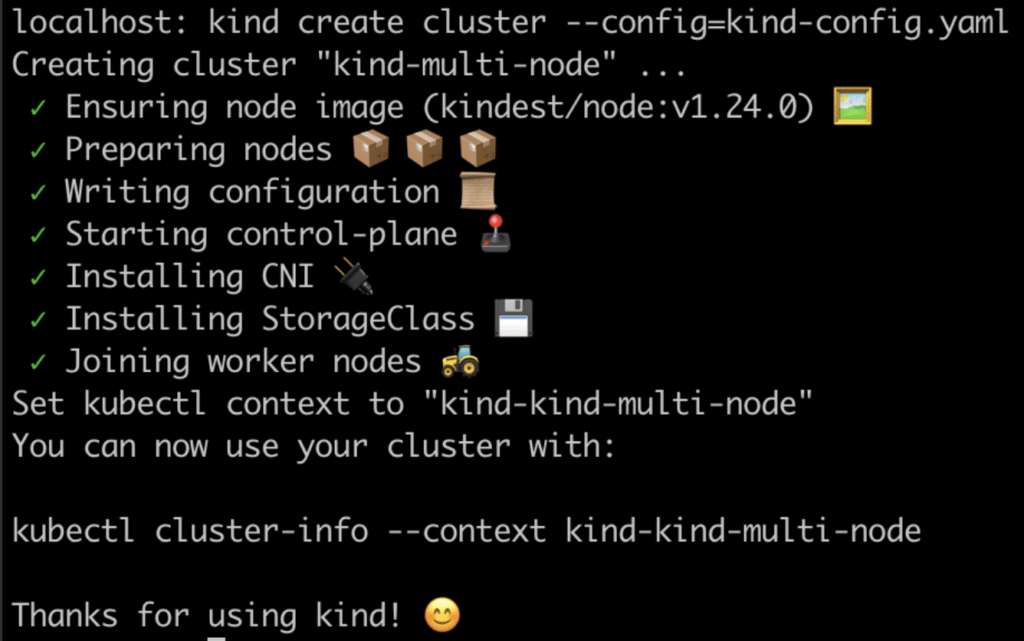
Figure 2: Displays the typical output of a successful Kind cluster creation
Configure Networking
One of the challenges of running Docker on a Mac (regardless of the application) is that there is extra networking required. On Linux, Docker runs natively, which allows its network interface to be accessed. With a VM, we need to do a little extra work. With Docker Desktop, there is a neat little tool called docker-mac-net-connect which manages this automatically. At the time of writing, the maintainers are looking into how to support Colima and other Docker runtime solutions. Unfortunately, for now, we have some manual setup to do.
First, we need to find a few bits of information.
On the Mac, run the following commands:
export colima_host_ip=$(ifconfig bridge100 | grep "inet " | cut -d' ' -f2)
echo $colima_host_ip
Check the output. It should be an IP address, typically 192.168.106.1
export colima_vm_ip=$(colima list | grep docker | awk '{print $8}')
echo $colima_vm_ip
Check the output. It should be an IP address, typically 192.168.106.2
export colima_kind_cidr=$(docker network inspect -f '{{.IPAM.Config}}' kind | cut -d'{' -f2 | cut -d' ' -f1)
echo $colima_kind_cidr
export colima_kind_cidr_short=$(docker network inspect -f '{{.IPAM.Config}}' kind | cut -d'{' -f2 | cut -d' ' -f1| cut -d '.' -f1-2)
echo $colima_kind_cidr_short
Check the output. For colima_kind_cidr it should be a CIDR range, typically 172.18.0.0/16, and colima_kind_cidr_short should be the first two octets, typically 172.18 and should match colima_kind_cidr.
export colima_vm_iface=$(colima ssh -- "ifconfig" | grep -B 1 $colima_vm_ip | cut -d' ' -f1)
echo $colima_vm_iface
Check the output. It should be the name of a network interface, typically col0.
export colima_kind_iface=$(colima ssh -- "ifconfig" | grep -B 1 $colima_kind_cidr_short | cut -d' ' -f1)
echo $colima_kind_iface
Check the output. It should be an interface name, typically in the format of br-1a2b3c4d5e6f
This gives us most of the information we need to route traffic to containers running inside the VM. We can now configure routing on our Mac and on the VM.
Then, we need to set up a route on the Mac to send traffic to the VM:
sudo route -nv add -net $colima_kind_cidr_short $colima_vm_ipWe now need to SSH into the VM and set up a route inside the VM to forward traffic to the Kind network. Since Colima does not have access to the host’s environment variables, we need to get our command ready to run in the Colima VM:
echo "sudo iptables -A FORWARD -s $colima_host_ip -d $colima_kind_cidr -i $colima_vm_iface -o $colima_kind_iface -p tcp -j ACCEPT"The output should look similar to this:
sudo iptables -A FORWARD -s 192.168.106.1 -d 172.18.0.0/16 -i col0 -o br-1a2b3c4d5e6f -p tcp -j ACCEPTCopy the output to your clipboard, as we will need to paste it into the VM. To do that, we need to start an ssh session:
colima ssh<Paste the above command>Then, close the ssh session with the following:
exitInstall MetalLB
MetalLB is a load-balancer implementation for bare metal Kubernetes clusters using standard routing protocols.
This will act as a stand-in for the AWS, GCP, or Azure load-balancer implementations which would create an external load-balancer resource and connect it to the cluster. The project is aimed at production-ready bare-metal installations of Kubernetes. However, in this use case, it offers convenience and consistent compatibility with the type of resources that we would typically define for a cloud-based setup.
To install MetalLB, apply the following manifest and wait for the resources to become ready:
kubectl apply -f https://raw.githubusercontent.com/metallb/metallb/v0.13.9/config/manifests/metallb-native.yaml
kubectl wait --namespace metallb-system \
                --for=condition=ready pod \
                --selector=app=metallb \
                --timeout=90s
NOTE: MetalLB does not recommend using the above manifest for production environments. As this is just a local development setup, it should not be a problem.
Configure MetalLB
In order for MetalLB to be able to configure load balancers, we need to define a couple of custom resources.
We need to assign a range within the kind_cidr subnet, which MetalLB can allocate to load balancers. This range should take into account the number of load balancers you might need. It is usually good practice to assign towards the end of the range, so if my kind_cidr was 172.18.0.0/16, I would choose 172.18.255.200 - 172.18.255.250. Choose a range that is appropriate to your local setup.
Save the following to a file called metallb-conf.yaml, replacing the addresses to suit your kind_cidr:
apiVersion: metallb.io/v1beta1
kind: IPAddressPool
metadata:
  name: example
  namespace: metallb-system
spec:
  addresses:
  - 172.18.255.200-172.18.255.250
---
apiVersion: metallb.io/v1beta1
kind: L2Advertisement
metadata:
  name: empty
  namespace: metallb-system
Apply the manifest:
kubectl apply -f metallb-conf.yamlThis now gives us everything in our setup. Figure 3 below illustrates the main components and how we have configured them together.
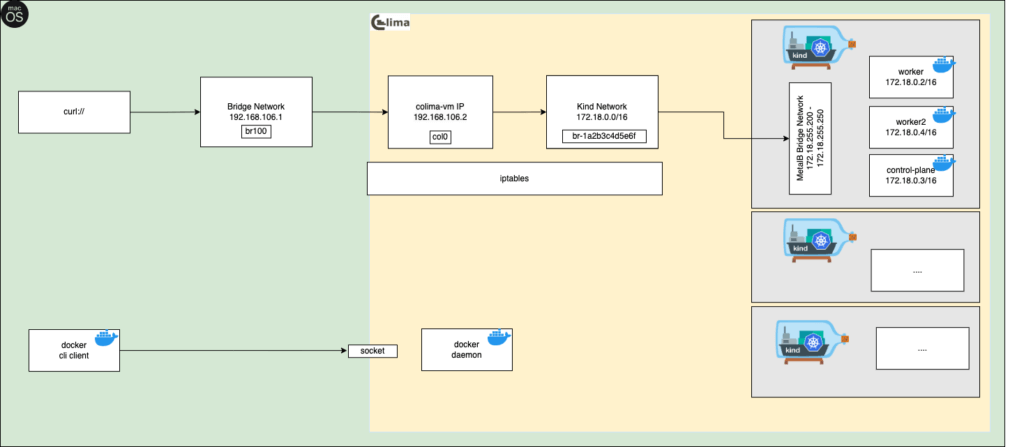
Figure 3: Displays the setup of the Kind clusters and MetalLB load balancer within Colima
Testing The Setup
Now we should have everything we need to have a local cluster as close as possible to our cloud deployments. Let’s test it out by creating a simple LoadBalancer service connected to two HTTP echo servers (so that we can distinguish between them from the output). This example was taken from the Kind documentation.
Save the following to a file called test-service.yaml:
kind: Pod
apiVersion: v1
metadata:
  name: foo-app
  labels:
    app: http-echo
spec:
  containers:
  - name: foo-app
    image: hashicorp/http-echo:0.2.3
    args:
    - "-text=foo"
---
kind: Pod
apiVersion: v1
metadata:
  name: bar-app
  labels:
    app: http-echo
spec:
  containers:
  - name: bar-app
    image: hashicorp/http-echo:0.2.3
    args:
    - "-text=bar"
---
kind: Service
apiVersion: v1
metadata:
  name: foo-bar-service
spec:
  type: LoadBalancer
  selector:
    app: http-echo
  ports:
  # Default port used by the image
  - port: 5678
Apply the manifest:
kubectl apply -f test-service.yamlWe should be able to see that the LoadBalancer has an ingress IP:
LB_IP=$(kubectl get svc/foo-bar-service -o=jsonpath='{.status.loadBalancer.ingress[0].ip}')
echo $LB_IP
If we curl this IP on port 5678 multiple times, we should see responses from both foo and bar:
for _ in {1..10}; do curl ${LB_IP}:5678; doneThe output should look similar to the output shown below in Figure 4:
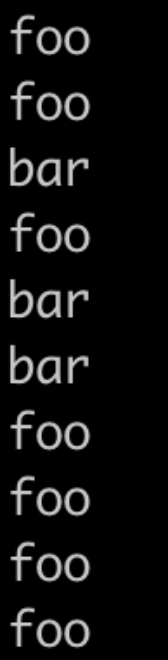
Figure 4: Displays the typical output of the test HTTP echo services with a load balancer
Conclusion
After a bit of configuration, we have created a local Kubernetes cluster that is as close as possible to cloud-based deployment. This should allow the same manifests to be applied and used in the same way. This will allow developers to locally test their changes in a setup that reflects their cloud environments. Platform engineers can test with settings and cluster configurations before touching any cloud deployments.
Published at DZone with permission of Matthew Revell-Gordon. See the original article here.
Opinions expressed by DZone contributors are their own.
Comments