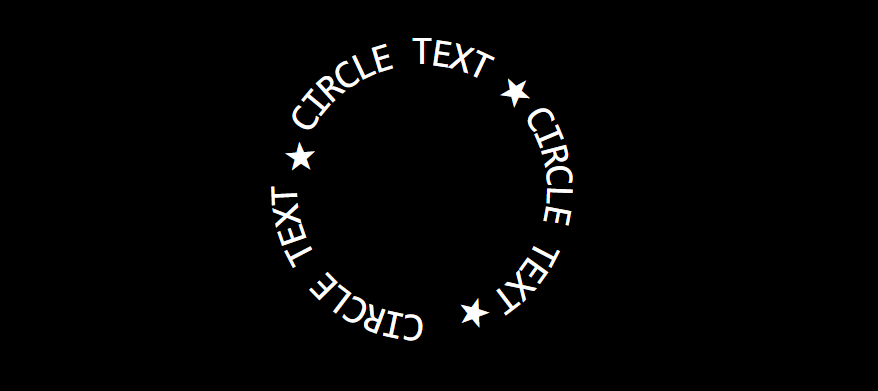
Circle Text With CSS and JavaScript
See how to give your HTML some circular flair.
Join the DZone community and get the full member experience.
Join For FreeIn this article, I will share the CSS and JS code to generate circle text from an HTML text element. This technique makes a span element for each letter and rotates it slightly. You can generate a circle text by adjusting the font size and circle radius.
Similar techniques have been implemented in online web applications like in the circle text generator in MockoFun.
![]()
So, let's see how to write text in a circle using CSS and JavaScript.
Circle Text Code
- Codepen project: Curved Text CSS
- GitHub Gist: Curved Text CSS Gist
Let's break down the steps to creating curved text or circle text using a little JS and CSS.
Circle Text HTML Code
x
<div>
<fieldset>
<label>Text:</label>
<input type="text" class="text" value="CIRCLE TEXT">
<label>Radius:</label>
<input class="radius" type="range" min="100" max="1000" value="500">
</fieldset>
</div>
<div class="curved-text">CIRCLE TEXT</div>
The HTML code is pretty straightforward. The div.curved-text element is actually the only important one because that's where we will write our circle text.
The other div element simply contains the configuration options for the curved text:
- input text for inputting the curved text content
- radius slider for adjusting the radius of the circle text
Circle Text CSS Code
x
.curved-text{
position:relative;
display:inline-block;
margin:0 auto;
font-size:32px;
}
.curved-text span{
min-width:0.5em;
text-align:center;
padding:30px;
margin:0px;
}
For creating the circle text effect, we will only use two CSS classes:
.curved-text: CSS class used for the wrapper element where the curved circle text will reside.curved-text span: CSS class used for each individual letters that make up the circle text
Circle Text JavaScript Code
xxxxxxxxxx
import jquery from "https://cdn.skypack.dev/jquery@~3.5.1";
function updateCurvedText($curvedText, radius) {
$curvedText.css("min-width", "initial");
$curvedText.css("min-height", "initial");
var w = $curvedText.width(),
h = $curvedText.height();
$curvedText.css("min-width", w + "px");
$curvedText.css("min-height", h + "px");
var text = $curvedText.text();
var html = "";
Array.from(text).forEach(function (letter) {
html += `<span>${letter}</span>`;
});
$curvedText.html(html);
var $letters = $curvedText.find("span");
$letters.css({
position: "absolute",
height:`${radius}px`,
// backgroundColor:"orange",
transformOrigin:"bottom center"
});
var circleLength = 2 * Math.PI * radius;
var angleRad = w/(2*radius);
var angle = 2 * angleRad * 180/Math.PI/text.length;
$letters.each(function(idx,el){
$(el).css({
transform:`translate(${w/2}px,0px) rotate(${idx * angle - text.length*angle/2}deg)`
})
});
}
var $curvedText = $(".curved-text");
updateCurvedText($curvedText,500);
function settingsChanged(){
$curvedText.text($(".text").val());
updateCurvedText($curvedText,$(".radius").val());
}
$(".radius").on("input change",settingsChanged);
$(".text").on("input change",settingsChanged);
The JavaScript is where the actual magic of the circle text happens.
First, we import the jQuery library. You could probably get away without using jQuery, but I just find it convenient in this case for manipulating the HTML elements of the circle text setup.
The updateCurvedText() function takes in two parameters:
$curvedText, which is a reference to the curved text wrapper elementradius: the radius for our curved/circle text
Let's see how this function works and how it creates our circle text:
xxxxxxxxxx
$curvedText.css("min-width", "initial");
$curvedText.css("min-height", "initial");
var w = $curvedText.width(),
h = $curvedText.height();
$curvedText.css("min-width", w + "px");
$curvedText.css("min-height", h + "px");
var text = $curvedText.text();
First, we reset the min-width and min-height properties of our wrapper. This will allow us to actually measure the dimensions of our text in its normal straight form.
We do this because when we curve the text, we will end up with an element that we don't want to be smaller than the original text. Otherwise, the element will jump all over the place when adjusting its radius.
We store the width (w), height (h) and also the text for later use.
xxxxxxxxxx
var html = "";
Array.from(text).forEach(function (letter) {
html += `<span>${letter}</span>`;
});
$curvedText.html(html);
Next, we need to wrap each letter of the text we want to curve into span elements. We simply go over each character of the text and add a span element around it. Then, we replace the content of our wrapper with the new HTML code.
Please notice that the span elements will use the CSS code we defined earlier.
Just a few more steps and we are done!
x
var $letters = $curvedText.find("span");
$letters.css({
position: "absolute",
height:`${radius}px`,
transformOrigin:"bottom center"
});
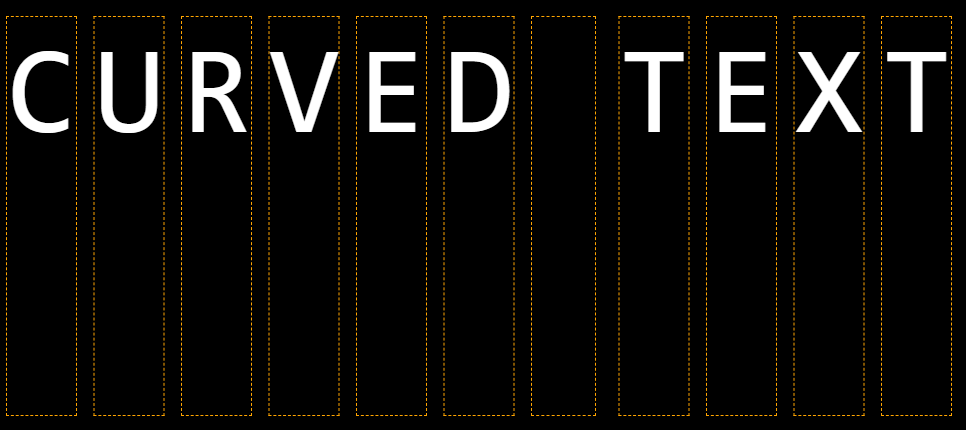
Imagine that each letter of our curved text becomes a rectangle element with the height set to the radius value of our desired circle text. We also need to set the transformOrigin to the bottom center of the rectangle, because we will want to rotate each letter by a certain angle to distribute the letters on a circle.
The image above is just to give you an idea of how the elements are transformed. We add the position:absolute CSS style, because we want all the letters to initially overlap. We want this because we want to rotate those rectangles around the same origin point.
And now, the last step — the actual rotation for writing text in a circle:
xxxxxxxxxx
var circleLength = 2 * Math.PI * radius;
var angleRad = w/(2*radius);
var angle = 2 * angleRad * 180/Math.PI/text.length;
$letters.each(function(idx,el){
$(el).css({
transform:`translate(${w/2}px,0px) rotate(${idx * angle - text.length*angle/2}deg)`
})
});
Let me explain the code:
The circleLength variable is not actually used. It's just a reminder of how to calculate the length of the circle.
This helps us determine the angle of a circle slice when we have the length of the slice edge. We simply divide this length by two times the radius of the whole circle.
The length of the circle slice, in our case, is the width of the original text. The idea here is that no matter how you bend text, the letters' combined width will always be the same.
Using the formula mentioned angleRad = w/(2*radius) gives us an angle in radians. CSS likes working with degrees though.
So, we simply need to transform the radians to degrees. We then divide this by the number of letters in the text. This will give us the angle step we need to rotate each letter.
With the angle calculated, we apply the CSS to translate each letter to the center of the word, and then rotate each letter with the same angle multiplied by the letter's index in the word.
When we rotate each letter, because we start at the angle value 0, we will end up with a curved text that starts on top.
That's fine, but it looks a lot better if the text in a circle is centered and balanced to the left and right.
So, we simply need to subtract text.length*angle/2 each time we rotate a letter.
In Conclusion
Now you know how to make curved text or circle text in CSS and JS.
If you don't want to start coding this yourself, you can use the Codepen snippet, or even better, you can use the MockoFun circle text generator. It's FREE and it gives you lots of flexibility, over 1,500 different fonts, changing colors and sizes with just a few clicks.
Opinions expressed by DZone contributors are their own.
Comments