Cloud Firestore: Read, Write, Update/Realtime, and Delete
Learn how to utilize the Firestore cloud database in your projects, including instructions for CRUD operations and real-time listeners.
Join the DZone community and get the full member experience.
Join For FreeAccording to the documentation, Cloud Firestore is a flexible, scalable database for mobile, web, and server development from Firebase and Google Cloud Platform.
Like Firebase's Realtime Database, it keeps your data in sync across client apps through real-time listeners and offers offline support for mobile and the web so you can build responsive apps that work regardless of network latency or Internet connectivity. This is just amazing if you ask me. It solves the whole essence of PWAs. You may ask how, of course. Well...
Cloud Firestore caches data that your app is actively using, so the app can write, read, listen to, and query data even if the device is offline. When the device comes back online, Cloud Firestore synchronizes any local changes back to Cloud Firestore.
Cloud Firestore also offers seamless integration with other Firebase and Google Cloud Platform products, including Cloud Functions.
However, Cloud Firestore is still in beta release. But if you’re enthusiastic (like me) and want to get hands-on immediately, then this tutorial will help you get started with basic read, write, update, and delete operations.
As usual, I like to prepare my tutorials to be very relevant and not very abstract, so let’s start building something with Firestore.
Create a new Android Studio project and connect it to Firebase. There are two ways you can do this depending on the version of Android Studio you’re on. If you're using version 2.2 (or later) of Android Studio, I recommend using the Firebase Assistant to connect your app to Firebase. The Firebase Assistant can connect your existing project or create a new one for you and automatically install any necessary Gradle dependencies. Here’s how you can do it.
To open the Firebase Assistant in Android Studio, click Tools > Firebase to open the Assistant window.
Click to expand one of the listed features (for example, Analytics), then click the provided tutorial link (for example, Log an Analytics event).
Click the Connect to Firebase button to connect to Firebase and add the necessary code to your app.
That's it!
If you are using the earlier versions of Android Studio, or you prefer not to use the Firebase Assistant, you can still add Firebase to your app using the Firebase console.
To add Firebase to your app, you'll need a Firebase project and a Firebase configuration file for your app.
Create a Firebase project in the Firebase console if you don't already have one. If you already have an existing Google project associated with your mobile app, click Import Google Project. Otherwise, click Create New Project.
Click Add Firebase to your Android app and follow the setup steps. If you're importing an existing Google project, this may happen automatically — you can just download the config file.
When prompted, enter your app's package name. It's important to enter the package name your app is using; this can only be set when you add an app to your Firebase project.
At the end, you'll download a google-services.json file. You can download this file again at any time.
If you haven't done so already, copy this into your project's module folder, typically app/.
Then you can add any of the Firebase libraries you’d like to use in your project to your build.gradle file. It is a good practice to always add com.google.firebase:firebase-core.
These instructions are according to the Firebase documentation, but if all of this is still not clear to you, you can always find more content on how to setup your Firebase project
Now that you have your Firebase project set up, let’s add the dependency for Firestore. As of the time of writing this tutorial, the latest version is compile ‘com.google.firebase:firebase-firestore:11.4.2’ — add it to your app level build.gradle file dependency block. It might have changed depending on when you’re reading this, so always check the Docs for the latest dependency and sync.
Before we proceed, let’s take a moment to understand the Firestore model
Cloud Firestore is a document database; it stores all your data in documents and collections. Documents operate more like containers of fields (key-value pairs) of diverse data types. However, a document cannot contain other documents, but it can point to a sub-collection. Collections, on the other hand, also operate like documents, but in this case, it’s a container of documents. Hence, it can’t contain anything else but documents.
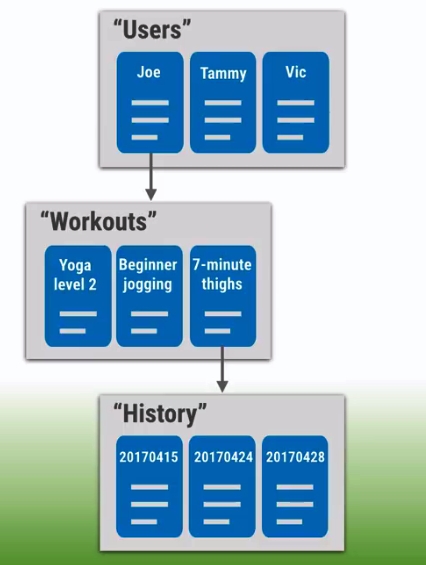
From the above image, “Users” is a collection of three documents: “Joe”, “Tammy”, and “Vic”. Document Joe, however, points to a sub-collection “Workouts”, which in itself has three documents (“Yoga level 2”, “Beginner Jogging”, and “7-minute thighs”). Then document “7-minute thighs” furthermore points to a sub-collection “History”, which in turn holds three more documents. This is deep nesting, and while it may seem a little bit complex, it is very efficient for query performance.
With this idea of how Firestore works, let’s dive into the firebase project we created earlier and start writing some code.
What Are We Building?
For the purposes of understanding the basics of Firestore in the best, simplest way, we’ll be building a phonebook database that stores contacts with three fields (Name, Email, and Phone). We’ll demonstrate how to write, read, update, and delete data from the database.
Let’s Get Cracking...
Usually, we would have started with setting up EditTextViews in the layout files, but we won’t be taking inputs from users in this one. Rather, we’ll just supply all the data we want to store from our Java files. So open up MainActivity and initialize Firestore:
public class MainActivity extends AppCompatActivity {

    private static final String NAME_KEY = "Name";
    private static final String EMAIL_KEY = "Email";
    private static final String PHONE_KEY = "Phone";

    FirebaseFirestore db;
    TextView textDisplay;

    @Override
    protected void onCreate(Bundle savedInstanceState) {
        super.onCreate(savedInstanceState);
        setContentView(R.layout.activity_main);

        db = FirebaseFirestore.getInstance();
        textDisplay = findViewById(R.id.textDisplay);
    }
}
You may have noticed I also initialized a Textview object and some String variables there; we’ll use the Textview to read data from the database and the String variables as “keys” for storing data in our document.
Considering the model we’ll be working with, it is best to think of the phonebook we are building as the database collection, so let’s add a newContact to our PhoneBook
Write
private void addNewContact() {
        Map < String, Object > newContact = new HashMap < > ();
        newContact.put(NAME_KEY, "John");
        newContact.put(EMAIL_KEY, "[email protected]");
        newContact.put(PHONE_KEY, "080-0808-009");
        db.collection("PhoneBook").document("Contacts").set(newContact)
            .addOnSuccessListener(new OnSuccessListener < Void > () {
                @Override
                public void onSuccess(Void aVoid) {
                    Toast.makeText(MainActivity.this, "User Registered",
                        Toast.LENGTH_SHORT).show();
                }
            })
            .addOnFailureListener(new OnFailureListener() {
                @Override
                public void onFailure(@NonNull Exception e) {
                    Toast.makeText(MainActivity.this, "ERROR" + e.toString(),
                        Toast.LENGTH_SHORT).show();
                    Log.d("TAG", e.toString());
                }
            });
So we first created the method addNewContact(). The method will create the newContact that we’d want to save in the PhoneBook and then pass the fields into it. Next, we specify in which document we want to save the contact. We do this by extending the Firestore instance we initialized earlier to accommodate both the collection and the document.
"db.set(newContact)" creates the document if it doesn’t already exist and also creates the PhoneBook collection so as to store the data in the appropriate path according to the DB path we initialized.
Then we use addOnSuccessListeners to make a Toast and keep us informed if the contact was registered successfully or if the registration failed. Looks like we’ve got it all set up! Before we run the app, we’ll need to head on over to the Firebase console and tweak our Rules tab a little bit to allow us to read and write to the database, because by default, nobody can read or write to it.
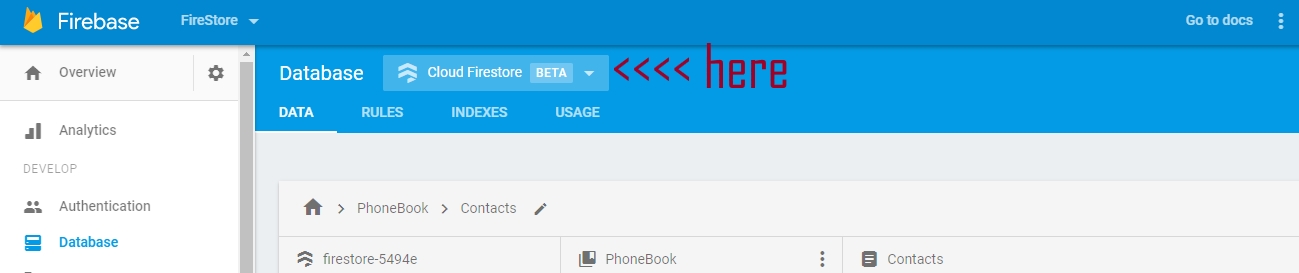
So go to your Firebase console, open the project, and make sure you select Firestore in the database tab
Then open the Rules tab. By default, it looks like this:
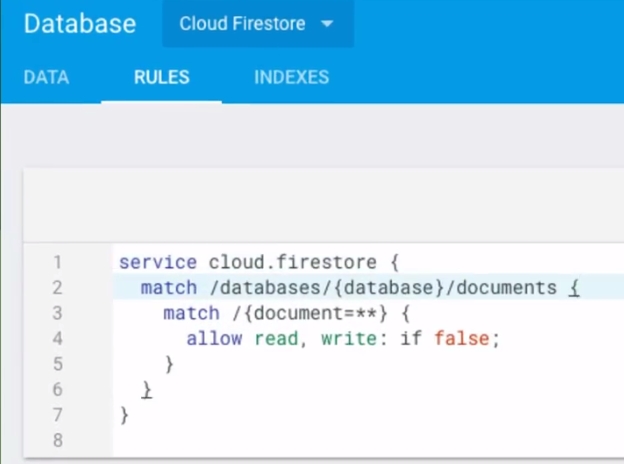
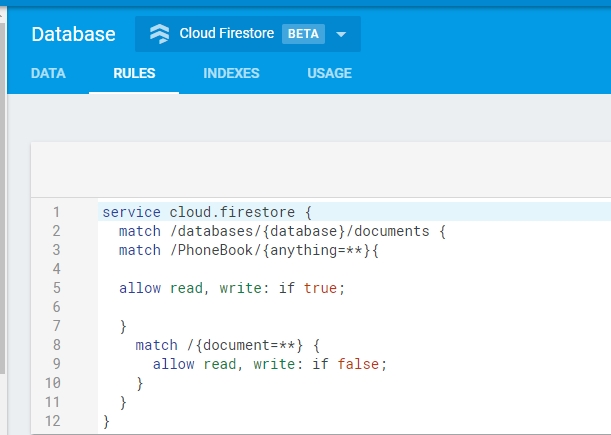
Then add this block of code to override the default security settings and gain external read and write access to your database
Match/your-collection/{anything=**}{
    allow read, write: if true;
}
At this point, your console Rules tab should look like this:
This is a terrible idea security-wise. If you’re working on a real project or something proprietary, you definitely want to properly authenticate users and define your security measures clearly. This tweaking is only serving the purpose of this tutorial.
Having set up the security rules in the console, publish it and wait for a few minutes. after which you can now run the app.
Hurrray! The app works. You’ve just stored your data in Firestore.
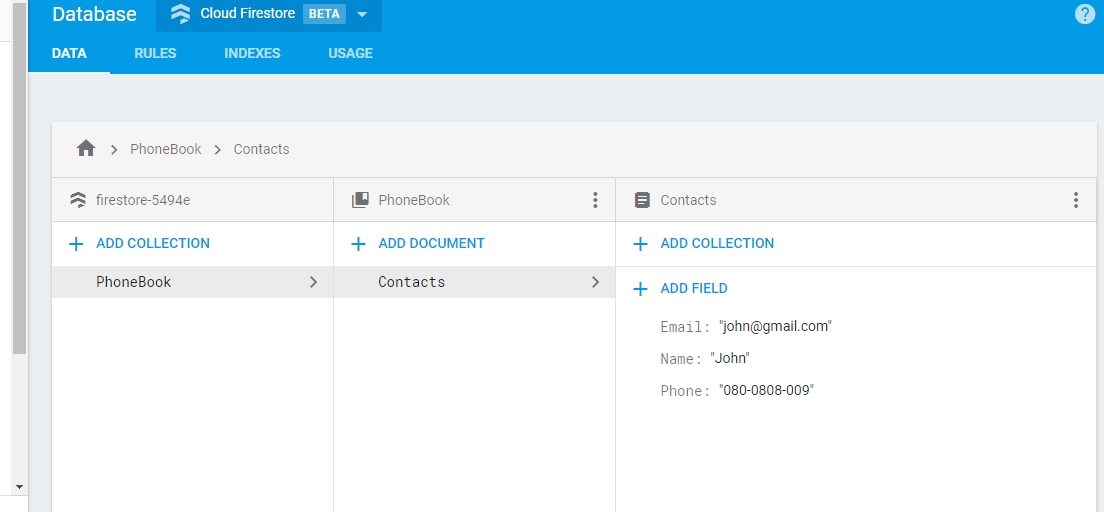
Now let’s try and read the data we’ve stored in the database to a TextView.
Read
First, we create the ReadSingleContact() method that’ll read data from the database and pass the data to the TextView object that we earlier initialized for this purpose.
private void ReadSingleContact() {

    DocumentReference user = db.collection("PhoneBook").document("Contacts");
    user.get().addOnCompleteListener(new OnCompleteListener < DocumentSnapshot > () {
            @Override
            public void onComplete(@NonNull Task < DocumentSnapshot > task) {
                if (task.isSuccessful()) {
                    DocumentSnapshot doc = task.getResult();
                    StringBuilder fields = new StringBuilder("");
                    fields.append("Name: ").append(doc.get("Name"));
                    fields.append("\nEmail: ").append(doc.get("Email"));
                    fields.append("\nPhone: ").append(doc.get("Phone"));
                    textDisplay.setText(fields.toString());
                }
            }
        })
        .addOnFailureListener(new OnFailureListener() {
            @Override
            public void onFailure(@NonNull Exception e) {

            }
        });

}
If we run the app, it populates the TextView object with the information stored on the database, as expected.
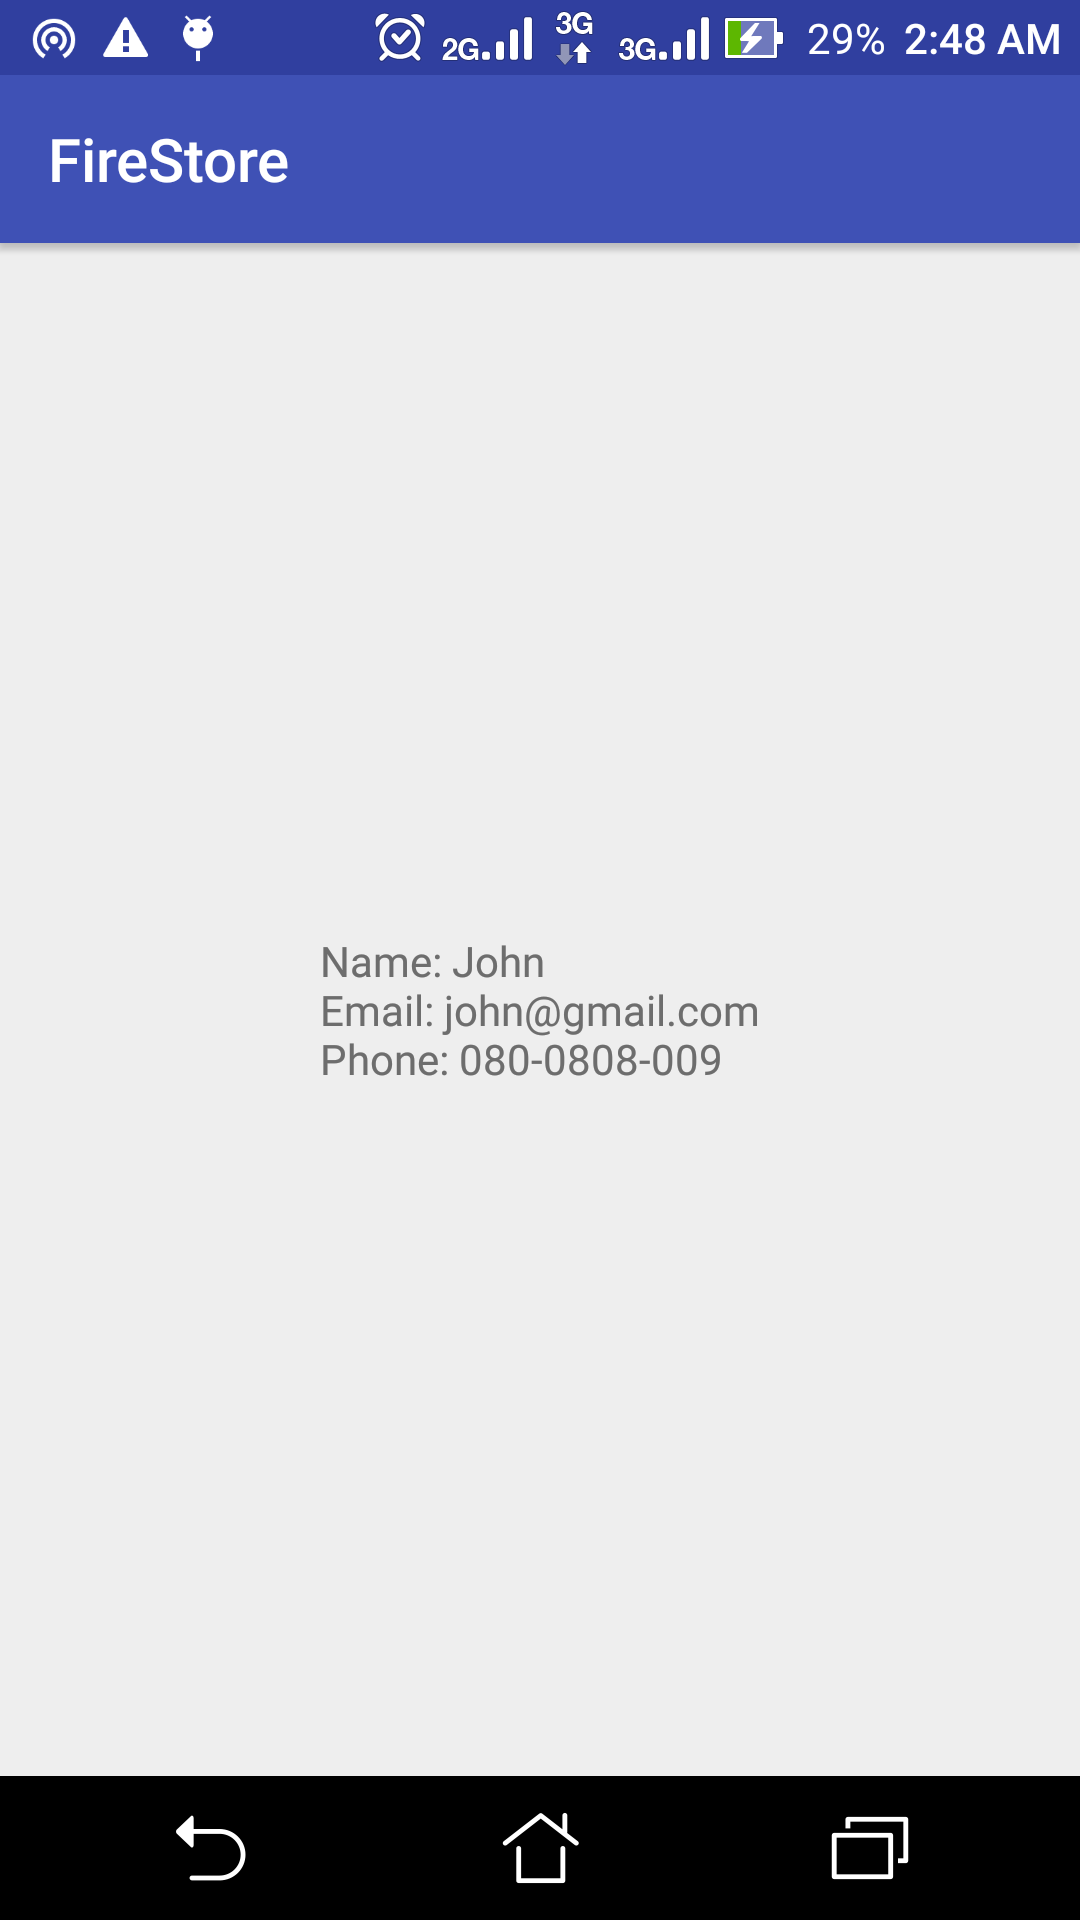
Next, we'll try to update the already-stored contact information.
Update
private void UpdateData() {
DocumentReference contact = db.collection("PhoneBook").document("Contacts");
contact.update(NAME_KEY, "Kenny");
contact.update(EMAIL_KEY, "[email protected]");
contact.update(PHONE_KEY, "090-911-419")
.addOnSuccessListener(new OnSuccessListener < Void > () {
@Override
public void onSuccess(Void aVoid) {
Toast.makeText(MainActivity.this, "Updated Successfully",
Toast.LENGTH_SHORT).show();
}
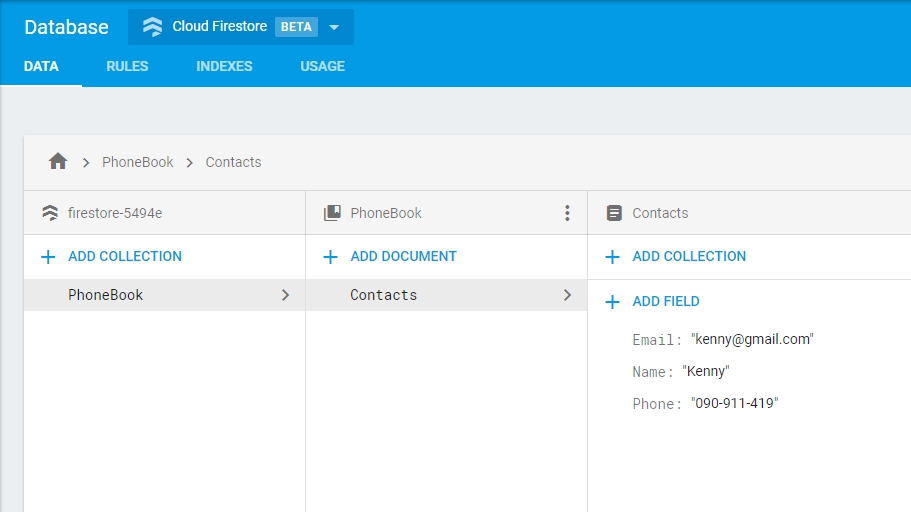
});Now, running the app will update the earlier stored data with the newly provided values in the UpdateData() method.
In the Data tab of your Firebase console, you'll find that the changes have been updated:
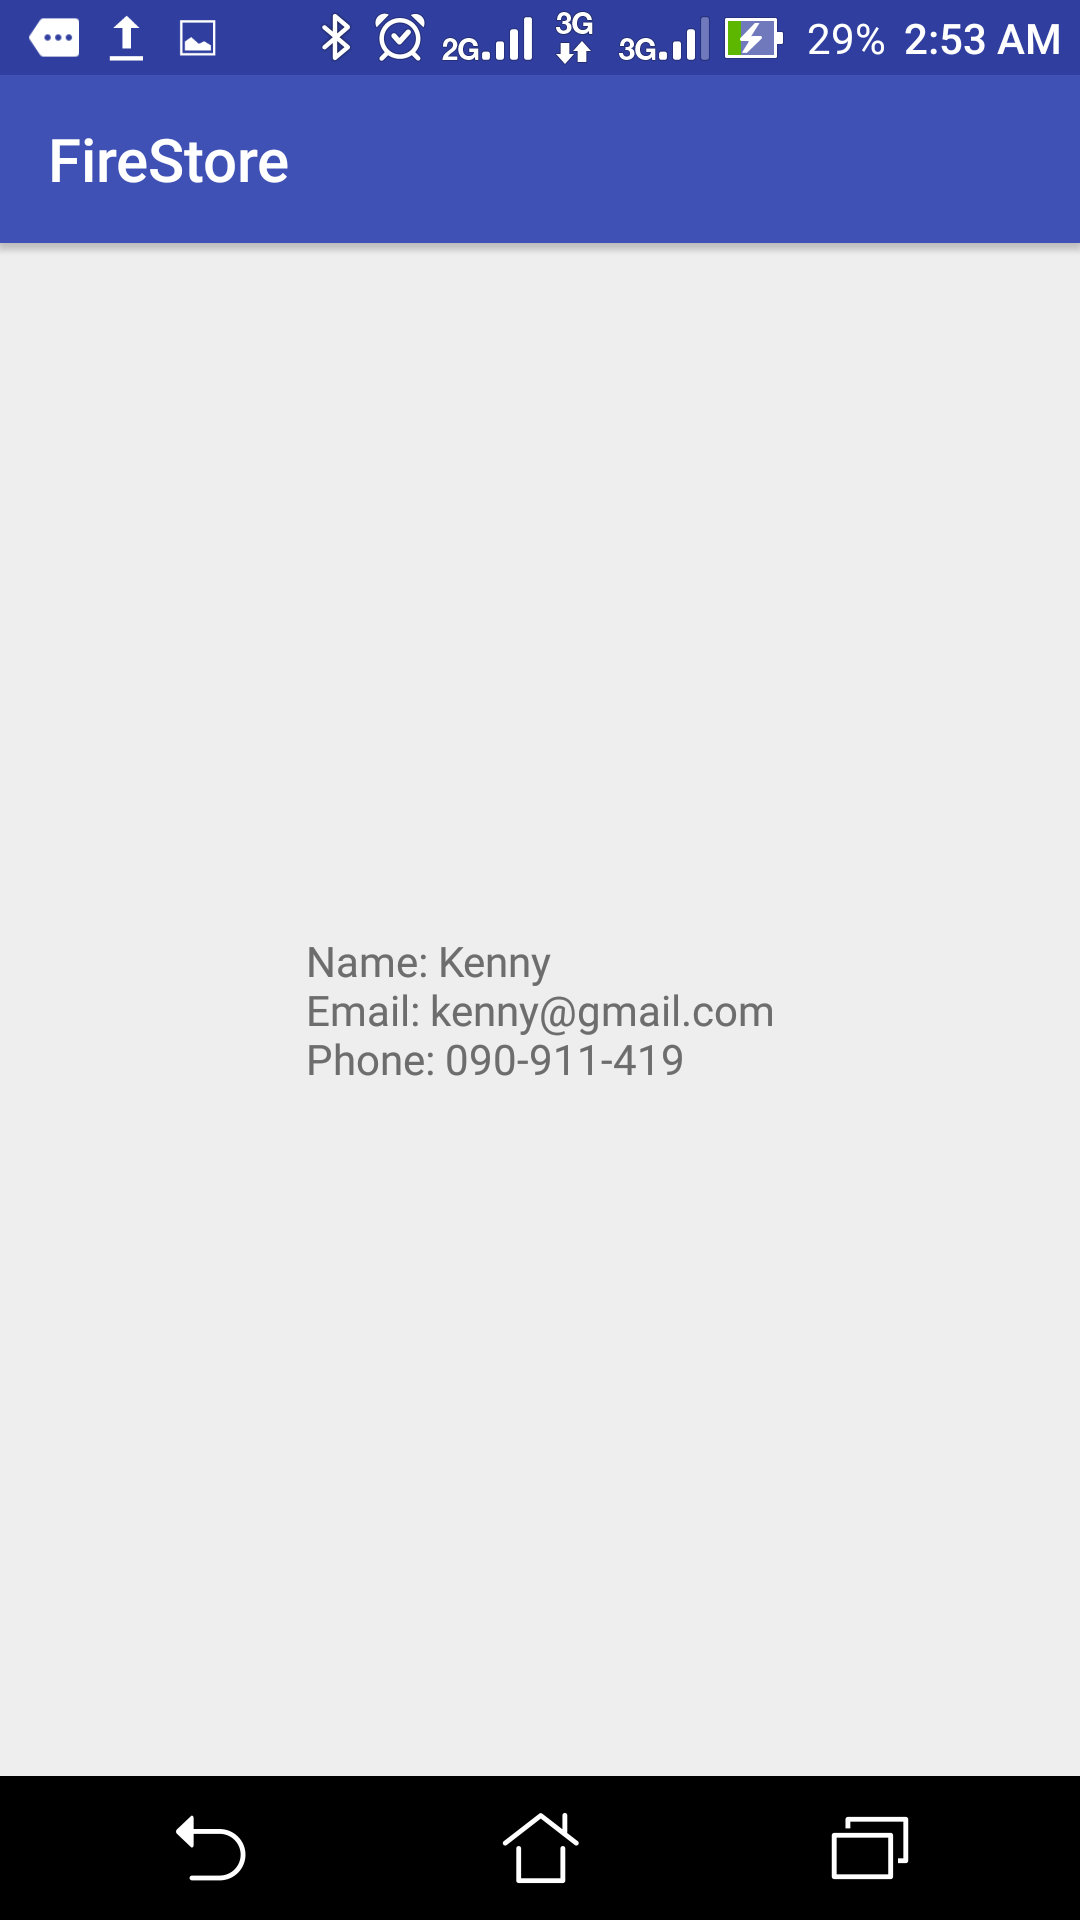
And if you run the ReadSingleContact() method again, it'll update the TextView with the current details:
Realtime Updates
Next up, we listen for updates on the document "Contacts". If we update these changes without running the code to read data from the database, we might not be able to see the changes on the UI, so we'll create a method that listens for updates in real time and makes a Toast to notify users of the changes.
private void addRealtimeUpdate() {

    DocumentReference contactListener = db.collection("PhoneBook").document("Contacts");
    contactListener.addSnapshotListener(new EventListener < DocumentSnapshot > () {
        @Override
        public void onEvent(DocumentSnapshot documentSnapshot, FirebaseFirestoreException e) {

            if (e != null) {

                Log.d("ERROR", e.getMessage());
                return;
            }

            if (documentSnapshot != null && documentSnapshot.exists()) {

                Toast.makeText(MainActivity.this, "Current data:" + documentSnapshot.getData(), Toast.LENGTH_SHORT).show();
            }
        }
    });
}
Finally, we perform the delete operation to delete the contact from the database.
Delete
private void DeleteData() {

    db.collection("PhoneBook").document("Contacts")
        .delete().addOnSuccessListener(new OnSuccessListener < Void > () {
            @Override
            public void onSuccess(Void aVoid) {

                Toast.makeText(MainActivity.this, "Data deleted !",
                    Toast.LENGTH_SHORT).show();

            }
        });
}
This block successfully deletes this contact from the PhoneBook database. So congratulations! You can now perform basic operations on one of the most sophisticated and newest online databases in the world. This is just a glimpse of what you can do with Cloud Firestore — there are a lot more features and operations to perform, and my intention was just to get you started with the basics.
Thanks for reading, and you are welcome to make contributions and ask for clarifications. I'm available on Twitter.
Published at DZone with permission of Peter Ekene Eze. See the original article here.
Opinions expressed by DZone contributors are their own.
Comments