Communication Between Components Using @Input() in Angular 2
Here's an Angular 2 tutorial that focuses on how a child component can interact with a parent component using the @Input() property.
Join the DZone community and get the full member experience.
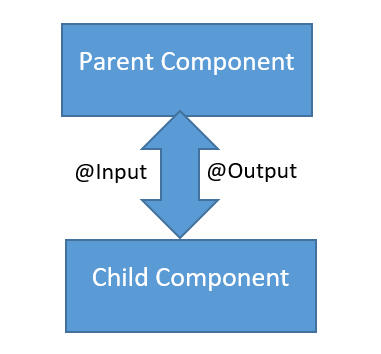
Join For Freein angular 2 a component can share data and information with another component by passing data or events. a component can be used inside another component, thus creating a component hierarchy. the component being used inside another component is known as the child component and the enclosing component is known as the parent component. components can communicate to each other in various ways, including:
- using @input()
- using @output()
- using services
- parent component calling viewchild
- parent interacting with child using a local variable
in this article, we will focus on how a child component can interact with a parent component using the @input() property. we’ll also look into intercepting the input message and logging changes in the input message.
let us consider the components created in the listing below. we have created a component called appchildcomponent, which will be used inside another component.
import { component } from '@angular/core';
@component({
    selector: 'appchild',
    template: `<h2>hi {greetmessage}</h2>`
})
export class appchildcomponent {
    greetmessage: string = "i am child";
}
we have also created another component called appcomponent. inside appcomponent, we are using appchildcomponent:
import {component } from '@angular/core';
import {appchildcomponent} from './appchild.component';

@component({
	selector: 'my-app',
	template: `<h1>hello {message}</h1> <br/>
	<appchild></appchild>`,
})

export class appcomponent {
	message : string = "i am parent";
}
in the above listings, appcomonent is using appchildcomponent, hence appcomponent is the parent component and appchildcomponent is the child component.
passing data from parent component to child component
let us start with passing data from the parent component to the child component. this can be done using the input property. @input decorator or input properties are used to pass data from parent to child component. to do this, we’ll need to modify child appchildcomponent as shown in the listing below:
import { component,input,oninit } from '@angular/core';

@component({
    selector: 'appchild',
    template: `<h2>hi {{greetmessage}}</h2>`
})
export class appchildcomponent  implements oninit{

    @input() greetmessage: string ;
        constructor(){

        }
        ngoninit(){

        }
    }
as you notice, we have modified the greetmessage property with the @input() decorator. also, we have implemented oninit, which will be used in demos later. so essentially, in the child component, we have decorated the greetmessage property with the @input() decorator so that value of greetmessage property can be set from the parent component.
next, let us modify the parent component appcomponent to pass data to the child component.
import {component } from '@angular/core';
import {appchildcomponent} from './appchild.component';

@component({
    selector: 'my-app',
    template: `<h1>hello {{message}}</h1> <br/>
  <appchild [greetmessage]="childmessage"></appchild>
  `,
})
export class appcomponent  {

        message : string = "i am parent";
        childmessage : string = "i am passed from parent to child component"

    }
from the parent component, we are setting the value of the child component’s property greetmessage. to pass a value to the child component, we need to pass the child component property inside a square bracket and set its value to any property of parent component. we are passing the value of childmessage property from the parent component to the greetmessage property of the child component.

intercept input from parent component in child component
we may have a requirement to intercept data passed from the parent component inside the child component. this can be done using getter and setter on the input property.
let us say we wish to intercept an incoming message in the child component, and combine it with some string. to achieve this, we created a property called _greetmessage and using @input() decorator creating getter and setter for _greetmessage property. in the getter, we’re intercepting the input from the parent component and combining it with the string. this can be done as shown in the next listing:
import { component,input,oninit } from '@angular/core';

@component({
    selector: 'appchild',
    template: `<h2>hi {{_greetmessage}}</h2>`
})
export class appchildcomponent  implements oninit{


        _greetmessage : string;
        constructor(){

        }
        ngoninit(){

        }

    @input()
        set greetmessage(message : string ){
            this._greetmessage = message+ " manipulated at child component";
        }
        get greetmessage(){
            return this._greetmessage;
        }

    }
in the setter, we are manipulating incoming data from the parent component and appending some text to that. keep in mind that the behavior of the parent component would not change whether we are intercepting the message or not. to explore it further, let us take another example and create a child component, which will display names passed from the parent. if the parent passes empty name value, then the child component will display some default name. to do this, we have modified the setter in the child component. in the setter, we are checking whether the name value is passed or not. if it is not passed or it is an empty string, the value of name would be assigned to a default value. the child component can be created as shown in the listing below:
import { component,input,oninit } from '@angular/core';

@component({
    selector: 'appchild',
    template: `<h2>{{_name}}</h2>`
})
export class appchildcomponent  implements oninit{


        _name: string;
        constructor(){

        }
        ngoninit(){

        }

    @input()
        set name(name : string ){
            this._name = (name && name.trim()) || "i am default name";
        }
        get name(){
            return this._name;
        }

    }
as you notice in the @input() setter, we are intercepting the value pass from the parent, and checking whether it is an empty string. if it is an empty string, we are assigning the default value for the name in the child component.
we can use appchildcomponent inside parent component appcomponent as shown in the listing below:
import {component } from '@angular/core';
@component({
selector: 'my-app',
template: `<h1>hello {{message}}</h1> <br/>
<appchild *ngfor="let n of childnamearray"
[name]="n">
</appchild>
`,
})
export class appcomponent {
message : string = "i am parent";
childmessage : string = "i am passed from parent to child component"
childnamearray = ['foo','koo',' ','moo','too','hoo',''];
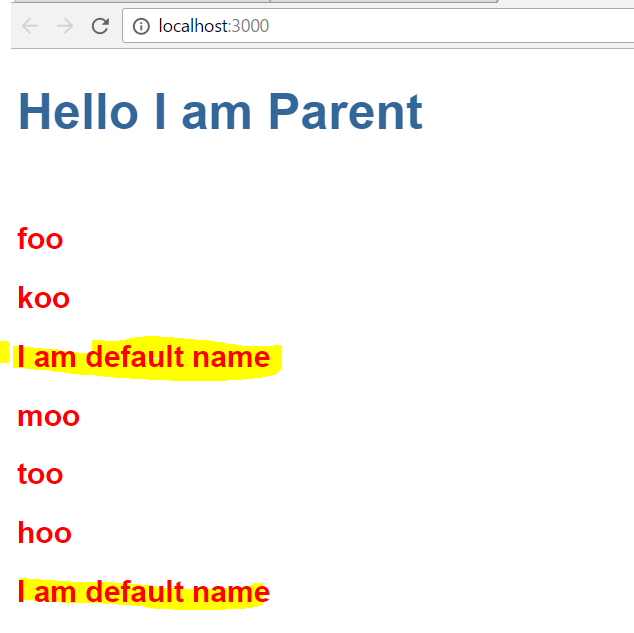
}inside parent component, we are looping the child component through all items of childnamearray property. a few items of the childnamearray are empty strings, these empty strings would be intercepted by the child component setter and set to the default value. the child component will render the values passed from the parent component as shown in the image below:
ngonchanges and @input() decorator
we can intercept any input property changes with onchanges lifecycle hook of the component. there could be various reasons that input property can be changed in the parent component and needed to be intercepted in the child component. this can be done on the onchanges life cycle hook.
let’s imagine we need to log changes on an input variable called counter. the value of counter is set by the parent component, and can be changed in the parent component. whenever the value of counter is changing in the parent component, we need to log the changes in the child component. we created a child component as shown in listing below:
import { component,input,onchanges,simplechange } from '@angular/core';
@component({
selector: 'appchild',
template: `<h2>{{counter}}</h2>
<h2>value changed</h2>
<ul>
<li *ngfor="let c of changelog">{{c}}</li>
</ul>
`
})
export class appchildcomponent implements onchanges{
@input() counter = 0 ;
changelog : string[] = [];
constructor(){
}
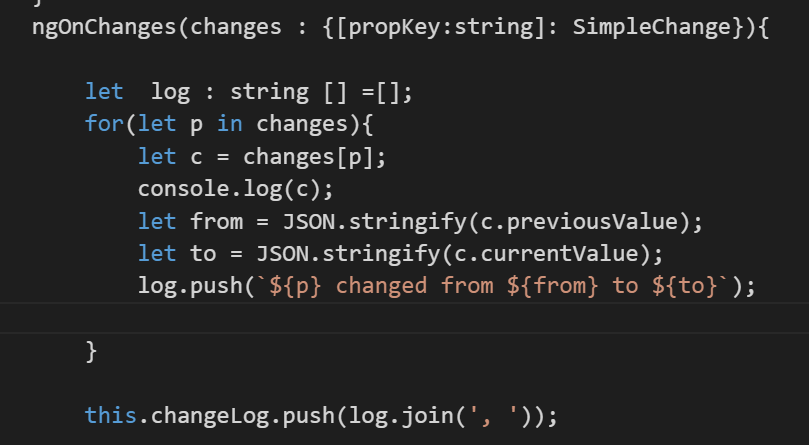
ngonchanges(changes : {[propkey:string]: simplechange}){
let log : string [] =[];
for(let p in changes){
let c = changes[p];
console.log(c);
let from = json.stringify(c.previousvalue);
let to = json.stringify(c.currentvalue);
log.push(`${p} changed from ${from} to ${to}`);
}
this.changelog.push(log.join(', '));
}
}essentially we are doing the following:
- implementing onchanges life cycle hook
- in ngonchanges method, passing array of type simplechange
- iterating through all the changes and pushing it to a string array
whenever the value of counter will be changed, the child component will log the previous value and current value. the reading of the previous value and current value for each input properties is done in the ngonchnages method as shown in the image below.
at the parent component, we are assigning a new random number to count the property on click of the button, and also setting the count property as the value of the child component’s input property counter.
import {component } from '@angular/core';
@component({
selector: 'my-app',
template: `<h1>hello {{message}}</h1> <br/>
<button (click)="nextcount()">change count</button> <br/>
<appchild [counter]="count"></appchild>
`,
})
export class appcomponent {
count : number = 0;
nextcount(){
console.log("hahahah");
this.count = this.getrandomintinclusive(this.count,this.count+1000);
}
getrandomintinclusive(min :number, max: number) {
min = math.ceil(min);
max = math.floor(max);
return math.floor(math.random() * (max - min + 1)) + min;
}
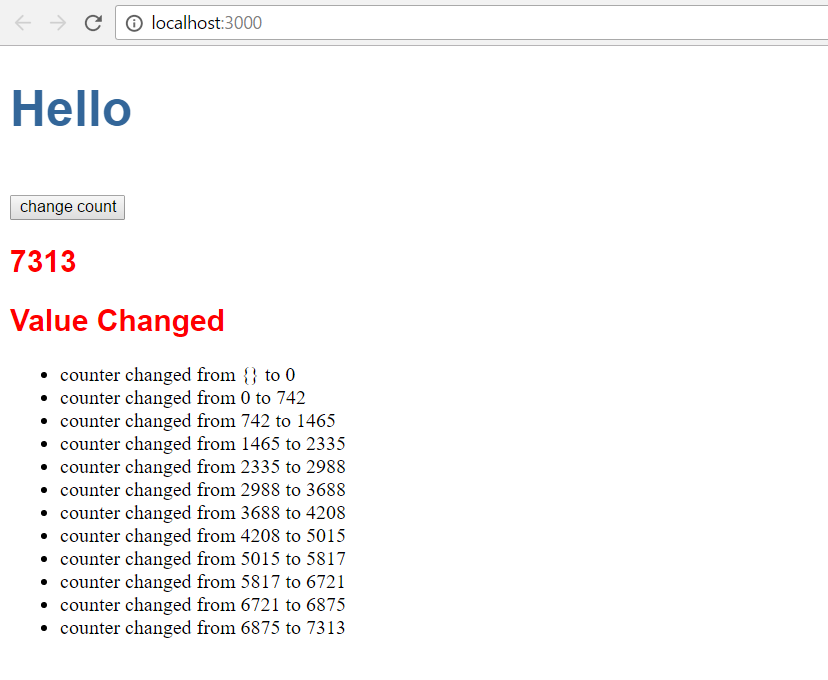
}essentially in the parent component, we are setting the value of the child component’s input property counter with the parent component’s count property, and also changing its value on each click of the button. whenever the count property value changes at the parent component, the value of the counter input property will be changed in the child component and the changed value would be logged.
on running the application, we may get the expected output with a change log as shown in the image below:
conclusion
in this article, we learned how to pass data from a parent component to a child component. we also learned how to intercept the input message and log changes. in further posts, we will explore more aspects of component communication. i hope you found this post useful, thanks for reading!
Published at DZone with permission of Dhananjay Kumar. See the original article here.
Opinions expressed by DZone contributors are their own.
Comments