Contributing an IoT LoRaWAN Raspberry Pi RAK831 Gateway to the Things Network
Learn more about connecting your LoRaWAN Raspberry Pi to the Things Network.
Join the DZone community and get the full member experience.
Join For FreeLoRa and LoRaWAN are getting the de-facto wireless IoT network in my area. It's no surprise that traditional telecom providers like Swisscom try to monetize the IoT sector. Luckily, there is an open and free alternative: https://www.thethingsnetwork.org/. Volunteers, enthusiasts, and members in the different TTN communities build gateways and offer free LoRaWAN network access. I wanted to contribute to that grassroots movement with building my gateway, providing LoRaWAN access to my neighborhood.

LoRaWAN TheThingsNetwork Gateway

TheThings Network LoRaWAN Gateways in Switzerland
RAK831 Semtech SX1301 LoRaWAN Gateway Module
RAK Wireless sells the RAK831 module:

Application Diagram (Source: Rakwireless.com)
As a host, I’m using a Raspberry Pi, which then will be able to act as a multi-channel LoRaWAN gateway supporting 10 channels (8 downlink, 1 uplink, and 1 FSK channel). The GPS module is used as a timestamp interface for the SX1301.
The Kit
I ordered my RAK831 868 MHz kit from AliExpress without a Raspberry Pi. I’m using it with a Raspberry Pi 3 Model B V1.2.

RAK831 Kit Content
The LoRA and the GPS module are connected with an antenna cable:

RAK831 Modules
I opted for the kit with the external GPS antenna and the aluminum enclosure with a heat sink. To fit the LoRa Gateway module into the case, the two sides brackets of the gateway PCB need to be removed.
Never (never!) power the gateway without the antenna attached; otherwise, it might burn the transceiver!
Raspberry Pi Setup
I assume basic knowledge about how to set up a Raspberry Pi: set up your system with a recent distribution.
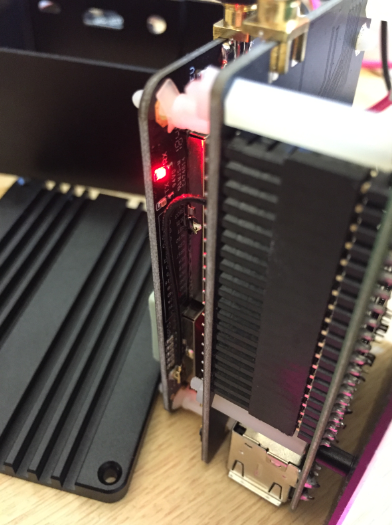
I do not recommend to fully assemble the enclosure during software installation, as otherwise the LED of the LoRa board cannot be monitored:

Pi with Gateway
Because the Semtech chip produces a lot of heat that blue heat transmission material is placed on top of the heat-sink via’s to transmit the heat to the enclosure.
Enable SPI
The Raspberry Pi gateway software communicates with the LoRa transceiver. The SPI peripheral is not turned on by default. To enable it, do the following.
Select ‘Interfacing Options’
Interfacing Options
Select ‘SPI’:
SPI
Select ‘yes’ to enable SPI:
Select SPI
Installing Gateway
First, get a general update:
sudo apt-get update && sudo apt-get upgrade && sudo apt-get install git -yNext, cd to the user account
cd ~Clone the gateway from git:
git clone https://github.com/ttn-zh/ic880a-gateway.git ~/ic880a-gatewaycd into that directory:
cd ic880a-gatewayReset Pin
By default, the gateway is using pin 25 to reset the gateway. This was the reason why I was not able to use the gateway out of the box; it took me a while to realize. So, change the reset pin setting from pin 25 to 17! There are actually two scripts: one in ~/ic880a-gateway/start.sh and one in /opt/ttn-gateway/bin/start.sh. Both files need to be modified!
The one in the ic880a-gateway folder can be modified right away and is copied to /opt/ttn-gateway/bin/start.sh during installation.

Reset pin number in start.sh
Setup
Run the script inside the ic880a-gateway folder:
sudo ./install.shIt shall report the EUI number: write it down or copy it:

EUI
Now, stop here for a while. First, we need to set up the TTN side. Register for a The-Things-Network (TTN) account.
Then, go to the ‘Console’ area on your TTN account where you can register a new gateway. Enter all the information, but make sure you select ‘I’m using the legacy packet forwarder.’ And now, we have to enter that EUI number we noted in the previous step:

Legacy Packet Forwarder
Fill out the other fields, e.g.:

Register Gateway
Remember the GPS coordinates as you will need them on the Raspberry Pi for initial setup, then proceed with the registration with pressing ‘N.’ Then, enter all the information:

Continue Setup
The information entered gets stored in /opt/ttn-gateway/bin/local_conf.json. In that same folder, there is a global_conf.json, which configures the other parts of the gateway.
In the end, the machine gets rebooted. Don’t forget to verify the reset pin number in /opt/ttn-gateway/bin/start.sh!
Reboot and check the logs with:
systemctl status ttn-gateway.serviceIt should report something like this:
Feb 24 17:20:29 LoRaWanGW ttn-gateway[356]: INFO: [down] for server router.eu.thethings.network PULL_ACK re
Feb 24 17:20:29 LoRaWanGW ttn-gateway[356]: ##### 2019-02-24 16:20:29 GMT #####
Feb 24 17:20:29 LoRaWanGW ttn-gateway[356]: ### [UPSTREAM] ###
Feb 24 17:20:29 LoRaWanGW ttn-gateway[356]: # RF packets received by concentrator: 0
Feb 24 17:20:29 LoRaWanGW ttn-gateway[356]: # CRC_OK: 0.00%, CRC_FAIL: 0.00%, NO_CRC: 0.00%
Feb 24 17:20:29 LoRaWanGW ttn-gateway[356]: # RF packets forwarded: 0 (0 bytes)
Feb 24 17:20:29 LoRaWanGW ttn-gateway[356]: # PUSH_DATA datagrams sent: 1 (241 bytes)
Feb 24 17:20:29 LoRaWanGW ttn-gateway[356]: # PUSH_DATA acknowledged: 100.00%
Feb 24 17:20:29 LoRaWanGW ttn-gateway[356]: ### [DOWNSTREAM] ###
Feb 24 17:20:29 LoRaWanGW ttn-gateway[356]: # PULL_DATA sent: 3 (100.00% acknowledged)
At the end, and with yet another reboot, the RX LED shall now be on:
Success LED is ON
Check the status of the gateway in the TTN Router console:

Gateway Overview
Congratulations, you have a LoRaWAN gateway!
Monitoring TCP Port 1700
A good way to check that everything is working is to use ‘tcpdump.’ If not already installed, install it with:
sudo apt-get install tcpdumpThen, I can monitor the traffic with
sudo tcpdump -AUq port 1700which should show something like this:

tcpdump
Another good way to verify the system is to check the syslog:
sudo tail -f /var/log/syslog
invalid gps time
As seen above, my GPS is not configured properly, so this is something I have to cover next.
GPS
For me, the GPS module was attached to ttyS0. Use the following to see the NMEA messages coming in:
sudo cat /dev/ttyS0Which should show some GPS messages coming.
What is missing is that the messages are consumed to the gateway. For this, I have to edit the /opt/ttn-gateway/bin/global_conf.json configuration file. Below what I had installed:
 original GPS configuration
I changed this to:
/* GPS configuration */
"gps_tty_path": "/dev/ttyS0",
"fake_gps": false,
"ref_latitude": 10,
"ref_longitude": 20,
"ref_altitude": -1,
The other thing is that I have to disable the login Shell on the UART. This is a setting in the configs:
sudo raspi-configthen Interfacing Options:
Interfacing Options
Then, select Serial:

Serial config
Disable the Login Shell:

login shell disabled
With the Serial Port Hardware enabled:

serial hw port enabled
Then, confirm and reboot. Login Shell is disabled and the interface is enabled. And now, I have a working GPS:


Working GPS
Summary
Contributing to an open-source and community network is a fun learning experience. The gateway is now working for several days and is handling LoRaWAN packets from my neighborhood. The next step is to attach a long fiberglass antenna and put that gateway with a fiberglass antenna on top of my house for a larger coverage
Happy LoRaWANing!
Helpful Links
- What is LoRa?
- RAK Wireless
- http://support.rakwireless.com/
- https://www.raspberrypi.org/
- https://www.thethingsnetwork.org/labs/story/rak831-lora-gateway-from-package-to-online
- RAK831
- https://www.hackster.io/naresh-krish/getting-started-with-the-rak831-lora-gateway-and-rpi3-e3351d
- RAK831 on AliExpress: search for “Lora Gateway Concentrator Module Kit, RAK831, base on SX1301, 433/470/868/915MHz, Wireless Spread Spectrum Transmission”
- https://www.hackster.io/rak-wireless/rak831-raspberry-pi3-gateway-and-rak811-loranode-user-manual-748f5b
- The Things Network
- Detect the GPS module of the official RAK831 shield for Raspberry Pi 3.
- TTN Mapper
Published at DZone with permission of Erich Styger. See the original article here.
Opinions expressed by DZone contributors are their own.
Comments