Controlling Web Audio With React and Redux Middleware
We look at how to use the popular React framework and Redux middleware together to create a web-based phone application.
Join the DZone community and get the full member experience.
Join For Free

let’s build a touchtone keypad!
if you’ve built react/redux applications before, you know there is a standard pattern of uni-directional data flow. the ui dispatches an action. a reducer handles the action, returning a new application state. the ui reorganizes itself accordingly.
but what if you need a redux action to trigger interaction with a complex system? say, a collection of web audio components used to create or analyze sound. those are not serializable objects. they shouldn’t be managed by a reducer. nor should a ui component manage them because it could be subject to unmounting at runtime, causing a loss of the audio system.
instead, we use middleware, and that is the focus of this article.
middleware is long-lived, and can therefore be expected to maintain whatever audio system we construct for the life of the application. furthermore, it has access to the store, so it can inspect the application state, dispatch actions in response to events from its charge, e.g., a web audio system, and can respond to actions that direct it to interact with such a system.
in this demo, we will keep it simple and just trigger some sounds in response to an action. the goal is simply to demonstrate how to use middleware to adapt the web audio api system to a redux application.
to celebrate the fact that i just this month ditched my landline after 12 years, (porting the number to the awesome openphone.co online service), we will simulate a touchtone telephone keypad.
researching the problem domain
 touchtone telephones use a system called
dtmf
(dual-tone multi-frequency) signaling, which triggers two separate frequencies when a key is pressed.
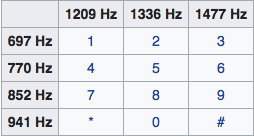
the linked wikipedia article contains lots more trivia, like the fact that the ‘#’ symbol was called an “ octothorpe ” by the original engineers. but, for the most part, all we need to know is contained in the one table you see here.
in our application, two oscillators in a small web audio api system can generate those frequencies, and we’ll use a redux middleware function to act as the go-between.
building the app
first, we just need to encode this table of magic frequencies in such a way that we can easily create a keypad that uses that information.
the brute force method would be to declare each button separately and hard-code the appropriate frequencies in each button’s click handler. the optimal way, however, would be to arrange the data so that we can actually generate the keypad from it. needless to say, the latter is the choice we’ll use here.
representing the domain
we define the row frequencies and column frequencies first, then create an array for each key with the frequency constants for its row and column position. finally, an array of arrays representing keypad rows is built, with each key being represented by an array containing a label and the array of tones for that key.
dtmf.js
// dtmf row frequencies
const row_1 = 697;
const row_2 = 770;
const row_3 = 852;
const row_4 = 941;

// dtmf column frequencies
const col_1 = 1209;
const col_2 = 1336;
const col_3 = 1477;

// dtmf key frequency pairs
const key_1 = [row_1, col_1];
const key_2 = [row_1, col_2];
const key_3 = [row_1, col_3];

const key_4 = [row_2, col_1];
const key_5 = [row_2, col_2];
const key_6 = [row_2, col_3];

const key_7 = [row_3, col_1];
const key_8 = [row_3, col_2];
const key_9 = [row_3, col_3];

const key_star  = [row_4, col_1];
const key_0     = [row_4, col_2];
const key_pound = [row_4, col_3];

// dtmf keypad labels and frequency pairs
export const keypad = [
    [ ['1', key_1],    ['2', key_2], ['3', key_3], ],   // keypad row 1
    [ ['4', key_4],    ['5', key_5], ['6', key_6], ],   // keypad row 2
    [ ['7', key_7],    ['8', key_8], ['9', key_9], ],   // keypad row 3
    [ ['*', key_star], ['0', key_0], ['#', key_pound] ] // keypad row 4
];
ui to middleware messaging
before we get into either the ui for representing the keypad or the middleware for playing the dtmf tones, let’s have a quick look at the message that will be sent between the two.
the action creator
playdtmfpair
will accept a pair of tones as defined in the
key_
constants above, and return an action of type
play_dtmf_pair
via which the tones can be dispatched from the ui to the middleware each time a key is pressed.
actions.js
// audio related actions
export const play_dtmf_pair = 'audio/play-dtmf';

// play a dtmf tone pair
export const playdtmfpair = tones => {
    return {
        type: play_dtmf_pair,
        tones
    };
};
creating the ui

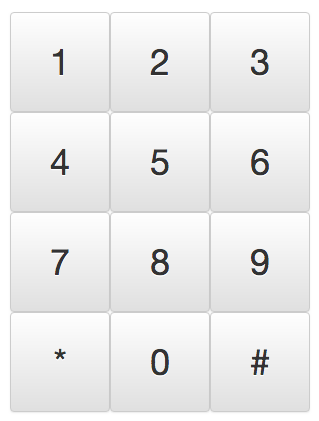
the demo is a standard react/redux setup. additionally, it uses react bootstrap and styled components to achieve the look and feel of a typical touchtone keypad with big, square, shaded buttons arranged in tight rows. you can review the project code for the styling aspects, but below are the two main react components used to render the keypad.
the
app
component is, as usual, the main container. in its
render
method, it creates a
styledkeypad
which is basically a columnar flexbox with content centering and some upper margin. inside that, it renders a
styledkeypadrow
container for each row of the keypad (you guessed it, a row-oriented flexbox). finally, inside each of those, it renders a
keypadkey
component for every key in the row, passing a label, the tones that the key needs to trigger, and a dispatcher for the action.
app.js
import react, {component} from 'react';
import {connect} from 'react-redux';

import {keypad} from '../constants/dtmf';
import {playdtmfpair} from '../store/audio/actions';
import {styledkeypad} from '../styles/styledkeypad';
import {styledkeypadrow} from '../styles/styledkeypadrow';
import keypadkey from './keypadkey';

class app extends component {

    render() {

        const {playtones} = this.props;

        return <styledkeypad>
            {
                keypad.map( (row, rindex) =>
                <styledkeypadrow key={rindex}>
                    {row.map( key => <keypadkey
                        key={key[0]}
                        label={key[0]}
                        tones={key[1]}
                        handleclick={playtones}/>)}
                </styledkeypadrow>)
            }
        </styledkeypad>;
    }
}

const mapdispatchtoprops = (dispatch) => ({
    playtones: tones => dispatch(playdtmfpair(tones))
});

export default connect(null, mapdispatchtoprops)(app);
the
keypadkey
component is a simple functional component which accepts the
label
,
tones
, and
handleclick
function we pass as props. it returns a
styledkeypadbutton
, which is just a big square bootstrap button with no outline, a readable font size, and an
onclick
handler that calls the
handleclick
function, passing the
tones
array.
keypadkey.js
import react from 'react';

import {styledkeypadbutton} from '../styles/styledkeypadbutton';

export default function keypadkey(props) {

    const {label, tones, handleclick} = props;

    return <styledkeypadbutton onclick={() => handleclick(tones)}>{label}</styledkeypadbutton>

}
the web audio api
complete polyphonic synthesizers have been built using the web audio api, such is the awesome breadth of its implementation. and choosing react/redux for your overall application framework is a great way to start such a project. while our demo will be piddling in comparison, the architecture could easily be adapted to such a grand purpose.
if you’re new to it, a
fantastic introduction
to the web audio api is available at css-tricks. in fact,
a section
of it forms the basis for our
touchtone
class. the main differences are that we get the audio context in the constructor rather than accepting it as an argument, we create two oscillators instead of just one, we start the sound immediately rather than accepting a time, and we turn the sound off immediately after half a second rather than ramping off exponentially.
since our focus is on adapting an audio system to redux, i’ll let the css-tricks article describe the particulars of the web audio api touched on here.
touchtone.js
export default class touchtone {

    constructor() {
        // get the audio context
        this.context = new (window.audiocontext || window.webkitaudiocontext)();
    }

    init() {

        // create, amplify, and connect row oscillator
        this.rowoscillator = this.context.createoscillator();
        this.rowoscillator.type = 'sine';
        this.rowgain = this.context.creategain();
        this.rowoscillator.connect(this.rowgain);
        this.rowgain.connect(this.context.destination);

        // create, amplify, and connect column oscillator
        this.coloscillator = this.context.createoscillator();
        this.coloscillator.type = 'sine';
        this.colgain= this.context.creategain();
        this.coloscillator.connect(this.colgain);
        this.colgain.connect(this.context.destination);

    }

    play(tones) {

        // initialize
        this.init();

        // get the current time from the audio context
        const time = this.context.currenttime;

        // load tones into oscillators
        this.rowoscillator.frequency.value = tones[0];
        this.coloscillator.frequency.value = tones[1];

        // set gain and start oscillators
        this.rowgain.gain.setvalueattime(1, time);
        this.colgain.gain.setvalueattime(1, time);
        this.rowoscillator.start(time);
        this.coloscillator.start(time);

        // set the stop time
        this.stop(time + .5);

    }

    stop(time) {

        // ramp down gain and stop oscillators
        this.rowgain.gain.setvalueattime(0, time);
        this.colgain.gain.setvalueattime(0, time);
        this.rowoscillator.stop(time);
        this.coloscillator.stop(time);
    }

}
the redux middleware
when you first read the official introduction to redux middleware it can easily twist your melon. this is because they go through a whole bunch of “wrong ways” to do things before arriving at their solution. that’s why i thought it would be nice to have a dead simple example to get you started.
it’s really not that complicated at all. a simple function accepts the redux store and returns a function that accepts the next piece of middleware in the chain’s callback. that callback accepts an action. inside that function we can handle or ignore any action passing through, but, when we’re done, we need to call the next piece of middleware’s callback, passing it the action.
the key things to remember are that it’s going to be around for the life of the application, and it will be given a chance to handle any dispatched action. this makes it a perfect mediator for interaction with non-serializable parts of our applications like sockets or audio components. it will have access to the store, so you can refer to the state and you can dispatch actions from it if you need to. in our case, we’re only going to respond to a single action dispatched by the keypad.
middleware.js
import touchtone from './touchtone';
import {play_dtmf_pair} from "./actions";

export const audiomiddleware = store => {

    const touchtone = new touchtone();

    return next => action => {

        switch (action.type) {

            case play_dtmf_pair:
                touchtone.play(action.tones);
                break;

            default:
                break;

        }

        next(action);
    }

};
conclusion
obviously, with a different interface and audio system, this application could implement a musical device, triggering much more pleasing tones than dtmf. the main focus was on how to adapt such a system.
using middleware to control the web audio api is pretty easy and architecturally the right way to go in a react/redux application. so don’t let the convoluted documentation on the redux site put you off if you’ve never built a piece of middleware.
more ambitious things that can happen in the middleware are that it could respond to events from an
audiolistener
or
scriptprocessornode
and dispatch actions by calling
store.dispatch()
. this would allow the app to perform audio spatialization or visualization.
you can download the project from github: https://github.com/cliffhall/react-dtmf-dialer
Published at DZone with permission of Cliff Hall, DZone MVB. See the original article here.
Opinions expressed by DZone contributors are their own.

Comments