Create a Self-Service Customer Support Chatbot Without Code
This tutorial walks through how to build a smart chatbot to handle customer service, using low-code and no-code solutions from platforms like Infobip Answers.
Join the DZone community and get the full member experience.
Join For FreeHelping users help themselves is one of the biggest wins a customer support team can achieve. When this happens, support has fewer tickets, and users can get their answers quickly. In fact, a study by American Express found that over 60% of consumers indicate their “go-to channel” for simple inquiries is a digital self-service solution (online chat, voice response, website, or mobile app).
With that in mind, chatbots are an ideal tool to provide self-service at scale. However, building a chatbot can be intimidating for the uninitiated. That’s a problem that Infobip’s Answers platform seeks to solve. With Answers, you can create intelligent, keyword-based chatbots that can improve customer satisfaction and reduce operational costs directly—and you can build that all with a no-code web GUI.
In this article, we’ll help you build your first chatbot, one that can solve real-world customer problems by using WhatsApp to communicate with end-users. If you don’t use WhatsApp for support, don’t worry. Answers supports a variety of other communications channels, including SMS and Live Chat.
How To create a WhatsApp Self-Service Customer Support Chatbot Without Code
For our example, we’re going to create a chatbot that helps the customers of a hard-to-find restaurant. They have great food and everyone knows their WhatsApp contact number, but people just can’t find the restaurant’s location. Sometimes, people that message the restaurant also want a menu and information on their rewards program.
Feel free to replace our specific restaurant use case with your own workflows as we go. The important part is that you get a feel for designing chatbot-to-human conversations with Answers.
Prerequisites
To follow this tutorial and create your first working chatbot, all you need is an Infobip trial account. You even get a free trial of the WhatsApp channel so you can test your chatbot from your phone.
While it’s not required to follow along, we recommend reading up on conversational design to help you get the most out of Answers.
Step 1: Define User Pain Points
Before you begin creating a self-service chatbot, it’s important to clearly define the user pain points you want to address. In our case, we have these pain points:
Users want to get to our restaurant but don’t know the address.
Users want a menu but don’t know where to find it.
Users want to earn rewards but don’t know where to sign up.
Notice that for each of these pain points, a single piece of information can help the user solve their problem. That’s what makes them great candidates for our first self-service chatbot. If you’re just getting started with self-service chatbots, look for pain points that are clearly defined and simple like these. Then, tackle more complex cases as you learn.
Step 2: Create an Outline of Answers for Your Bot
Once you have a clear definition of pain points, outline how your chatbot can address them.
Because we’ve been answering these WhatsApp messages manually, we know exactly what answers our users need.
Our bot will:
Provide the restaurant’s address and a Google Maps link to users that want directions.
Provide a link to users that want a menu.
Provide a signup page link to users that want to sign up for rewards.
Given our experience answering these questions manually, we know that providing those links will directly address the users’ pain points.
Step 3: Login and Create the Chatbot
Now, we can start designing our chatbot.
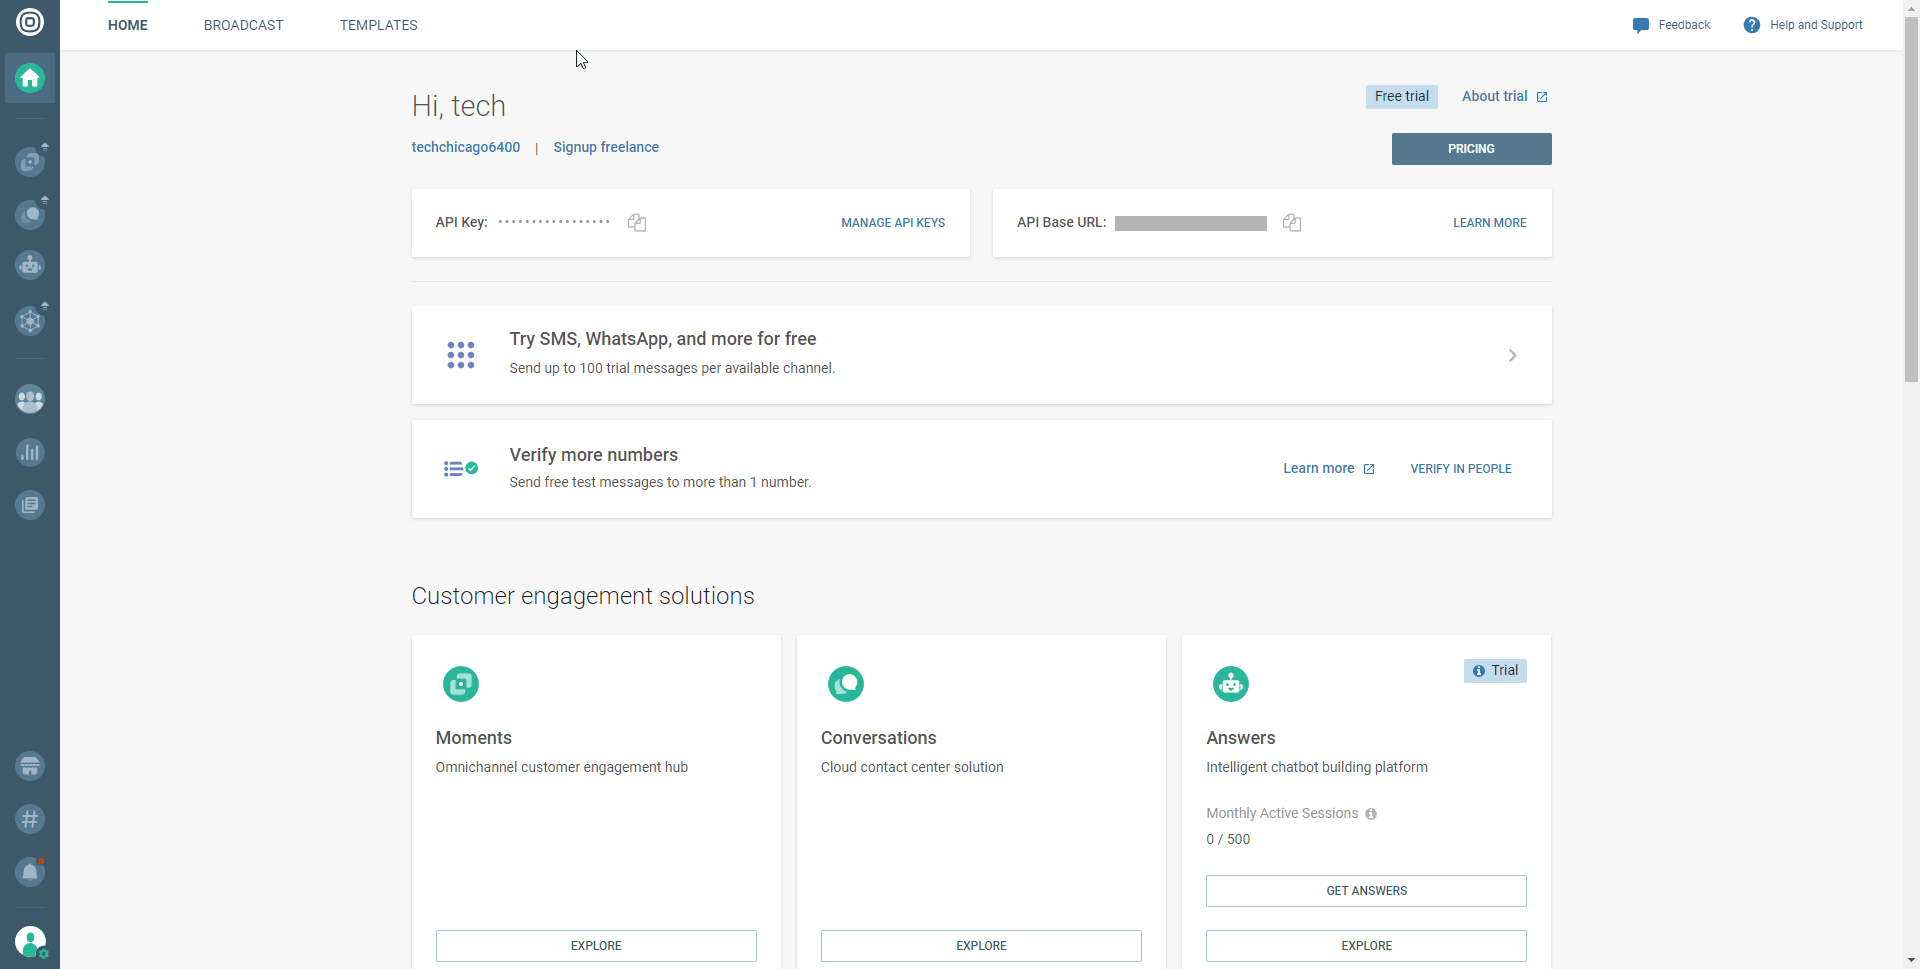
Log in to the Infobip portal.
Click Answers in the menu on the left.
Click the NEW CHATBOT button.
Fill out the fields in the Configure your chatbot pop-up (make sure to select WhatsApp in the Channel dropdown), and click CREATE CHATBOT.
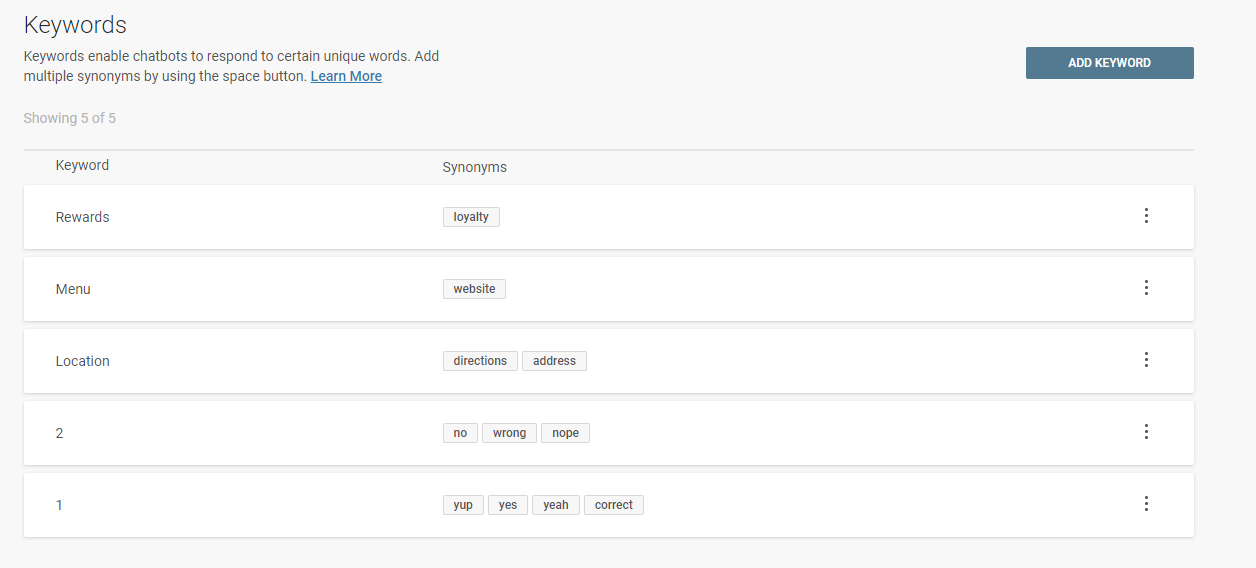
Step 4: Create Your Keywords
Now, we’ll create the Keywords that will help our bot branch the conversation correctly.
Click the Keywords tab.
Click ADD KEYWORD.
Type in a Keyword. For our example, we’ll use location.
Type in at least one Synonym for the keyword. A synonym will trigger the same logic as a keyword. Press enter after each synonym and click the check icon when you’re done. For our location keyword, we'll make directions and address synonyms.
Repeat steps two through five for each keyword you plan to use. In our case, we know we plan to prompt our user to input 1 for “yes” or 2 for “no.” We also need keywords to know when to send the user a link to our menu or rewards program, so our final list looks like this:
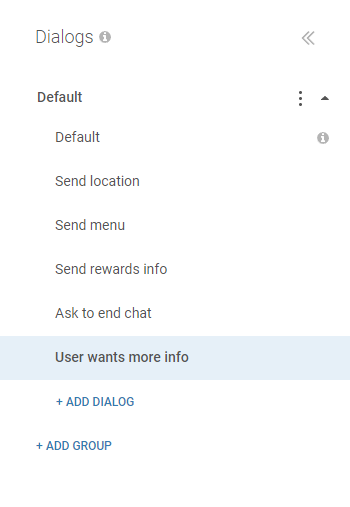
Step 5: Create Your Dialogs
Now, we can begin creating dialogs to interact with users. For this step, we’ll use our pain points and their corresponding answers to start designing our conversations.
Our example will consist of these six dialogs. Here is a quick description of each:
Our dialog name |
Description |
| Default |
The default dialog when a user sends a message; we’ll modify it to greet the user and forward them to “Send location”, “Send menu”, or “Send rewards info” based on user input |
| Send location | Sends the user a Google Maps link and address, then proceeds to the “Ask to end chat” dialog |
| Send menu |
Sends the user a link to an online menu, then proceeds to the “Ask to end chat” dialog |
| Send rewards info | Sends the user a link to create a rewards account, then proceeds to the “Ask to end chat” dialog |
| Ask to end chat | Asks the user if they need anything else, then ends chat or forwards to “User wants more info” based on user input |
| User wants more info | Asks the user “How else can I help?” then forwards them to “Send location”, “Send menu”, or “Send rewards info” based on user input |
The Default dialog already exists, so to begin, we’ll create the other five:
Click the Dialogs tab.
Click +ADD DIALOG.
Click the pencil icon to edit the dialog name, add one of your dialog names (e.g. Send location), and then click the check icon.
Repeat steps two and three for the remaining dialog names. When you’re done, the list should look like this:
Step 6: Configure the Dialogs
Now that we’ve created the dialogs, we’ll configure each one to match our desired conversation flow.
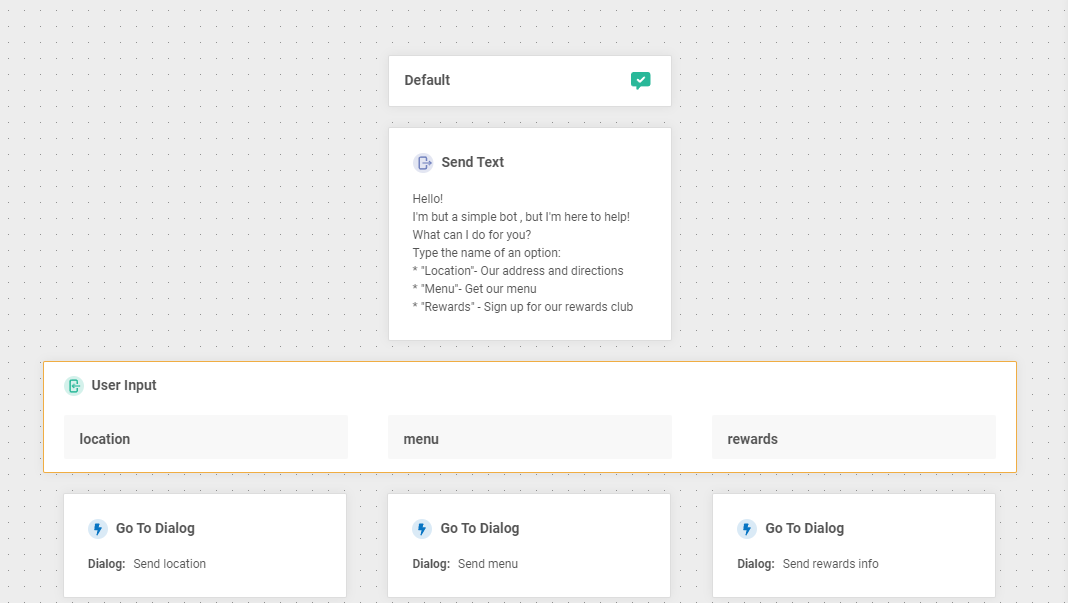
Configure the Default Dialog
With our basic chatbot logic, the default dialog will be what greets anyone who messages our chatbot. We’ll give users three options to choose from, and then fall back to transferring to an agent if our chatbot doesn’t understand the user. To set up this default message, follow these steps:
1. Click the Default dialog in the left menu.
2. Drag a Text element onto the canvas.
3. Type a welcome message in the Message 1 box. For our example, we’ll use this text:
Hello!

I'm but a simple bot, but I'm here to help!

What can I do for you?

Type the name of an option:

* "Location"-  Our address and directions
* "Menu"- Get our menu
* "Rewards" - Sign up for our rewards club
4. Slide a User Input element onto the canvas.
5. Click +ADD KEYWORD MAPPING and select location. Note: if you didn’t create a keyword earlier, you can create it now by clicking +Create new keyword.
6. Repeat the previous step to add the menu and rewards keywords.
7. Drag a To Dialog element under each of the three User Input blocks.
8. Click the User Input element in the canvas. Then, in the build panel on the right, scroll down to the Repeat section. Set the Repeat count to 1. Then, type a message in the Repeat message (optional) text box for the bot to send if the user input is not understood. In our case, we’ll use:
Sorry, I misunderstood.
Type one of the options in quotes and I'll do my best to help!
* "Location"-  Our address and directions
* "Menu"- Get our menu
* "Rewards" - Sign up for our rewards club
9. Note: Answers integrates with Infobip Conversations for escalation to the Infobip cloud contact center. If you’re not planning to use Conversations, you can bypass this step or configure a different Fallback action.
Scroll down to the Fallback action in the build panel and change the dropdown to Connect with agent. If our chatbot fails to understand the user input after the response to the Repeat message, this action will connect them to a human agent. Type a message in the Fallback message (optional) text box for the bot to send before making the transfer. In our case we’ll use:
Sorry, but I still don't understand.
Let me get you transferred to a human.
10. Click the Go To Dialog element under location and set the to Go to dropdown to the Send location dialog.
11. Click the Go To Dialog element under the menu and set the to Go to dropdown to the Send menu dialog.
12. Click the Go To Dialog element under rewards and set the to Go to dropdown to the Send rewards info dialog. The canvas should look like this when you’re done:
Configure the “Send Location” Dialog
Next, we’ll make our Send location workflow. In this case, we know the user got here because the bot thinks they want to know our restaurant’s address. Therefore, we simply need to get them the directions and see if they need anything else.
Pro tip: If you’re sending multiple messages at once, include at least a two-second delay between messages. This will make your messages feel more organic, improve UX, and give the user a bit of time to digest what you’ve sent.

Click the Send location dialog in the left menu.
Slide a Delay element to just under Send location on the canvas and change the delay time to two seconds.
Slide a Location element under the Delay element.
Type and select an address in the Location address or select on a map field in the Send Location build panel. This will send the user a Google Maps location.
Add another two-second Delay element below the Send Location element.
Add a Text element below the second Delay element.
Input a message in the Message 1 box confirming the address for the user. In our case, we’ll use:
We're on 35th Street! That's the Maps link.
Slide a To Dialog element under the Send Text element.
Select Ask to end chat in the Go to dropdown in the build panel.
The finished dialog should look similar to this:

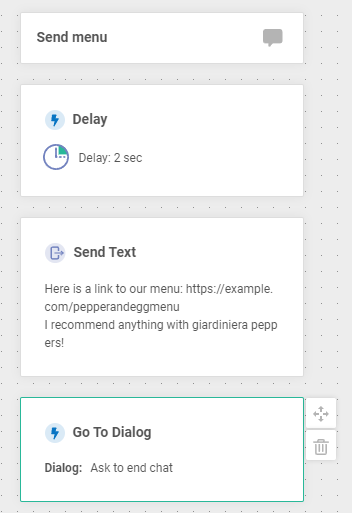
Configure the “Send Menu” Dialog
Now that we’ve completed the send location dialog, the send menu dialog should feel similar. In this case, we will simply send a link to a menu instead of a location.
Once you’re done, the finished dialog should look similar to this:
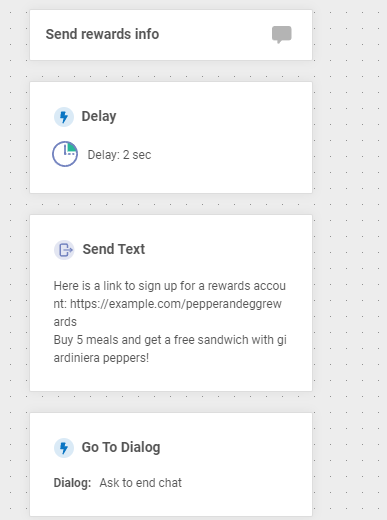
Configure the “Send Rewards Info” Dialog
Conceptually, the send rewards info dialog is the same as the send menu dialog, except that our chatbot will send a link to help the user create a rewards account.
Once you’re done, the finished dialog should look like the following:
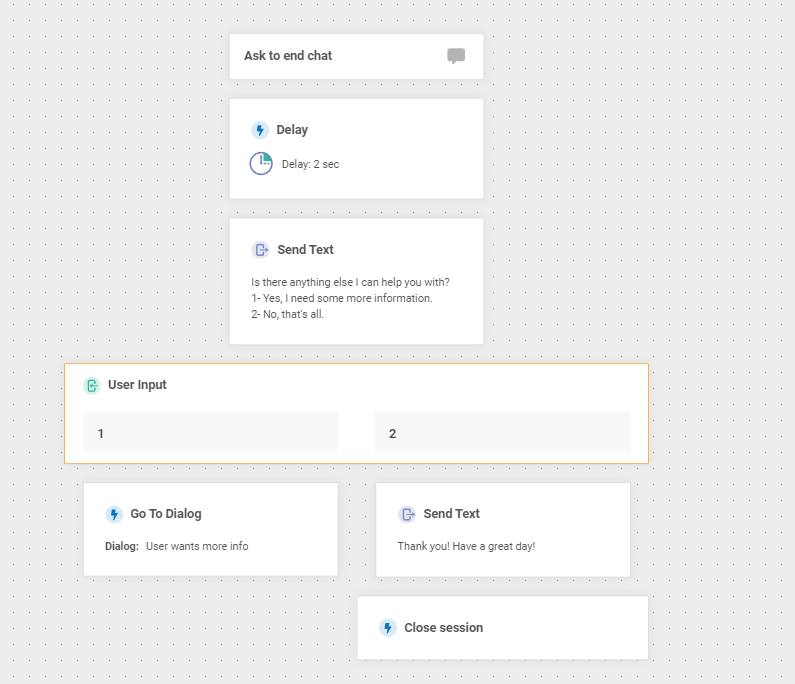
Configure the “Ask to End Chat” Dialog
Keeping conversational design in mind, the Ask to end chat dialog is a flow for when our chatbot has given the user some information. Now it’s time to ask if they need anything else and if not, end the chat.
1. Click the Ask to end chat dialog in the left menu.
2. Drag a Delay element under the Ask to end chat element on the canvas and set the delay to two seconds.
3. Drag a Text element under the Delay element.
4. Input a message in the Message 1 box that includes a link to the “menu”. In our case, we’ll use:
Is there anything else I can help you with?

1- Yes, I need some more information.
2- No, that's all.
5. Drag a User Input element onto the canvas under the Send Text element.
6. Click the User Input dialog, then click +ADD KEYWORD MAPPING and select 1. Then click +ADD KEYWORD MAPPING again and select 2.
7. Scroll down to the Fallback action in the build panel and change the dropdown to Connect with agent. If our chatbot fails to understand the user input, we will connect them to a human agent. Type a message in the Fallback message (optional) text box for the bot to send before making the transfer. In our case, we’ll use:
Sorry, I’m having a little trouble.
Let me get you transferred to a human.
8. Slide a To Dialog element under User Input 1 and set the Go to dropdown to User Wants more info.
9. Slide a Text element under User Input 2 and input a goodbye message in the Message 1 box. For our example, we’ll use:
Thank you! Have a great day!10. Slide a Close session element under the last Text element you created in the previous step.
The finished dialog should look similar to this:
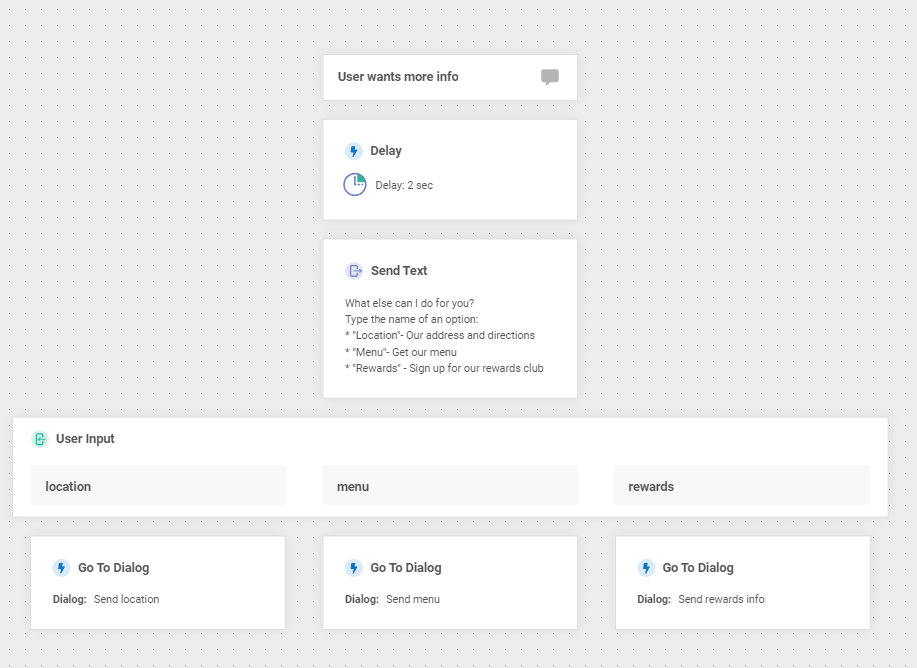
Configure the “User Wants More Info” Dialog
Finally, we need to configure the User wants more info dialog in case the user has more questions. This dialog is basically the same as our earlier default dialog with a slightly modified greeting, so we won’t repeat all the steps.
Pro tip: Once you have the hang of dialog creation, use the Duplicate feature to save time. You may notice that the User wants more info dialog achieves effectively the same purpose as our Default dialog. Instead of creating it from scratch, we can also duplicate the Default dialog and edit it.
The completed dialog should look similar to this:
Step 7: Test Your Chatbot
Now that we’ve configured all the dialogs, we can test our chatbot using the Infobip Simulator.

Click the Simulator tab.
Click the START SIMULATION button.
Type messages in the Send message box to see how your bot responds.
Tweak your chatbot as needed based on the test results. You can use the buttons in the Simulator to help with debugging. For example, in the screenshot below, we can see that our To dialog logic triggered the Dialog start which opened with a Delay then performed a Send text action.
Once you’re satisfied with your testing, proceed to the next section to activate it.
Step 8: Activate Your Self-Service Customer Support Chatbot
Now you can activate your chatbot by clicking the ACTIVATE button in the upper right of the screen.

Your chatbot will be listed in your Infobip portal at https://portal.infobip.com/bots/. You can send messages to it via WhatsApp at the number listed in the Number/Page column.

Your Next Steps With Chatbots
Now you have a chatbot that can handle basic customer service workflows. However, we’ve only scratched the surface of your chatbot’s potential. Once you’re comfortable with the basics, you can layer in intelligence and more complex workflows to supercharge your customer service efforts.
Here are some topics that you could explore next:
Intents: By configuring custom intents, you can help your chatbots better understand what your customer wants and provide higher quality responses.
Natural language processing (NLP): The Answers platform supports NLP, which enables your chatbots to make “inferences” that improve the quality of responses, even if a user doesn’t match a keyword or synonym exactly.
Attributes: We didn’t personalize our messages here, but attributes can help your chatbots to learn and understand your users better and improve the UX.
Opinions expressed by DZone contributors are their own.
Comments