Create and Publish Your Rest API Using Spring Boot and Heroku
In this tutorial, you will learn how to use Spring Boot to develop RESTful API and publish your API to Heroku.
Join the DZone community and get the full member experience.
Join For FreeIn this tutorial, you will learn how to use Spring Boot to develop RESTful API and publish your API to Heroku. First, we will build the API; upon completion, we will deploy to Heroku.

Introduction to REST
A RESTful API or web service is an application programming interface using HTTP request types: GET, POST, DELETE, and PUT to perform actions on data. It is generally preferred to its closest alternative Simple Object Access Protocol (SOAP) because it requires fewer resources. By writing APIs that adhere to RESTful practices, you are agreeing to adopt an architectural style of representing, requesting, storing data and deleting data.
GET: It is used for requesting data. You can request for a single item or list of items
PUT: It is used for updating an item.
POST: It is used for creating an item
DELETE: It is used for deleting an item.
Tools used in the tutorial
- IDE: IntelliJ
- Framework: Spring Boot
- Dependency: Spring boot starter web
- Build Tool: Maven
- Language: Java
- Hosting platform: Heroku
The Spring boot starter web contains everything needed to bootstrap an app such as an embedded server. Tomcat is the default.
If you don’t have a Heroku account, you may sign up using this link.
What Are We Building?
Imagine we have a bucket list of places we wish to travel to or visit in our lifetime. I hope you do. We would create an app for adding, editing, viewing and deleting items in our bucket list. In this tutorial, we will be using a non-persistent DB (ArrayList); if you want a persistent store, comment below as we have another tutorial for that.
Section 1
- Head over to start.spring.io and provide the group and artifact name for your app. It is a Maven project written in Java and the dependency is Web.
- The only dependency needed is the Web dependency.
- Click on generate project
- Extract to your computer and import the downloaded maven project to your favorite editor
- Open extracted folder in your editor.

Time to Write Some Code
We need to create two Java classes. One will serve as a controller for receiving request and responding with response. The second will serve as a data model.
Data Mode l(BucketList)
package com.zerotoproduction.firstrest;

public class BucketList {

    private long id;
    private String name;

    BucketList(long id, String name){
        this.id = id;
        this.name = name;
    }

    public long getId() {
        return id;
    }

    public void setId(long id) {
        this.id = id;
    }

    public String getName() {
        return name;
    }

    public void setName(String name) {
        this.name = name;
    }
}
Controller (BucketListController)
package com.zerotoproduction.firstrest;

import org.springframework.http.ResponseEntity;
import org.springframework.web.bind.annotation.*;

import java.util.ArrayList;
import java.util.List;
import java.util.concurrent.atomic.AtomicLong;

@RestController
public class BucketListController {

    private List<BucketList> myBucketList = new ArrayList();
    private final AtomicLong counter = new AtomicLong();

    public BucketListController(){
        myBucketList.add(new BucketList(counter.incrementAndGet(), "Visit Colosseum in Rome"));
    }

    @GetMapping(value = "/")
    public ResponseEntity index() {
        return ResponseEntity.ok(myBucketList);
    }

    @GetMapping(value = "/bucket")
    public ResponseEntity getBucket(@RequestParam(value="id") Long id) {
        BucketList itemToReturn = null;
        for(BucketList bucket : myBucketList){
            if(bucket.getId() == id)
                itemToReturn = bucket;
        }

        return ResponseEntity.ok(itemToReturn);
    }

    @PostMapping(value = "/")
    public ResponseEntity addToBucketList(@RequestParam(value="name") String name) {
        myBucketList.add(new BucketList(counter.incrementAndGet(), name));
        return ResponseEntity.ok(myBucketList);
    }

    @PutMapping(value = "/")
    public ResponseEntity updateBucketList(@RequestParam(value="name") String name, @RequestParam(value="id") Long id) {
        myBucketList.forEach(bucketList ->  {
            if(bucketList.getId() == id){
                bucketList.setName(name);
            }
        });
        return ResponseEntity.ok(myBucketList);
    }

    @DeleteMapping(value = "/")
    public ResponseEntity removeBucketList(@RequestParam(value="id") Long id) {
        BucketList itemToRemove = null;
        for(BucketList bucket : myBucketList){
            if(bucket.getId() == id)
                itemToRemove = bucket;
        }

        myBucketList.remove(itemToRemove);
        return ResponseEntity.ok(myBucketList);
    }
}
As an addendum, although it is not required, you can specify a port for running your apps. If you do not specify a port, it uses port 8080 by default. I have specified my port to be 9009 in the application properties file like so:
server.port=9009Let's Test Our APIs Locally Using Postman
- To get all items in bucketlist, I am using this URL:
localhost:9009You ought to change the port number to what you have specified locally.
You should see a response similar to the one below

2. To add an item, we specify the name in the URL like so:
localhost:9009?name=Visit Big BenWe have added “Visit Big Ben”

3. To view a single item in bucketlist:
localhost:9009/bucket?id=2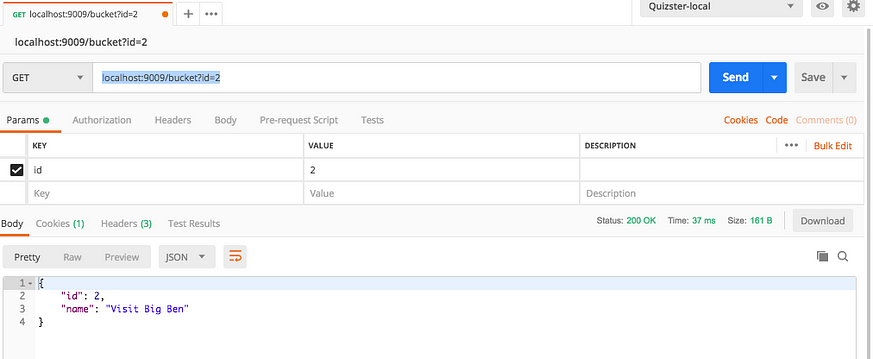
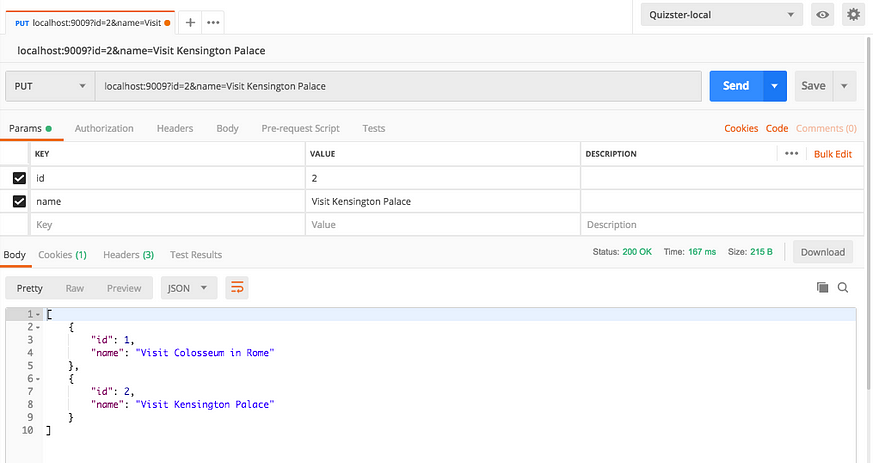
4. To edit an item, we specify the ID and new name in the URL like so:
localhost:9009?id=2&name=Visit Kensington PalaceWe just changed the name of the second item in our bucket list from visit Big Ben to Visit Kensington Palace.
5. To remove an item, we specify the ID.
localhost:9009?id=2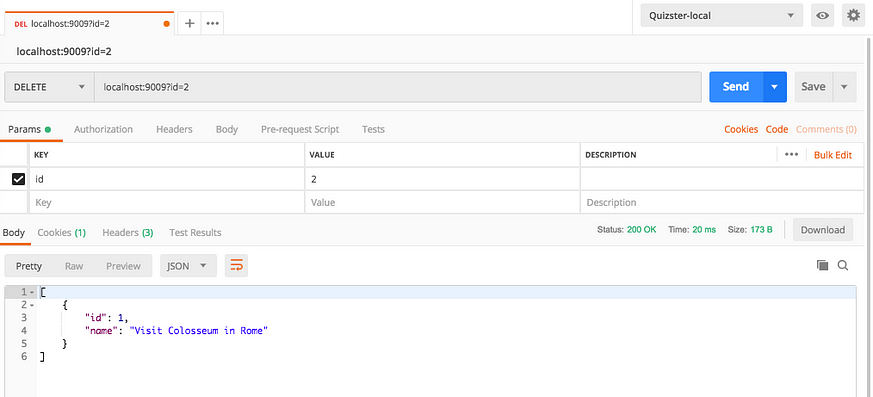
Section 2: Deploy to Heroku
- You need to create an account on Heroku
- Install Heroku Cli. Heroku CLI is a command-line application that lets you create, deploy, and manage Heroku apps from the command line. You can download Heroku CLI from Heroku Dev Center.
- Login using your email and password
heroku login4. Set up Git and create a Heroku app.
git initgit add .git commit -m "initial commit"5. Now, create an app using Heroku create like so:
heroku create6. Deploy the app to Heroku.
git push heroku master7. Our app has been deployed to Heroku now.
https://intense-sands-41425.herokuapp.com/Let’s test again, but you must remove the localhost and port with the URL given by Heroku.
For example, to get all items in our bucketlist, we use:
https://intense-sands-41425.herokuapp.com/And to get an item, we use:
https://intense-sands-41425.herokuapp.com/bucket?id=1That wraps up our tutorial today.
If you have any questions, you can leave a comment below.
The GitHub repository for this tutorial is here: https://github.com/zero-to-production/firstrest
Happy coding!
Opinions expressed by DZone contributors are their own.
Comments