Creating a Selective HSL Adjustment Filter in Core Image
More image magic in Swift from Simon Gladman.
Join the DZone community and get the full member experience.
Join For Free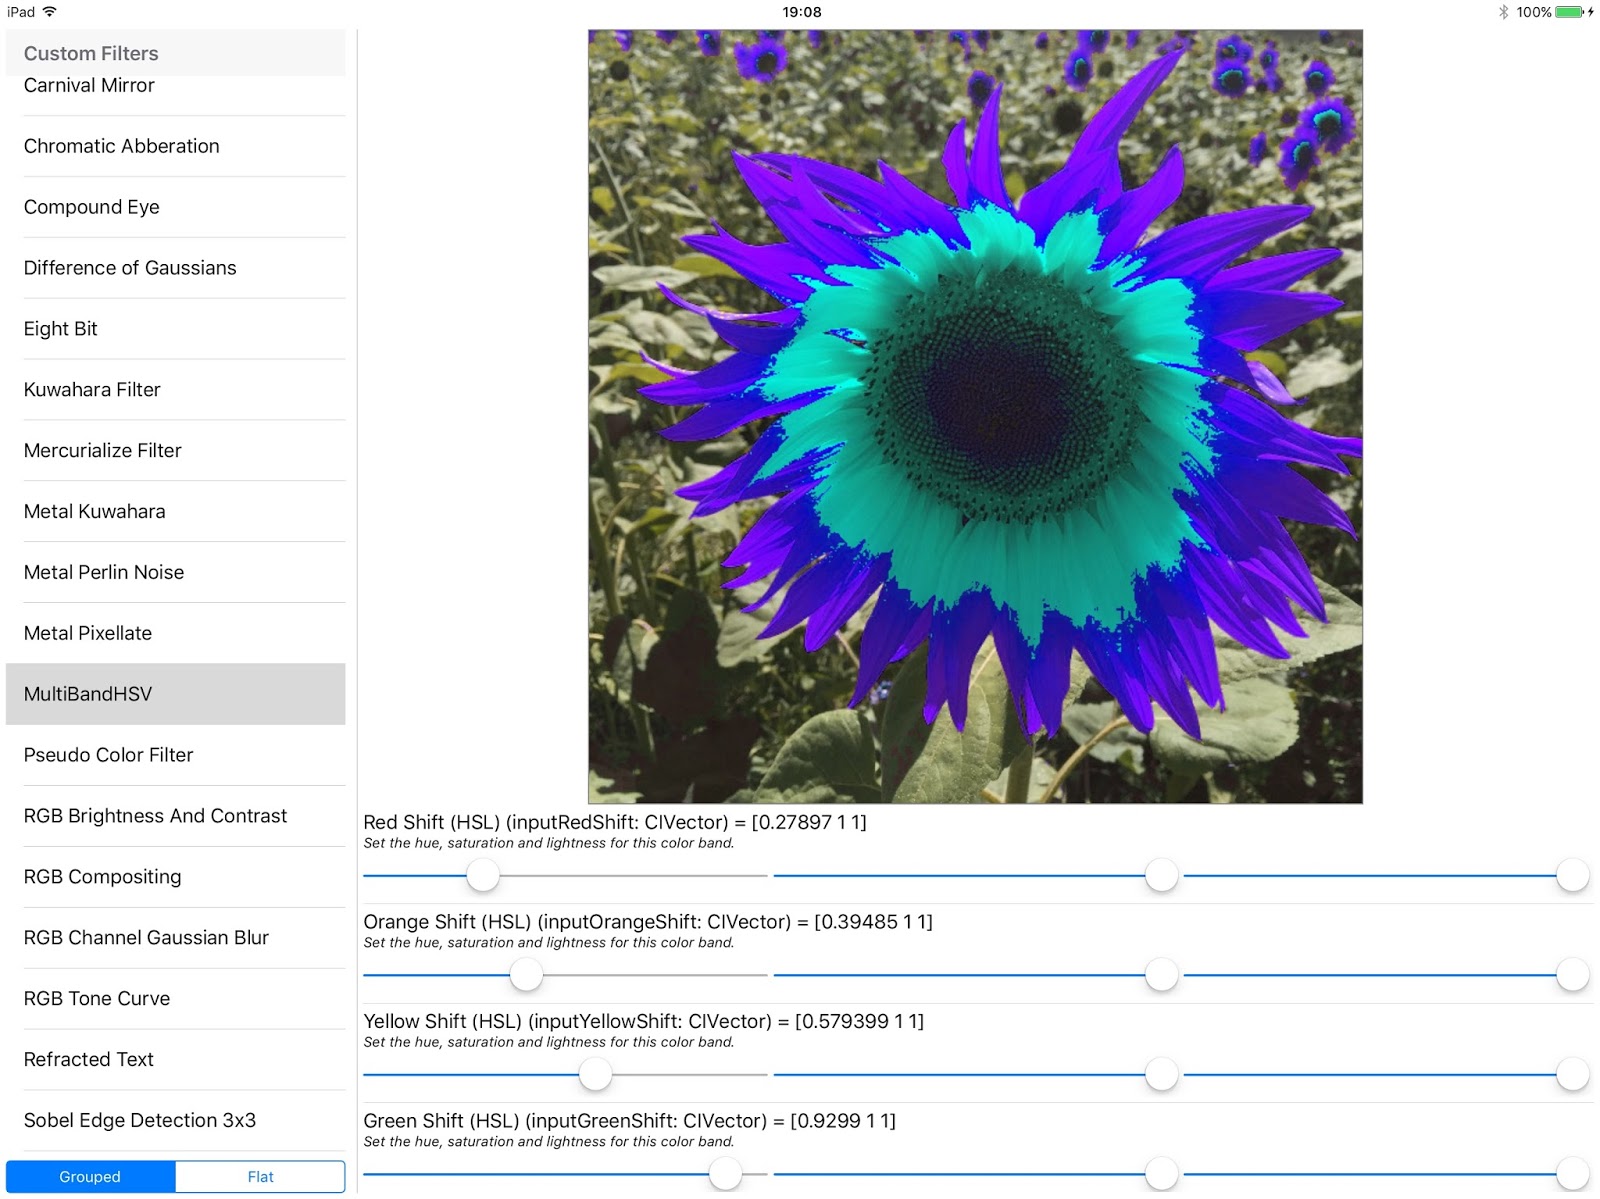
The other day, while idly browsing Stack Overflow, I came across this question: the questioner was asking whether they could use Core Image to adjust the hue, saturation and luminance of an image within defined bands. For example, could they darken the blues while desaturating the greens and shifting the hue of the yellows to be redder. Well, I know of no built-in filter that can do that, but I'm always up for a challenge. The final result is, in my opinion, quite an interesting Core Image exercise and deserves a little blog post.
The Filter in Use
Before diving into the technical explanation of how I put the filter together, let's look at some results. Sadly, Timothy Hogan was busy, so I took it upon myself to photograph this beautiful still life:

My filter has attributes to change the hue, saturation and lightness for eight color bands. Each attribute is a CIVectorwith x setting an additive hue shift, and y and z setting saturation and lightness multipliers. The default value for each color attribute is: (x: 0, y: 1, z: 1). So, the following settings will desaturate red and shift the blues and purples:
filter.inputRedShift = CIVector(x: 0, y: 0, z: 1)
filter.inputAquaShift = CIVector(x: 0.2, y: 1, z: 1)
filter.inputBlueShift = CIVector(x: 0.4, y: 1, z: 1)
filter.inputPurpleShift = CIVector(x: 0.2, y: 1, z: 1)
And give this result:

Or, we could shift the reds and greens and desaturation and lighten the blues with:
filter.inputRedShift = CIVector(x: 0.1, y: 1, z: 1)

 filter.inputOrangeShift = CIVector(x: 0.2, y: 1.1, z: 1)

 filter.inputYellowShift = CIVector(x: 0.3, y: 1.2, z: 1)

 filter.inputGreenShift = CIVector(x: 0.2, y: 1.1, z: 1)

 filter.inputAquaShift = CIVector(x: 0.1, y: 1, z: 1.5)

 filter.inputBlueShift = CIVector(x: 0.05, y: 0, z: 2)

 filter.inputPurpleShift = CIVector(x: 0, y: 1, z: 1.5)

 filter.inputMagentaShift = CIVector(x: 0.05, y: 1, z: 1)
Which gives:

We could even desaturate everything apart from red - which we'll shift to blue with:
 filter.inputRedShift = CIVector(x: 0.66, y: 1, z: 1.25)
        filter.inputOrangeShift = CIVector(x: 0.25, y: 0, z: 1)
        filter.inputYellowShift = CIVector(x: 0, y: 0, z: 1)
        filter.inputGreenShift = CIVector(x: 0, y: 0, z: 1)
        filter.inputAquaShift = CIVector(x: 0, y: 0, z: 1)
        filter.inputBlueShift = CIVector(x: 0, y: 0, z: 1)
        filter.inputPurpleShift = CIVector(x: 0, y: 0, z: 1)
        filter.inputMagentaShift = CIVector(x: 0.25, y: 0, z: 1)
With this result:

Note that there are some artifacts caused by JPEG compression.
Creating The Filter
Although Core Image for iOS now has over 170 filters, to create this effect, we'll need to take a deep dive into Core Image and write a custom filter using a kernel program written in Core Image Kernel Language (CIKL). CIKL is a dialect of GLSL, and the programs written in it are passed as a string into a CIColorKernel which, in turn, is wrapped in a CIFilterand can be used as any other built in filter.
First things first, the eight colors for the bands need to be defined. It's the hue of these eight colors which the kernel will use to apply the "shift values" above. I've written a small extension to UIColor which returns the hue:
extension UIColor
    {
        func hue()-> CGFloat
        {
            var hue: CGFloat = 0
            var saturation: CGFloat = 0
            var brightness: CGFloat = 0
            var alpha: CGFloat = 0

            self.getHue(&hue,
                        saturation: &saturation,
                        brightness: &brightness,
                        alpha: &alpha)

            return hue
        }
    }
Using that, we can define eight constants for the required hues using familiar UIColor RGB values:
  let red = CGFloat(0)
    let orange = UIColor(red: 0.901961, green: 0.584314, blue: 0.270588, alpha: 1).hue()
    let yellow = UIColor(red: 0.901961, green: 0.901961, blue: 0.270588, alpha: 1).hue()
    let green = UIColor(red: 0.270588, green: 0.901961, blue: 0.270588, alpha: 1).hue()
    let aqua = UIColor(red: 0.270588, green: 0.901961, blue: 0.901961, alpha: 1).hue()
    let blue = UIColor(red: 0.270588, green: 0.270588, blue: 0.901961, alpha: 1).hue()
    let purple = UIColor(red: 0.584314, green: 0.270588, blue: 0.901961, alpha: 1).hue()
    let magenta = UIColor(red: 0.901961, green: 0.270588, blue: 0.901961, alpha: 1).hue()
With those Swift constants, we can start building the kernel string:
 var shaderString = ""

    shaderString += "#define red \(red) \n"
    shaderString += "#define orange \(orange) \n"
    shaderString += "#define yellow \(yellow) \n"
    shaderString += "#define green \(green) \n"
    shaderString += "#define aqua \(aqua) \n"
    shaderString += "#define blue \(blue) \n"
    shaderString += "#define purple \(purple) \n"
    shaderString += "#define magenta \(magenta) \n"
The color passed into the kernel will be RGB, but we're going to need to convert this to HSL and back again to work with it. Luckily, Patricio Gonzalez Vivo has this Gist which contains the code to do exactly that. So, those functions are added to the shader string:
 shaderString += "vec3 rgb2hsv(vec3 c)"
    shaderString += "{"
    shaderString += "    vec4 K = vec4(0.0, -1.0 / 3.0, 2.0 / 3.0, -1.0);"
    shaderString += "    vec4 p = mix(vec4(c.bg, K.wz), vec4(c.gb, K.xy), step(c.b, c.g));"
    shaderString += "    vec4 q = mix(vec4(p.xyw, c.r), vec4(c.r, p.yzx), step(p.x, c.r));"

    shaderString += "    float d = q.x - min(q.w, q.y);"
    shaderString += "    float e = 1.0e-10;"
    shaderString += "    return vec3(abs(q.z + (q.w - q.y) / (6.0 * d + e)), d / (q.x + e), q.x);"
    shaderString += "}"

    shaderString += "vec3 hsv2rgb(vec3 c)"
    shaderString += "{"
    shaderString += "    vec4 K = vec4(1.0, 2.0 / 3.0, 1.0 / 3.0, 3.0);"
    shaderString += "    vec3 p = abs(fract(c.xxx + K.xyz) * 6.0 - K.www);"
    shaderString += "    return c.z * mix(K.xxx, clamp(p - K.xxx, 0.0, 1.0), c.y);"
    shaderString += "}"
Now for the magic. My nattily titled function, smoothTreatment(), accepts five arguments:
- HSV - is of type vec3 (a vector containing three elements) and is the color of the pixel currently being computed by the kernel.
- hueEdge0 and hueEdge1 - are both of type float and are lower and upper bounds of the hue "band" the current pixel is in.
- shiftEdge0 and shiftEdge1 - are both of type vec3 and are the values of the two filter shift attributes for the edge hue values above.
shaderString += "vec3 smoothTreatment(vec3 hsv, float hueEdge0, float hueEdge1, vec3 shiftEdge0, vec3 shiftEdge1)"
The first job of the function is to use smoothStep() to get a Hermite interpolated value between zero and one that describes the current pixel's color in relation to its position between hueEdge0 and hueEdge1:
shaderString += " float smoothedHue = smoothstep(hueEdge0, hueEdge1, hsv.x);"
Then it's some simple maths to figure out what needs to be added (or multiplied) to the current pixel's HSV based on the shift edges:
 shaderString += "kernel vec4 kernelFunc(__sample pixel,"
    shaderString += "  vec3 redShift, vec3 orangeShift, vec3 yellowShift, vec3 greenShift,"
    shaderString += "  vec3 aquaShift, vec3 blueShift, vec3 purpleShift, vec3 magentaShift)"
Finally, the function returns a vec3 by building a vector from those values:
shaderString += "return vec4(hsv2rgb(hsv), 1.0);"
Core Image will invoke the kernel function which is declared with the kernel keyword. It will need the value of the current pixel which is of type __sample (this is actually a vec4 - with components for red, green, blue and alpha) and values for each of the shift parameters:
    shaderString += "kernel vec4 kernelFunc(__sample pixel,"
    shaderString += "  vec3 redShift, vec3 orangeShift, vec3 yellowShift, vec3 greenShift,"
    shaderString += "  vec3 aquaShift, vec3 blueShift, vec3 purpleShift, vec3 magentaShift)"
Using the utility function above, pixel is converted to HSV:
shaderString += " vec3 hsv = rgb2hsv(pixel.rgb); \n"
Using the current pixel's hue, we can set the correct parameters for smoothTreatment():
    shaderString += " if (hsv.x < orange){ hsv = smoothTreatment(hsv, 0.0, orange, redShift, orangeShift);} \n"
    shaderString += " else if (hsv.x >= orange && hsv.x < yellow){ hsv = smoothTreatment(hsv, orange, yellow, orangeShift, yellowShift); } \n"
    shaderString += " else if (hsv.x >= yellow && hsv.x < green){ hsv = smoothTreatment(hsv, yellow, green, yellowShift, greenShift);  } \n"
    shaderString += " else if (hsv.x >= green && hsv.x < aqua){ hsv = smoothTreatment(hsv, green, aqua, greenShift, aquaShift);} \n"
    shaderString += " else if (hsv.x >= aqua && hsv.x < blue){ hsv = smoothTreatment(hsv, aqua, blue, aquaShift, blueShift);} \n"
    shaderString += " else if (hsv.x >= blue && hsv.x < purple){ hsv = smoothTreatment(hsv, blue, purple, blueShift, purpleShift);} \n"
    shaderString += " else if (hsv.x >= purple && hsv.x < magenta){ hsv = smoothTreatment(hsv, purple, magenta, purpleShift, magentaShift);} \n"
    shaderString += " else {hsv = smoothTreatment(hsv, magenta, 1.0, magentaShift, redShift); }; \n"
Finally converting the updated HSV back to RGB and returning it:
shaderString += "return vec4(hsv2rgb(hsv), 1.0);"
That lengthy string is passed into a CIColorKernel's initializer to create an executable Core Image kernel:
let multiBandHSVKernel = CIColorKernel(string: shaderString)!
To actually invoke the kernel, we wrap it in a CIFilter and override the outputImage getter whereapplyWithExtent is invoked:
  override var outputImage: CIImage?
    {
        guard let inputImage = inputImage else
        {
            return nil
        }

        return multiBandHSVKernel.applyWithExtent(inputImage.extent,
          arguments: [inputImage,
            inputRedShift,
            inputOrangeShift,
            inputYellowShift,
            inputGreenShift,
            inputAquaShift,
            inputBlueShift,
            inputPurpleShift,
            inputMagentaShift])
    }
The final filter is available in my Filterpedia GitHub repository.
More on Core Image!

If this post has whetted your appetite and you want to dive deeper into Core Image, may I suggest my book, Core Image for Swift. Along with a comprehensive look at the built-in filters, it discusses custom kernels in "proper" detail including the other kernel types: general and warp.
Core Image for Swift is available from the iBook Store and from Gumroad.
Published at DZone with permission of Simon Gladman. See the original article here.
Opinions expressed by DZone contributors are their own.
Comments