Configure, Secure, and Access Mule Application Properties
This article will help you to use Mule application properties in a secure way. Here's how to create and access Mule properties.
Join the DZone community and get the full member experience.
Join For FreeIn this article, you will see a different way in which we can configure and secure Mule application properties.
Creating and Accessing Mule Properties
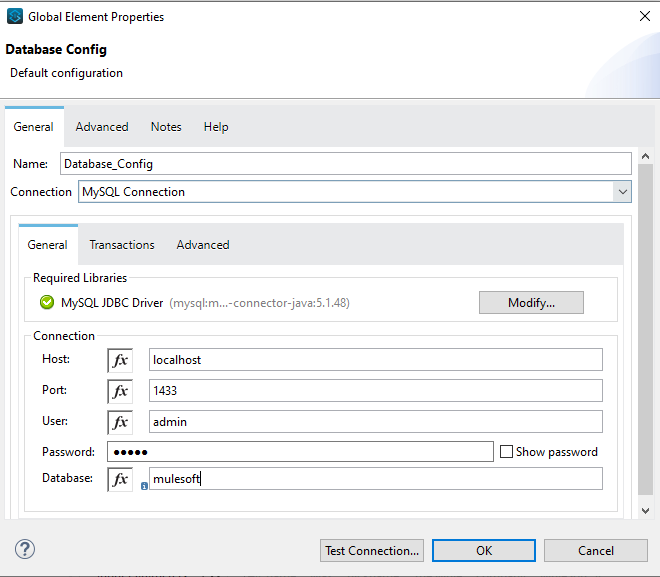
Let's start with directly configuring the properties in the connector. Here we are simply hardcoding the value in the configuration section. Let's see this in a Database connector configuration as an example.

Setting Values Without Properties File
This is not the right way to do it as the data will be different for different environments (DEV, QA, and PROD). To avoid this we will create a properties file and get data from there.
Properties files can be created in two ways: .yaml and .properties. We will see it in both ways.
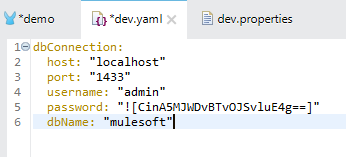
The .yaml file follows a parent-child structure, so we need to take care of indentation while defining the properties. Let's see it with an example.
We will create a .yaml file in the Mule project inside src/main/resources. 
*.yaml File
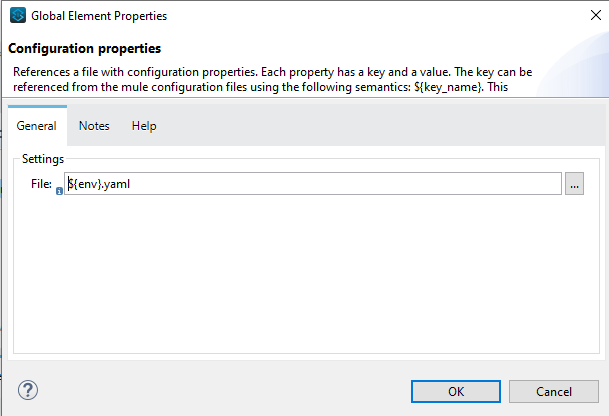
To make use of this .yaml file, we need to create configuration properties in the Global element and set the configuration file path. Once this is done we can use ${dbConnection.<<name>>} to set the properties variable in connection configuration.

Configuration Properties

Note: To make this dynamic, i.e. to pick data of dev when code is deployed in dev or QA when code is deployed in QA, define an argument env and pass it as a runtime variable, eg. -Denv=dev.
Get Properties File Based on env
If you want to use .properties file you need to define data as below in the configuration file. To refer to these properties, we will use the same pattern ${dbConnection.<<name>>} as we did for .yaml file.
*.properties File
Till now, we were defining property files within our mule project, but what if you need to refer to properties files kept at different file locations. Let us see how we can achieve this.
For this, we need to create global properties and set the path where our file is kept as below.
Setting Up Property File Path
Now create a configuration property and use this path to fetch the properties file. Once this is done, the rest of the process is the same as how to use those properties as shown above.
Another way to access the properties is by using the p function. For this, enable the fx function and then use #[Mule::p('<property name')] syntax to access the properties. 
Securing Mule Properties
As seen above, we are using plain text for a password value which is not ideal. Now we will see how we can encrypt the password and use it in a secure way.
For this, first download secure-properties-tool.jar which we will be used to encrypt/decrypt any data that we want to consume in a secure manner.
Once done, we need to go to the required download path and open the command prompt in that location. Below is the syntax to do encrypt or decrypt text strings.
java -cp secure-properties-tool.jar com.mulesoft.tools.SecurePropertiesTool \
<method> \
<operation> \
<algorithm> \
<mode> \
<key> \
<value> \
--use-random-iv [optional]
We will now encrypt our password using the above syntax. We are using the AES algorithm to encrypt the password. Here is the list of supported algorithm and modes .
To configure secure properties it needs to be enclosed in ![] , and to access it, the syntax is ${secure::<propertyName>} as shown below.


Opinions expressed by DZone contributors are their own.

Comments