Creating an AWS Service Proxy for Amazon SQS
Want to use SQS without AWS Lambda functions? Get ready to dive into API Gateway so you can send and receive messages while securing them with IAM roles.
Join the DZone community and get the full member experience.
Join For FreeLast week, our team decided to expose an API using API Gateway Service Proxy to use SQS without using a Lambda function. We started to look inside Amazon API Gateway and found a couple of tutorials for SNS, DDB, S3, and Kinesis, but I couldn't find something good for SQS.
So I decided to do it by myself and publish it for people who need it for their own project.
In this piece of work, I am going to show describe how to
Create an Amazon SQS queue.
Create an Amazon IAM policy and role (to access the SQS queue).
Publish an API on API Gateway.
Send and receive messages (single and batch) through the API Gateway.
For this article:
I assume that you have already set up an account with Amazon and you know how to use the AWS Managed Services, including API Gateway and SQS.
At end of the demo, please do NOT forget to delete the API, IAM role and policy, and SQS queue.
Creating an Amazon SQS Queue
This is the easiest step, you just need to access SQS service dashboard and follow the instructions:
Select Create New Queue and the enter the queue name. If you like you can change the queue settings to your preferred settings. Here, I am going to set the Queue Name to "demoqueue" and I chose the default values.
After creating the queue, make a note of your queue's ARN (Amazon Resouce Name). The ARN is a unique resource identifier assigned by AWS and is a combination of am:aws:sqs:YOUR-REGION:ACCOUNT-ID:YOUR-QUEUE-NAME.
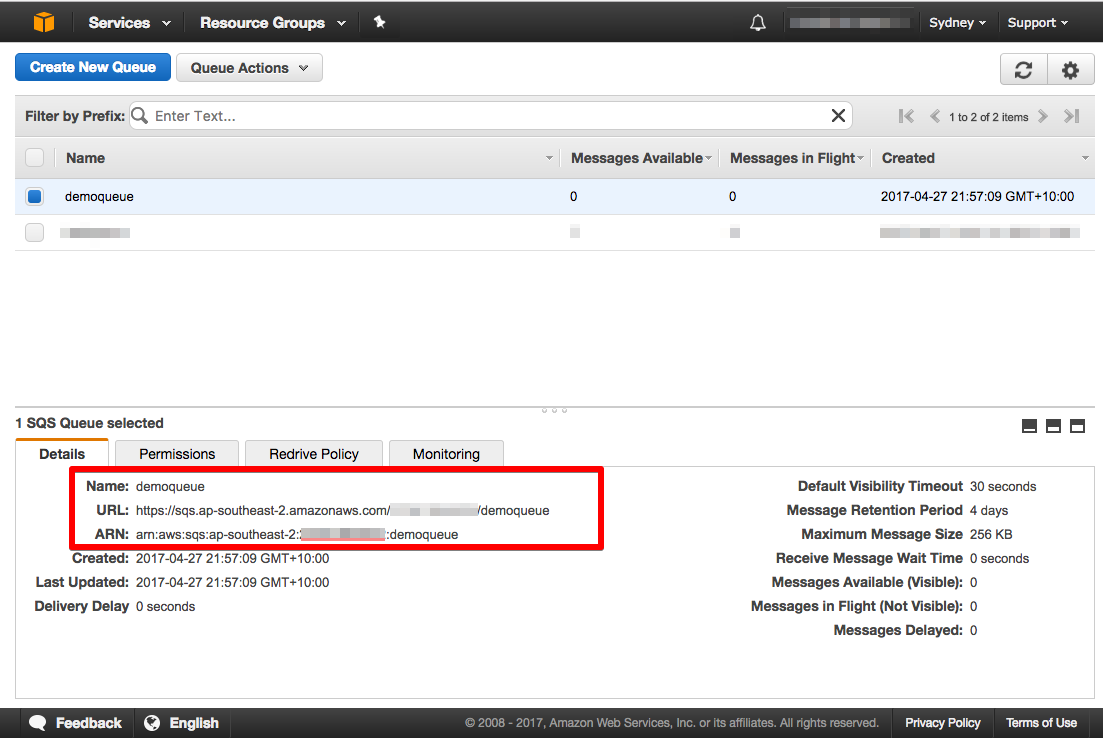
After creating my queue, I need to set up an IAM policy and role for the Amazon API Gateway in order to access the "demoqueue" queue.
Creating Amazon IAM Policy and Role
As you may know, you need to set up permissions (combination of roles and policies) for AWS managed services such API Gateway and Redshift in order to allow them to access your queue. The following steps describe how to set up an IAM policy and create a custom role for Amazon API Gateway to send or receive a message from the demo queue.
Switch to the IAM dashboard and select the Policies tab from the right-side menu; you should see the following dialog, then select "Create policy" and go to the next step
IAM gives you a couple of choices: You can choose either Policy Generator or Create Your Own Policy. If you want to start with a template as a base, then you can go with the first option. For this tutorial, let's keep it simple and just copy and paste the following sample policy below, but don't forget to replace the YOUR-SQS-ARN with your queue ARN value.
{
    "Version": "2012-10-17",
    "Statement": [
        {
            "Effect": "Allow",
            "Resource": [
                "YOUR-SQS-ARN"
            ],
            "Action": [
                "sqs:SendMessage",
                "sqs:ReceiveMessage"
            ]
        }
    ]
}
I called my policy apigateway-sqs-demoqueue-access-policy and added a description for it.
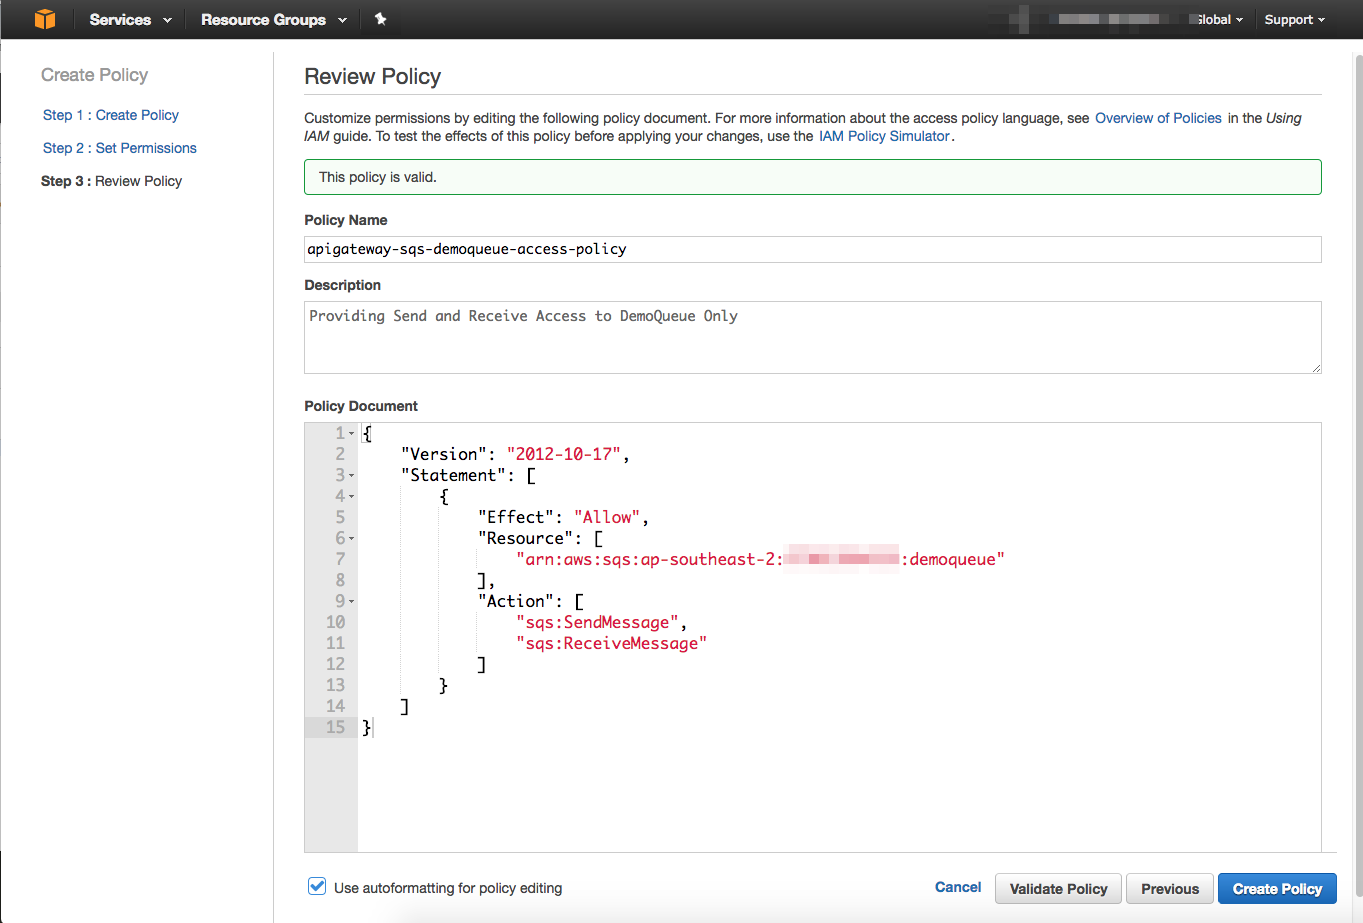
At the end, select Create Policy and make a note of remembering the name of the policy for the next few steps.
From the IAM dashboard, select Roles and choose Create new role. To create a role, we need to select role type (Amazon API Gateway) and establish trust fro the role, then attach the policy created in the previous step to the role as shown below.


So far, we have created an SQS queue (demoqueue) and an IAM role. You should have two ARNs as follows:
| Resource | ARN |
| Amazon SQS |
arn:aws:sqs:ap-southeast-2:YOUR-ACCOUNT-ID:YOUR-QUEU-NAME |
| Amazon IAM Role |
arn:aws:iam::YOUR-ACCOUNT-ID:role/YOUR-ROLE-NAME |
Publishing an API on Amazon API Gateway
In order to send and receive messages to the SQS queue, I am going to show you how to publish an API on Amazon API Gateway and define the required resources and methods for that.
I decided to divide this step into two parts:
Part A: Creating resources, sub-resources, and an HTTP method associated with them.
Part B: Configuring the HTTP methods' integration and execution setting for SQS service.
Let's start with Part A for now!
Part A: Creating Resources, Sub-Resources, and HTTP Method
As you can see below, my API path starts with version (/v1) and is followed by a sub-resource or action. You may wonder about the other sub-resources, /batch/ and /purge, in the API definition. These are used for sending batch messages to the queue and for removing the messages from the queue, but they are optional for this tutorial and you can find their implementation in my GitHub repo.
POST /v1/send          # Sending a single message [You can use GET as well]
GET /v1/receive       # Recieving messages
DELETE /v1/purge         # Purging a message using handler (optional)
POST /v1/batch/send    # Sending batch messages (optional)
DELETE /v1/batch/purge   # Purging batch messages (optional)
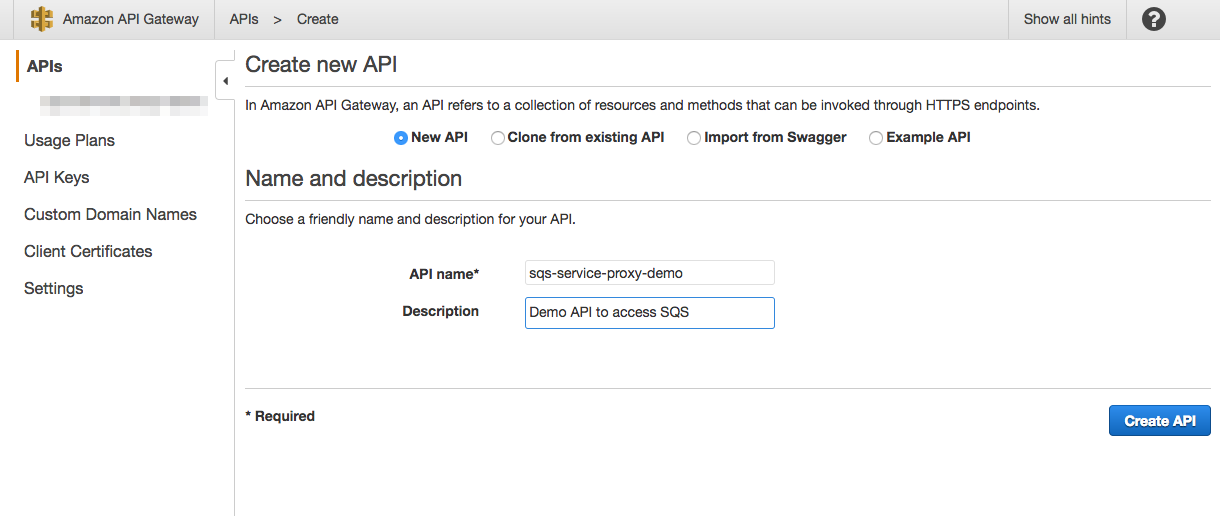
1- From AWS services, select Amazon API Gateway; once the API Gateway dashboard displayed, select Create New API then New API.
Once our API is ready, we should start to create the API resources listed in the Part A introduction.
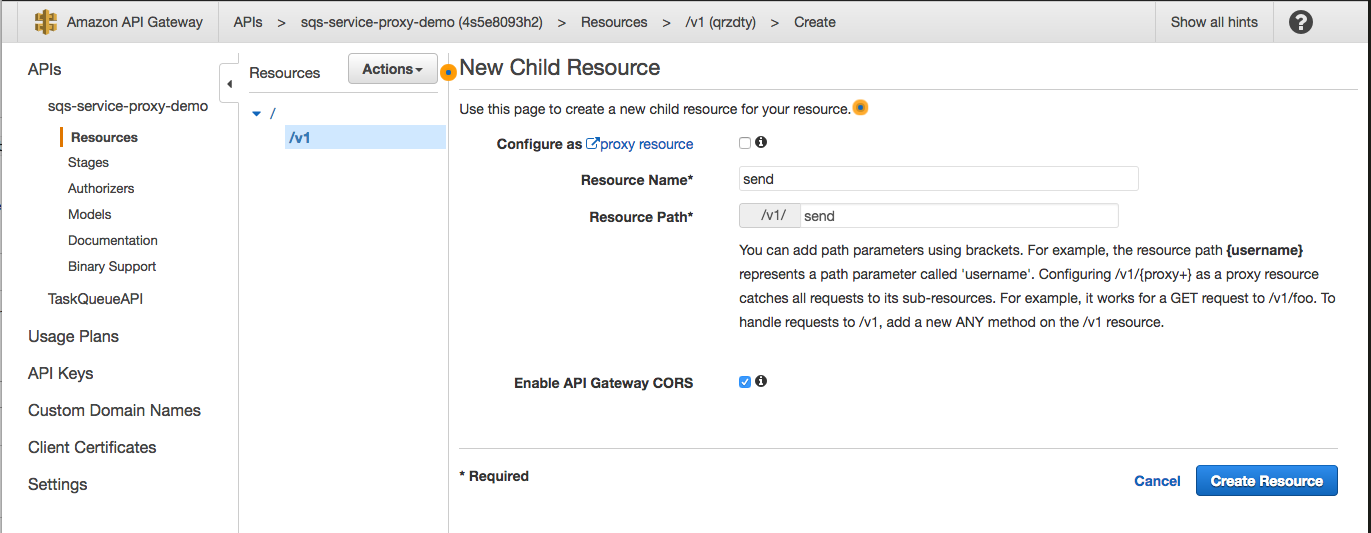
Create the /v1 resource as shown here:
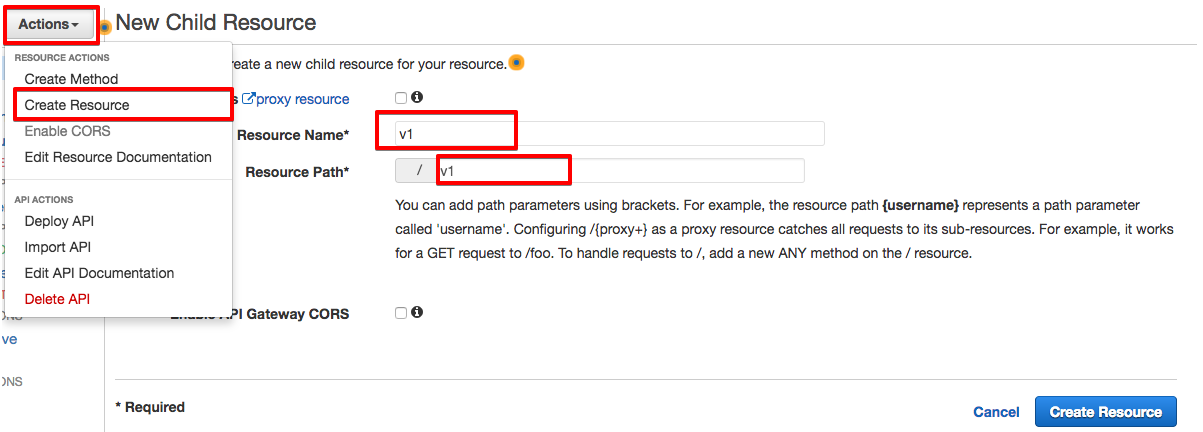
Then create a sub-resource for /v1/send under /v1 resource:
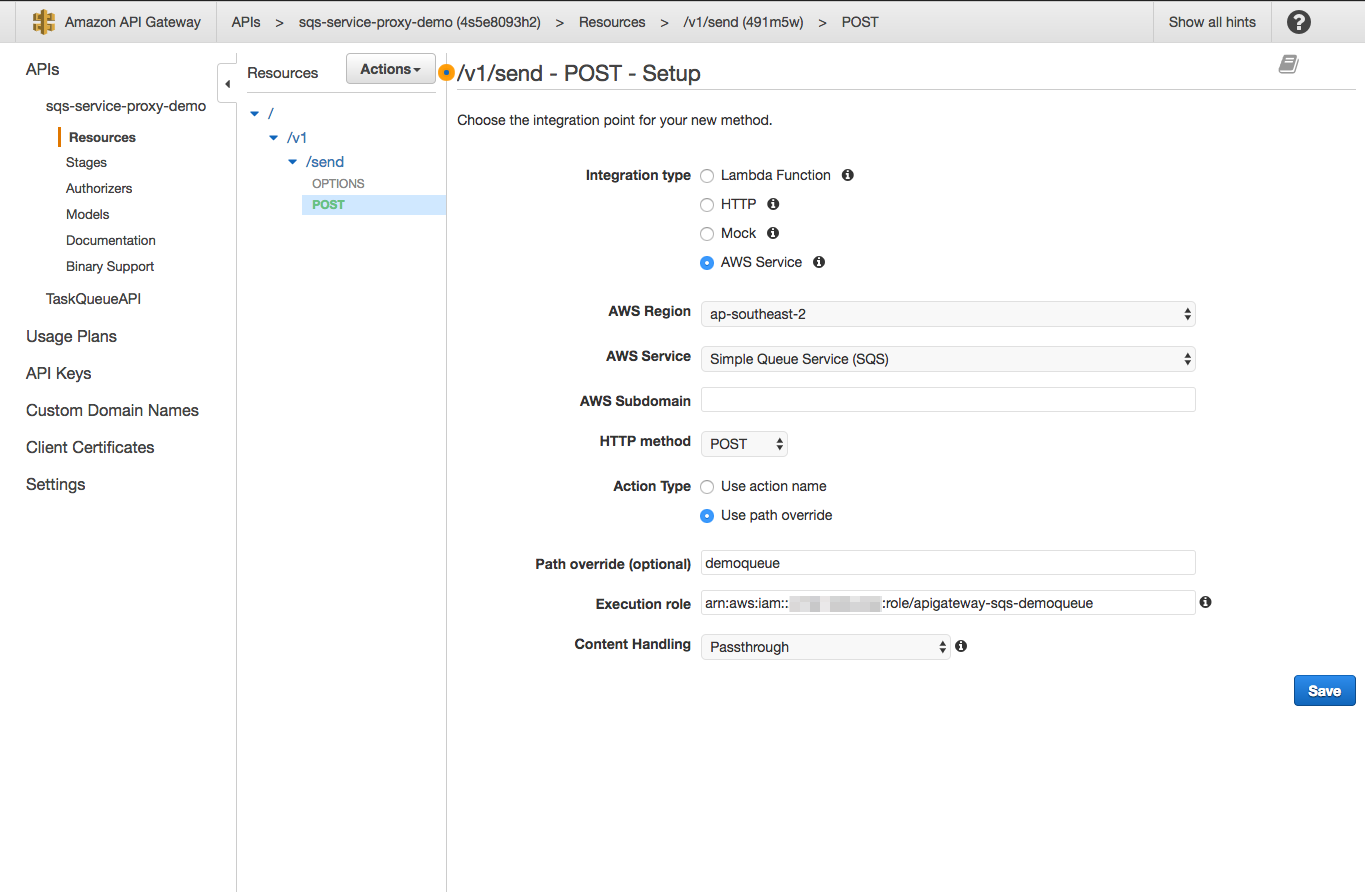
Once you have finished the creation of the resource, we need to add the HTTP method (POST) to our resources by selecting Action > Create Method. For creating the method, we need to specify Integration Type (AWS Service), AWS region (your specific region), and AWS Service (SQS). In addition to that, the API Gateway requires an IAM permitted role (as mentioned above, use your IAM created role ARN) to access our queue.
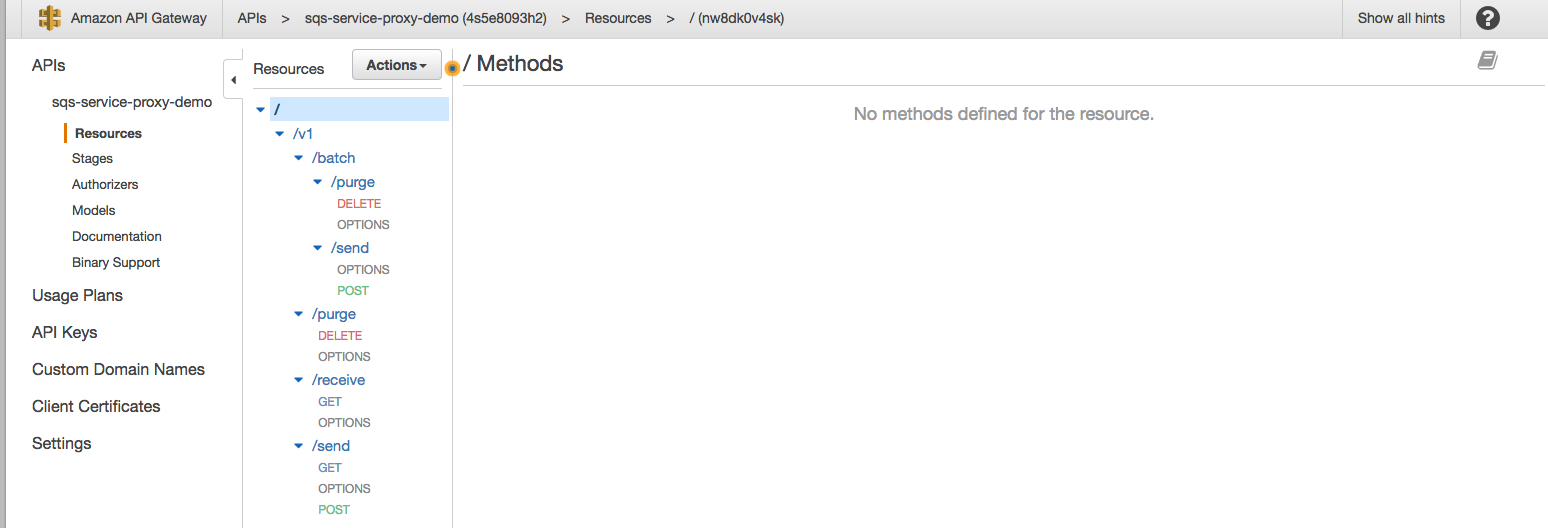
Repeat the steps above for the other sub-resources (you can ignore batch and purge for now) and you should end up with a structure as follow:
Now we are going start to work on Part B: Configuring the HTTP methods' Execution and integration.
Part B: Configuring the HTTP methods' Integration and Execution for the SQS Service
As you may notice, after creating each resource and assigning a proper HTTP method to it (e.g. /v1/send - POST), the API Gateway dashboard will display the following view, which includes request-response flows, backend services, or target endpoints, and a Test button.
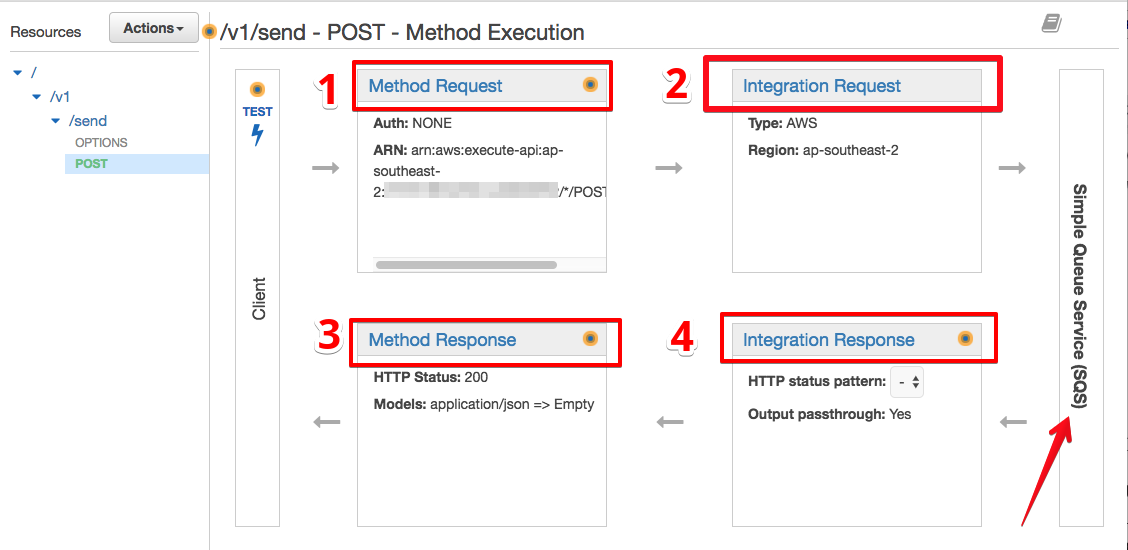
For this section, we are going to focus only on points 1 and 2 (as shown in the screenshot above), and then try to use Test button to see the result of our work. For more information about integration and execution methods, I will refer you to the API Gateway documentation.
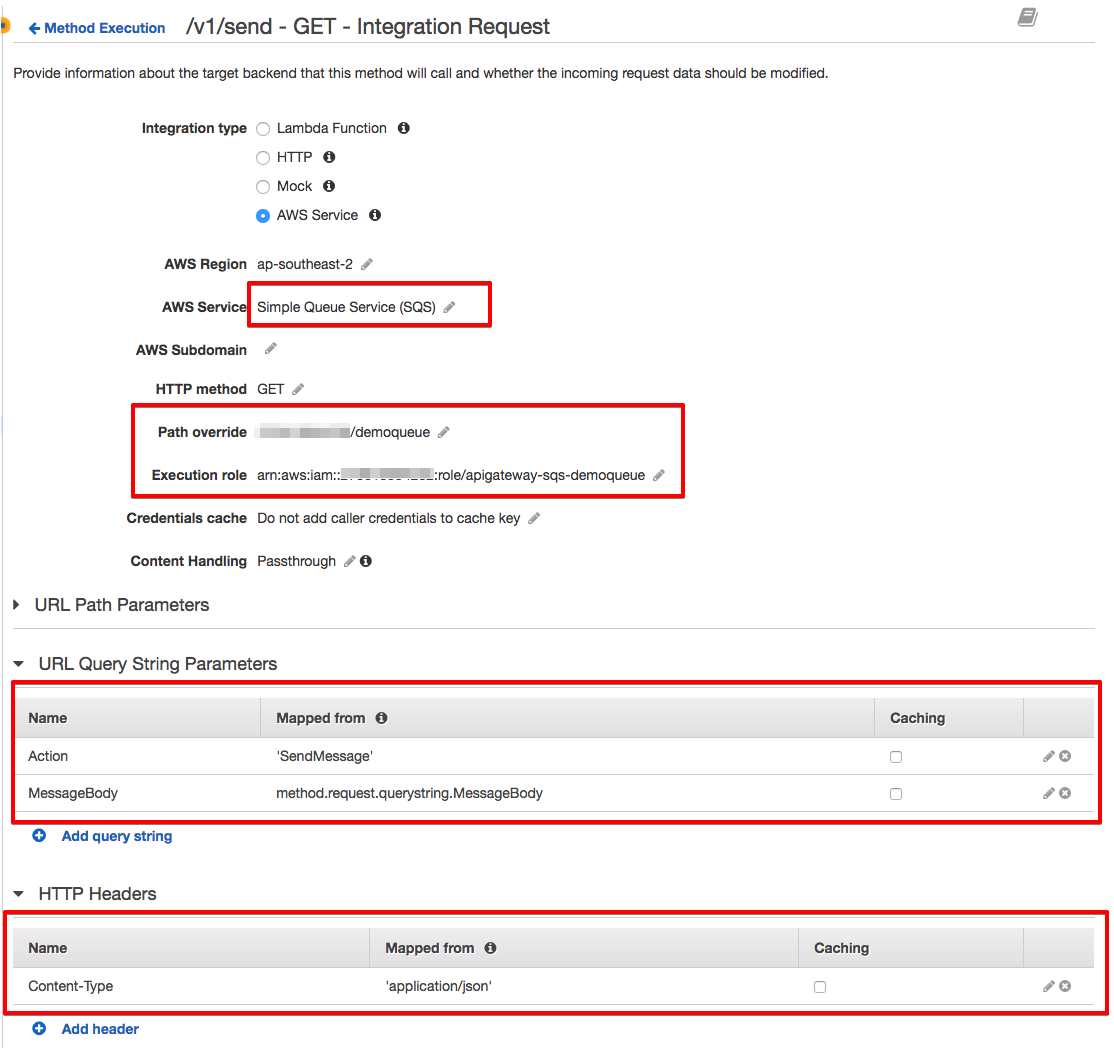
Let's begin with /v1/send and HTTP GET, to send a message to the queue using the GET and query string. Select Method Request and then Integration Request and configure the following settings as shown in the screenshots:
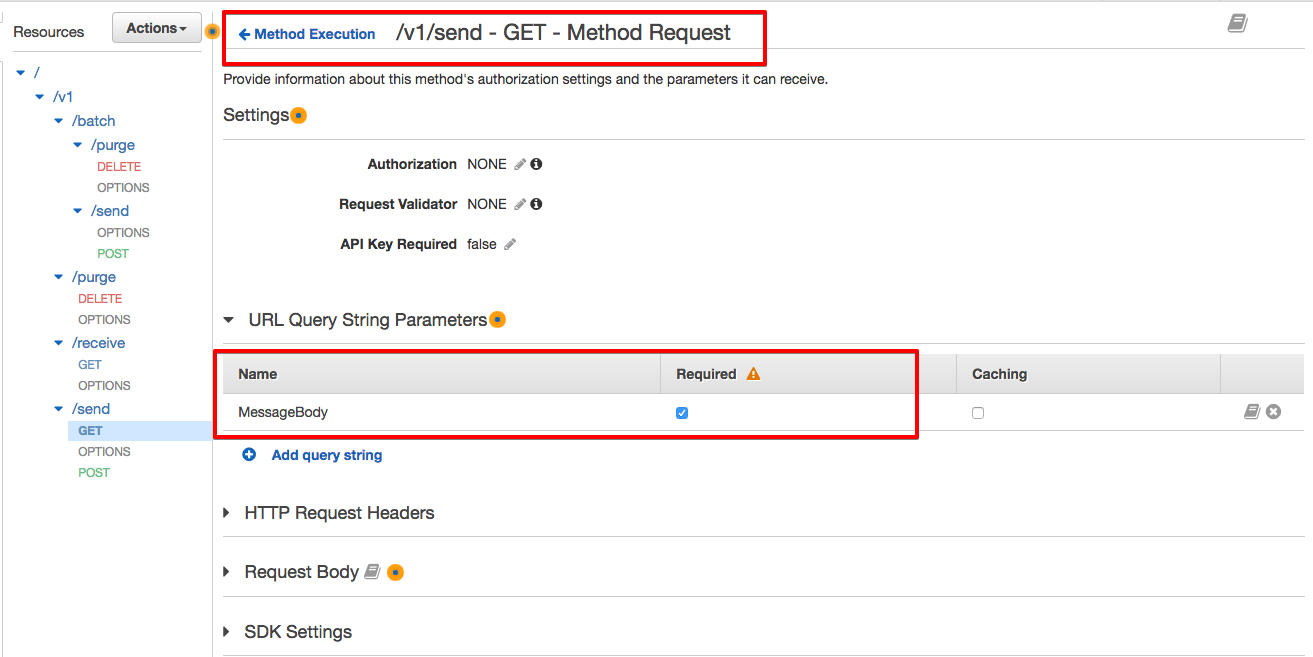
For our integration request, you will need to specify the setup:
Path override (AWS ACCOUNT-ID/QUEUE-NAME)
Execution role (IAM Role's ARN created in the IAM steps)
The SQS Action corresponding to this resource and selected HTTP Method (SendMessage). Do not forget to add single quotes around the 'SendMessage'.
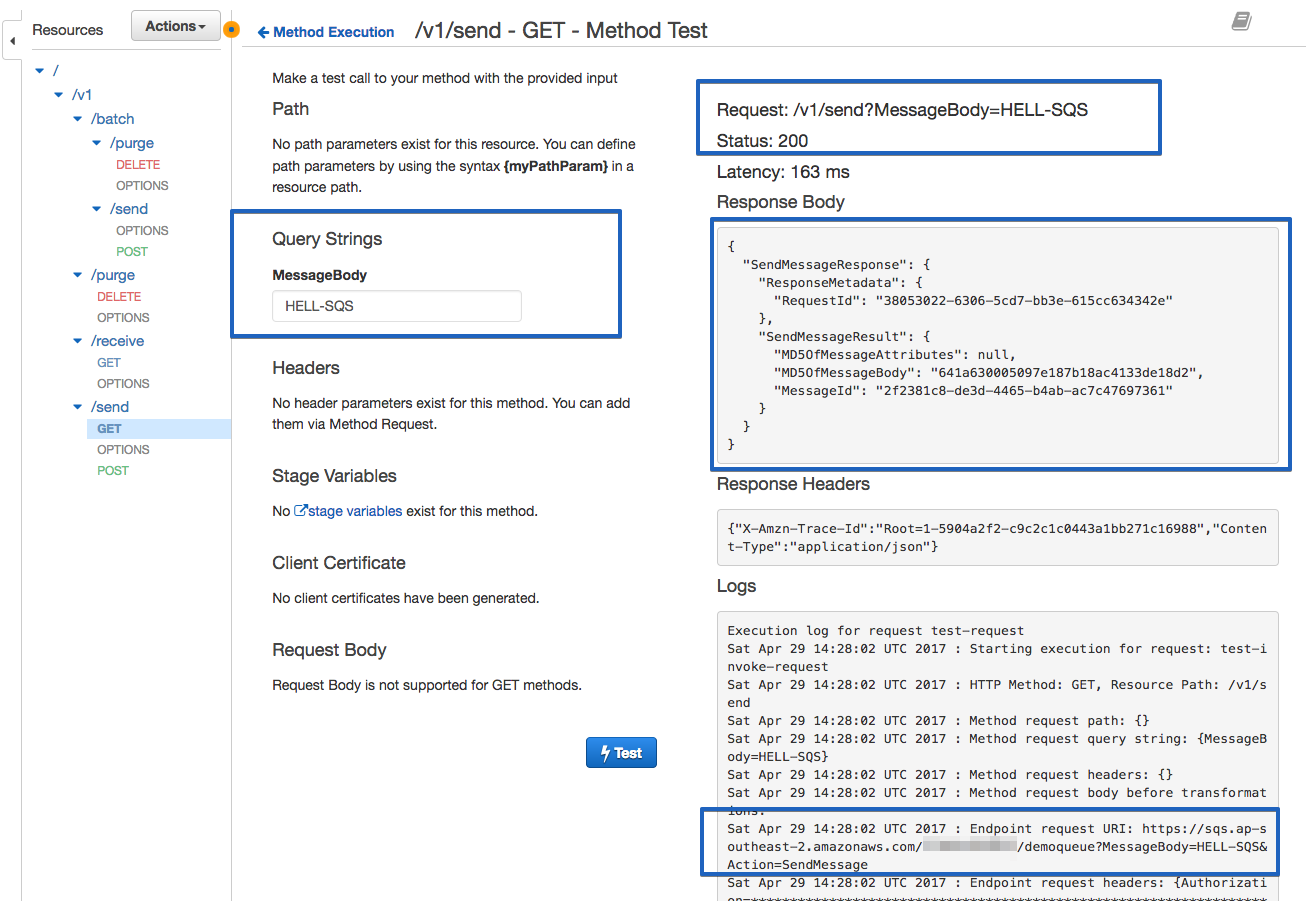
Once it's done, save and select Test, and you should see the testing dashboard:
For /v1/send and HTTP POST, there will be no configuration for the Method Request. However, we need to do some more work in the Integration Request path as follow:

For the Body Mapping Template section, you can use the following code snippet:
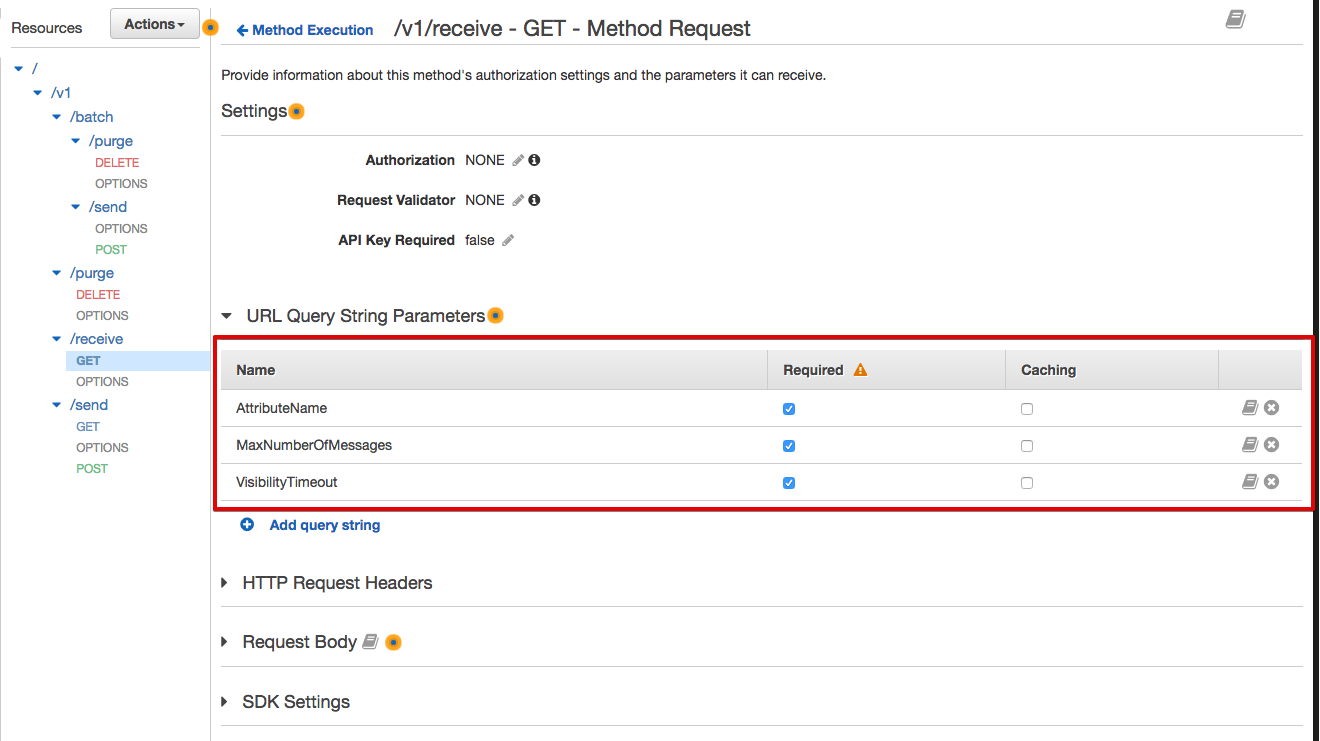
Action=SendMessage&MessageBody=$util.urlEncode($util.escapeJavaScript($input.json('$')))Now we are going to configure the API (/v1/receive) to read messages from the SQS queue. Looking at the SQS documentation, you can path multiple parameters to the SQS service in order to scan the queue and retrieve your messages. For this demo, I am going to pass only a subset of them, including AttributeName (all), MaxNumberOfMessages (1 to 10), and VisibilityTimeout.
Select the /v1/receive, GET method, and then Method Request as below:
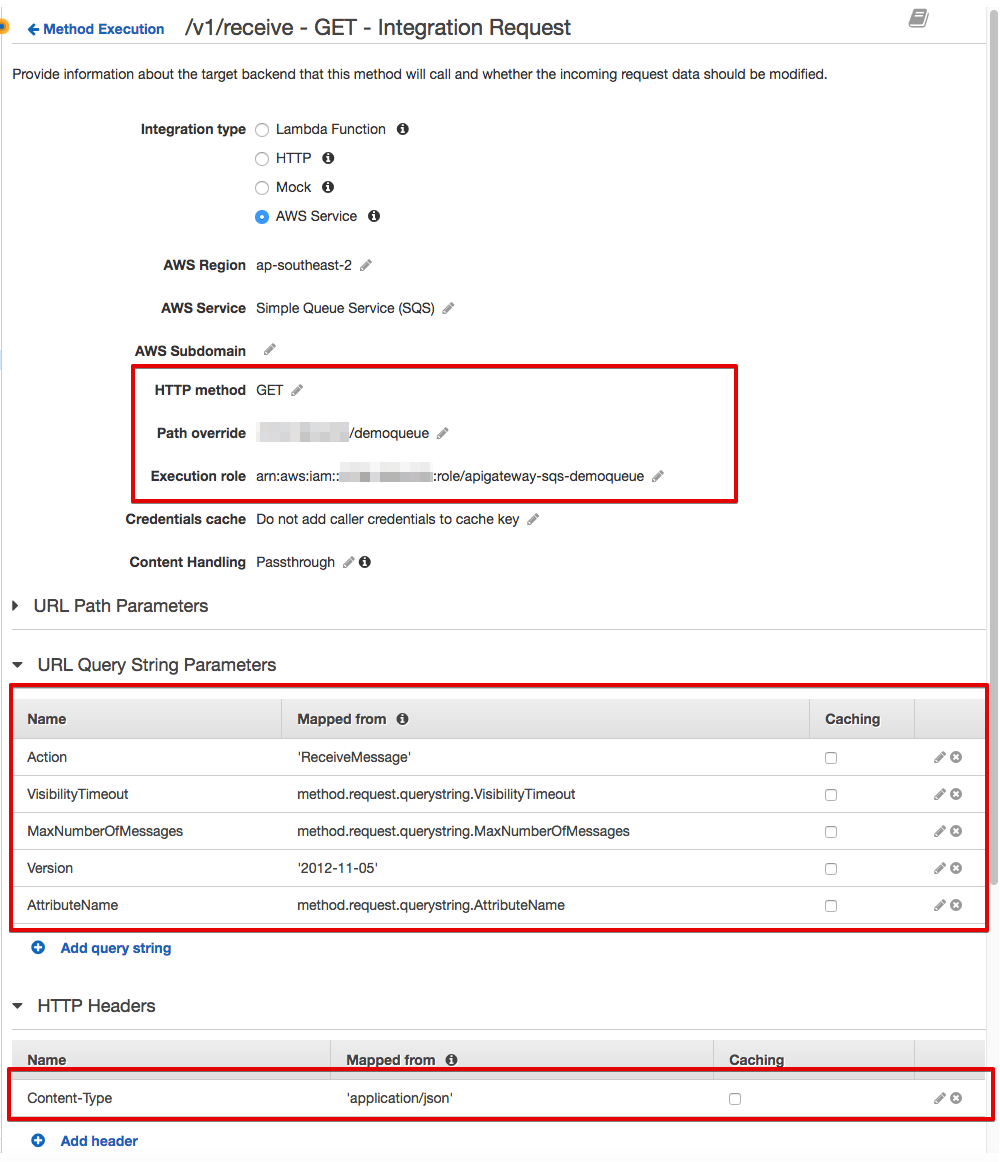
Once we've configured the Method Request, select the Method Integration and set up:
Path override (AWS ACCOUNT-ID/QUEUE-NAME)
Execution role (IAM Role's ARN created in the IAM steps)
SQS Action corresponding to this resource and selected HTTP Method (ReceiveMessage). Do not forget to add single quotes around 'ReceiveMessage'.
After configuring our method integration for /v1/receieve, you can now test it and try to read messages from the queue:
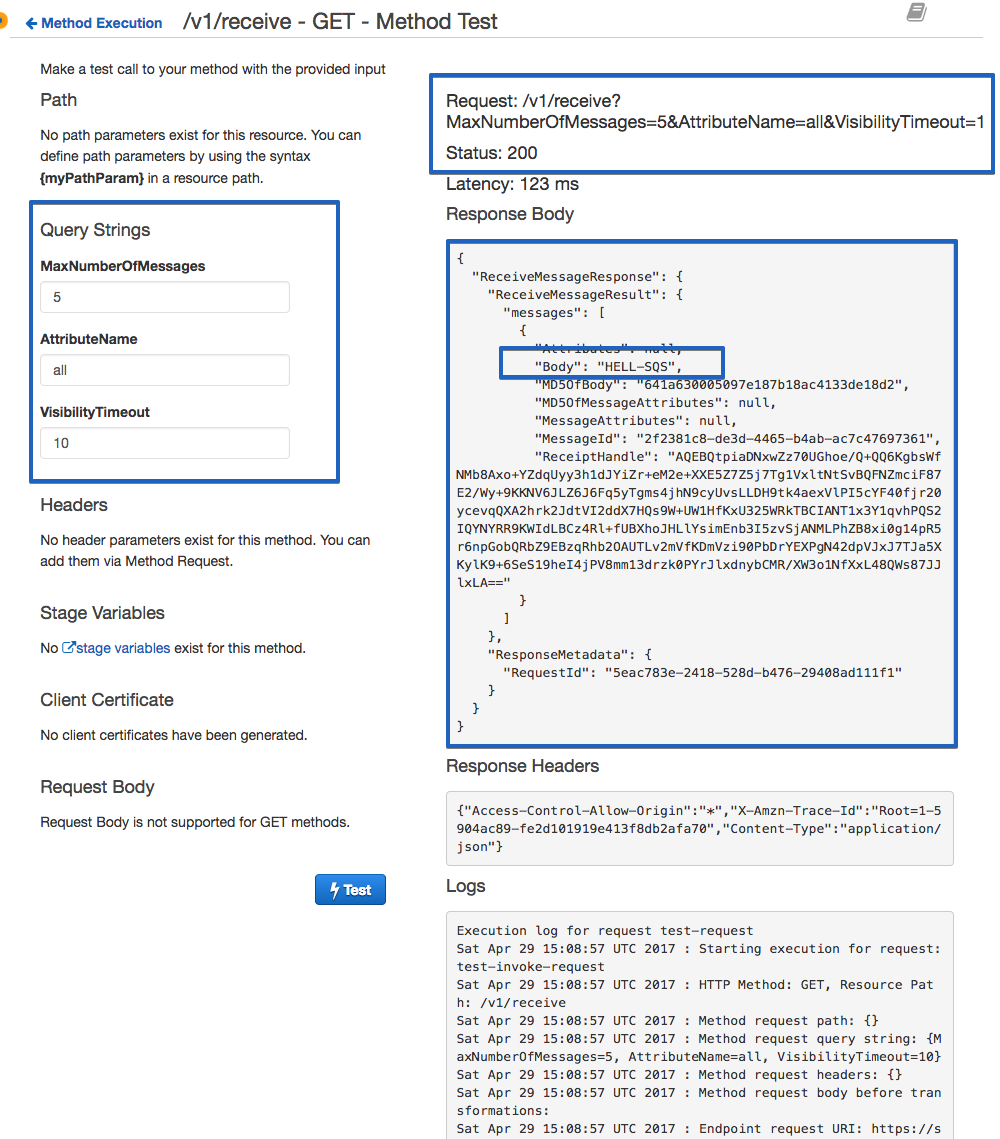
For now, you should be able to send and receive messages from the queue using the test button. However, you are not able to delete (purge) or send batch messages to your queue. We haven't also published this API to the outside world.
Publishing an API is easy: You just a need to create a stage and publish your API, but you need to take care of your API security and plan your authentication mechanism.
If you'd like to know how to configure purge and batch requests, I suggest looking at the API Gateway configuration and Postman in my GitHub repository.
What I am still thinking about and exploring is adding more features to my API, such as creating or listing my queues and also securing my API using Amazon Cognito and IAM.
I hope you enjoyed this tutorial and please send me your feedback and questions.
Opinions expressed by DZone contributors are their own.
Comments