Creating My First Web App With Angular 2 in Eclipse
In this article, the author will show you how to create a simple master-details application using Angular 2, TypeScript, Angular CLI and Eclipse Java EE.
Join the DZone community and get the full member experience.
Join For FreeAngular 2 is a framework for building desktop and mobile web applications. After hearing rave reviews about Angular 2, I decided to check it out and take my first steps into modern web development. In this article, I’ll show you how to create a simple master-details application using Angular 2, TypeScript, Angular CLI and Eclipse Java EE.
Tools and Prerequisites
- Node.js and NPM—You will need to install this open-source JavaScript runtime environment and its package manager.
- Angular CLI—Install this handy command line interface for Angular.
- JDK and Eclipse for Java EE Developers—The Java EE IDE and tools I used in this example.
- TypeScript plugin for Eclipse—A typed superset of JavaScript that compiles to plain JavaScript.
- Terminal plugin for Eclipse—A fully working command-line Terminal inside Eclipse.
- Basic TypeScript, HTML and Eclipse usage knowledge
The Goal
Let’s create a simple app containing a vehicle list with the ability to edit vehicle properties. I’ve included a sample project that you can refer to.
Getting Started in Eclipse
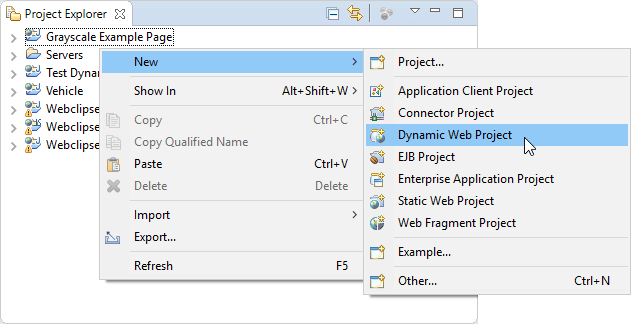
From the Eclipse menu, choose File>New>Dynamic Web Project; or right click in Project/Package Explorer and choose New>Dynamic Web Project.
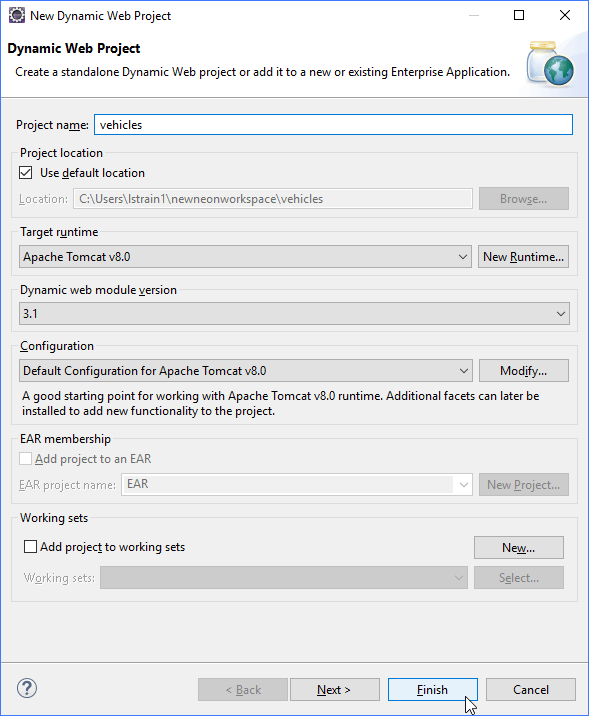
 Type Vehicles for the project name and click Finish—that’s all you need here.
Angular CLI Comes to the Scene
Angular CLI is a command-line tool that allows you to create a working Angular 2 application out-of-the-box without a massive amount of manual work—and also allows you to generate Angular 2 components, services, etc. in the same way. Let’s try it! Right-click the newly created project and select Show in>Terminal.
From the Terminal view, type ng init. After the process finishes, refresh the project in Eclipse—the src folder is updated with an app folder and several files; index.html (well-known to web developers) and main.ts among them. Is this really all that’s required to get an Angular 2 Hello World application? Yes! Open the project in Terminal view and type npm start. After a short time, you’ll see output like:
Serving on http://localhost:4200/ Build successful - 17270ms.Open your browser (I use Chrome for testing) and type the given URL (http://localhost:4200/). You’ll see a “Loading…” message and then “App works!”. See, it actually works!
Model
Let’s go ahead and create a model for our app. This model will be pretty simple. Create a package app.model in your src folder, and in it create file vehicle.ts with the following contents:
export class Vehicle { id; name; type; mass; }The class contains only four fields describing some vehicle.
Components
It’s time to make some UI bricks for our application, called components. Open the Terminal view for folder (Your Project)>Java Resources>src>app and type ng g component vehicle-list. The CLI command ng with the key g (or generate) is responsible for generating Angular 2 application entities and, particularly, components.
As you can conclude from its name, vehicle-list is responsible for displaying a list with vehicle details. Let’s expand vehicle-list folder and open vehicles-list.component.ts:
import { Component, OnInit } from '@angular/core'; @Component({ moduleId: module.id, selector: 'app-vehicles-list', templateUrl: 'vehicles-list.component.html', styleUrls: ['vehicles-list.component.css'] }) export class VehiclesListComponent implements OnInit { constructor() { } ngOnInit() { } }All the basic component infrastructure is present here.
- The first line is importing the Component decorator function. This function is describing metadata for any Angular 2 reusable UI component.
- Selector specifies the tag name that would trigger this component’s insertion.
- TemplateUrl and styleUrls specify file names that contain an HTML-based template for the component UI and CSS styling for it.
- Class VehiclesListComponent should contain almost all inner component logic written in TypeScript. For now, it contains only an empty constructor and empty ngOnInit lifecycle hook. This hook can be useful for some “heavy” initialization like network or database calls, constructor should be used only for basic initialization, without any heavy IO.
OK, we’ll definitely need to store a list of our vehicles somewhere. Let’s add the field vehicles: Vehicle[]; to the VehiclesListComponent class. Of course, Vehicle will be highlighted in red—currently, the TS compiler knows nothing about it. To fix this, add import { Vehicle } from '../model/vehicle'; to the imports section and save the file. The red highlighting should disappear. If not, make a small edit (like adding space) and save again—unfortunately, the current version of the TypeScript plugin has poor validation.
Well, now we have a vehicle list, but how can we interact with it? Passing it to the constructor would make our code less flexible by requiring a concrete list to be specified when creating a vehicle list component. There’s a better solution—Angular 2 supports Dependency Injection out-of-the-box, and it can be accomplished using Angular 2 Services.
Go to app.model in the terminal and type ng g service vehicle. After the command executes, refresh app.model. Two files will be created,vehicle.service.spec.ts and vehicle.service.ts. The last one is interesting to us. For now we won’t implement any complex logic to obtain the list and will just hard code our vehicles list. In the following code we import the Injectable decorator, set up our list, assign given list to class field and return it by demand:
import { Injectable } from '@angular/core'; var vehicles = [ { id:1, name:"Trailer - 1", type:"Truck", mass:40 }, { id:2, name:"An-2", type:"Plane", mass:5 }, { id:3, name:"LandCruiser 80", type:"Jeep", mass:2 }, ]; @Injectable() export class VehicleService { private vehicles; constructor() { this.vehicles = vehicles; } getVehicles() { return this.vehicles; } }Now go back to vehicles-list.component.ts, import VehicleService in the same way as Vehicle is imported, and make 2 more edits: add providers: [VehicleService] to @Component and change constructor to:
constructor(private vehicleService: VehicleService) { this.vehicles = this.vehicleService.getVehicles(); }To avoid compilation errors, you’ll need to keep consistent not only component ts script, but also spec.ts script generated for unit tests. Since we changed the constructor a bit, open it, import VehiclesService as it’s done above and change component creation to the following:
let component = new VehiclesListComponent(this._injector.get(VehicleService));
We’re basically done with the component, let’s switch to UI. Open vehicle-list.component.html and replace its mock contents with our table.
<table class="tftable">
    <tr>
        <th>ID</th>
        <th>Name</th>
        <th>Type</th>
        <th>Mass</th>
    <tr *ngFor="let vehicle of vehicles">
        <td>{{vehicle.id}}</td>
        <td>{{vehicle.name}}</td>
        <td>{{vehicle.type}}</td>
        <td>{{vehicle.mass}}</td>
    </tr>
</table>
We do a conceptually simple thing here—create a table with a constant header and then iterate over vehicles list, creating a table row for each vehicle. A row is composed of cells with corresponding properties.
- *ngFor is a built-in directive iterating over a list (vehicles in our case).
- {{ }} tells Angular to read a given property from the TypeScript model and render it.
Also, we specify table class here because we want to have some styling for it—corresponding styles are put into vehicles-list.component.css. You can download the sample project and open them if necessary.
Plugging In
Ok, we’re done with our initial UI. To see the result, we’ll need to plug our component into the main app component. To do this, in app.component.ts import VehiclesListComponent and then add a directive to @Component. The result will be like the following:
import { Component } from '@angular/core'; import { VehiclesListComponent} from './vehicles-list/vehicles-list.component'; @Component({ moduleId: module.id, selector: 'app-root', templateUrl: 'app.component.html', styleUrls: ['app.component.css'], directives: [VehiclesListComponent], }) export class AppComponent { title = 'Vehicle registry'; }A second insertion point is app.component.html. Just add our selector tag: <vehicles-list></vehicles-list>.
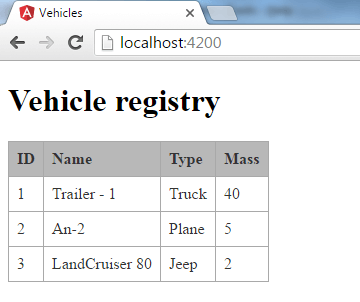
In the Terminal, go to the project root dir and type npm start…Here we go!
Master-Details
Our table is pretty, but not very interactive, huh? OK, let’s make it a bit more “dynamic” by adding a Details view that displays a clicked table row and allows the fields to be edited. Let’s create VehicleDetailsComponent under the same parent with VehiclesListComponent using the command ng g component vehicle-details.
Like it was for Vehicles List, a folder with ts and HTML/CSS files will be created. We’ll need to modify 2 of them. VehicleDetailsComponent in vehicle-details.component.ts needs to have a field for current vehicle—vehicle:Vehicle, with @Input directive above. This decorator declares the vehicle field as an input, which makes passing an actual value to it much easier.
Now let’s take a closer look at the template file for it:
<div *ngIf="vehicle">
  <h2>{{vehicle.name}} properties</h2>
  <table>
    <tr>
      <td>
        <label>ID:</label>
      </td>
      <td>{{vehicle.id}}</td>
    </tr>
    <tr>
      <td>
        <label>Name: </label>
      </td>
      <td>
        <input [(ngModel)]="vehicle.name" placeholder="name" />
      </td>
    </tr>
    <tr>
      <td>
        <label>Type: </label>
      </td>
      <td>
        <input [(ngModel)]="vehicle.type" placeholder="type" />
      </td>
    </tr>
    <tr>
      <td>
        <label>Mass: </label>
      </td>
      <td>
        <input [(ngModel)]="vehicle.mass" placeholder="mass" />
      </td>
    </tr>
  </table>
</div>- *ngIf=”vehicle”—Designates to only proceed with the content when vehicle field has value, which is needed to avoid errors when selection is empty.
- [(ngModel)]=”vehicle.name” (same for type and mass)—Implements bi-directional data binding between input field and corresponding property.
Now, we need to change our VehiclesListComponent to handle selection. Let’s add a selectedVehicle field and a method onSelect to handle selection.
Also, in the HTML template, we’ll need to add a tag for the details component. To make it work, we need to import VehicleDetailsComponent and add the corresponding directive. After given changes, vehicles-list.component.ts will look like the following:
import { Component, OnInit } from '@angular/core'; import { VehicleService } from '../model/vehicle.service'; import { VehicleDetailsComponent } from '../vehicle-details/vehicle-details.component'; import { Vehicle } from '../model/vehicle'; @Component({ moduleId: module.id, selector: 'vehicles-list', templateUrl: 'vehicles-list.component.html', styleUrls: ['vehicles-list.component.css'], directives: [VehicleDetailsComponent], providers: [VehicleService] }) export class VehiclesListComponent implements OnInit { vehicles: Vehicle[]; selectedVehicle:Vehicle; constructor(private vehicleService: VehicleService) { this.vehicles = this.vehicleService.getVehicles(); } ngOnInit() { } onSelect(vehicle: Vehicle) { this.selectedVehicle = vehicle; } }Next, let’s change the vehicles list template, vehicles-list.component.html. We need to add the click handler to each table row to call the corresponding selection method—(click)="onSelect(vehicle)". Also, let’s add a tag for the vehicle details component below our table:
<table class="tftable">
  <tr>
    <th>ID</th>
    <th>Name</th>
    <th>Type</th>
    <th>Mass</th>
  <tr *ngFor="let vehicle of vehicles"       (click)="onSelect(vehicle)">
    <td>{{vehicle.id}}</td>
    <td>{{vehicle.name}}</td>
    <td>{{vehicle.type}}</td>
    <td>{{vehicle.mass}}</td>
  </tr>
</table>
<vehicle-details [vehicle]="selectedVehicle"></vehicle-details>
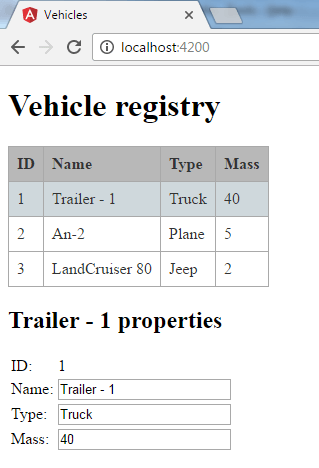
Let’s call npm start and see how it looks:
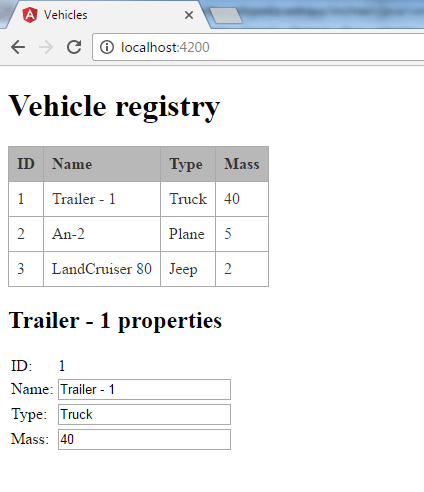 You can try editing any value under the “properties” and the change will be immediately reflected in the table, nothing extra needed for it! Perfect.
A Little Bit of Styling
It looks pretty good now, but it’s a bit difficult to determine which row is selected. Let’s fix this. Add an attribute [class.selected]="vehicle === selectedVehicle" to the <tr> tag in vehicles-list.component.html. Its meaning is pretty obvious—add a CSS class for the case when the current row’s vehicle equals the selected one. Of course, to make this work, we need to add the corresponding style to vehicles-list.component.css:
.selected { background-color: #CFD8DC !important;}
Let’s add hovering style too! It’s as easy as adding one line to the CSS file:
table.tftable tr:hover {background-color: #DDD; left: .1em;}
My Final Thoughts
I haven’t done too much web development in my life. When I first started out as a developer, if you wanted anything more complex than just some static web pages with a navigation bar it required a lot of JavaScript coding. This proved quite a challenge with all that dynamic typing, a lack of a normal object model, and the headache of making it work and look as expected under different browsers. Now that I have returned to web development, I can definitely say that TypeScript is pretty awesome. It allows you to write almost any complex logic and it’s nearly as simple as Java—you are free to write your code and be “Java-ish”, making the classes/methods you want.
Angular also brings a huge improvement to web development. Now you can have natural HTML templates avoiding complex DOM manipulation and focus on creating components and UI. Angular CLI accelerates development by creating necessary component stubs using Angular best practices with just a single short command.
The recent release of Webclipse has added significantly better support for TypeScript, though the Eclipse community at large is still lacking a bit. I am excited about recent discussions on language server support inside Eclipse coming in the future!
Resources
vehicles.zip—Sample project for this blog
https://angular.io/docs/ts/latest/tutorial/—Tour of Heroes tutorial for Angular 2
https://cli.angular.io/—Angular CLI with commands description
https://www.genuitec.com/dow/tech/jsjet-javascript-in-eclipse/using-typescript/ - TypeScript support
Opinions expressed by DZone contributors are their own.

Comments