Create a Custom Logger to Log Response Details With Playwright Java
This tutorial teaches how to create a custom logger for login response details using the Playwright Java framework for API testing.
Join the DZone community and get the full member experience.
Join For FreeWhile working on the series of tutorial blogs for GET, POST, PUT, PATCH, and DELETE requests for API Automation using Playwright Java. I noticed that there is no logging method provided by the Playwright Java framework to log the requests and responses.
In the REST-assured framework, we have the log().all() method available that is used for logging the request as well as the response. However, Playwright does not provide any such method. However, Playwright offers a text() method in the APIResponse interface that could be well used to extract the response text.
Playwright currently does not have the feature to access the request body and request headers while performing API Testing. The issue is already raised on GitHub for this feature, please add an upvote to this issue so this feature gets implemented soon in the framework.
In this blog, we will learn how to extract the response and create a custom logger to log the response of the API tests using Playwright Java.
How to Log Response Details in Playwright Java
Before we begin with actual coding and implementation for the logger, let’s discuss the dependencies, configuration, and setup required for logging the response details.
Getting Started
As we are working with Playwright Java using Maven, we will use the Log4J2 Maven dependency to log the response details. The dependency for Jackson Databind will be used for parsing the JSON response.
<dependency>
                <groupId>org.apache.logging.log4j</groupId>
                <artifactId>log4j-api</artifactId>
                <version>${log4j-api-version}</version>
            </dependency>
            <dependency>
                <groupId>org.apache.logging.log4j</groupId>
                <artifactId>log4j-core</artifactId>
                <version>${log4j-core-version}</version>
            </dependency>
            <dependency>
                <groupId>com.fasterxml.jackson.core</groupId>
                <artifactId>jackson-databind</artifactId>
                <version>${jackson-databind-version}</version>
            </dependency>
As a best practice, the versions of these dependencies will be added in the properties block as it allows users to easily check and update the newer version of dependencies in the project.
<properties>
        <project.build.sourceEncoding>UTF-8</project.build.sourceEncoding>
        <log4j-core-version>2.24.1</log4j-core-version>
        <log4j-api-version>2.24.1</log4j-api-version>
        <jackson-databind-version>2.18.0</jackson-databind-version>
    </properties>
The next step is to create a log4j2.xml file in the src/main/resources folder. This file stores the configuration for logs, such as log level, where the logs should be printed — to the console or to the file, the pattern of the log layout, etc.
<?xml version="1.0" encoding="UTF-8"?>
<Configuration status="INFO">
    <Appenders>
        <Console name="LogToConsole" target="SYSTEM_OUT">
            <PatternLayout pattern="%d{HH:mm:ss.SSS} [%t] %-5level %logger{36} - %msg%n"/>
        </Console>
    </Appenders>
    <Loggers>
        <Logger name="io.github.mfaisalkhatri" level="info" additivity="false">
            <AppenderRef ref="LogToConsole"/>
        </Logger>
        <Root level="error">
            <AppenderRef ref="LogToConsole"/>
        </Root>
    </Loggers>
    <Loggers>
        <Logger name="io.github.mfaisalkhatri" level="trace" additivity="false">
            <AppenderRef ref="LogToConsole"/>
        </Logger>
        <Root level="error">
            <AppenderRef ref="LogToConsole"/>
        </Root>
    </Loggers>
</Configuration>
The <Appenders> section contains the information related to log printing and its pattern format to print. The <Loggers> section contains the log-level details and how it should be printed. There can be multiple blocks of <Loggers> in the file, each for different log levels, such as “info,” “debug,” “trace,” etc.

Implementing the Custom Logger
A new Java class Logger is created to implement the methods for logging the response details.
public class Logger {

   private final APIResponse                     response;
   private final org.apache.logging.log4j.Logger log;

   public Logger (final APIResponse response) {
       this.response = response;
       this.log = LogManager.getLogger (getClass ());
   }

//...

}
This class has the APIResponse interface of Playwright and the Logger interface from Log4j declared at the class level to ensure that we can reuse it in further methods in the same class and avoid duplicate code lines.
The constructor of the Logger class is used for creating objects of the implementing classes. The APIResponse interface is added as a parameter as we need the response object to be supplied to this class for logging the respective details.
The logResponseDetails() method implements the function to log all the response details.
public void logResponseDetails () {
        String responseBody = this.response.text ();
        this.log.info ("Logging Response Details....\n responseHeaders: {}, \nstatusCode: {},",
            this.response.headers (), this.response.status ());
        this.log.info ("\n Response body: {}", prettyPrintJson (responseBody));
        this.log.info ("End of Logs!");
    }
The responseBody variable will store the response received after executing the API. The next line of code will print the response details, Headers, and Status Code.
As the response returned is not pretty printed, meaning the JSON format is shown in String in multiple lines wrapped up, this makes the logs look untidy. Hence, we have created a prettyPrintJson() method that consumes the response in String format and returns it in pretty format.
private String prettyPrintJson (final String text) {
        if (StringUtils.isNotBlank (text) && StringUtils.isNotEmpty (text)) {
            try {
                final ObjectMapper objectMapper = new ObjectMapper ();
                final Object jsonObject = objectMapper.readValue (text, Object.class);
                return objectMapper.writerWithDefaultPrettyPrinter ()
                    .writeValueAsString (jsonObject);
            } catch (final JsonProcessingException e) {
                this.log.error ("Failed to pretty print JSON: {}", e.getMessage (), e);
            }
        }
        return "No response body found!";

    }
This method accepts the String in the method parameter where the response object will be supplied.
A check is performed using the if() condition to verify that the text supplied is not blank, null and it is not empty. If the condition is satisfied, then the ObjectMapper class from the Jackson Databind dependency is instantiated.
Next, the text value of the response is read, and it is converted and returned as the JSON pretty print format using the writerWithDefaultPrettyPrinter() and writeValueAsString() methods of the ObjectMapper class.
If the response is null, empty, and blank, it will print the message “No response body found!” and the method will be exited.
How to Use the Logger in the API Automation Tests
The Logger class needs to be instantiated and its respective methods need to be called in order to get the response details printed while the tests are executed.
We need to make sure that we don’t write duplicate code everywhere in the tests to get the response details logged. In order to handle this, we would be using the BaseTest class and creating a new method, logResponse(APIResponse response).
This method will accept the APIResponse as parameter, and the logResponseDetails() method will be called after instantiating the Logger class.
public class BaseTest {

//...

    protected void logResponse (final APIResponse response) {
        final Logger logger = new Logger (response);
        logger.logResponseDetails ();
    }
}
As the BaseTest class is extended to all the Test classes; it becomes easier to call the methods directly in the test class.
The HappyPathTests class that we have used in previous blogs for adding happy scenario tests for testing GET, POST, PUT, PATCH, and DELETE requests already extends the BaseTest class. Let’s print the response logs for the POST and GET API request test.
The testShouldCreateNewOrders() verifies that the new orders are created successfully. Let’s add the logResponse() method to this test and get the response printed in the logs.
public class HappyPathTests extends BaseTest{
    @Test

    public void testShouldCreateNewOrders() {

        final int totalOrders = 4;

        for (int i = 0; i < totalOrders; i++) {
            this.orderList.add(getNewOrder());
        }

        final APIResponse response = this.request.post("/addOrder", RequestOptions.create()
                .setData(this.orderList));

        logResponse (response);

//...
// Assertion Statements...

  }
}
The logResponse() method will be called after the POST request is sent. This will enable us to know what response was received before we start performing assertions.
The testShouldGetAllOrders() verifies the GET /getAllOrder API request. Let’s add the logResponse() method to this test and check the response logs getting printed.
public class HappyPathTests extends BaseTest{
    @Test
    public void testShouldGetAllOrders() {

        final APIResponse response = this.request.get("/getAllOrders");

        logResponse (response);

        final JSONObject responseObject = new JSONObject(response.text());
        final JSONArray ordersArray = responseObject.getJSONArray("orders");

        assertEquals(response.status(), 200);
        assertEquals(responseObject.get("message"), "Orders fetched successfully!");
        assertEquals(this.orderList.get(0).getUserId(), ordersArray.getJSONObject(0).get("user_id"));
        assertEquals(this.orderList.get(0).getProductId(), ordersArray.getJSONObject(0).get("product_id"));
        assertEquals(this.orderList.get(0).getTotalAmt(), ordersArray.getJSONObject(0).get("total_amt"));
    }
}
The logResponse() method is called after the GET request is sent and will print the response logs in the console.
Test Execution
The tests will be executed in order where POST request will be executed first so new orders are created and then the GET request will be executed. It will be done using the testng-restfulecommerce-postandgetorder.xml file.
<?xml version="1.0" encoding="UTF-8"?>
<!DOCTYPE suite SYSTEM "http://testng.org/testng-1.0.dtd">
<suite name="Restful ECommerce Test Suite">
    <test name="Testing Happy Path Scenarios of Creating and Updating Orders">
        <classes>
            <class name="io.github.mfaisalkhatri.api.restfulecommerce.HappyPathTests">
                <methods>
                    <include name="testShouldCreateNewOrders"/>
                    <include name="testShouldGetAllOrders"/>
                </methods>
            </class>
        </classes>
    </test>
</suite>
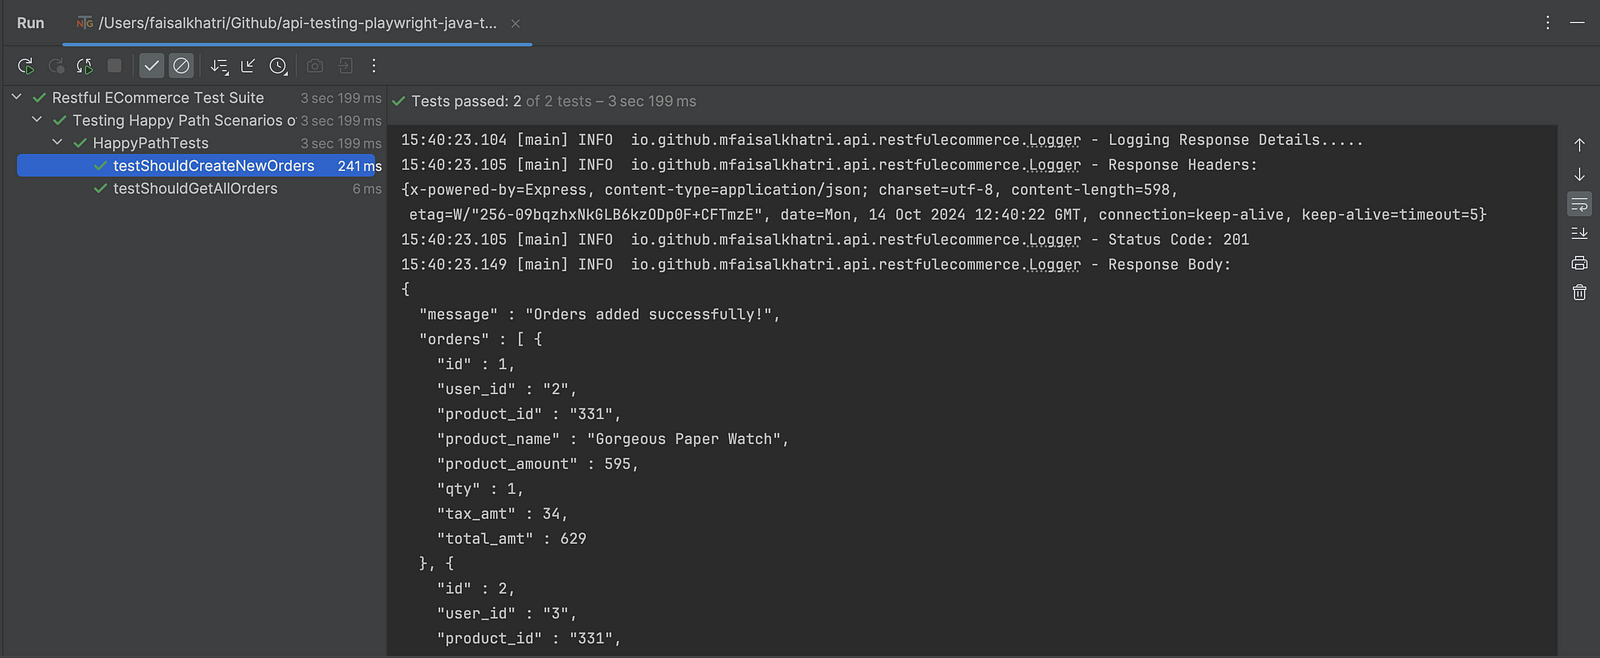
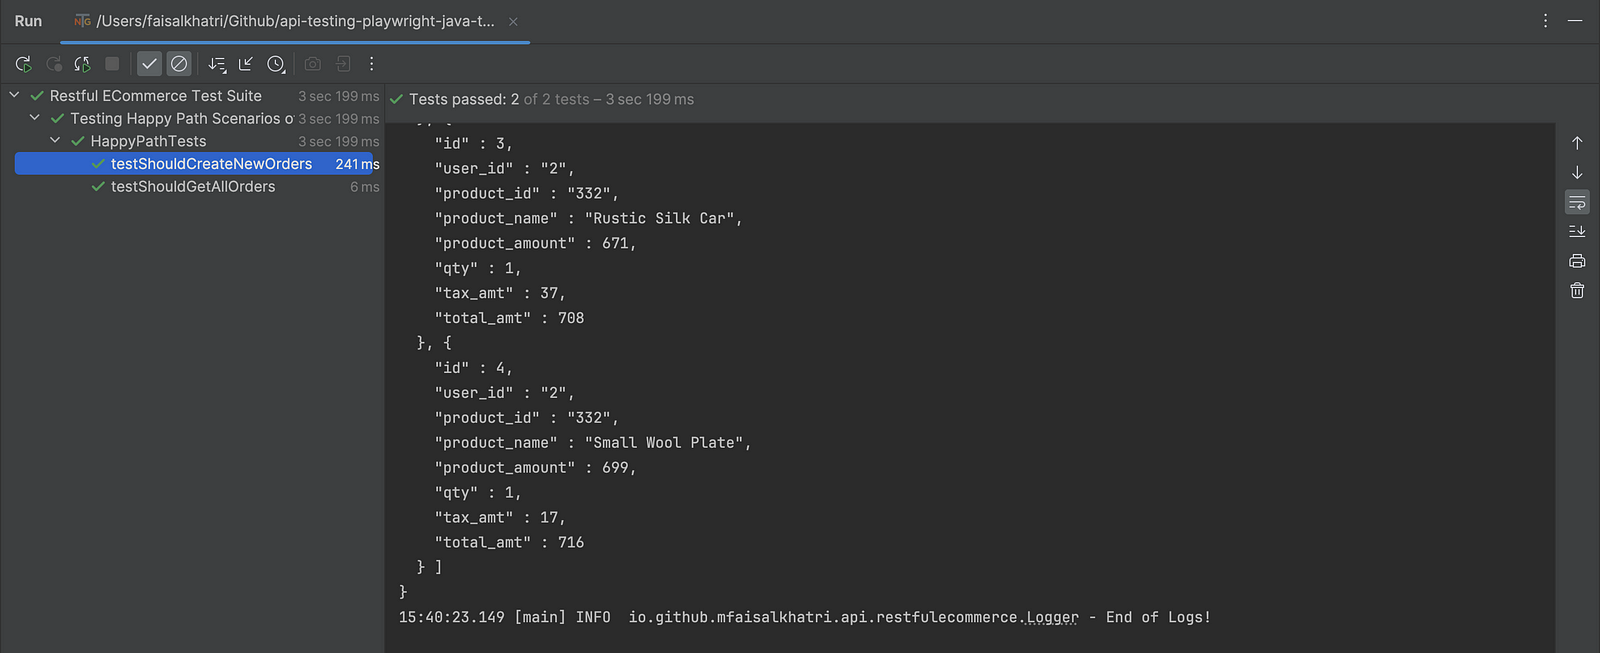
On executing the above testng-restfulecommerce-postandgetorder.xml file, the POST, as well as GET API requests, are executed, and the response is printed in the console, which can be seen in the screenshots below.
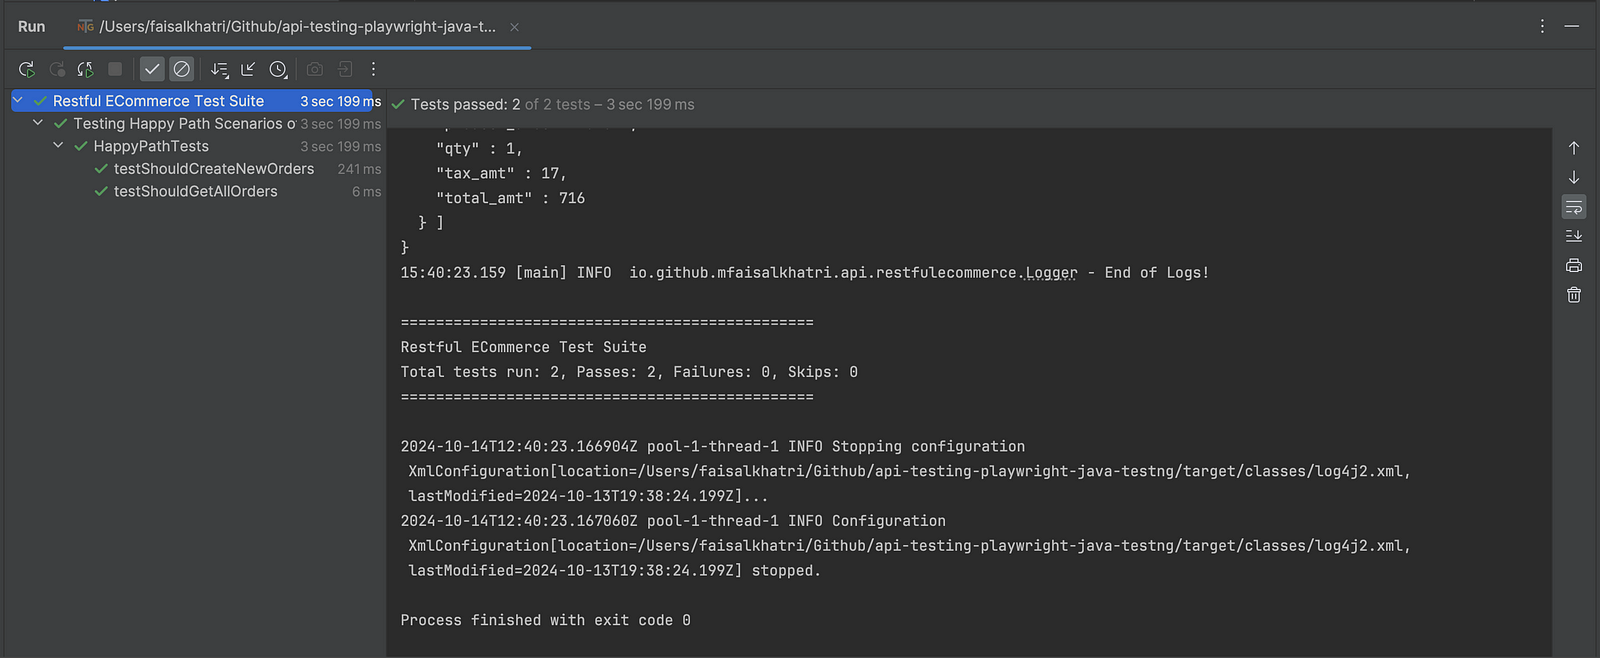
POST API Response Logs
GET API Response Logs
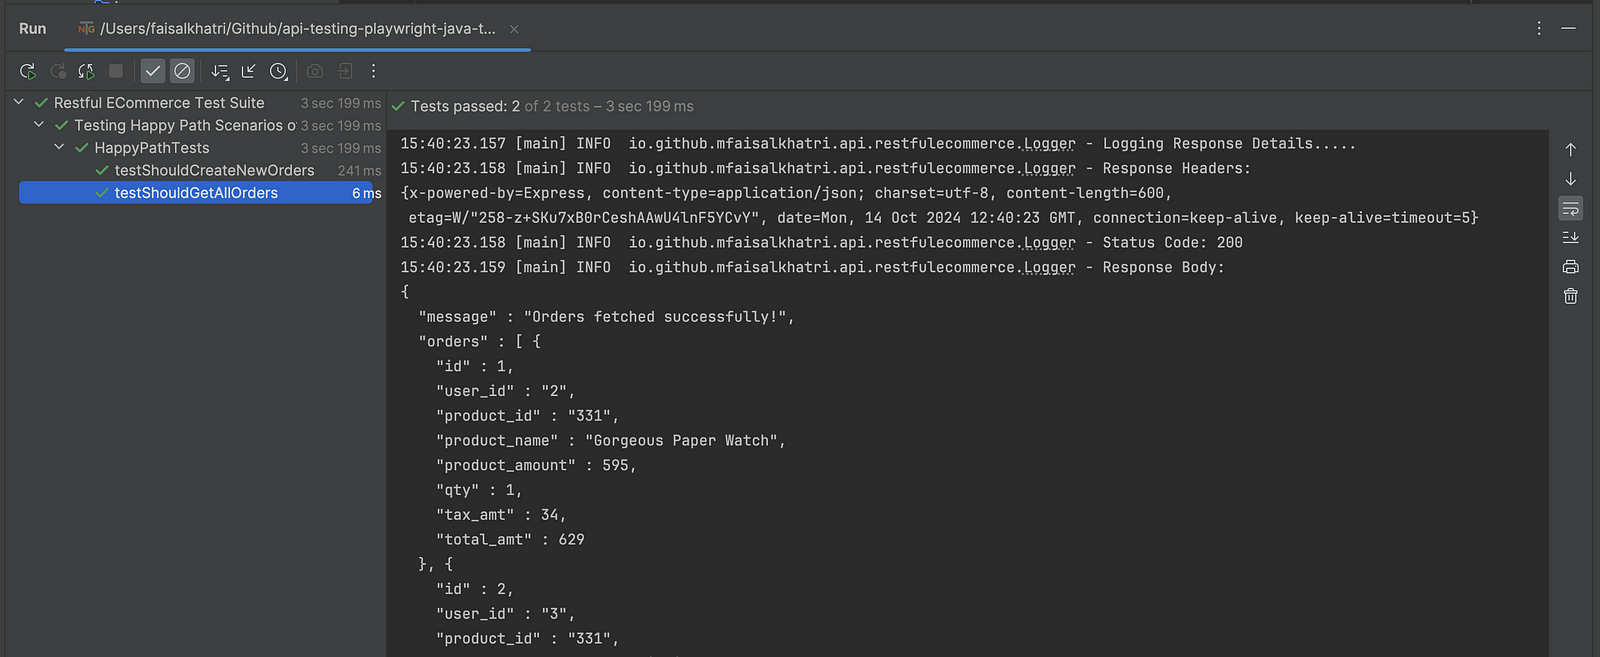
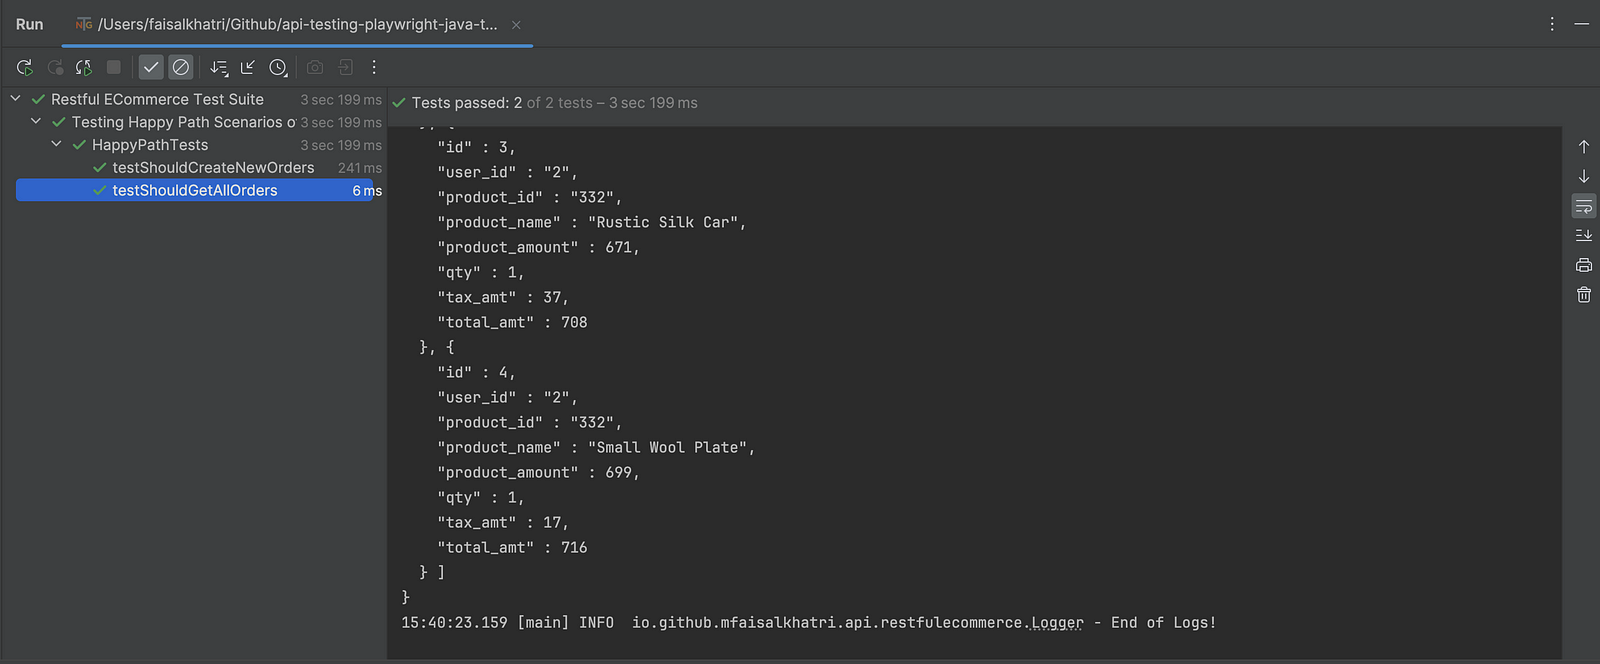
It can be seen from the screenshots that the response logs are printed correctly in the console and can now help us know the exact results of the test execution.
Summary
Adding a custom logger in the project can help in multiple ways. It will provide us with the details of the test data that was processed along with the final output, giving us control over the tests. It also helps in debugging the issue for failed tests and finding a fix quickly for it.
If the response data is readily available we can quickly find the pattern of the issue and try for a quick fix. As Playwright does not provide any method for logging the response details, we can add our own custom logger that can help us in fetching the required details.
Happy testing!
Published at DZone with permission of Faisal Khatri. See the original article here.
Opinions expressed by DZone contributors are their own.

Comments