Custom Spinner for Android Application
Learn how to create drop-downs (called spinners in Android parlance) using Kotlin for your Android applications.
Join the DZone community and get the full member experience.
Join For FreeIntroduction
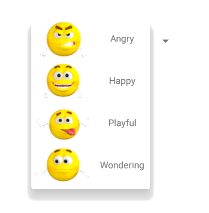
Spinners provide an easy way to select a single value from a set of values. Generally, it is very easy to create a standard spinner populated with choices represented by a TextView widget. Things get a bit more complicated when you want to show something fancy in the dropdown list. For example - images. In this article, we will build a spinner that is able to show an image next to text as in the screenshot below:
The final application is written in Kotlin and is of course available on GitHub. The free smileys are taken from Pixabay and lincensed under the Pixabay license.
First, we need to understand adapters and adapter views. Hopefully, the below figure sheds some light.
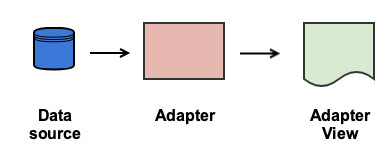
As stated in the Android documentation, an adapter acts as a bridge between an AdapterView and the underlying data for that view. There are many standard adapter views. The Spinner is just one of them. Others are ListView, ExpandableListView, GridView, and more. What we are going to do is to:
Create a data source for our spinner — we will use a simple list stuffed with data.
Create an adapter for this data source which will extend ArrayAdapter.
Attach our custom array adapter to a spinner.
Data Source
First of all, we will need a class that represents a single row in our spinner — Mood. This will be a simple Kotlin data class, a holder for an image resource id accompanied by text:
data class Mood(val image: Int,
                val description: String)
That is pretty much it. We will use it soon when creating the list serving as a data source.
Adapter
This is the most important part of our custom spinner. The code is shown below:
class MoodArrayAdapter(ctx: Context,
                       moods: List<Mood>) :
    ArrayAdapter<Mood>(ctx, 0, moods) {

    override fun getView(position: Int, recycledView: View?, parent: ViewGroup): View {
        return this.createView(position, recycledView, parent)
    }

    override fun getDropDownView(position: Int, recycledView: View?, parent: ViewGroup): View {
        return this.createView(position, recycledView, parent)
    }

    private fun createView(position: Int, recycledView: View?, parent: ViewGroup): View {

        val mood = getItem(position)

        val view = recycledView ?: LayoutInflater.from(context).inflate(
            R.layout.demo_spinner,
            parent,
            false
        )

        view.moodImage.setImageResource(mood.image)
        view.moodText.text = mood.description

        return view
    }
}
Our adapter accepts a list with Mood instances. This list contains the actual data that will be shown in the spinner. We will use the parent constructor of ArrayAdapter that takes three arguments. The second is a resource id but we will pass 0 because this id is used only when the actual view is created. We will override these factory methods and take complete control of the view creation.
The idea behind the adapter views is that some of the views that show the data are reused instead of creating new ones. An example is when the user scrolls up and down in a list view. I highly recommend you watch this short video which clearly explains the theory behind view recycling. The difference between getView and getDropDownView is that the later creates the views in the drop down list of the spinner as the name implies. In our case both of the views will be the same.
How do we create the actual view then? All of the action happens in our createView method. The position argument represents the position of the element that has to be visualized within our data array. getItem comes from the super class and returns the actual element from the moods list. If the recycled view is null this means that we need to inflate a new view, otherwise, we have to just populate the properties of the existing (scrap) view. The new view is inflated from the demo spinner layout which is shown below.
<android.support.constraint.ConstraintLayout ...>

    <ImageView
            android:id="@+id/moodImage"
            android:layout_width="wrap_content"
            android:layout_height="wrap_content"
            app:layout_constraintStart_toStartOf="parent"
            app:layout_constraintTop_toTopOf="parent"/>
    <TextView
            android:id="@+id/moodText"
            android:layout_width="wrap_content"
            android:layout_height="20dp"
            app:layout_constraintTop_toTopOf="parent"
            app:layout_constraintEnd_toEndOf="parent"
            app:layout_constraintStart_toEndOf="@+id/moodImage"
            android:layout_marginStart="8dp"
            app:layout_constraintBottom_toBottomOf="@+id/moodImage"
            android:layout_marginBottom="8dp"
            android:layout_marginEnd="8dp"/>
</android.support.constraint.ConstraintLayout>
There is absolutely nothing special in this layout, just an image and some text next to each other, that were quickly created with the designer in Android Studio.
Attaching the Adapter
Now we come the sweetest part — attaching the adapter to an existing spinner and enjoying the results. We have added a spinner into our main activity layout:
<android.support.constraint.ConstraintLayout  ...>

    <Spinner
            android:id="@+id/moodSpinner"
            android:layout_width="wrap_content"
            android:layout_height="wrap_content"
            app:layout_constraintBottom_toBottomOf="parent"
            app:layout_constraintLeft_toLeftOf="parent"
            app:layout_constraintRight_toRightOf="parent"
            app:layout_constraintTop_toTopOf="parent"/>

</android.support.constraint.ConstraintLayout>
Next we will hard code some moods and initialize our adapter with the below code:
override fun onCreate(savedInstanceState: Bundle?) {
        super.onCreate(savedInstanceState)
        setContentView(R.layout.activity_main)

        moodSpinner.adapter = MoodArrayAdapter(
            this,
            listOf(
                Mood(R.drawable.angry, "Angry"),
                Mood(R.drawable.happy, "Happy"),
                Mood(R.drawable.playful, "Playful"),
                Mood(R.drawable.wondering, "Wondering")
            )
        )

    }
After that, we are ready to run our application. The complete source is available here.
Opinions expressed by DZone contributors are their own.
Comments