How To Create a Homescreen Widget in Android
People use widgets on a daily basis. In this article, the author will explain, step-by-step, how to create a simple home screen widget for Android.
Join the DZone community and get the full member experience.
Join For FreePeople use widgets on a daily basis. It’s a crucial and natural part of user interaction with apps that users may be completely unaware of using widgets so often. Widgets serve many purposes. A widget can be an addition to the desktop, a means of messaging, or a way to attract users' attention.
Widgets play the role of a personal assistant that the user can customize for their needs. The most popular applications of this type include news feeds, clocks, weather, calendars, dictionaries, traffic, games, and much more.
A widget is not just a compact and useful feature, but can also be a handy marketing tool. They also enhance the usability of applications, allowing users to quickly access important information and perform basic functions without having to open the app.
In this article, I am going to explain step by step how to create a simple home screen widget for Android.
What Is a Widget?
Let’s start with the basics and define what a widget is.
You can think of widgets as "at-a-glance" views of an app's most important data and functionality that are accessible right on the user's home screen. Users can add widgets to the home screen, move them around, resize, and customize them. Widgets can be designed as standard Android elements or customisable applications created by developers.
Home screen widgets can include various interface elements such as text boxes, buttons, images, lists, etc. They can display static information or dynamically update in real-time, such as showing the current weather, the latest news, or calendar events.
Basic Components of an Android Widget
A widget requires the following basic components:
AppWidgetProviderInfo Object
Describes the metadata for a widget, such as the widget's layout, update frequency, and AppWidgetProvider class. You need to define it in an XML resource file.
AppWidgetProvider Class
A convenience class to aid in implementing an AppWidget provider. It defines the basic methods that allow you to interact with the widget programmatically. Use the AppWidgetProvider class to handle widget broadcasts: receive broadcasts when the widget is updated, enabled, disabled, or deleted. You need to declare AppWidgetProvider in the manifest and then implement it.
View Layout
Defines the initial layout for the widget. The layout is defined in XML.
Now that we figured out what we need to create a widget, let’s follow the steps to create a simple widget.
How To Implement a Simple Widget
To create a widget for your app, you will need to do the following:
1. Define the essential features of your widget with the AppWidgetProviderInfo object in an XML resource file using a single <appwidget-provider> element and save it in the project's res/xml/ folder:
<appwidget-provider />
2. Register AppWidgetProvider in the application manifest and specify the created AppWidgetProviderInfo:
<?xml version="1.0" encoding="utf-8"?>
<manifest>

    <application>
        <receiver
            android:name="android.appwidget.AppWidgetProvider"
            android:exported="false">
            <intent-filter>
                <action android:name="android.appwidget.action.APPWIDGET_UPDATE" />
            </intent-filter>
            <meta-data
                android:name="android.appwidget.provider"
                android:resource="@xml/demo_app_widget_info"/>
        </receiver>
        ...
    </application>

</manifest>
As a result, you have your own widget. However, it still doesn’t have any functionality. This is how you can configure it.
How to Configure Your Widget
There are many different parameters to configure the widget, which you can read about in detail in the documentation. Let's take a look at the main ones:
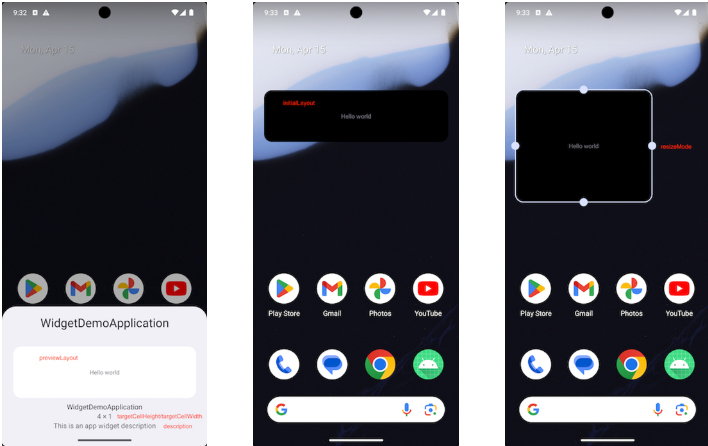
initialLayout—Widget layoutpreviewLayout—Widget preview layout in the widget selection interfacedescription—Widget description in the widget selection interfacetargetCellHeight/targetCellWidth—Width and height of the widget in cellsresizeMode—Mode of possibility to resize widget dimensions
Let's get the configuration:
<?xml version="1.0" encoding="utf-8"?>
<appwidget-provider xmlns:android="<http://schemas.android.com/apk/res/android>"
    android:initialLayout="@layout/demo_app_widget"
    android:previewLayout="@layout/demo_app_widget_preview"
    android:description="@string/app_widget_description"
    android:targetCellHeight="1"
    android:targetCellWidth="4"
    android:resizeMode="horizontal|vertical"/>
As a layout, let’s use the basic TextView (previewLayout has a different background attribute):
<RelativeLayout xmlns:android="http://schemas.android.com/apk/res/android"
    android:layout_width="match_parent"
    android:layout_height="match_parent"
    android:background="@android:color/black">

    <TextView
        android:id="@+id/appwidget_text"
        android:layout_width="wrap_content"
        android:layout_height="wrap_content"
        android:layout_centerHorizontal="true"
        android:layout_centerVertical="true"
        android:layout_margin="8dp"
        android:contentDescription="Hello world"
        android:text="Hello world"
        android:textSize="12sp" />
</RelativeLayout>


res/layout/demo_app_widget.xml
This is what you’ll get as a result:
Expanding the Functionality of Your Widget
In the example above, the widget content is static, but usually, the widget needs to react to events in the system. To implement this, you can make your own implementation of AppWidgetProvider, where you define how the widget will react to events in the system or to user actions.
The simplest scenario is to open the application when you click on the Widget.
First, define DemoAppWidget:
XML
Copy
class DemoAppWidget : AppWidgetProvider() {
    override fun onUpdate(context: Context, appWidgetManager: AppWidgetManager, appWidgetIds: IntArray) {
        appWidgetIds.forEach { appWidgetId ->
            val pendingIntent: PendingIntent = PendingIntent.getActivity(
                context,
                0,
                Intent(context, MainActivity::class.java),
                PendingIntent.FLAG_UPDATE_CURRENT or PendingIntent.FLAG_IMMUTABLE
            )

            val views: RemoteViews = RemoteViews(
                context.packageName,
                R.layout.demo_app_widget
            ).apply {
                setOnClickPendingIntent(R.id.demo_app_widget, pendingIntent)
            }
            appWidgetManager.updateAppWidget(appWidgetId, views)
        }
    }
}


DemoAppWidget.kt
Then you need to specify it in AndroidManifest.xml:
XML
Copy
<?xml version="1.0" encoding="utf-8"?>
<manifest>

    <application>
        <receiver
            android:name=".DemoAppWidget"
            android:exported="false">
            <intent-filter>
                <action android:name="android.appwidget.action.APPWIDGET_UPDATE" />
            </intent-filter>
            <meta-data
                android:name="android.appwidget.provider"
                android:resource="@xml/demo_app_widget_info"/>
        </receiver>
        ...
    </application>

</manifest>
Widget Settings
If you want users to be able to configure your widget, you can create the configuration activity. This activity is automatically launched by the app widget host either when the widget is created or later, depending on the configuration options you specify.
This activity lets users modify widget settings — for example, the time zone for a clock widget.
Letting Users Pin Your Widget to Homescreen
You may need to suggest the user to add the app widget to their home screen. In this case, you can show a prompt to add a widget by some event in the application (for example, upon toppling a button). To do so, create a request in your app for the system to pin a widget onto a supported launcher:
button.setOnClickListener {
    val appWidgetManager = AppWidgetManager.getInstance(this)
    val provider = ComponentName(this, DemoAppWidget::class.java)
    appWidgetManager.requestPinAppWidget(provider, null, null)
}
Now, when a user taps on the button, they will get a prompt to pin the widget to their home screen:
Conclusion
In this article, we learned the basics of creating a widget and gave our widget certain functionality and interactivity. For the details on the project, feel free to check out this GitHub link.
I hope my guide was useful for you. If you have any experience in creating widgets for Android, share it in the comments.
Opinions expressed by DZone contributors are their own.
Comments