

Using RESTful APIs and Microservices to Work With Db2
In this article, see an in-depth tutorial on how to use RESTful APIs and microservices to work with Db2.
 ·
·
Join the DZone community and get the full member experience.
Join For FreeThe new Db2 Data Management Console is a free browser-based user interface included with Db2 for Linux, UNIX, and Windows. It's more than a graphical user interface to monitor, manage, run, and optimize Db2. It is a set of open RESTful APIs and microservices for Db2.
Anything you can do in the user interface is also available through REST. You can also embed parts of the user interface into your own webpages, or Jupyter notebooks.
This article demonstrates how to use the open RESTful APIs and the composable user interfaces that are available in the Db2 Console service.
To learn more about the Db2 Console check out the community at www.ibm.biz/Db2Console. You can download the Db2 Console and find more coding examples, best practices, and access to a free hands-on coding lab.
You might also want to read: Invoking REST APIs From Java Microservices
Constructing API Calls
To access the service, we need to first authenticate with the service and create a reusable token that we can use for each call to the service. The token ensures that we don't have to provide a user ID and password each time we run a command while keeping the communication secure.
Each request is constructed of several parts. First, you need to identify the URL of the service. For example: http://localhost:11080. In this example, we assume that the console service is running on the same machine as the Jupyter notebook but it can be remote. Port 11080 is typical for running an unsecured connection. (11081 for https).
You then need to identify the API and the API version. In this case dbapi/v4 .
The next part of the call identifies the REST request and the options. For example '/metrics/applications/connections/current/list' . This is followed by more options separated by an & .
So a complete call might look like this:
xxxxxxxxxx
http://9.30.210.195:11080/dbapi/v4/metrics/applications/connections?end=1579643744759&include_sys=false&limit=100&offset=0&sort=-application_handle&start=1579640144759
In this case, the options are the start and end time, whether to include system-generated connections, how to sort the results, and where to start the list.
Some complex requests also include a JSON payload. For example, running SQL includes a JSON object that identifies the script, statement delimiters, the maximum number of rows in the results set as well as what to do if a statement fails.
The full set of APIs is documented as part of the Db2 Data Management Console user interface in the help menu.
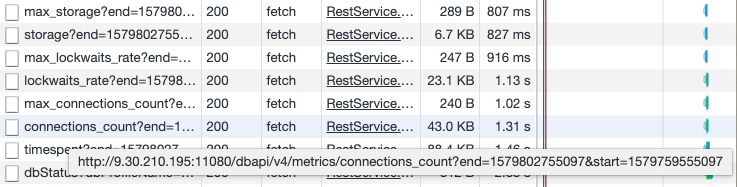
You can also use the developer tools in your favorite browser to see the API traffic between the Db2 Console user interface and the Db2 Console API service.
Simple cURL Example
cURL is a command-line tool for getting or sending data including files using URL syntax. The name stands for "Client URL". It is particularly useful to write simple scripts to access the RESTful APIs of the Db2 Console. In this example, we include cURL calls in a BASH script. The script constructs the URLs that contain the RESTful calls, then submits them to the Db2 Console's 11080 communication port.
The jq library I used in these examples makes parsing JSON a snap.
The first call establishes a connection and retrieves a reusable token that is used to securely submit additional requests.
xxxxxxxxxx
#!/bin/bash
## curl-basic-auth
## - http basic Db2 Console Authentication Example
## curl in bash
## use jq to parse JSON, see https://stedolan.github.io/jq/download/
## version 0.0.1
##################################################
HOST='http://localhost:11080'
USERID='db2inst1'
PASSWORD='db2inst1'
CONNECTION='SAMPLE'
## Authenticate with the service and return a reusable connection token
TOKEN=$(curl -s -X POST $HOST/dbapi/v4/auth/tokens \
-H 'content-type: application/json' \
-d '{"userid": '$USERID' ,"password":'$PASSWORD'}' | jq -r '.token')
Once we have a reusable token, you can start to retrieve data from the service. This first example we retrieve information about the database connection we are using:
xxxxxxxxxx
## Get the details of the database you are connected to
JSON=$(curl -s -X GET \
$HOST'/dbapi/v4/dbprofiles/'$CONNECTION \
-H 'authorization: Bearer '$TOKEN \
-H 'content-type: application/json')
echo $JSON | jq '.'
The Db2 Console saves the information to connect to a Db2 database in a connection profile. Here is what that looks like in the JSON that is returned:
xxxxxxxxxx
{
"name": "SAMPLE",
"disableDataCollection": "false",
"databaseVersion": "11.5.0",
"databaseName": "SAMPLE",
"timeZone": "-50000",
"DB2Instance": "db2inst1",
"db2license": "AESE,DEC",
"isInstPureScale": "false",
"databaseVersion_VRMF": "11.5.0.0",
"sslConnection": "false",
"userProfileRole": "OWNER",
"timeZoneDiff": "0",
"host": "localhost",
"_PROFILE_INIT_": "true",
"dataServerType": "DB2LUW",
"port": "50000",
"URL": "jdbc:db2://localhost:50000/SAMPLE",
"edition": "AESE,DEC",
"isInstPartitionable": "false",
"dataServerExternalType": "DB2LUW",
"capabilities": "[\"DSM_ENTERPRISE_LUW\"]",
"OSType": "Linux",
"location": ""
}
You can get more than just setup and configuration information. The next example returns a list of the schemas available in the database:
xxxxxxxxxx
JSON=$(curl -s -X GET \
$HOST'/dbapi/v4/schemas' \
-H 'authorization: Bearer '$TOKEN \
-H 'content-type: application/json' \
-H 'x-db-profile: '$CONNECTION)
echo $JSON | jq '.'
Here is the result set:
xxxxxxxxxx
{
"count": 14,
"resources": [
{
"definertype": "U",
"name": "DB2INST1"
},
{
"definertype": "S",
"name": "IBM_RTMON"
},
{
"definertype": "S",
"name": "NULLID"
},
{
"definertype": "S",
"name": "SQLJ"
},
{
"definertype": "S",
"name": "SYSCAT"
},
{
"definertype": "S",
"name": "SYSFUN"
},
{
"definertype": "S",
"name": "SYSIBM"
},
{
"definertype": "S",
"name": "SYSIBMADM"
},
{
"definertype": "S",
"name": "SYSIBMINTERNAL"
},
{
"definertype": "S",
"name": "SYSIBMTS"
},
{
"definertype": "S",
"name": "SYSPROC"
},
{
"definertype": "S",
"name": "SYSPUBLIC"
},
{
"definertype": "S",
"name": "SYSSTAT"
},
{
"definertype": "S",
"name": "SYSTOOLS"
}
]
}
Python and Jupyter Notebooks and the Db2 Console
Once you start getting into more complex projects, you will need a more powerful language and a more powerful environment. I found that Python and Jupyter notebooks are a perfect way to build some very powerful routines to automate your work with Db2 through the Db2 Console.
For Database Administrators who use scripts today, there are several advantages other than just using a powerful language like Python. Jupyter notebooks are part of a simple but powerful development environment that lets you build and share your notebooks. Notebooks can combine code, microservices, documentation, and data analysis into a single document.
Let's start with a few Python routines that will get you started. (All of the examples here are available through GITHUB with links at the end of the article.)
Import a Few Helper Classes
To get started, you need to include a few standard Python libraries so that we can work with REST, JSON, and communicate with the Db2 Console APIs.
xxxxxxxxxx
# Import the class libraries
import requests
import ssl
import json
from pprint import pprint
from requests import Response
from requests.packages.urllib3.exceptions import InsecureRequestWarning
requests.packages.urllib3.disable_warnings(InsecureRequestWarning)
The Db2 Class
To make life easier, we created a Db2 helper class that encapsulates the REST API calls that access the Db2 Console service. The class below includes retrieving the reusable token as well as the basic structures to POST and GET requests and extract JSON from the API responses.
xxxxxxxxxx
# Run the Db2 Class library
# Used to construct and reuse an Autentication Key
# Used to construct RESTAPI URLs and JSON payloads
class Db2():
def __init__(self, url, verify = False, proxies=None, ):
self.url = url
self.proxies = proxies
self.verify = verify
def authenticate(self, userid, password, profile=""):
credentials = {'userid':userid, 'password':password}
r = requests.post(self.url+'/auth/tokens', verify=self.verify, \
json=credentials, proxies=self.proxies)
if (r.status_code == 200):
bearerToken = r.json()['token']
if profile == "":
self.headers = {'Authorization': 'Bearer'+ ' '+bearerToken}
else:
self.headers = {'Authorization': 'Bearer'+ ' '+bearerToken, \
'X-DB-Profile': profile}
else:
print ('Unable to authenticate, no bearer token obtained')
def getRequest(self, api, json=None):
return requests.get(self.url+api, verify = self.verify, headers=self.headers, proxies = self.proxies, json=json)
def postRequest(self, api, json=None):
return requests.post(self.url+api, verify = self.verify, headers=self.headers, proxies = self.proxies, json=json)
def getStatusCode(self, response):
return (response.status_code)
def getJSON(self, response):
return (response.json())
Establishing a Connection to the Console
To connect to the Db2 Data Management Console service, you need to provide the URL, the service name (v4), the Db2 Console username and password, and the name of the connection profile used by the Db2 Console to connect to the database you want to work with.
xxxxxxxxxx
# Connect to the Db2 Data Management Console service
Console = 'http://localhost:11080'
profile = 'SAMPLE'
user = 'DB2INST1'
password = 'db2inst1'
# Set up the required connection
profileURL = "?profile="+profile
databaseAPI = Db2(Console+'/dbapi/v4')
databaseAPI.authenticate(user, password, profile)
database = Console
Confirm the Connection
To confirm that your connection is working, get the details of the specific database connection you are working with. Since your console user id and password may be limited as to which databases they can access, you need to provide the connection profile name to drill down on any detailed information for the database.
Take a look at the JSON that is returned by the call in the cell below. (This is similar to what you did with cURL.) You can see the name of the connection profile, the database name, the database instance the database belongs to, the version, release, and edition of Db2 as well as the operating system it is running on.
xxxxxxxxxx
# List Monitoring Profile
r = databaseAPI.getRequest('/dbprofiles/'+profile)
json = databaseAPI.getJSON(r)
print(json)
xxxxxxxxxx
{'name': 'SAMPLE', 'disableDataCollection': 'false', 'databaseVersion': '11.5.0', 'databaseName': 'SAMPLE', 'timeZone': '-50000', 'DB2Instance': 'db2inst1', 'db2license': 'AESE,DEC', 'isInstPureScale': 'false', 'databaseVersion_VRMF': '11.5.0.0', 'sslConnection': 'false', 'userProfileRole': 'OWNER', 'timeZoneDiff': '0', 'host': 'localhost', '_PROFILE_INIT_': 'true', 'dataServerType': 'DB2LUW', 'port': '50000', 'URL': 'jdbc:db2://localhost:50000/SAMPLE', 'edition': 'AESE,DEC', 'isInstPartitionable': 'false', 'dataServerExternalType': 'DB2LUW', 'capabilities': '["DSM_ENTERPRISE_LUW"]', 'OSType': 'Linux', 'location': ''}
You can also check the status of the monitoring service. This call takes a bit longer since it is running a quick diagnostic check on the Db2 Data Management Console monitoring service. You should see that both the database and authentication services are online.
xxxxxxxxxx
# Get Monitor Status
r = databaseAPI.getRequest('/monitor')
json = databaseAPI.getJSON(r)
print(json)
xxxxxxxxxx
{'database_service': 'online', 'authentication_service': 'online', 'messages': ['Succeed']}
Object Exploration
The console lets you work with objects in the Database. Here are just two examples of how to access that through REST and the composable interface.
List the Available Schemas in the Database
You can call the Db2 Data Management Console microservice to provide an active console component that you can include in an IFrame directly into your notebook. The first time you access this, you will have to log in just like any other time you use the console in a new browser session. If you want to see all the schemas including the catalog schemas, select the "Show system schemas" toggle at the right side of the panel.
In the schema explorer microservice interface, click on Show system schemas at the right side of the screen. This displays all the schemas in the Db2 catalog as well as user schemas.
xxxxxxxxxx
from IPython.display import IFrame
IFrame(database+'/console/?mode=compact#explore/schema'+profileURL, width=1400, height=500)
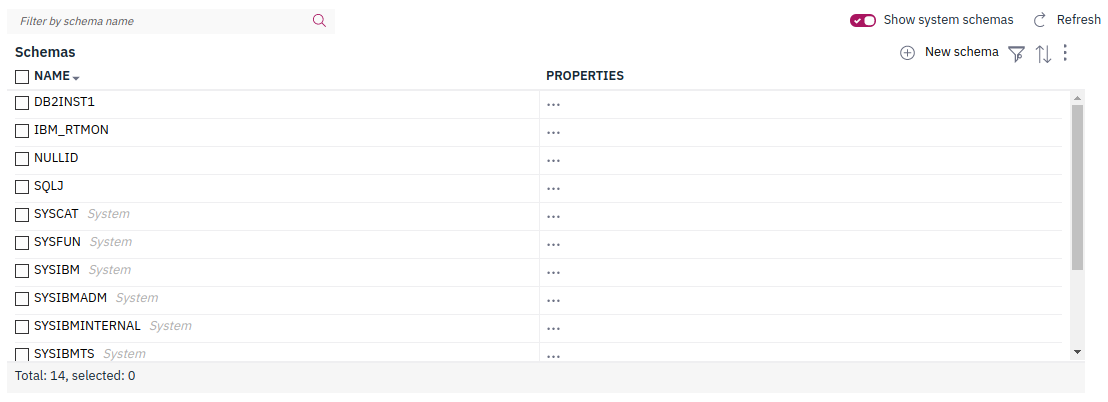
You can get the same list through the RESTful service call, which we walk through in the next example.
Pandas DataFrames
Many of the examples below use the Pandas DataFrames library. JSON data sets can be much easier to work with if you can convert them to a DataFrame. To use them, you need to import the required libraries.
xxxxxxxxxx
import pandas as pd
from pandas.io.json import json_normalize
DataFrames are a powerful way to represent data in Python as an in-memory table. The library has many functions that can manipulate the data in the frame.
Listing Schemas Through the API
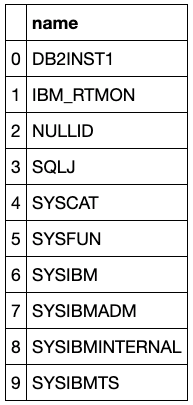
This next example calls the /schemas API. If the call is successful, it will return a 200 status code. The API call returns a JSON structure that contains the list of schemas. The code extracts the 'resources' section of the JSON result and passes it to the json_normalize function and is then used to create a DataFrame. A single call displays the names of the first 10 schemas. display(df[['name']].head(10)) is a quick way to display all the column names in the DataFrame.
xxxxxxxxxx
r = databaseAPI.getRequest('/schemas')
if (databaseAPI.getStatusCode(r)==200):
json = databaseAPI.getJSON(r)
df = pd.DataFrame(json_normalize(json['resources']))
print(', '.join(list(df)))
display(df[['name']].head(10))
else:
print(databaseAPI.getStatusCode(r))
xxxxxxxxxx
definertype, name
Object Search
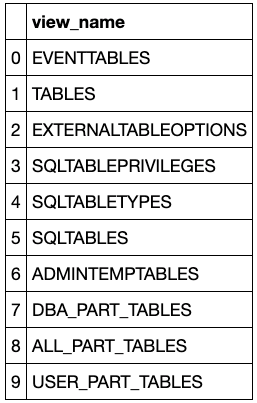
You can search the objects in your database through the /admin API. This API requires a JSON payload to define the search criteria. In this example, we are looking for Views with "table" in their name. It will search through both user and catalog views.
xxxxxxxxxx
# Search for tables across all schemas that match simple search critera
# Display the first 100
# Switch between searching tables or views
obj_type = 'view'
# obj_type = 'table'
search_text = 'TABLE'
rows_return=10
show_systems='true'
is_ascend='true'
json = {"search_name":search_text, \
"rows_return":rows_return, \
"show_systems":show_systems, \
"obj_type":obj_type, \
"filters_match":"ALL","filters":[]}
r = databaseAPI.postRequest('/admin/'+str(obj_type)+'s',json);
if (databaseAPI.getStatusCode(r)==200):
json = databaseAPI.getJSON(r)
df = pd.DataFrame(json_normalize(json))
print('Columns:')
print(', '.join(list(df)))
display(df[[obj_type+'_name']].head(100))
else:
print("RC: "+str(databaseAPI.getStatusCode(r)))
xxxxxxxxxx
Columns:
view_name, view_schema, owner, owner_type, read_only, valid, view_check, sql, create_time, alter_time, stats_time, optimize_query
Tables in a Schema
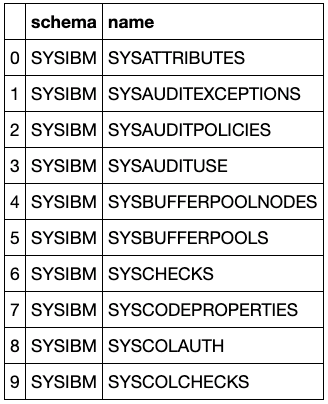
This example uses the /schemas API to return all the tables in a single schema.
xxxxxxxxxx
# Find all the tables in the SYSIBM schema and display the first 10
schema = 'SYSIBM'
r = databaseAPI.getRequest('/schemas/'+str(schema)+'/tables');
if (databaseAPI.getStatusCode(r)==200):
json = databaseAPI.getJSON(r)
df = pd.DataFrame(json_normalize(json['resources']))
print(', '.join(list(df)))
display(df[['schema','name']].head(10))
else:
print(databaseAPI.getStatusCode(r))
xxxxxxxxxx
Columns:
schema, name
Accessing Key Performance Metrics
You can access key high-level performance metrics by directly including the monitoring summary page in an IFrame or calling the /metrics API. To see the time series history of the number of rows read in your system over the last day, run the statement below. Then scroll to the right side and find the Database Throughput Widget. Then select Rows Read and Last 1 hour.
xxxxxxxxxx
IFrame(database+'/console/?mode=compact#monitor/summary'+profileURL, width=1400, height=500)
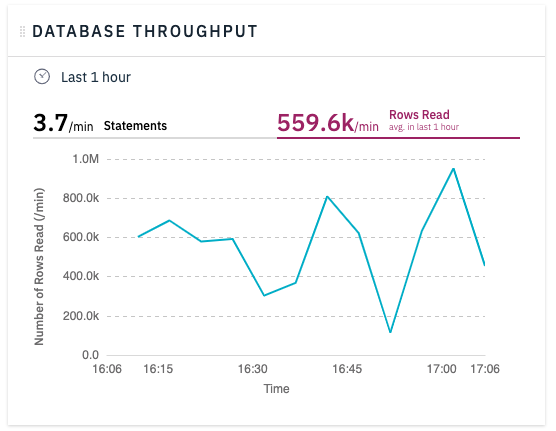
To access the same data directly through an API, you can use the /metrics/rows_read API call. To extract the timeseries data from the JSON returned from the API, you need to access the 'timeseries' part of the full JSON data set.
The example below retrieves the last hour of data and converts it to a Pandas DataFrame for easy manipulation. It prints out the names of the columns available in the dataframe.
xxxxxxxxxx
# Retrieve the number of rows read over the last hour
import time
endTime = int(time.time())*1000
startTime = endTime-(60*60*1000)
# Return the rows read rate over the last hour
r = databaseAPI.getRequest('/metrics/rows_read?start='+str(startTime)+'&end='+str(endTime));
if (databaseAPI.getStatusCode(r)==200):
json = databaseAPI.getJSON(r)
if json['count'] > 0:
df = pd.DataFrame(json_normalize(json['timeseries'])) #extract just the timeseries data
print('Available Columns')
print(', '.join(list(df)))
else:
print('No data returned')
else:
print(databaseAPI.getStatusCode(r))
xxxxxxxxxx
Columns:
Available Columns rows_read_per_min, interval, timestamp
EPOC Time Conversion
The timeseries data is returned as UNIX epoch time. That is the number of msec since January 1st 1970. Notice that the start and end times in the REST request are also defined in EPOC time.
To make the timeseries data readable, we need a routine to do the conversion from EPOC to a human-readable timestamp.
xxxxxxxxxx
# Setup data frame set calculation functions
def epochtotimeseries(epoch):
return time.strftime('%Y-%m-%d %H:%M:%S', time.localtime(epoch/1000))
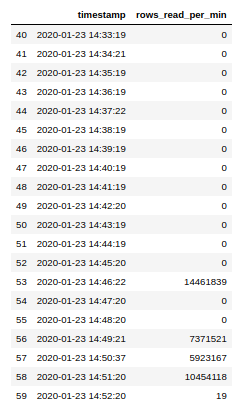
Next, we will apply the routine to each row in the DataFrame and display the last 20 measurements.
xxxxxxxxxx
# Convert from EPOCH to timeseries data
# Display the last 20 datapoints
df['timestamp'] = df['timestamp'].apply(epochtotimeseries)
display(df[['timestamp','rows_read_per_min']].tail(20))
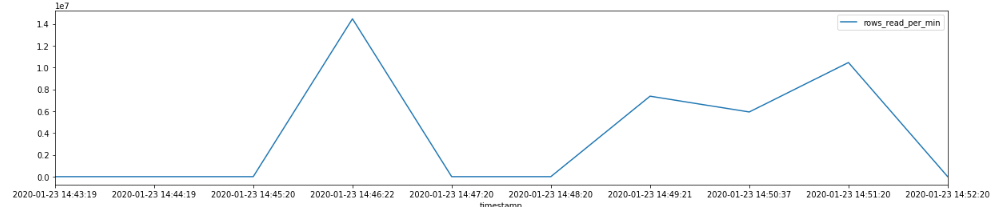
Finally, we can plot the results.
xxxxxxxxxx
%matplotlib inline
import matplotlib
import matplotlib.pyplot as plt
df[['timestamp','rows_read_per_min']].tail(10) \
.plot.line(x='timestamp',y='rows_read_per_min', figsize=(20,4))
plt.show()
Storage Usage
You can access the storage report page directly by calling it into an IFrame, or you can access the data from an API. In the report below, you can select the timeframe for storage usage, group by table, or schema, select the object you want to analyze, and then select View Details from the Actions column.
xxxxxxxxxx
IFrame(database+'/console/?mode=compact#monitor/storage'+profileURL, width=1400, height=480)

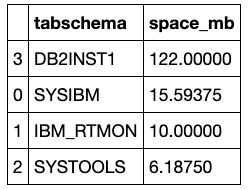
You can also list storage by schema. The following example retrieves the current level of storage usage. There are lots of columns available in the JSON results but the example below displays the schema name and size.
xxxxxxxxxx
# List storage used by schema
# Display the top ten schemas
r = databaseAPI.getRequest('/metrics/storage/schemas?end=0&include_sys=true&limit=1000&offset=0&start=0')
if (databaseAPI.getStatusCode(r)==200):
json = databaseAPI.getJSON(r)
if json['count'] > 0:
df = pd.DataFrame(json_normalize(json['resources']))
print(', '.join(list(df)))
df['space_mb'] = df['data_physical_size_kb'].apply(lambda x: x / 1024)
df = df.sort_values(by='data_physical_size_kb', ascending=False)
display(df[['tabschema','space_mb']].head(10))
else:
print('No data returned')
else:
print("RC: "+str(databaseAPI.getStatusCode(r)))
timestamp, tabschema, type, lastused, rowcompmode, data_logical_size_kb, index_logical_size_kb, long_logical_size_kb, lob_logical_size_kb, xml_logical_size_kb, column_organized_data_logical_size_kb, total_logical_size_kb, data_physical_size_kb, index_physical_size_kb, long_physical_size_kb, lob_physical_size_kb, xml_physical_size_kb, column_organized_data_physical_size_kb, total_physical_size_kb, estimated_reclaim_size_kb, est_adapt_svgs_kb, est_adapt_svgs_pct, est_static_svgs_kb, est_static_svgs_pct, est_reclaim_svgs_pct
These were just a few examples of what is possible by using the open RESTful APIs and the microservice user interface in the Db2 Console.
You can find a copy of this notebook on GitHub. This GitHub library includes many other notebooks that cover more advanced examples of how to use Db2 and Jupyter together through open APIs.
You can also access a free hands-on interactive lab that uses all of the notebooks at www.ibm.biz/DMCDemosPOT. After you sign up for the lab, you will get access to a live cloud-based system running Db2, the Db2 Console, as well as extensive Jupyter Notebooks and Python to help you learn by doing.
Published at DZone with permission of Peter Kohlmann. See the original article here.
Opinions expressed by DZone contributors are their own.
Comments