Deploying Java Applications to AWS Elastic Beanstalk
This tutorial shares a simple example of deploying a Java application to Elastic Beanstalk by using Amazon CDK.
Join the DZone community and get the full member experience.
Join For FreeCreate Your Application
Before starting, you can check the repository that includes completed SpringBoot and CDK projects on GitHub.
First, we need to create a simple Spring boot app, you should add the Spring Web package while you are creating this. You can initialize a spring boot project from here if you do not have IntelliJ Idea Ultimate. After initializing the project, you should build your application to a jar:
$ mvn clean install
When you follow these steps correctly, the target folder of your spring boot app will look like this:

To deploy our Spring Boot application, we will use AWS Cloud Development Kit (CDK) with Typescript, but you can use any language instead. First, we need to create an example CDK app project in an empty directory. Run this command in an empty directory which you want:
$ CDK init app –language typescript
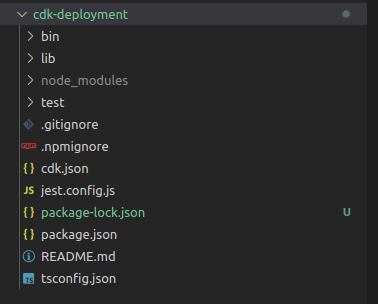
Your CDK folder will look like this after running this command:
Time to code now! We are going to make changes on the lib/cdk-deployment-stack.ts file. First, we’ll create an S3 bucket asset to store our application and then an Elastic Beanstalk environment that runs our application.
    const appName ="EBS-Demo"

    const app = new elasticbeanstalk.CfnApplication(this, 'Application', {
      applicationName: `${appName}-EB-App`
    });

    const apiZipped = new s3assets.Asset(this, 'Zipped-Spring-App',{
      path: `Path of our application zip`,
    });

    const appVersionProps = new elasticbeanstalk.CfnApplicationVersion(this, 'Version-1.0', {
      applicationName: `${appName}-EB-App`,
      sourceBundle: {
        s3Bucket: apiZipped.s3BucketName,
        s3Key: apiZipped.s3ObjectKey,
      },
    });

    appVersionProps.addDependsOn(app);
There are two constructs — the S3 asset that consists of our Spring application and the EB application version resource which is an iteration of our deployable code.
Elastic Beanstalk can perform some actions on environment resources automatically, but you need to define some permissions using AWS Identity and Access Management (IAM) services. We will add managed policies to our EB role for these permissions:
const EbInstanceRole = new iam.Role(this, `${appName}-aws-elasticbeanstalk-ec2-role`, {
  assumedBy: new iam.ServicePrincipal('ec2.amazonaws.com'),
});
const managedPolicy = iam.ManagedPolicy.fromAwsManagedPolicyName('AWSElasticBeanstalkWebTier')

EbInstanceRole.addManagedPolicy(managedPolicy);

const profileName = `${appName}-EbsDemoProfile`

const instanceProfile = new iam.CfnInstanceProfile(this, profileName, {

  instanceProfileName: profileName,
  roles: [
    EbInstanceRole.roleName
  ]
});
These policies and roles will be configured by OptionSettingProperty of our environment instance. After assigning all of this, our environment settings will look like this:
const optionSettingProperties: elasticbeanstalk.CfnEnvironment.OptionSettingProperty[] = [
  {
    namespace: 'aws:autoscaling:launchconfiguration',
    optionName: 'InstanceType',
    value: 't3.small',
  },
  {
    namespace: 'aws:autoscaling:launchconfiguration',
    optionName: 'IamInstanceProfile',
    value: profileName
  },
  {
    namespace: 'aws:autoscaling:launchconfiguration',
    optionName: 'IamInstanceProfile',
    value: instanceProfile.attrArn,
  }
];
Now we can create our EB environment:
    const ebs_env = new elasticbeanstalk.CfnEnvironment(this, 'Environmentm', {
      environmentName: `${appName}-EB-Env`,
      applicationName:  `${appName}-EB-App`,
      solutionStackName: '64bit Amazon Linux 2 v3.2.7 running Corretto 8',
      optionSettings: optionSettingProperties,
      versionLabel: appVersionProps.ref,
    });
We are setting ‘opptionSettings’ we just created for configurations. Also, we defined VersionLabel to let EB know where our application zip is. SolutionStackName is another important property, you can freely pick your infrastructure but you must choose your JDK version appropriate for your Spring Boot project JDK version. To see available solution stack names, run this command on any terminal:
$ aws elasticbeanstalk list-available-solution-stacks
Deploying Your Application
At this point, your application will be uploaded to the S3 bucket, but it is not deployed yet. You can see your Elastic Beanstalk environment and application on the AWS console, but the URL of the application will not work. You need to use the "Upload and Deploy" button on the "Elastic Beanstalk > Environments > EBS-Demo-Env" page and choose your uploaded application from the versions tab. Doing this on every deployment does not sound very useful at all, does it? So we will automate it now…
There is only one configuration to run the Spring application correctly. We need to tell Elastic Beanstalk how to run our application that exists in S3. We are going to do this in three steps:
- Create Procfile that runs desired commands to run the uploaded application. You can create it root directory of your Spring Boot application but recommend you move this to a folder named ‘conf’ to make your project tree cleaner. Procfile may consist of only one command to run jar:
web: java -jar SpringApp-0.0.1-SNAPSHOT.jar2. Create ‘bin.xml’ under ‘src/main/resources/assembly’ directory. This configures our Procfile.
<assembly xmlns="http://maven.apache.org/ASSEMBLY/2.0.0"
          xmlns:xsi="http://www.w3.org/2001/XMLSchema-instance"
          xsi:schemaLocation="http://maven.apache.org/ASSEMBLY/2.0.0 http://maven.apache.org/xsd/assembly-2.0.0.xsd">
    <id>assembly-descriptor</id>
    <baseDirectory>/</baseDirectory>
    <formats>
        <format>zip</format>
    </formats>
    <fileSets>
        <fileSet>
            <directory>${project.basedir}/conf</directory>
            <outputDirectory>/</outputDirectory>
            <includes>
                <include>Procfile</include>
            </includes>
        </fileSet>
        <fileSet>
            <directory>${project.build.directory}</directory>
            <outputDirectory>/</outputDirectory>
            <includes>
                <include>*.jar</include>
            </includes>
        </fileSet>
        <fileSet>
            <directory>${project.basedir}</directory>
            <outputDirectory>/</outputDirectory>
            <includes>
                <include>*.jar</include>
            </includes>
        </fileSet>
    </fileSets>
</assembly>We also changed the output of the build format to zip. So we can insert agents or additional packages for our application to use.
3. Insert assembly plugin to your pom.xml:
    <profiles>
        <profile>
            <id>build</id>
            <activation>
                <activeByDefault>false</activeByDefault>
            </activation>
            <build>
                <plugins>
                    <plugin>
                        <groupId>org.apache.maven.plugins</groupId>
                        <artifactId>maven-assembly-plugin</artifactId>
                        <version>2.6</version>
                        <executions>
                            <execution>
                                <id>assembly-on-package</id>
                                <configuration>
                                    <descriptor>src/main/resources/assembly/bin.xml</descriptor>
                                    <finalName>${project.build.finalName}</finalName>
                                    <appendAssemblyId>false</appendAssemblyId>
                                </configuration>
                                <phase>package</phase>
                                <goals>
                                    <goal>single</goal>
                                </goals>
                            </execution>
                        </executions>
                    </plugin>
                </plugins>
            </build>
        </profile>
    </profiles>
Also, we need to make one more configuration for running the spring application correctly. The default port used by Elastic Beanstalk is 5000 on ‘64bit Amazon Linux 2 v3.2.5 running Corretto 8’. I used that, but it is 8080 for Spring Boot. So if we deploy our application directly, EB will not be able to run this. We can change the port of our application by adding this line to application.properties file:
server.port=5000
Additionally, we can also change the default port of Elastic Beanstalk from ‘OptionSettingProperty’ instead of changing the Spring app’s port.
All configurations are done! Now run the build command by using the assembly plugin in the directory of your Spring app again.
$ mvn clean install -P build
Check if the zip file exists under the target file:

‘Target’ file after running the command
const apiZipped = new s3assets.Asset(this, 'Zipped-Spring-Api',{
     path:`${__dirname}/../../SpringApp/target/SpringApp-0.0.1-SNAPSHOT.zip`,
})
Finally, run the deploy command in your CDK directory, and it is over.
$ cdk deploy
We can see our application running on EB. Check it from the AWS console:

Go to your URL address:
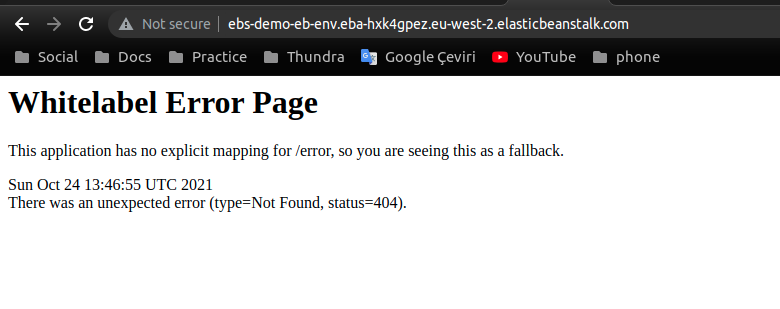
Congratulations! Your app is running on the cloud. Do not forget to destroy your app to prevent unwanted invoices:
$ cdk destroy
Bonus
I talked briefly about why we configured our "bin.xml" to build our application inside a zip file. Now we will use an agent with our Spring application. This will help us to monitor our application that is running on Elastic Beanstalk. By doing this, we will be able to monitor hits on endpoints, their success rates, latency information, and so on. This is a product named Application Performance Monitoring (APM) from Thundra.
It is pretty easy to add an APM agent to your application. You can also follow the docs, but I will briefly explain how to do it.
- After signing up for Thundra, log in and pick APM. From the left bottom choose Profile>projects and copy API Key from here. Do not share this ApiKey, and protect it as your honor :)
2. Download APM Agent and move it to the root directory of your Spring application.

3. Update the procfile to run our application with the APM agent.
web: java -javaagent:thundra-agent-bootstrap-2.7.50.jar -Dthundra.apiKey=********-****-****-****-************ -Dthundra.agent.application.name=My-Spring-App -jar SpringApp-0.0.1-SNAPSHOT.jarThat is all! When you build your application with ‘mvn clean install -P build’ again and you will see our zip file includes the APM agent. Finally, you can redeploy resources and update the application.
$ cdk deploy
Published at DZone with permission of Emin Bilgic. See the original article here.
Opinions expressed by DZone contributors are their own.
Comments