Detailed Guide: Setup Apache Spark Development Environment on Windows 10
Join the DZone community and get the full member experience.
Join For FreeIntroduction
In my last article, I have covered how to set up and use Hadoop on Windows. Now, this article is all about configuring a local development environment for Apache Spark on Windows OS.
Apache Spark is the most popular cluster computing technology, designed for fast and reliable computation. It provides implicit data parallelism and default fault tolerance. It integrates easily with HIVE and HDFS and provides a seamless experience of parallel data processing. You can read more about Spark at https://spark.apache.org.
By default, Spark SQL projects do not run on Windows OS and require us to perform some basic setup first; that’s all we are going to discuss in this article, as I didn’t find it well documented anywhere over the internet or in books.
This article can also be used for setting up a Spark development environment on Mac or Linux as well. Just make sure you'll downloading the correct OS-version from Spark's website.
You can refer to the Scala project used in this article from GitHub here: https://github.com/gopal-tiwari/LocalSparkSql.
What to Expect
At the end of this article, you should be able to create/run your Spark SQL projects and spark-shell on Windows OS.
I have divided this article into three parts. You can follow any of the three modes depending on your specific use-case.
You may also like: The Complete Apache Spark Collection [Tutorials and Articles].
Spark Local Development Setup Modes
- Single Project Access (Single Project Single Connection)
Setup Time: 15 Minutes
Functionality: Limited- Every project will have its own metastore and warehouse.
- Databases and Tables created by one project will not be accessible by other projects.
- Only one Spark SQL project can run or execute at a time.
- Multi Project Access(Multi Project Single Connection)
Setup Time: 20 Minutes
Functionality: Extended- Every project will share a common metastore and warehouse.
- Tables created by one project will be accessible by other projects or spark-shell.
- It will provide a pseudo cluster like feel.
- Only one Spark SQL project can run or execute at a time.
- Full Cluster Like Access(Multi Project Multi Connection)
Setup Time: 40 Minutes
Functionality: Full- This configuration is a bit tedious, but a one-time setup will grant you the ability to have multiple connections open for a metastore.
- There will be no difference between your local system and a cluster in terms of functionality.
- Databases and Tables will be shared among all Spark projects or shells.
- You can keep running multiple spark-shell or Spark projects at the same time.
Solution for Spark Errors
Many of you may have tried running spark on Windows and might have faced the following error while running your project:
16/04/02 19:59:31 WARN NativeCodeLoader: Unable to load native-hadoop library for
 your platform... using builtin-java classes where applicable
16/04/02 19:59:31 ERROR Shell: Failed to locate the winutils binary in the hadoop
binary path java.io.IOException: Could not locate executable null\bin\winutils.exe
in the Hadoop binaries.
This is because your system does not have native Hadoop binaries for Windows OS.
You can build one by following my previous article or download one from https://github.com/cdarlint/winutils.
The below error is also related to the Native Hadoop Binaries for Windows OS.
16/04/03 19:59:10 ERROR util.Shell: Failed to locate the winutils binary in the
 hadoop binary path java.io.IOException: Could not locate executable
C:\hadoop\bin\winutils.exe in the Hadoop binaries.
The solution is the same. We need to setup HADOOP_HOME with Native Windows binaries.
So, just follow along with this article, and at the end of this tutorial, you should be able to get rid of all of these errors.
Downloading the Required Files
- Download and install JDK according to your OS and CPU architecture from https://www.oracle.com/technetwork/java/javase/downloads/jdk8-downloads-2133151.html.
- Install the Scala version depending upon the Spark version you're using from https://www.scala-lang.org/download/all.html.
- Download and install 7-zip from https://www.7-zip.org/download.html.
- Download and extract Apache Spark using 7-zip from http://spark.apache.org/downloads.html.
- Download zip or clone Hadoop Windows binaries from https://github.com/cdarlint/winutils.
- If you do not have an IDE installed, please install one. Intellij IDEA is preferred, and you can get the Community edition from https://www.jetbrains.com/idea/download/#section=windows.
- Download Microsoft Visual C++ 2010 Redistributable Package if your system does not have these pre-installed:
For 32 Bit (x86) OSs, you need to install only a., and for 64 Bit (x64) please install a. and b.
For this tutorial, we are assuming that Spark and Hadoop binaries are unzipped in your C:\ drive. However, you can unzip them at any location in your system.
Setup and Installation
JDK
Before we proceed further, let’s make sure your Java setup is done properly and environment variables are updated with Java's installation directory.
To confirm that Java's installed on your machine, just open cmd and type java –version. You should be able to see the version of Java installed on your system.
If you get an error message, like “'java' is not recognized as an internal or external command, operable program or batch file,” then please follow the following steps. Otherwise, skip it.
- Execute the downloaded JRE and JDK setup and finish the installation with default settings.
- Now, open the system environment variables dialogue
- For Windows 7, right-click on My Computer and select Properties > Advanced.
- For Windows 8, go to Control Panel > System > Advanced System Settings.
- For Windows 10, go to Control Panel > System and security > System > Advanced System Settings.
- Click the Environment Variables button.
- Click the New… button in the System Variables section. Then, type
JAVA_HOMEin the Variable name field and provide your JDK installation path in the Variable value field. - If the path contains spaces, use the shortened path name — for example, C:\Progra~1\Java\jdk1.8.0_74
- For Windows users on 64-bit systems
- Progra~1 = 'Program Files'
- Progra~2 = 'Program Files(x86)'
-
It should look like:
![Adding new system variable]()
Adding new system variable - Now click ok.
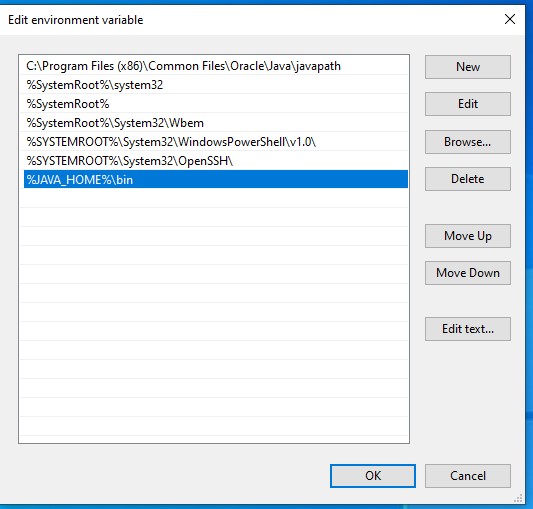
- Then, search for the Path variable in the System Variable section under the Environment Variables dialogue box you just opened.
- Edit the path and click the Edit text or New button and add “;%JAVA_HOME%\bin” at the end of it.
![Adding "%JAVA_HOME%\bin" to PATH]()
Adding "%JAVA_HOME%\bin" to PATH ![Environment variables]()
Environment variables - To confirm Java installation, open a new cmd and type
java –version, and you should be able to see the version of Java you just installed. ![Checking version of Java installed]()
Checking version of Java installed If your command prompt somewhat looks like the image above, you are good to go. Otherwise, you need to check whether your setup version matches with your OS architecture (x86, x64). The environment variables path could also be incorrect.


Scala
- You might need to install Scala, depending on your version of Spark.
- For this article, we are going to use Spark 2.4.4 and Scala 2.12.10.
- Just execute the downloaded scala-2.12.10.msi and follow the installation instructions.
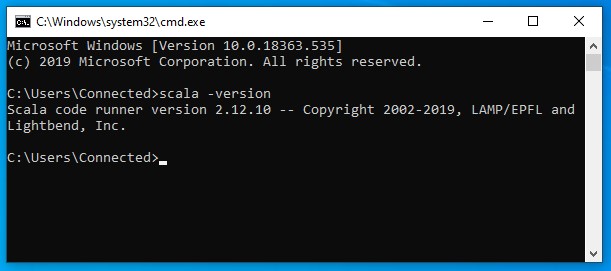
- To confirm Scala installation, open cmd and type
scala –version. Your command prompt should look like the image below: ![Checking Scala version]()
Checking Scala version
IntelliJ IDEA Setup
- You can set up Eclipse with a Scala plugin or just install IntelliJ IDEA.
- You can choose to install the Scala plugin from the first-time setup screen or from Settings > plugin > Search and install Scala.
- If you have VPN proxy issues during the installation of the plugin, you can opt for offline plugin installation.
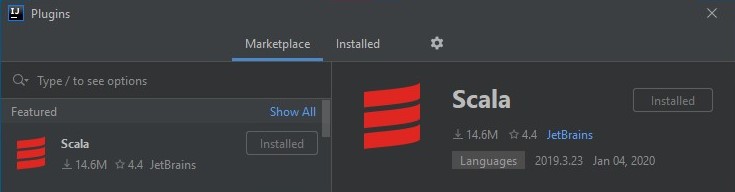
- Make sure the file > settings > plugins window shows that the Scala plugin is installed, as shown in the following image:
![Scala plugin installation]()
Scala plugin installation
Hadoop Home Setup
- Open your downloaded GitHub repo https://github.com/cdarlint/winutils using 7-zip (i.e. winutils-master.zip).
- Inside that, you will find the file, hadoop-2.7.7. Now, extract it to the C:\ drive.
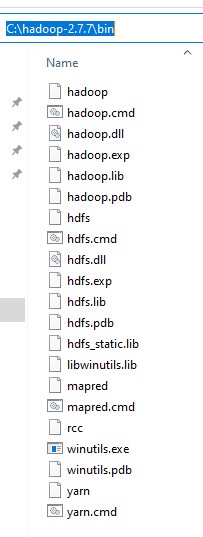
- Your C:\hadoop-2.7.7\bin directory should look like the image below:
![C:\hadoop-2.7.7\bin directory]()
C:\hadoop-2.7.7\bin directory - Once extraction is finished, we need to add a new
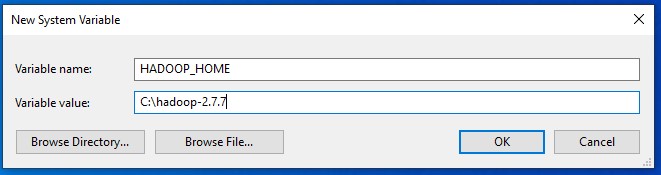
HADOOP_HOMESystem Environment Variable. - To add a
HADOOP_HOME, open the Environment variables dialogue box and click on the New… button in the System variable section and fill the Name and Value text boxes, as shown in the image below: ![Adding HADOOP_HOME variable]()
Adding HADOOP_HOME variable
Spark Home Setup
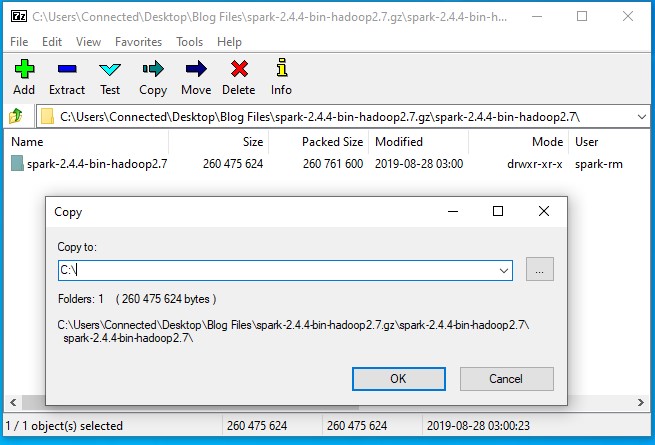
- Open your downloaded Spark gz file using 7-zip (i.e. spark-2.4.4-bin-hadoop2.7.gz).
- Inside that, you will find the tar file spark-2.4.4-bin-hadoop2.7. Double-click on it and extract the spark-2.4.4-bin-hadoop2.7 directory to the C:\ drive.
![Copying Hadoop file to C:\ drive]()
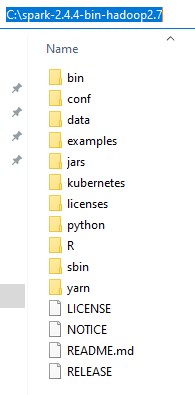
Copying Hadoop file to C:\ drive - Your C:\ spark-2.4.4-bin-hadoop2.7 directory should look like below image:
![C:\ spark-2.4.4-bin-hadoop2.7 directory]()
C:\ spark-2.4.4-bin-hadoop2.7 directory - Once extraction is finished, we need to add the Spark bin directory to the System Environment “Path” Variable.
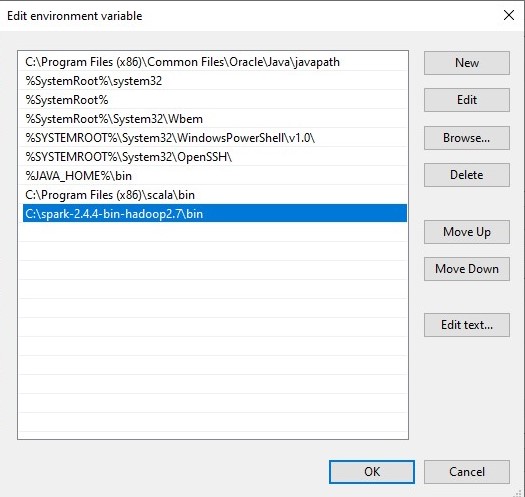
- Edit the path variable and add “C:\spark-2.4.4-bin-hadoop2.7\bin,” as shown in the image below:
![Editing environment variables]()
Editing environment variables
NOTE: If you do not have administrator access to add Environment Variables, don’t worry, as you can set it in your IDE for each project separately. The process is explained in the below section.
Single Project Access
Now, let’s create a new Scala-Maven project named "LocalSparkSql." Alternatively, you can clone it from GitHub: https://github.com/gopal-tiwari/LocalSparkSql.
The project structure looks like this:
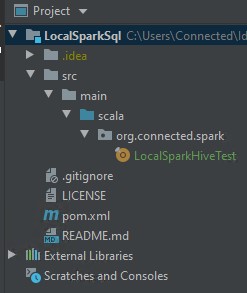
LocalSparkHiveTest.scala
xxxxxxxxxx
package org.connected.spark
import org.apache.spark.sql.{DataFrame, SaveMode, SparkSession}
object LocalSparkHiveTest {
def main(args: Array[String]): Unit = {
val spark: SparkSession = SparkSession.builder()
.enableHiveSupport()
.master("local")
.appName("Demo")
.getOrCreate()
spark.sql("SHOW DATABASES").show
spark.sql("CREATE DATABASE IF NOT EXISTS sparkdemo")
spark.sql("CREATE TABLE IF NOT EXISTS sparkdemo.table1(id INT, name STRING)")
spark.sql("SHOW DATABASES").show
import spark.implicits._
val df:DataFrame = Seq(
(1, "One"),
(2, "Two"),
(3, "Three")
).toDF("id","name")
df.write.mode(SaveMode.Append).format("hive").saveAsTable("sparkdemo.table1")
//Thread.sleep(60 * 1000)
spark.sql("SELECT * FROM sparkdemo.table1").show(false)
println(spark.sql("select * from sparkdemo.table1").count)
}
}
pom.xml
xxxxxxxxxx
<project xmlns="http://maven.apache.org/POM/4.0.0"
xmlns:xsi="http://www.w3.org/2001/XMLSchema-instance"
xsi:schemaLocation="http://maven.apache.org/POM/4.0.0 http://maven.apache.org/xsd/maven-4.0.0.xsd">
<modelVersion>4.0.0</modelVersion>
<groupId>org.connected.spark</groupId>
<artifactId>LocalSparkSql</artifactId>
<version>1.0.0-SNAPSHOT</version>
<dependencies>
<dependency>
<groupId>org.apache.spark</groupId>
<artifactId>spark-core_2.12</artifactId>
<version>2.4.4</version>
</dependency>
<dependency>
<groupId>org.apache.spark</groupId>
<artifactId>spark-sql_2.12</artifactId>
<version>2.4.4</version>
</dependency>
<dependency>
<groupId>org.apache.spark</groupId>
<artifactId>spark-hive_2.12</artifactId>
<version>2.4.4</version>
</dependency>
</dependencies>
</project>
Now, let’s right-click on the “LocalSparkHiveTest” file and click on Run.
Error 1
Exception in thread "main" org.apache.spark.sql.AnalysisException:
java.lang.RuntimeException: java.io.IOException: (null) entry in command string:
 null chmod 0733 C:\tmp\hive;
If you see the above error, it means your HADOOP_HOME is not set properly.
If you were not able to set System Environment Variables due to the Admin access issue you can set it here at project level with few steps given below otherwise, you can skip to next instruction.
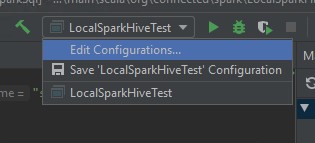
- Go to the upper right corner of you Intellij screen and Edit Configurations
![Edit configurations]()
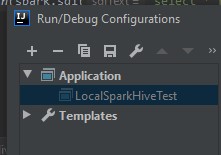
Edit configurations - From the left side panel expand Application can add and choose LocalSparkHiveTest.
![Run/Debug configurations]()
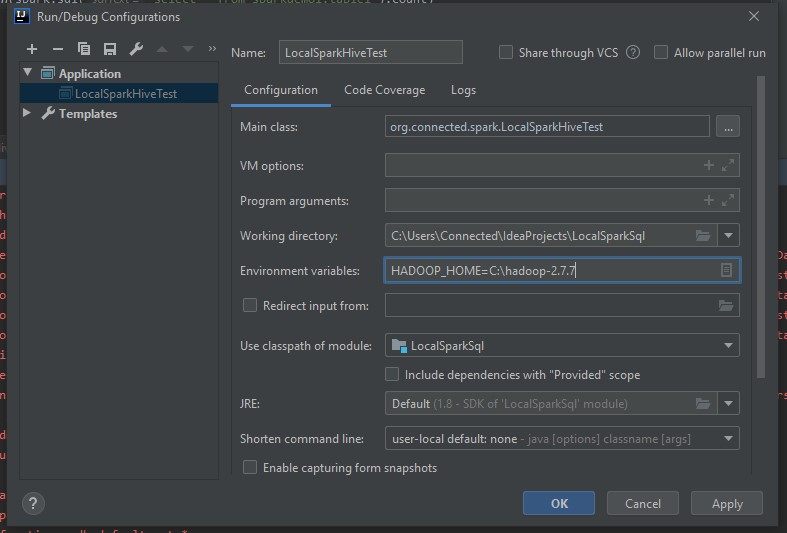
Run/Debug configurations - Now, add “HADOOP_HOME=C:\hadoop-2.7.7” in Environment Variable textbox.
![Adding Environment variables]()
Adding Environment variables - Click on apply and close the dialog box.
Now, let’s try to run the main object again
Error 2
Exception in thread "main" org.apache.spark.sql.AnalysisException:
java.lang.RuntimeException: java.lang.RuntimeException: The root scratch dir:
 /tmp/hive on HDFS should be writable. Current permissions are: ---------;
To resolve this error, we need to open the permissions on the Hive default temp directory.
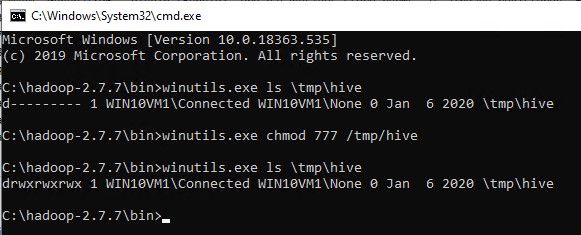
Here, we need to open your Hadoop home and then get into the /bin directory and execute the below command:
winutils.exe chmod 777 /tmp/hive
The granted permissions should be "drwxrwxrwx," you can check the permission status using below command
winutils.exe ls \tmp\hive
Error 3
You might get the following error if your machine does not have the Microsoft Visual C++ 2010 Redistributable Package.
The code execution cannot proceed because MSVCR100.dll was not found.
Reinstalling the program may fix this problem.
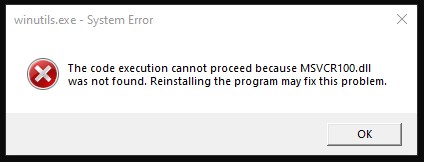
You can download and install C++ 2010 Redistributable Package from the Downloads section of this article, as I have provided the direct download link there.
Now, let’s execute the project again, and you should be able to create a database and table without any issues.
Output:
By now, you might have noticed that two new directories have been created under your project’s root folder, metastore_db and spark-warehouse.
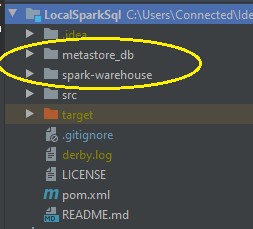
What are these directories???
metastore_db:
Spark SQL uses a Hive metastore to manage the metadata information of databases and tables created by users. You can assume it as a small relational database that stores the information about the actual database directory path, table structures, partition columns, file locations, etc.
By default, Spark comes with an Embedded Derby Db support to manage metadata. More information on Derby can be found here https://db.apache.org/derby/.
spark-warehouse:
A warehouse directory is a location where table data is written. By default, Spark creates the directory as spark-warehouse.
You can get more information here https://jaceklaskowski.gitbooks.io/mastering-spark-sql/spark-sql-hive-metastore.html.
Now, if we create another new project with the same code we used for the LocalSparkSql project, we can notice that we are not able to access the database "sparkdemo" created by our previous project. The reason behind this behavior is that for every project, the metastore_db and spark-warehouse are created again, and they're specific to that project, as they're created under the project’s root directory.
However, we can connect to other projects metastore and warehouse, but a better approach would be to create a common separate metastore_db and spark-warehouse directory and share the same between multiple projects by adding few extra configurations to SparkSession, and that’s what we are going to discuss in our next section.
Multi-Project Access
To simulate this behavior, we need to create a new project and try to access a common metastore_db and warehouse.
For this demo, we are going to use directory locations, as below:
For metastore_db C:\tmp\hive\metastore_db
For warehouse C:\tmp\hive\spark-warehouse
Configuring Spark-Project
To let Spark refer to our new common directory, we need to add the following config during the creation of a Spark session object:
spark.sql.warehouse.dir = C:/tmp/hive/spark-warehouse
javax.jdo.option.ConnectionURL = jdbc:derby:;databaseName=C:/tmp/hive/metastore_db;create=true
Code should look like:
val spark: SparkSession = SparkSession.builder()
.enableHiveSupport()
.master("local")
.appName("Demo")
.config("spark.sql.warehouse.dir","C:/tmp/hive/spark-warehouse")
.config("javax.jdo.option.ConnectionURL","jdbc:derby:;databaseName=C:/tmp/hive/metastore_db;create=true")
.getOrCreate()
You need to use the above configuration in each of your projects to let projects access databases and tables created by other applications.
Configuring Spark-Shell
Now, to check the validity of the above configurations, we can launch a spark-shell and try to access a “sparkdemo” database and “table1”.
Before we launch spark-shell, we need to configure it to point towards our common metastore and warehouse using the following steps:
- Go to the Spark config directory, C:\spark-2.4.4-bin-hadoop2.7\conf.
- Create or rename the already existing file “spark-defaults.conf.template” to “spark-defaults.conf”
- Add the following two lines at the end of the file:
spark.driver.extraJavaOptions -Dderby.system.home=C:/tmp/hivespark.sql.warehouse.dir C:/tmp/hive/spark-warehouse
- Now, open a new cmd and run
spark-shellfrom the C:\spark-2.4.4-bin-hadoop2.7\bin directory.
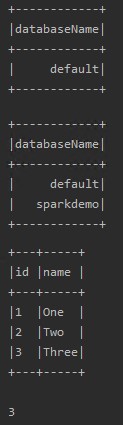
Now, let’s try to list all the databases by running SHOW DATABASES and selecting all data from table1 in the shell.
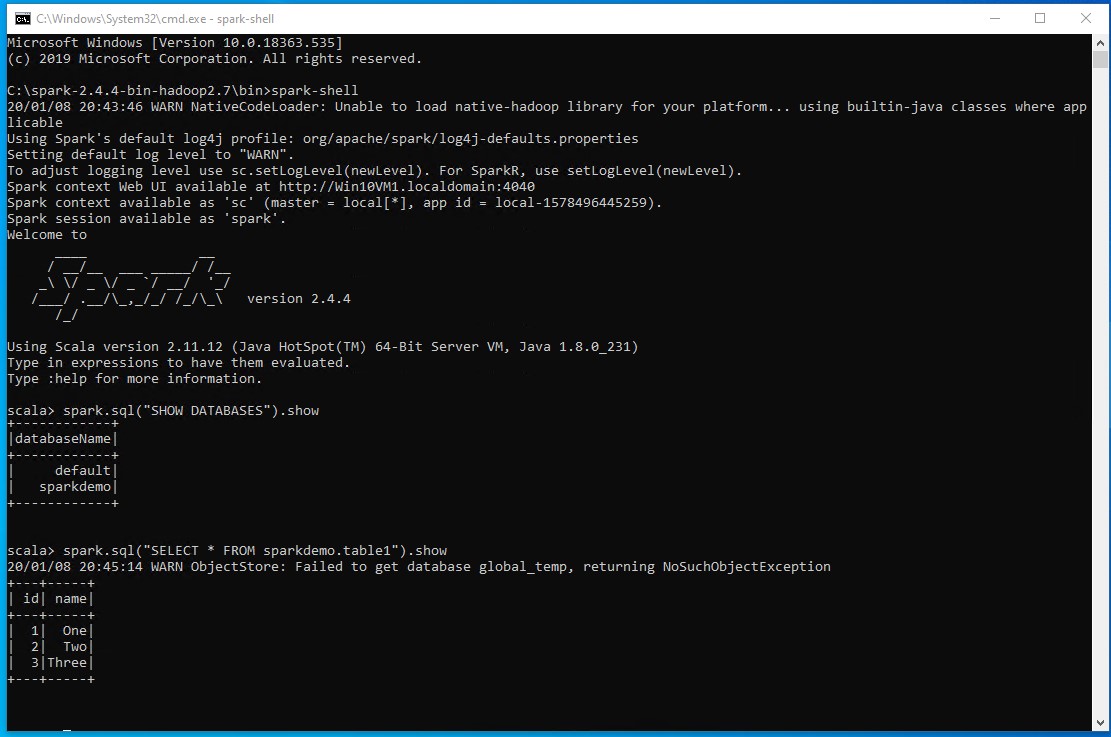
The above result validates that our shared metastore configurations are correct, as we are able to access tables created by the above code.
Now, if you keep the spark-shell open and try to run your scala project at the same point of time you will get the below error.
Unable to open a test connection to the given database. JDBC url = jdbc:derby:;databaseName=C:/tmp/hive/metastore_db;create=true, username = APP. Terminating connection pool (set lazyInit to true if you expect to start your database after your app). Original Exception: ------

java.sql.SQLException: Failed to start database 'C:/tmp/hive/metastore_db' with class loader org.apache.spark.sql.hive.client.IsolatedClientLoader$$anon$1@4262fdeb, see the next exception for details.
This is because we are using Spark’s embedded derbyDb, and one application (i.e. spark-shell) is already directly connected to the shared metastore_db database and acquired the lock, so another instance cannot be initiated. This situation could have been avoided if we could have connected to derby using network service instead of directly connecting to the database. But, we do not have a derby server instance running, so we can’t do that in this case.
However, we can create the Hive metastore in a separate relational database and let Spark connect to that database to enable a multi-connection setup. We are going to talk about it in our next section.
Full Cluster-Like Access
To configure local metastore in this mode we need to download and install few extra components listed below along with the others specified in the “Downloads” section of this article.
Note: It is not a great idea to directly skip to this section of the article, as you might miss a few important and mandatory steps, so kindly follow the article from the start to get the configuration done properly.
Downloads
- Download and Install MySql Community Edition: https://dev.mysql.com/downloads/windows/installer/8.0.html.
- If you do not have a SQL GUI Editor, please Install HeidiSql: https://www.heidisql.com/download.php
- Download MySql connector jar, depending on your MySql Server Version from https://dev.mysql.com/downloads/connector/j/. Make sure to choose Platform Independent as the Operating System to proceed.
- Download or open Hive metastore DDL: https://raw.githubusercontent.com/apache/hive/master/metastore/scripts/upgrade/mysql/hive-schema-2.3.0.mysql.sql
- Download Hive transactional schema DDL from: https://raw.githubusercontent.com/apache/hive/master/metastore/scripts/upgrade/mysql/hive-txn-schema-2.3.0.mysql.sql
Installation
MySql:
- Run the downloaded mysql-installer-community-8.0.*.*.msi.
- Choose Setup Type as Custom.
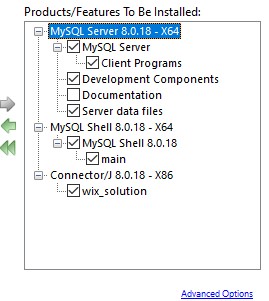
- Please choose at least the following features to be installed:
![Installing MySQL Server]()
Installing MySQL Server - On the next page, click Execute to let the installer download and install any missing components from your system.
- Click on next and execute to let the installation begin.
- After installation, the configuration page will appear; let’s choose Standalone MySQL Server.
- Select Development Computer as the config type and leave the other settings as default.
- We are setting the root password as "root" for the simplicity of this demo.
- Keep the other settings as default and finish the installation.
HeidiSQL
- Now, execute the downloaded HeidiSQL_*_Setup.exe and finish the installation with default settings.
- Open HeidiSQL and choose the Network type as MariaDB or MySQL.
- Provide user and password as root (or your configured username and password) and click on open.
- Open a new query window and execute the following statements:
CREATE DATABASE metastore_db;USE metastore_db;
- Now, copy the content of the Hive metastore ddl from the hive-schema-2.3.0.mysql.sql file. Link: https://raw.githubusercontent.com/apache/hive/master/metastore/scripts/upgrade/mysql/hive-schema-2.3.0.mysql.sql.
- Remove or comment out the line number 835, as “-- SOURCE hive-txn-schema-2.3.0.mysql.sql;”
- Execute the entire DDL on metastore_db.
- Now, copy and execute the DDL of the Hive transactional schema from hive-schema-2.3.0.mysql.sql file. Link: https://raw.githubusercontent.com/apache/hive/master/metastore/scripts/upgrade/mysql/hive-txn-schema-2.3.0.mysql.sql.
Once both the SQL files are executed on your metastore_db successfully, you are all set to configure your projects to access this metastore. So, let’s configure spark-shell and Scala/Java projects using the following steps:
Configuring Spark-Shell
Before we launch spark-shell, we need to configure it to use our common MySQL metastore and warehouse. Please follow these steps to configure the shell:
- Go to the Spark config directory C:\spark-2.4.4-bin-hadoop2.7\conf.
- Make sure you delete the file “spark-defaults.conf” or comment out the previously added line for spark.driver.extraJavaOptions and spark.sql.warehouse.dir.
- Now, create a new file with the name hive-site.xml. Then, add the following content under the conf directory.
hive-site.xml
XML
xxxxxxxxxx129
1<configuration>2<property>3<name>javax.jdo.option.ConnectionURL</name>4<value>jdbc:mysql://localhost:3306/metastore_db?ceateDatabaseIfNotExist=true</value>5<description>JDBC connect string for a JDBC metastore</description>6</property>78<property>9<name>javax.jdo.option.ConnectionDriverName</name>10<value>com.mysql.cj.jdbc.Driver</value>11<description>Driver class name for a JDBC metastore</description>12</property>1314<property>15<name>javax.jdo.option.ConnectionUserName</name>16<value>root</value>17</property>1819<property>20<name>javax.jdo.option.ConnectionPassword</name>21<value>root</value>22</property>2324<property>25<name>hive.metastore.warehouse.dir</name>26<value>C:/tmp/hive/spark-warehouse</value>27<description>location of default database for the warehouse</description>28</property>29</configuration>
- Copy the mysql-connector-java-8.0.18.jar to the C:\spark-2.4.4-bin-hadoop2.7\jars\ directory. You can get it from C:\Program Files (x86)\MySQL\Connector J 8.0\ or use the already downloaded one from the downloads section. Link: https://dev.mysql.com/downloads/connector/j/.
- Delete the old warehouse directory (i.e. C:\tmp\hive\spark-warehouse). Otherwise, we might get a “Directory already exists” error, as we are re-using the same directory.
- Now, open a new command prompt and run spark-shell from the C:\spark-2.4.4-bin-hadoop2.7\bin directory and execute the following code:
-
Shell
xxxxxxxxxx132
1spark.sql("CREATE DATABASE IF NOT EXISTS sparkdemo")23spark.sql(4s"""5CREATE TABLE IF NOT EXISTS sparkdemo.table26(7id INT,8name STRING9)10PARTITIONED BY(11date STRING12)13STORED AS PARQUET14""")1516import org.apache.spark.sql.{DataFrame, SaveMode}17import spark.implicits._1819spark.conf.set("hive.exec.dynamic.partition.mode","nonstrict")2021val df2: DataFrame = Seq(22(1, "One","2020-01-01"),23(2, "Two","2020-01-03"),24(3, "Three","2020-01-11")25).toDF("id", "name","date")2627df2.write.mode("overwrite").insertInto("sparkdemo.table2")2829spark.sql("SHOW DATABASES").show30spark.sql(“SELECT * FROM sparkdemo.table2”).show31spark.sql("SHOW PARTITIONS sparkdemo.table2").show
Output:![Output from SQL commands]() Output from SQL commands
Output from SQL commands
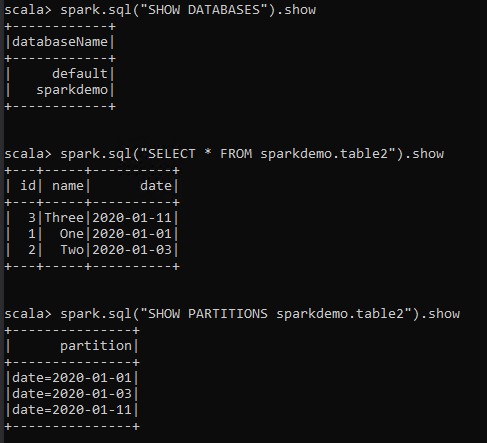 Output from SQL commands
Now, we need to validate that we can open multiple connections to the Hive metastore. Then, we can check that we can run multiple Spark projects concurrently in our local Windows system. Let’s try to access the metastore from a separate project without closing the current spark-shell in our next section.
Configuring a Spark Project
Now, let’s create a new Scala object, LocalMySQLMetastoreTest in our “LocalSparkSql” project.
In this object, we will try to insert a few more records into sparkdemo.table2, which we just created using spark-shell.
Now, we need to provide a few extra configurations related to MySQL server address and credentials, so that it can be used by the SparkSession instance to connect it to our new MySQL metastore.
A configuration sample, along with the full code is given below:
Sample
xxxxxxxxxx
val spark: SparkSession = SparkSession.builder()
.enableHiveSupport()
.master("local")
…
.config("javax.jdo.option.ConnectionURL", "jdbc:mysql://<MySQL SERVER>:<PORT>/metastore_db")
.config("javax.jdo.option.ConnectionDriverName", "<DATABASE DRIVER CLASS NAME>")
.config("javax.jdo.option.ConnectionUserName", "<USER NAME>")
.config("javax.jdo.option.ConnectionPassword", "<PASSWORD>")
…
.getOrCreate()
As we are going to use MySQL JDBC for connection, we need to add MySQL JDBC driver as a dependency in the pom.xml, as shown below:
xxxxxxxxxx
<dependencies>
…
<dependency>
<groupId>mysql</groupId>
<artifactId>mysql-connector-java</artifactId>
<version>8.0.18</version>
</dependency>
..
</dependencies>
Full Code
LocalMySQLMetastoreTest.scala
xxxxxxxxxx
import org.apache.spark.sql.{DataFrame, SaveMode, SparkSession}
object LocalMySQLMetastoreTest {
def main(args: Array[String]): Unit = {
val spark: SparkSession = SparkSession.builder()
.enableHiveSupport()
.master("local")
.appName("Demo")
.config("spark.sql.warehouse.dir", "C:\\tmp\\hive\\spark-warehouse")
.config("javax.jdo.option.ConnectionURL", "jdbc:mysql://localhost:3306/metastore_db")
.config("javax.jdo.option.ConnectionDriverName", "com.mysql.cj.jdbc.Driver")
.config("javax.jdo.option.ConnectionUserName", "root")
.config("javax.jdo.option.ConnectionPassword", "root")
.config("hive.exec.dynamic.partition.mode", "nonstrict")
.getOrCreate()
import spark.implicits._
spark.sql("CREATE DATABASE IF NOT EXISTS sparkdemo")
spark.sql(
s"""
CREATE TABLE IF NOT EXISTS sparkdemo.table2
(
id INT,
name STRING
)
PARTITIONED BY(
date STRING
)
STORED AS PARQUET
""")
val df2: DataFrame = Seq(
(4, "Four", "2020-01-13"),
(5, "Five", "2020-01-13"),
(6, "Six", "2020-01-15")
).toDF("id", "name", "date")
df2.write.mode(SaveMode.Overwrite).insertInto("sparkdemo.table2")
spark.sql("SELECT * FROM sparkdemo.table2").show
spark.sql("SHOW PARTITIONS sparkdemo.table2").show
}
}
pom.xml
xxxxxxxxxx
<project xmlns="http://maven.apache.org/POM/4.0.0"
xmlns:xsi="http://www.w3.org/2001/XMLSchema-instance"
xsi:schemaLocation="http://maven.apache.org/POM/4.0.0 http://maven.apache.org/xsd/maven-4.0.0.xsd">
<modelVersion>4.0.0</modelVersion>
<groupId>org.connected.spark</groupId>
<artifactId>LocalSparkSql</artifactId>
<version>1.0.0-SNAPSHOT</version>
<dependencies>
<dependency>
<groupId>org.apache.spark</groupId>
<artifactId>spark-core_2.12</artifactId>
<version>2.4.4</version>
</dependency>
<dependency>
<groupId>org.apache.spark</groupId>
<artifactId>spark-sql_2.12</artifactId>
<version>2.4.4</version>
</dependency>
<dependency>
<groupId>org.apache.spark</groupId>
<artifactId>spark-hive_2.12</artifactId>
<version>2.4.4</version>
</dependency>
<dependency>
<groupId>mysql</groupId>
<artifactId>mysql-connector-java</artifactId>
<version>8.0.18</version>
</dependency>
</dependencies>
</project>
Now, let’s run our LocalMySQLMetastoreTest object. The output should look like the image below:
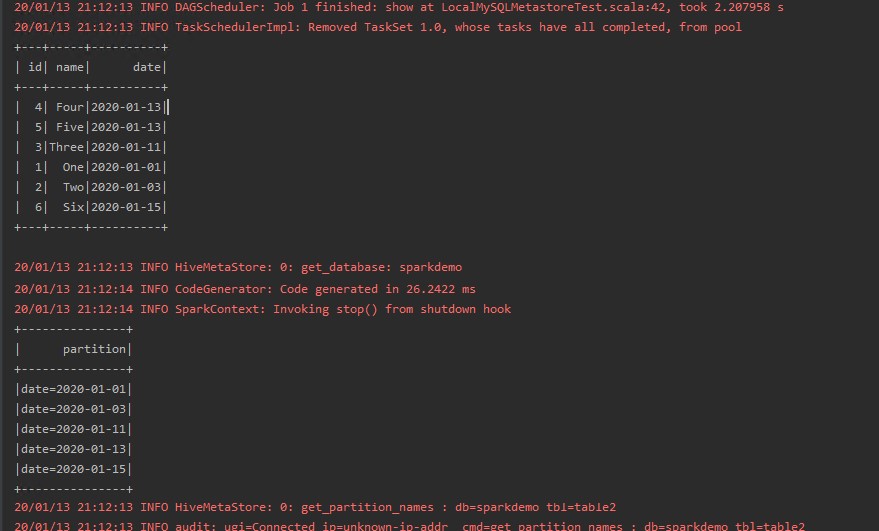
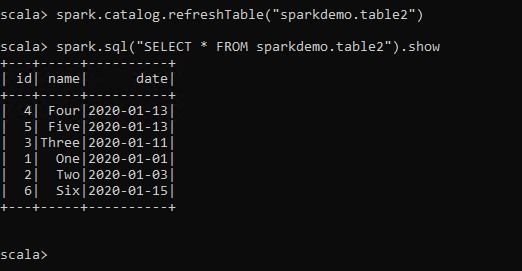
Note: In some cases, you might not be able to see a newly added partition or data by other spark-shell/projects, as this is expected behavior of Hive/Spark metastore management. You can consider executing ALTER TABLE ADD PARTITIONS or spark.catalog.refreshTable("dbname.tablename") to reflect new data.
After running the project one more time with the same data, I got the following exception when I tried to run spark.sql("SELECT * FROM sparkdemo.table2").show in my old spark-shell:
java.io.FileNotFoundException: File
file:/C:/tmp/hive/spark-warehouse/sparkdemo.db/table2/date=2020-01-13/part-000
00-666cc8ed-b44b-4025-9606-e5d9e660c8db.c000 does not exist
The reason behind this is simple; we added/modified a few extra rows/partitions from outside of the shell, so our spark-shell’s metastore catalog is not aware of these changes.
Running the below code will execute a forced update of metadata and will eventually sort out this issue
xxxxxxxxxx
spark.catalog.refreshTable("sparkdemo.table2")
Now, executing spark.sql("SELECT * FROM sparkdemo.table2").show in a shell gives the following updated results:
End Notes
I hope this extended demo on setting up a local Spark development environment gave you a full, in-depth understanding of configurations related to local setup. I have tried to cover as many failure scenarios as I can, but if you have any other issues, questions, or suggestions, you can share them in the comments below.
Thanks for reading!!
Further Reading
Opinions expressed by DZone contributors are their own.
Comments