Developing A Spring Boot Application for Kubernetes Cluster: A Tutorial [Part 1]
The first part of this tutorial will show you how to install and configure Docker and the master and worker nodes your Spring app will need.
Join the DZone community and get the full member experience.
Join For FreeThis article is part 1 of a series of four subsequent articles. Check out part 2, part 3, and part 4 here.
Introduction
One of my recent projects involved deploying a Spring Boot application into a Kubernetes cluster in the Amazon Elastic Compute Cloud (Amazon EC2) infrastructure. Although individual components of the overall technology stack have been well-documented, I thought it would still be useful to describe the particular installation and configuration steps. Hence, this article will discuss the following:
Creating a Kubernetes cluster in the Amazon EC2 environment.
Developing a sample Spring Boot application and storing it in a private Docker repository.
Deploying the application into the cluster by fetching it from the private Docker repository.
The Amazon EC2 environment discussed in this article involves only free tier servers. Thus, interested readers can sign up for AWS Free Tier and develop their own project following this tutorial without expensive hardware/software.
This article is organized as follows. The next section gives a quick overview of the Kubernetes framework. The following section discusses the high-level architecture of the project. The subsequent sections describe detailed steps to complete our project, in particular:
Configuring and launching virtual servers for individual nodes in the cluster.
Installing Docker, Kubelet, Kubeadm, Kubectl in each node.
Configuring master node and worker nodes.
Installing Flannel as a network pod for the cluster.
Developing a sample Spring Boot application for deployment into the cluster.
Building and deploying the sample Spring application into a private Docker repository at hub.docker.com.
Creating a secret key in the master node to access the Docker repository.
Fetching individual components of the application from the Docker repository and deploying them into the corresponding nodes in the cluster.
Creating the cluster services to access the application.
The last section will give concluding remarks.
Background
Kubernetes is an open-source platform to support deployment, management, and scaling of container-based applications. Kubernetes is compatible with various container runtimes, such as Docker. A pod in Kubernetes represents one or more containerized applications that run together for a specific business purpose. A node is a machine where one or more pods are deployed. For example, in Amazon EC2 environment a virtual server instance created from an Ubuntu server image can be viewed as a node. A service brings together one or more pods to represent a multi-tier application with an IP address, DNS name, and load-balanced access to pods encapsulated by the service.
A Kubernetes cluster consists of multiple nodes hosting one or more services. Components in a Kubernetes cluster can be divided into two groups: those that manage each individual node and those that manage the cluster itself. The components in the latter group are also known to be part of the control plane and they execute in a master node of the cluster. The components in the control plane manage configuration data of the cluster, provide access to the configuration data via an API server, furnish scheduling of pods across nodes depending on workload demands, and arrange various controller services for different types of resources. There is at least one master node in a cluster. Components that manage each individual node deal with state management for the pods, node resource usage and performance monitoring, load-balancing and network proxy tasks, and container management.
Some additional definitions are listed below.
kubeadm: A software tool that can be used to create and manage a Kubernetes cluster.
kubelet: A software agent that runs in each cluster node, mainly responsible for managing containers inside pods.
kubectl: A command-line tool to create and manage various entities in a cluster including pods and services.
Flannel: A cluster plug-in used to deliver IPv4 addressing, routing and network control between the nodes in a cluster.
For a high-level overview of Kubernetes concepts, a good starting point is the Kubernetes Wikipedia page. For a deeper dive, start here.
Architecture
The below diagram outlines the architecture discussed in this article. The Kubernetes cluster in the Amazon EC2 environment consists of one master and 4 worker nodes. The sample Spring Boot application is composed of a web layer and a service layer. Each of those is a separate Spring Boot application built, deployed and configured separately. For high availability, each of the web and service layers is deployed into two distinct worker nodes, Web-1, Web-2 for the web layer and Service-1, Service-2 for the service layer. The single master node is responsible for cluster configuration and administration. The Spring Boot application is stored and fetched from the private repository in Docker Hub.

The following software versions will be used.
Ubuntu: 16.04.4 LTS
Kubectl: 1.11.1
Kubeadm: 1.11.1
Kubernetes: 1.11.1
Flannel: v0.10.0-amd64
Docker: 17.03.2-ce
Spring Boot: 2.0.1
Spring Cloud: Finchley Release
Java: openjdk-8
Preparing The Amazon EC2 Environment
As mentioned previously, the project discussed here involves only Amazon EC2 free tier servers. Referring to the architecture diagram above, we need to create a total of 6 instances, one master node, 4 worker nodes, and one outside node to test access to cluster from outside. Each node will utilize the Ubuntu Server 16.04 LTS (HVM) Amazon Machine Image. That is a server with a single virtual CPU and 1 GB memory, below the recommended benchmark to install Kubernetes in a production environment, but still sufficient for the project in this article.
Let us start with the master node. In the Amazon EC2 console, launch an instance selecting Ubuntu Server 16.04 LTS (HVM) Amazon Machine Image. Accept defaults and create a new key pair when prompted (or use an existing key pair if you already have one).

After the instance starts, click on "Security groups launch-wizard-XX" as shown below.

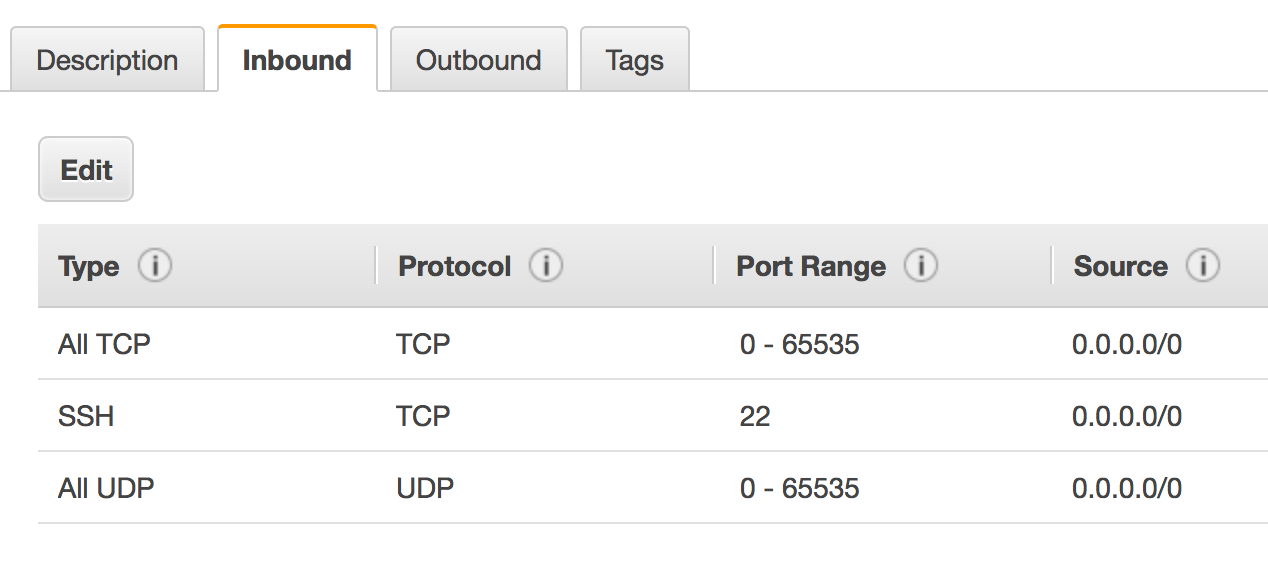
In the Inbound tab, add custom TCP and UDP rules to allow inbound traffic in 0-65535 port range for all sources. Hence, inbound rules will look like below.
 (In any real application the allowable port range will be much narrower.)
For outbound traffic, no change needs to be made. By default, all outbound traffic is allowed.
Installation and configuration steps for the master node are broken into two groups, "Worker Node Steps" and "Additional Steps for Master." As the name implies, "Worker Node Steps" will be executed for each worker node. For the master node, after executing "Worker Node Steps" follow "Additional Steps for Master."
Worker Node Steps
Connect to the instance, worker or master, depending on the particular scenario (use the key pair created and chosen while launching the instance). Become root with the command sudo su - . Commands indicated below should be executed in sequence.
We start by installing Docker.
apt-get update

apt-get install -y apt-transport-https ca-certificates curl software-properties-common

curl -fsSL https://download.docker.com/linux/ubuntu/gpg | apt-key add -

add-apt-repository "deb https://download.docker.com/linux/$(. /etc/os-release; echo "$ID") $(lsb_release -cs) stable"

apt-get update && apt-get install -y docker-ce=$(apt-cache madison docker-ce | grep 17.03 | head -1 | awk '{print $3}')
We continue with installing kubeadm, kubelet and kubectl.
apt-get update && apt-get install -y apt-transport-https curl

curl -s https://packages.cloud.google.com/apt/doc/apt-key.gpg | apt-key add -

cat <<EOF >/etc/apt/sources.list.d/kubernetes.list
deb http://apt.kubernetes.io/ kubernetes-xenial main
EOF


apt-get update

apt-get install -y kubelet kubeadm kubectl

sysctl net.bridge.bridge-nf-call-iptables=1

systemctl daemon-reload

systemctl restart kubelet
Additional Steps for Master
Connect to the instance for master node (use the key pair created and chosen while launching the instance). Become root via sudo su - . Execute the following.
apt-get update && apt-get upgrade

kubeadm init --pod-network-cidr=10.244.0.0/16
This last command will take a while to execute. At the end, you should see something like this:
...

Your Kubernetes master has initialized successfully!

To start using your cluster, you need to run the following as a regular user:

  mkdir -p $HOME/.kube
  sudo cp -i /etc/kubernetes/admin.conf $HOME/.kube/config
  sudo chown $(id -u):$(id -g) $HOME/.kube/config

You should now deploy a pod network to the cluster.
Run "kubectl apply -f [podnetwork].yaml" with one of the options listed at:
  https://kubernetes.io/docs/concepts/cluster-administration/addons/

You can now join any number of machines by running the following on each node
as root:

kubeadm join 172.31.22.14:6443 --token mkae5q.j5mudz8g9e1xgc5u --discovery-token-ca-cert-hash sha256:dbddef4f66cf01e25f6aa39b30172e84c43f2990a4ebcd8b94600a5837de1d75
Jot down the command that starts with kubeadm join which will be needed by worker nodes to join the cluster later on.
Continue the configuration of the master node by executing the following three commands.
mkdir -p $HOME/.kube

sudo cp -i /etc/kubernetes/admin.conf $HOME/.kube/config

sudo chown $(id -u):$(id -g) $HOME/.kube/config
At this point, if you execute
systemctl status kubelet --full --no-pageryou should see something like this:
kubelet.service - kubelet: The Kubernetes Node Agent
   Loaded: loaded (/lib/systemd/system/kubelet.service; enabled; vendor preset: enabled)
  Drop-In: /etc/systemd/system/kubelet.service.d
           └─10-kubeadm.conf
   Active: active (running) since Fri 2018-07-27 14:30:39 UTC; 2h 25min ago
     ...
The only remaining step in installing and configuring the master node is the installation of a pod network. For our purposes, we will utilize Flannel. To install Flannel, execute
kubectl apply -f https://raw.githubusercontent.com/coreos/flannel/v0.10.0/Documentation/kube-flannel.ymlThen, executing
kubectl get services --all-namespaces -o wideshould display
NAMESPACE     NAME              TYPE        CLUSTER-IP     EXTERNAL-IP   PORT(S)          AGE       SELECTOR
default       kubernetes        ClusterIP   10.96.0.1      <none>        443/TCP          2m        <none>
kube-system   kube-dns          ClusterIP   10.96.0.10     <none>        53/UDP,53/TCP    2m        k8s-app=kube-dns
The service named kube-dns with IP address 10.96.0.10 provides DNS service for the cluster. We will utilize that service later on.
At this point, the installation and configuration of the master node has been completed. We now have a cluster that consists of a single master node. The next steps involve adding worker nodes to cluster.
Install and Configure Worker Nodes
For each of the 4 worker nodes repeat the following.
Launch an instance selecting Ubuntu Server 16.04 LTS (HVM) Amazon Machine Image.
Configure the corresponding security group by adding custom TCP and UDP rules to allow inbound traffic in 0-65535 port range for all sources.
Execute the steps in 'Worker Node Steps'.
Execute the
kubeadm joincommand previously displayed in the master node in response tokubeadm initcommand. For example,
kubeadm join 172.31.17.161:6443 --token nznjj2.nr2hqpunalqqwnem --discovery-token-ca-cert-hash sha256:19d6a42e17c43efb47aa78609dc0acf9b01db6011c5d64efee8c8c71b52d06d4Via the above steps, you have installed and configured the worker node. You have also joined the worker node to the cluster.
Check the Running of the Cluster
Once you complete the steps for all worker nodes to connect to the cluster, in master node become root via sudo su - and execute kubectl get nodes . You should see something like this:
NAME               STATUS    ROLES     AGE       VERSION
ip-172-31-16-16    Ready     <none>    8m        v1.11.1
ip-172-31-22-14    Ready     master    23h       v1.11.1
ip-172-31-33-22    Ready     <none>    2m        v1.11.1
ip-172-31-35-232   Ready     <none>    29s       v1.11.1
ip-172-31-42-220   Ready     <none>    5m        v1.11.1
At this point, we have fully configured cluster consisting of one master and 4 worker nodes.
Create Outside Node
In reference to the architecture diagram above, we also need a node outside the cluster to test cluster access from outside. To create that node:
Launch an instance selecting Ubuntu Server 16.04 LTS (HVM) Amazon Machine Image.
Configure the corresponding security group by adding custom TCP and UDP rules to allow inbound traffic in 0-65535 port range for all sources.
No additional steps are necessary.
View Instances in Amazon EC2 Console
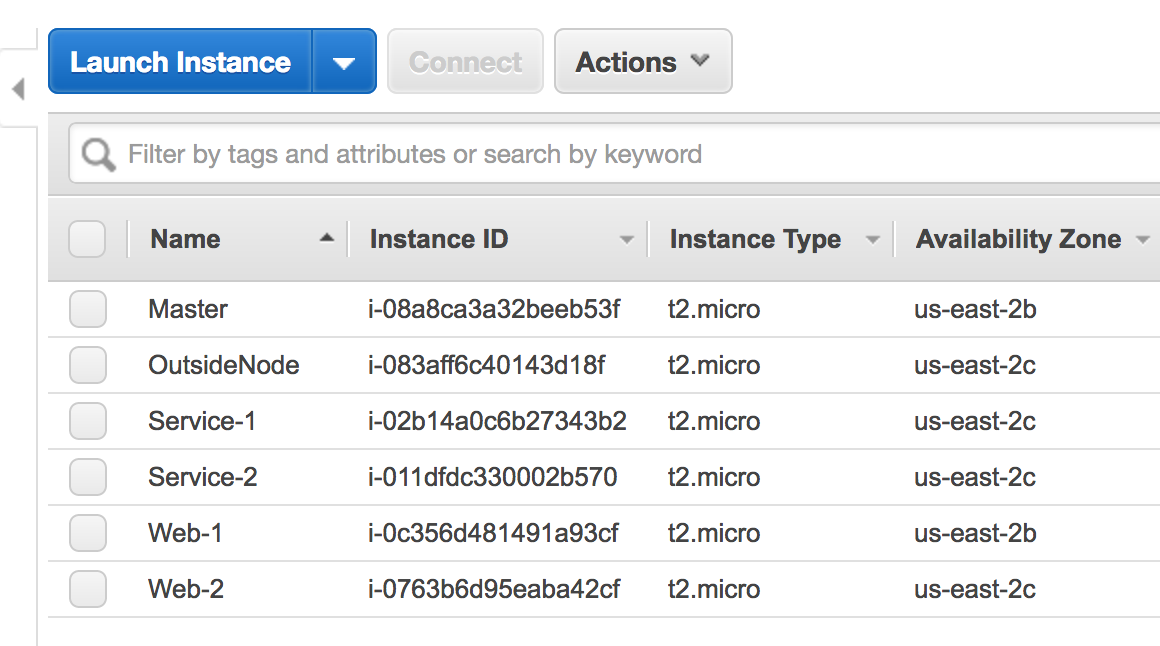
In my console, I entered a name for each node under the Name column. The worker nodes were named Web-1, Web-2, Service-1, Service-2, the master node was named Master, and the outside node was named OutsideNode. It looks like below.

Look for part 2 of this tutorial!
Opinions expressed by DZone contributors are their own.

Comments