Spring Boot With Kubernetes
This tutorial will help you to understand developing a Spring Boot application and deploying it on the Kubernetes platform locally.
Join the DZone community and get the full member experience.
Join For FreeHello folks! In this tutorial, we are going to see how a Spring Boot application can be deployed using Kubernetes (K8S) locally.
Kubernetes is an open-source container orchestration platform that provides a way to scale your application. Kubernetes API allows automating of resource management and provisioning tasks. In addition to this, Kubernetes is cloud-agnostic, and it can run on AWS, GCP, Azure, and also it can run on-premises.
Here, we will create a Spring Boot application, build its image using Docker, and deploy it on the Kubernetes platform locally.
Initial Requirements
- Spring Boot application containing Dockerfile, deployment.yaml: We will see what Dockerfile and deployment.yaml is and what it contains.
- Docker Desktop for Windows (I'm using Windows OS): Docker desktop setup can be done via https://docs.docker.com/desktop/windows/install/ (please read the minimum requirements for installing Docker Desktop).
Developing a Spring Boot Application
Let's start with creating a simple Spring Boot application. We will create a Student application via https://start.spring.io/.
- Go to https://start.spring.io/ and generate a Spring Boot app with dependencies: Spring Web, JPA, Lombok, H2 DB. Enter artifact id and group id as required. Here, I'm naming the application as student-kubernetes-demo.
- Extract the generated project and import it into your favorite IDE. I will be using IntelliJ IDEA.
- Create a package for entity and add the below class to it.
package com.techspeaks.studentkubernetesdemo.entity;

import lombok.AllArgsConstructor;
import lombok.Data;
import lombok.NoArgsConstructor;
import javax.persistence.Entity;
import javax.persistence.GeneratedValue;
import javax.persistence.GenerationType;
import javax.persistence.Id;

@Data
@AllArgsConstructor
@NoArgsConstructor
@Entity
public class Student {

    @Id
    @GeneratedValue(strategy = GenerationType.AUTO)
    private Integer studentId;
    private String name;
    private String email;
}
package com.techspeaks.studentkubernetesdemo.repository;

import com.techspeaks.studentkubernetesdemo.entity.Student;
import org.springframework.data.jpa.repository.JpaRepository;

public interface StudentRepository extends JpaRepository<Student,Integer> {
}
5. Create a package for controller and add the below class to it.
package com.techspeaks.studentkubernetesdemo.controller;

import com.techspeaks.studentkubernetesdemo.entity.Student;
import com.techspeaks.studentkubernetesdemo.repository.StudentRepository;
import org.springframework.beans.factory.annotation.Autowired;
import org.springframework.web.bind.annotation.*;

import java.util.List;
import java.util.Optional;
import java.util.logging.Logger;

@RestController
@RequestMapping("/student-records")
public class StudentController {

    @Autowired
    private StudentRepository studentRepository;

    private Logger logger = Logger.getLogger(StudentController.class.getName());

    @PostMapping(value = "/student",produces = "application/json")
    public Student saveStudent(@RequestBody Student student){
        logger.info("Saving a new student");
        Student student1 = studentRepository.save(student);
        return student1;
    }

    @GetMapping(value = "/students",produces = "application/json")
    public List<Student> getStudents(){
        logger.info("Retrieving all students");
        return studentRepository.findAll();
    }

    @GetMapping(value = "/students/{id}",produces = "application/json")
    public Optional<Student> getStudent(@PathVariable("id") Integer id){
        logger.info("Retrieving student by id");
        return studentRepository.findById(id);
    }

    @DeleteMapping("/student/delete/{id}")
    public void deleteStudent(@PathVariable("id") Integer id){
        logger.info("Deleting student by id");
        studentRepository.deleteById(id);
    }
}
6. Spring Boot Main Application
package com.techspeaks.studentkubernetesdemo;

import org.springframework.boot.SpringApplication;
import org.springframework.boot.autoconfigure.SpringBootApplication;
import org.springframework.data.jpa.repository.config.EnableJpaRepositories;

@SpringBootApplication
@EnableJpaRepositories
public class StudentKubernetesDemoApplication {

	public static void main(String[] args) {
		SpringApplication.run(StudentKubernetesDemoApplication.class, args);
	}

}
7. pom.xml
<?xml version="1.0" encoding="UTF-8"?>
<project xmlns="http://maven.apache.org/POM/4.0.0" xmlns:xsi="http://www.w3.org/2001/XMLSchema-instance"
	xsi:schemaLocation="http://maven.apache.org/POM/4.0.0 https://maven.apache.org/xsd/maven-4.0.0.xsd">
	<modelVersion>4.0.0</modelVersion>
	<parent>
		<groupId>org.springframework.boot</groupId>
		<artifactId>spring-boot-starter-parent</artifactId>
		<version>2.6.2</version>
		<relativePath/> <!-- lookup parent from repository -->
	</parent>
	<groupId>com.techspeaks</groupId>
	<artifactId>student-kubernetes-demo</artifactId>
	<version>0.0.1-SNAPSHOT</version>
	<name>student-kubernetes-demo</name>
	<description>Demo project for Spring Boot Kubernetes deployment</description>
	<properties>
		<java.version>1.8</java.version>
	</properties>
	<dependencies>
		<dependency>
			<groupId>org.springframework.boot</groupId>
			<artifactId>spring-boot-starter-data-jpa</artifactId>
		</dependency>
		<dependency>
			<groupId>org.springframework.boot</groupId>
			<artifactId>spring-boot-starter-web</artifactId>
		</dependency>

		<dependency>
			<groupId>com.h2database</groupId>
			<artifactId>h2</artifactId>
			<scope>runtime</scope>
		</dependency>
		<dependency>
			<groupId>org.projectlombok</groupId>
			<artifactId>lombok</artifactId>
			<optional>true</optional>
		</dependency>
		<dependency>
			<groupId>org.springframework.boot</groupId>
			<artifactId>spring-boot-starter-test</artifactId>
			<scope>test</scope>
		</dependency>
	</dependencies>

	<build>
		<plugins>
			<plugin>
				<groupId>org.springframework.boot</groupId>
				<artifactId>spring-boot-maven-plugin</artifactId>
				<configuration>
					<excludes>
						<exclude>
							<groupId>org.projectlombok</groupId>
							<artifactId>lombok</artifactId>
						</exclude>
					</excludes>
				</configuration>
			</plugin>
		</plugins>
	</build>

</project>
I believe the code here is self-explanatory.
Before going to the next part, please build your application using mvn clean install and then run as mvn spring-boot:run. This will ensure our application is working.
You can see the jar file created as student-kubernetes-demo-0.0.1-SNAPSHOT.jar inside the target folder.
Note: I'm using Git Bash here for build and run commands.
8. Add a Dockerfile at the root of the project.
FROM openjdk:8
ADD ./target/student-kubernetes-demo-0.0.1-SNAPSHOT.jar student-kubernetes-demo-0.0.1-SNAPSHOT.jar
ENTRYPOINT ["java","-jar","/student-kubernetes-demo-0.0.1-SNAPSHOT.jar"]
Dockerfile is required by Docker to read and build an image out of the application. This image will be deployed further on Kubernetes platform.
This Dockerfile contains a few configs as below.
a.) FROM openjdk:8: This tells that while building an image it will pull the openjdk 8 image from Docker Hub and use it to build our application.
b.) ADD ./target/student-kubernetes-demo-0.0.1-SNAPSHOT.jar student-kubernetes-demo-0.0.1-SNAPSHOT.jar: This will add the generated jar file from the target folder to your docker image.
c.) ENTRYPOINT ["java","-jar","/student-kubernetes-demo-0.0.1-SNAPSHOT.jar"]: This is used to set the executables that will always run when the container is executed.
Using this Dockerfile, we will see how to build a Docker image of the Student application.
Note: The above configuration is also useful when you just want to build an image and deploy it on the Docker container.
9. Add a deployment.yaml file at the root of the project.
apiVersion: v1 # Kubernetes API version
kind: Service # Kubernetes resource kind we are creating
metadata: # Metadata of the resource kind we are creating
  name: student-kubernetes-demo
spec:
  selector:
    app: student-kubernetes-demo
  ports:
    - protocol: "TCP"
      port: 8080 # The port that the service is running on in the cluster
      targetPort: 8080 # The port exposed by the service
  type: LoadBalancer # type of the service. LoadBalancer indicates that our service will be external.
---
apiVersion: apps/v1
kind: Deployment # Kubernetes resource kind we are creating
metadata:
  name: student-kubernetes-demo
spec:
  selector:
    matchLabels:
      app: student-kubernetes-demo
  replicas: 2 # Number of replicas that will be created for this deployment
  template:
    metadata:
      labels:
        app: student-kubernetes-demo
    spec:
      containers:
        - name: student-kubernetes-demo
          image: student-kubernetes-demo # Image that will be used inside the container in the cluster
          imagePullPolicy: IfNotPresent
          ports:
            - containerPort: 8080 # The port that the container is running on in the cluster
The deployment.yaml file mainly contains two sections.
a.) kind: Service: This part contains some of the metadata related to the application (like the name of service), then the information related to the ports, and type of Services, which in this case is LoadBalancer.
b.) kind: Deployment: This part also contains similar metadata (like name of deployment), then the replicas that you need, container information, or configuration as defined.
Using this deployment.yaml, we will see how to deploy the Docker image created above into the Kubernetes cluster.
Build and Deployment Section
- I will be using Git Bash here for build and deploy commands execution.
- Start the Docker engine first from the Docker desktop. This step is mandatory.
- Go to your project folder and right click and choose Git Bash here.
- Command for building a docker image: docker build -t student-kubernetes-demo. (Ensure to have a "." at the end, which tells that your Dockerfile is at the root of the project, and also ensure this image name is the same as in the deployment.yaml file.)
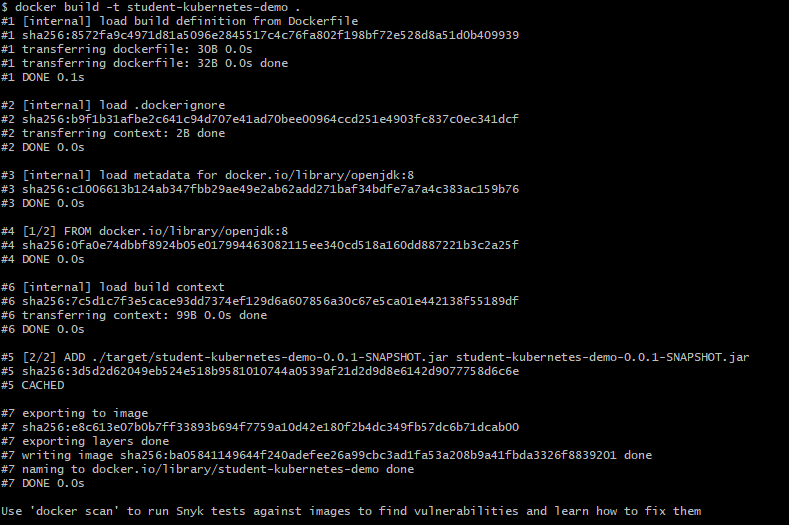
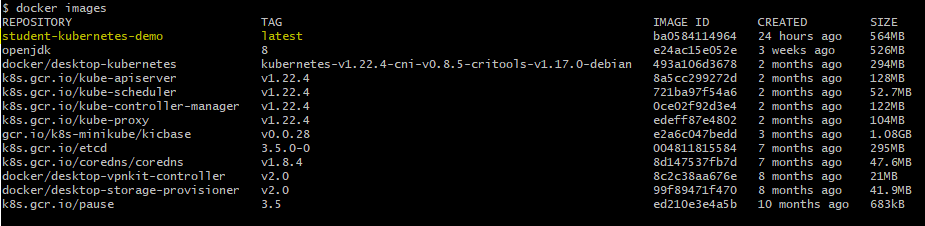
5. At first, it might take some time to build. After the command executes successfully, check if the image is built using the command: docker images.
6. If all is good, we will proceed further to deploy this image onto the Kubernetes cluster.
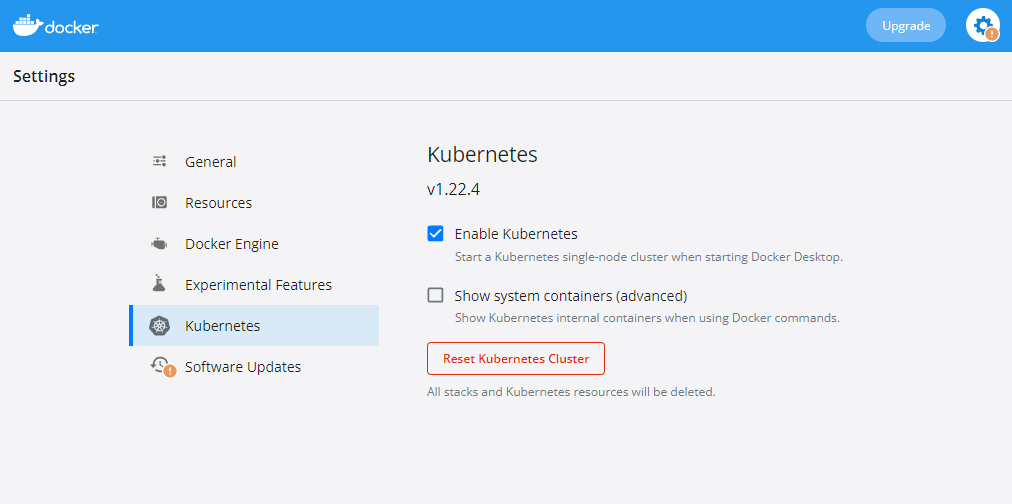
7. Firstly go to your Docker desktop settings and ensure under Kubernetes that the Enable Kubernetes checkbox is ticked. Please tick if it is not.
8. Now coming back to Git Bash, we will first check the Kubernetes cluster using the below commands. We will be using kubectl command (this step is optional).
- kubectl get nodes: This should show the name as docker-desktop along with roles control-plane and master. A Kubernetes cluster consists of a set of worker machines called nodes that run containerized applications. Every cluster has at least one worker node.
The worker node(s) host the Pods that are the components of the application workload. The control plane manages the worker nodes and the Pods in the cluster.
The control plane's components make global decisions about the cluster (for example, scheduling), as well as detecting and responding to cluster events.
A master node is a node that controls and manages a set of worker nodes (workloads runtime) and resembles a cluster in Kubernetes.
More information is available at https://kubernetes.io/docs/concepts/overview/components/.

- kubectl get pods: This will be empty before we deploy the image.

9. Now we will deploy the image kubectl apply -f deployment.yaml. This command reads the instructions from the deployment.yaml and creates the deployment. If all goes well, you will see the output as
service/student-kubernetes-demo created
deployment.apps/student-kubernetes-demo created

10. Now go to the pods section again: kubectl get pods. You will see 2 pods running as we had mentioned the replicas as 2 inside deployment.yaml.

11. Now go to services using kubectl get services command. You will see the information related to the service deployed.
Service name: student-kubernetes-demo
Type: LoadBalancer
Cluster IP, External IP: Here, as we have deployed on local Kubernetes you will see the external IP as localhost with port 8080.

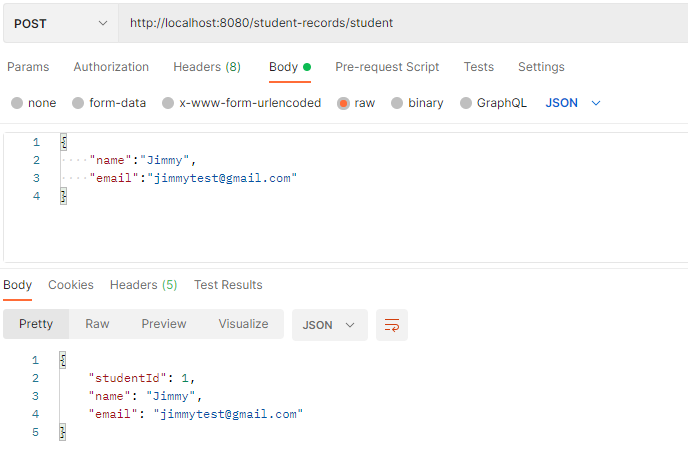
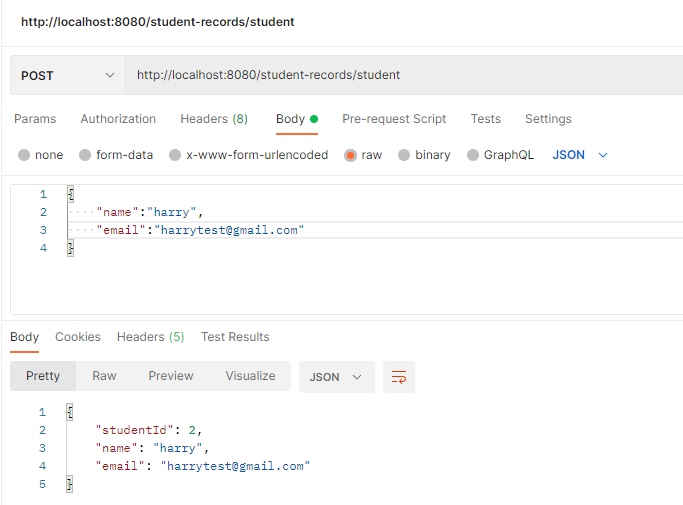
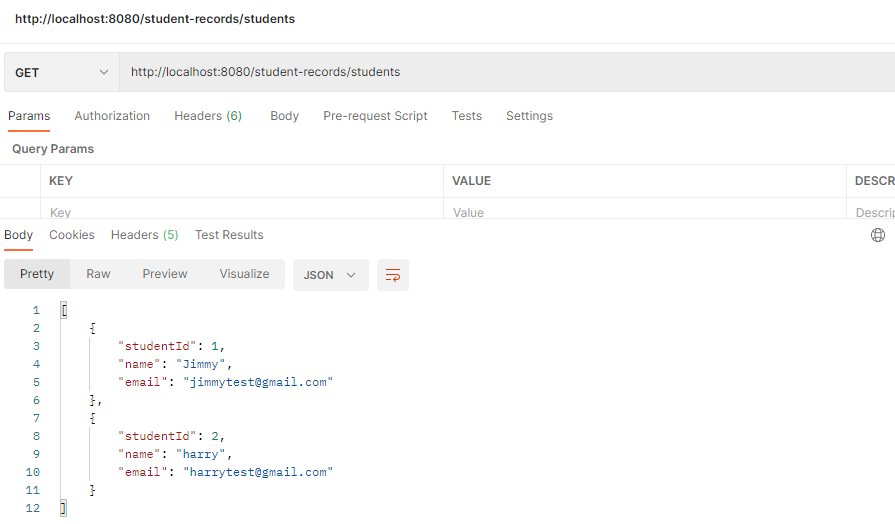
12. Now the deployment is completed on the Kubernetes cluster. We will go to Postman and hit the localhost URL to see if our application works.
We will try two APIs as below:
a.) POST API to create student records
b.) GET API to retrieve all students
POST API:
GET API:
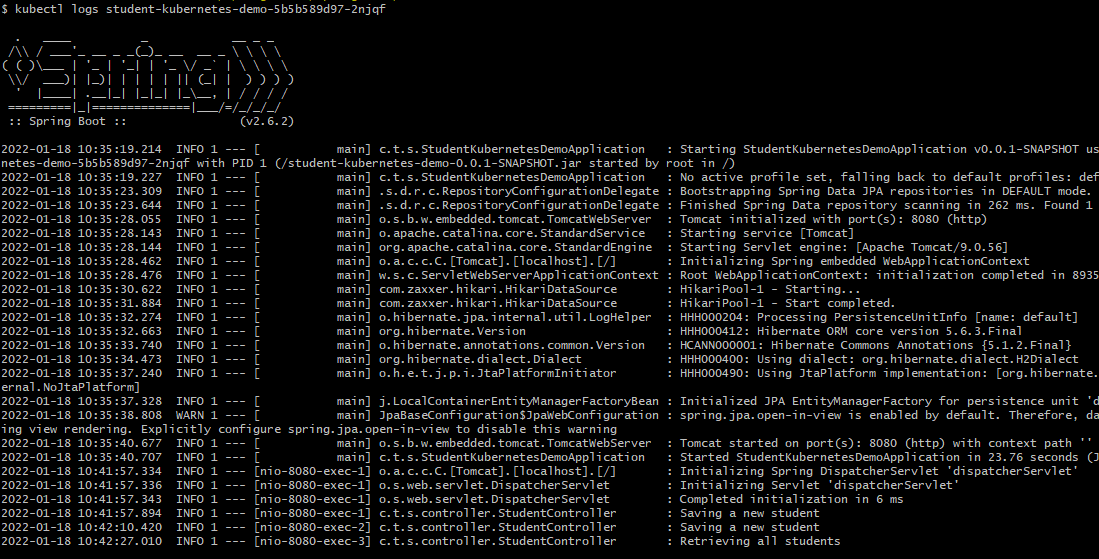
13. As I have put some loggers inside the code, I can see those loggers getting printed inside the pods. Just type the command as follows:
kubectl get pods
kubectl logs <podname>
That's all folks for this tutorial. Hope you all liked it. Happy Learning!
Opinions expressed by DZone contributors are their own.
Comments