Docker Security: 6 Practical Labs From Audit to AI Protection
Master Docker security with six practical labs that take you from basic configuration audits to advanced AI workload protection
Join the DZone community and get the full member experience.
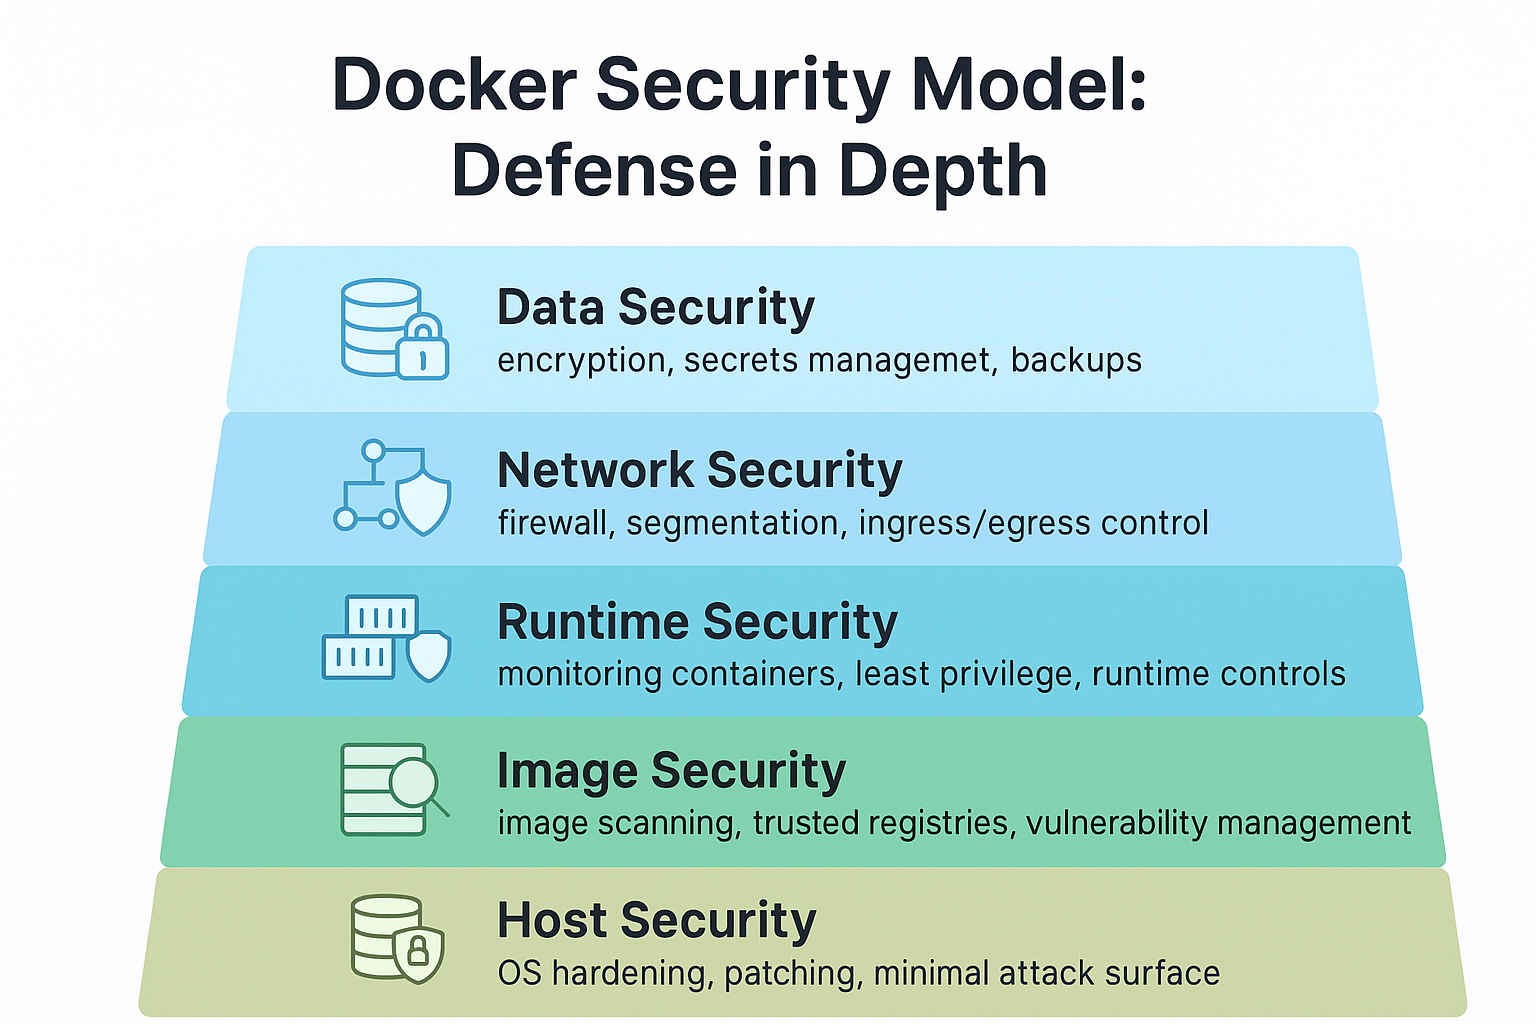
Join For FreeDocker containers share the host kernel. A single misconfigured container can expose sensitive data, provide root access to the host, or compromise the entire infrastructure. This guide provides six practical labs that work on Linux, macOS, and Windows.
The examples use open source tools and demonstrate both vulnerable and secure configurations. Each lab is hands-on and runnable. All code and detailed instructions are available on GitHub: https://github.com/opscart/docker-security-practical-guide
This article covers six essential security practices:
- Configuration auditing with Docker Bench Security
- Container hardening with capabilities and read-only filesystems
- Vulnerability scanning with Trivy and policy enforcement
- Image signing for supply chain security
- Seccomp profiles for system call filtering
- AI/ML workload security
Why Docker Bench Security for Lab 01
When building this guide, we initially considered Falco for runtime detection. However, Falco requires kernel modules and only works on Linux systems. This creates platform dependency issues for developers on macOS or Windows.
Docker Bench Security emerged as the better choice:
- Official Docker tool with 100+ automated checks
- Works on all platforms where Docker runs
- Based on CIS Docker Benchmark v1.6.0 (industry standard)
- No dependencies beyond Docker itself
- Run one command, get immediate results
Falco remains valuable for production runtime monitoring on Linux servers. For learning security fundamentals, Docker Bench provides universal accessibility.
Lab 01: Security Auditing With Docker Bench
What You'll Learn
Run comprehensive security audits to identify misconfigurations before they become vulnerabilities. Docker Bench Security checks host configuration, daemon settings, file permissions, container configurations, and network settings.
Hands-On Exercise
Clone the repository and navigate to Lab 01:
git clone https://github.com/opscart/docker-security-practical-guide.git
cd docker-security-practical-guide/labs/01-docker-bench-security
Step 1: Run Initial Audit
./run-audit.sh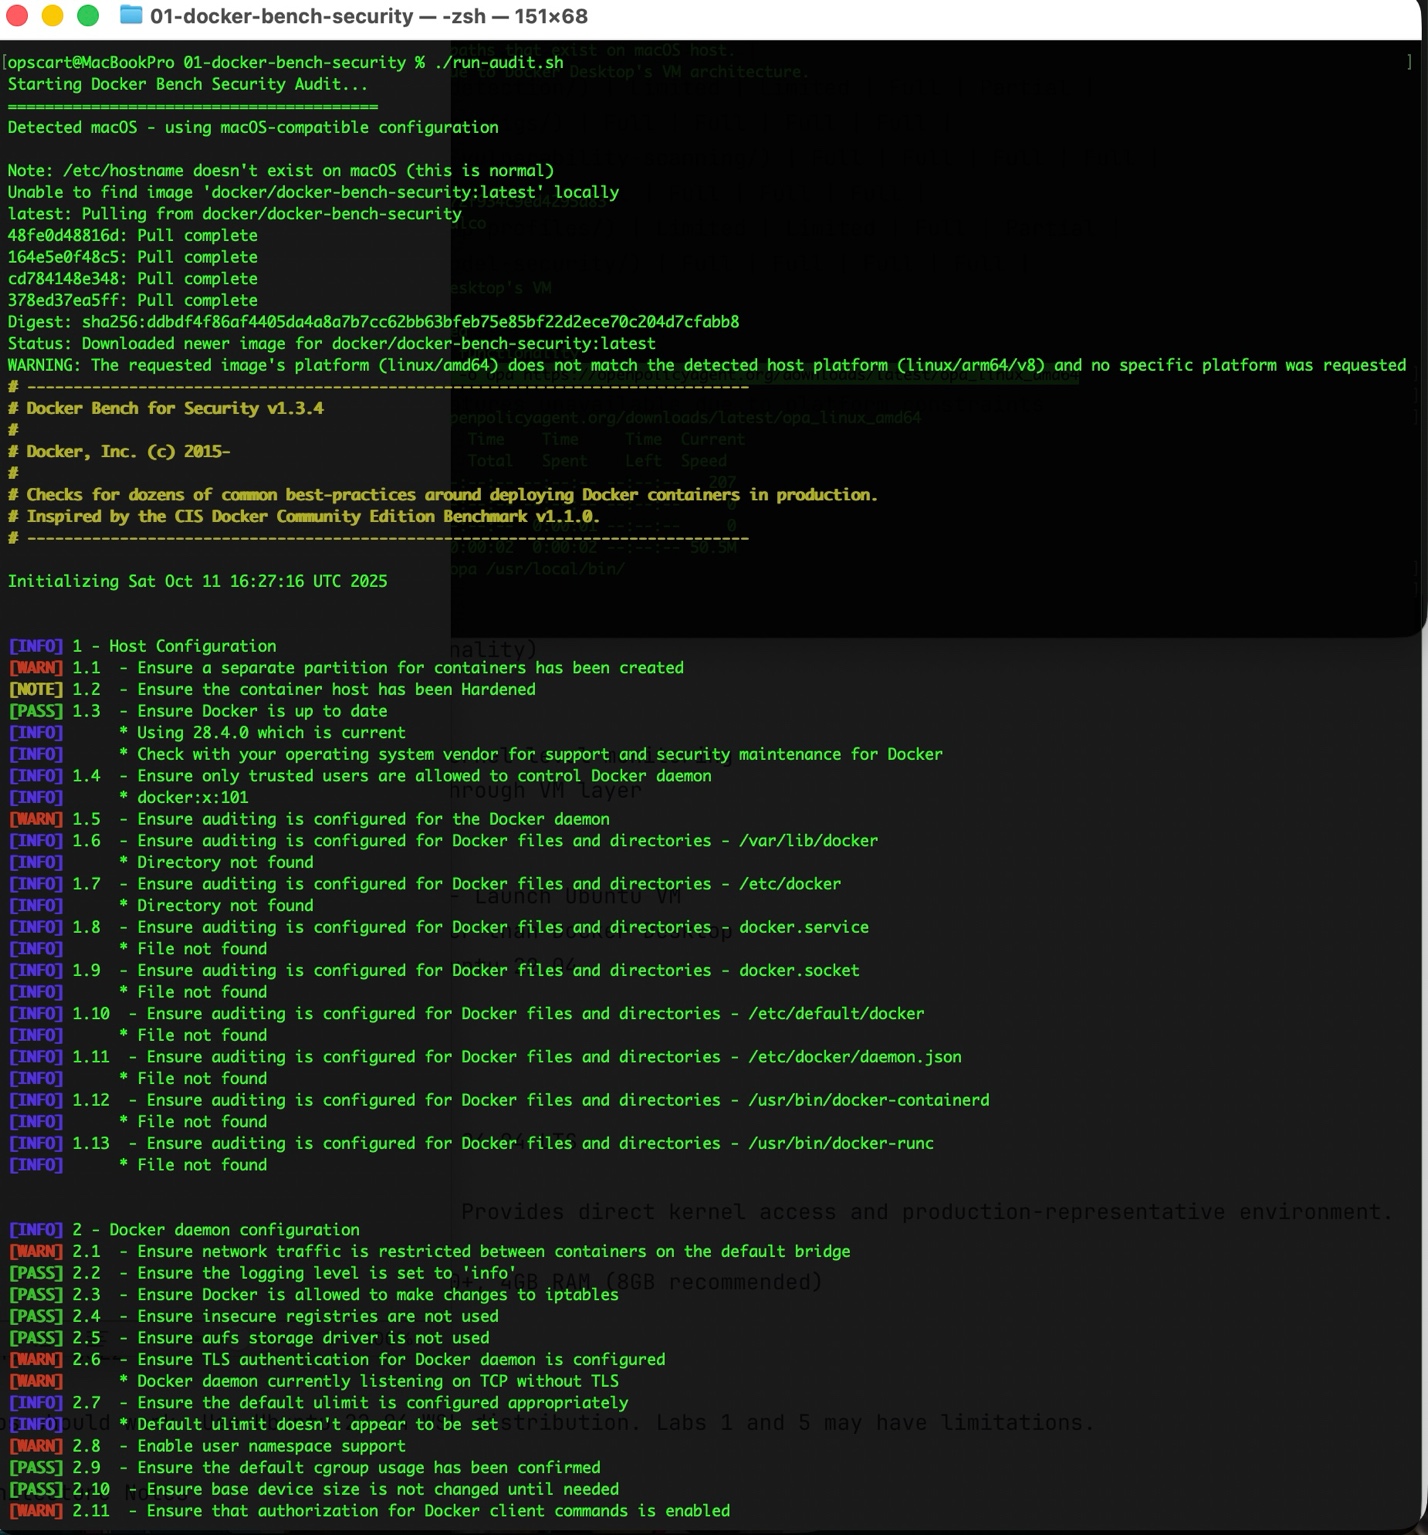
Docker Bench runs 105 checks across seven CIS benchmark sections. The output shows PASS (compliant), WARN (needs attention), and INFO (manual review) results. Initial runs typically show a modest score as Docker's defaults prioritize usability over maximum security.
Step 2: Deploy Vulnerable Application
Deploy a container with intentional security issues:
docker-compose -f demo-vulnerable-app.yml up -d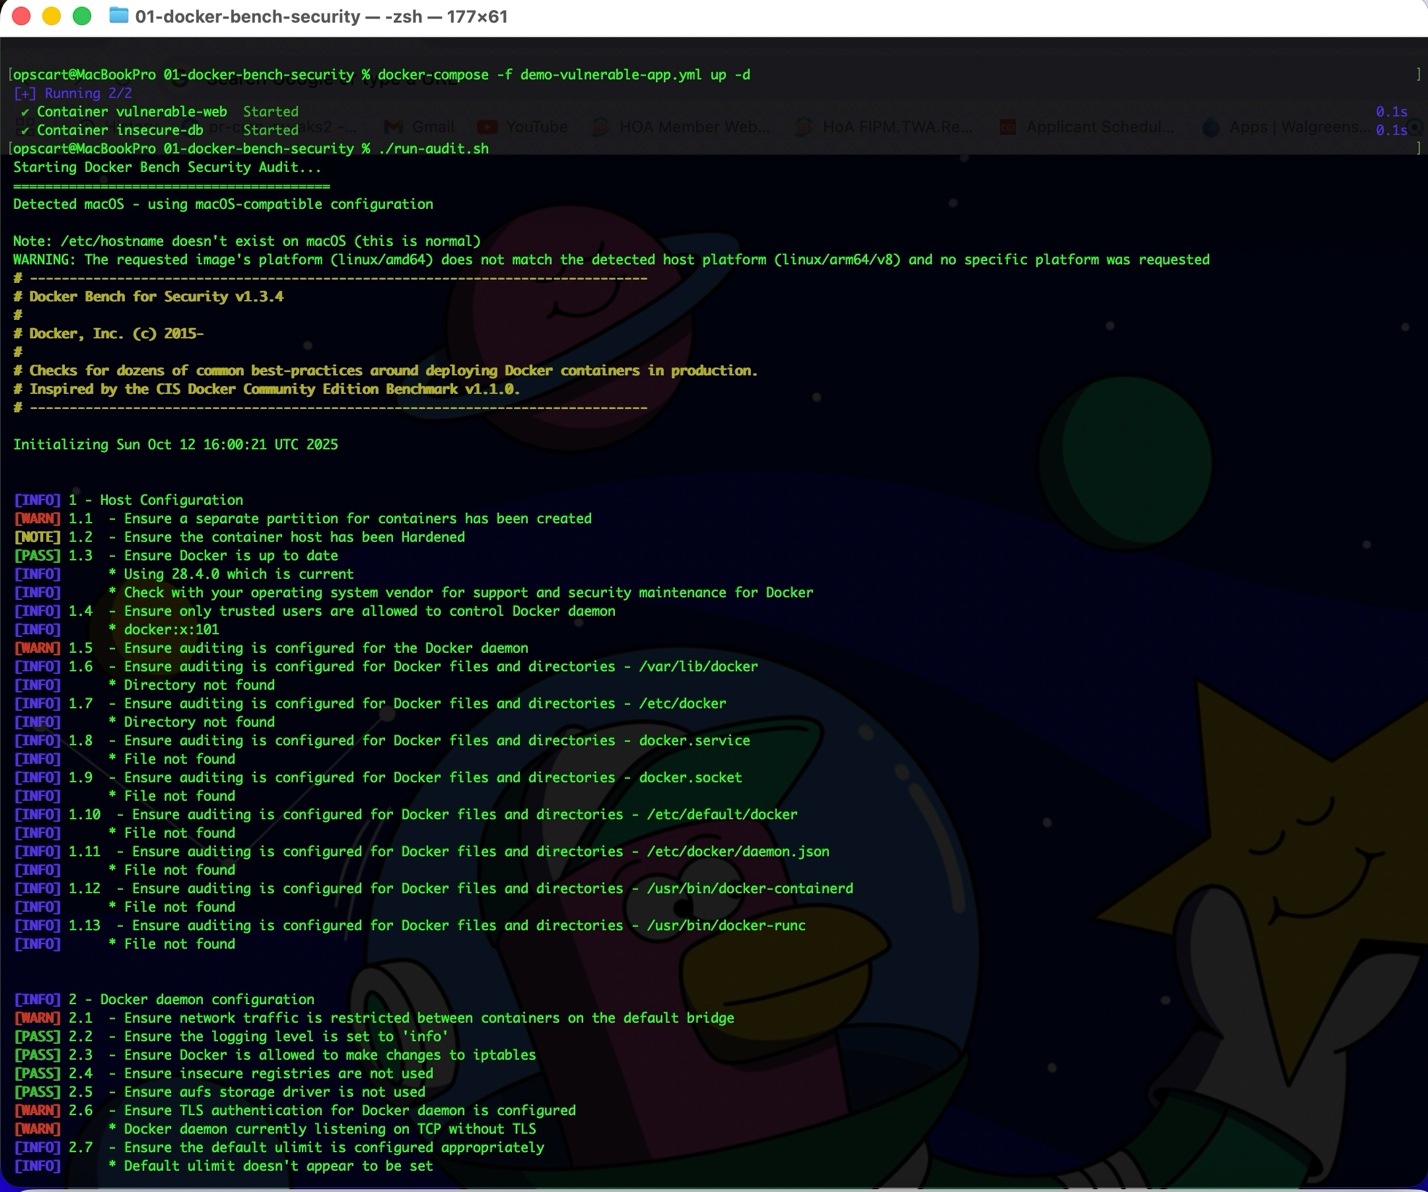
This creates containers with multiple problems:
- Privileged mode enabled
- Host network namespace shared
- Docker socket mounted inside the container
- Hardcoded credentials in environment variables
- All Linux capabilities granted
Step 3: Audit Again
./run-audit.sh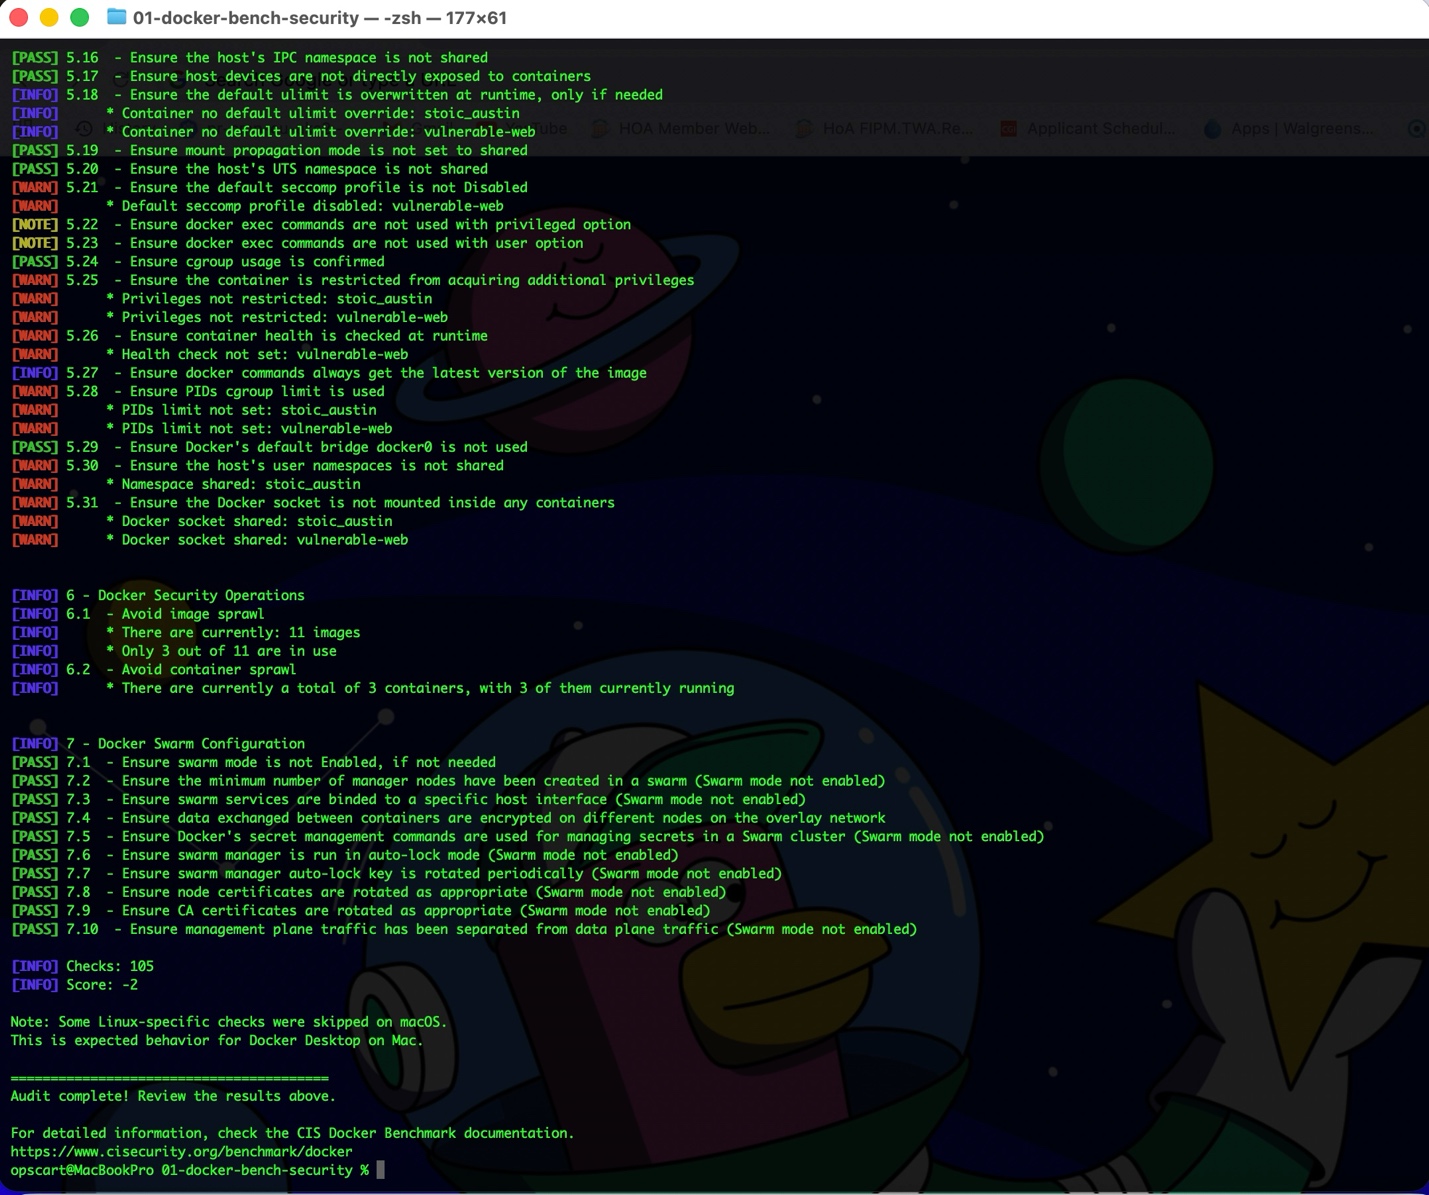
The score drops significantly. New WARN findings appear for privileged containers, exposed Docker socket, and disabled security profiles.
Understanding the Results
Output format:
[PASS] 5.1 - Verify AppArmor profile, if applicable
[WARN] 5.2 - Container running in privileged mode
[INFO] 5.3 - Restrict Linux Kernel Capabilities within containers
Three categories:
- PASS: Meets CIS benchmark requirements
- WARN: Security issue requiring action
- INFO: Requires manual verification
Common Issues and Fixes
1. Issue: Privileged containers
Problem:
privileged: true # Grants full host accessFix:
cap_drop:  - ALL cap_add:  - NET_BIND_SERVICE
# Only required capabilities security_opt:  - no-new-privileges:true
2. Issue: Docker socket mounted
Problem:
volumes: - /var/run/docker.sock:/var/run/docker.sockThis grants the container full control over the Docker daemon — equivalent to root access on the host.
Fix: Remove the socket mount entirely. If Docker API access is needed, use proper authentication instead.
Step 4: Cleanup
docker-compose -f demo-vulnerable-app.yml down
docker system prune -f
Lab 02: Secure Container Configurations
Objectives
Compare insecure versus secure container configurations. Learn how Linux capabilities work and why read-only filesystems matter.
Understanding Linux Capabilities
Linux divides root privileges into distinct units called capabilities. Instead of running containers as root with full privileges, grant only specific capabilities needed.
Common capabilities:
CAP_NET_BIND_SERVICE– Bind to ports below 1024CAP_CHOWN– Change file ownershipCAP_SETUID/SETGID– Change user/group IDs
Default Docker behavior grants a subset of capabilities. The secure approach: drop all capabilities, then add back only what the application requires.
Hands-On Exercise
cd labs/02-secure-configsStep 1: Deploy Insecure Container
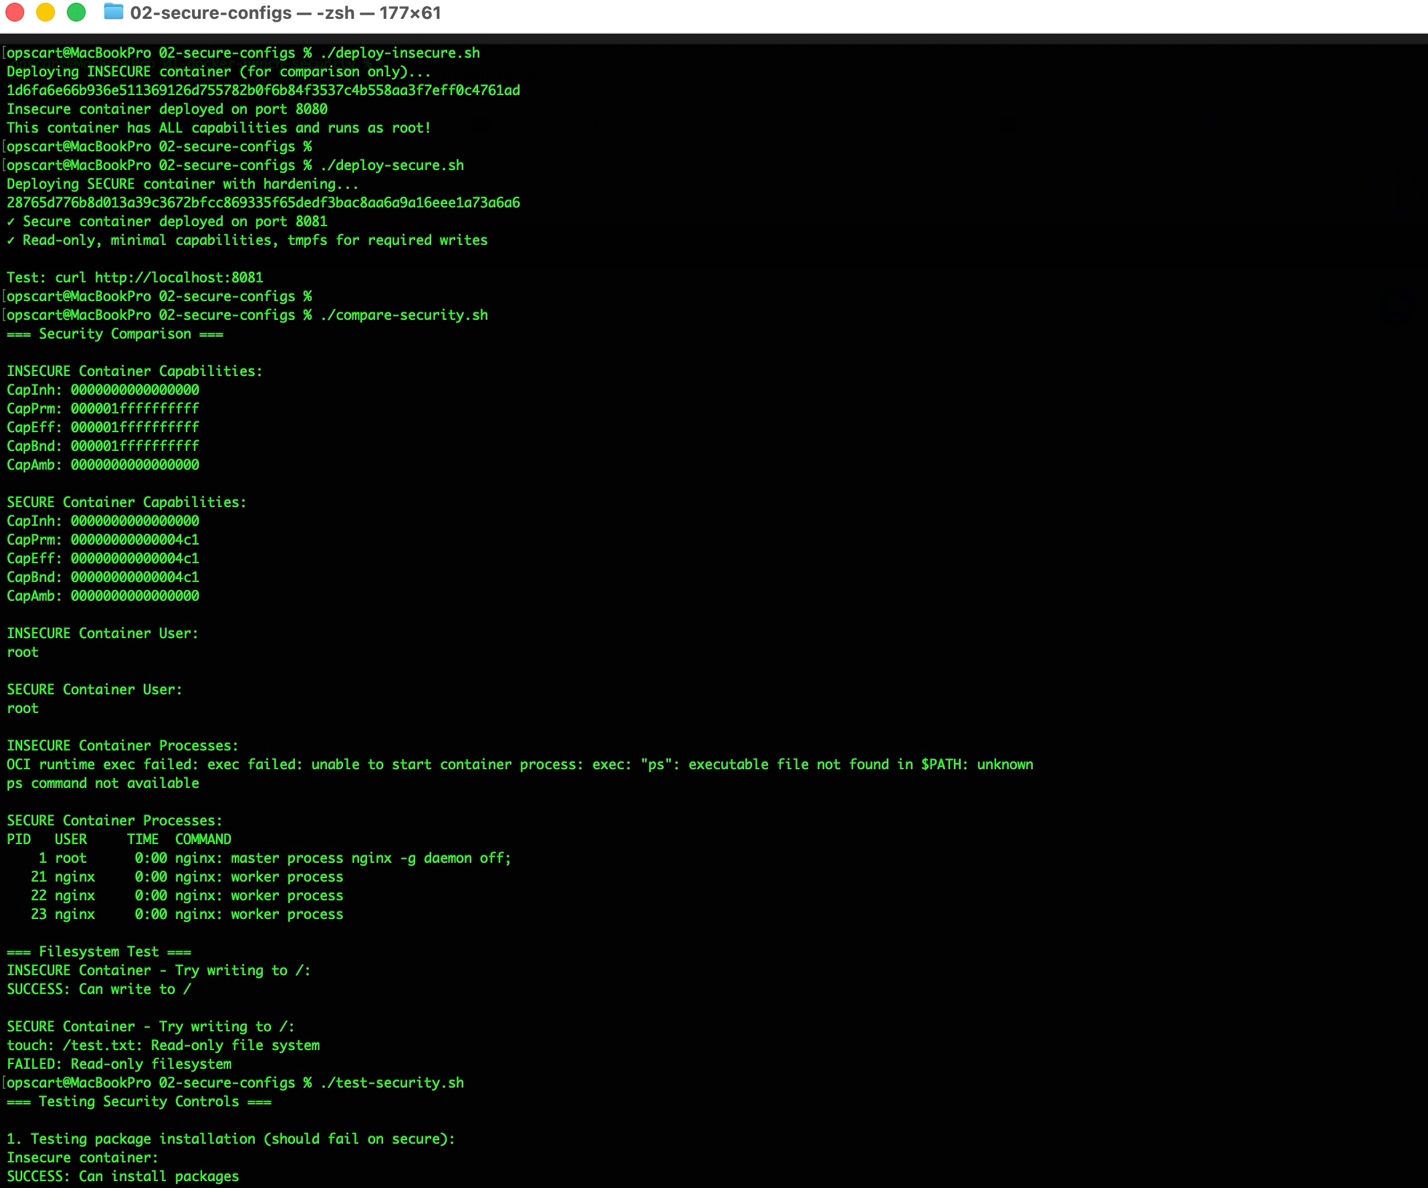
./deploy-insecure.sh
Deploys nginx with all capabilities, read-write filesystem, running as root, and no security restrictions.
Step 2: Deploy Secure Container
./deploy-secure.sh
Deploys nginx with minimal capabilities, read-only root filesystem, tmpfs mounts for required writes, and no-new-privileges enabled.
Step 3: Compare Security Postures
./compare-security.sh
Output shows:
INSECURE Container Capabilities: CapEff: 000001ffffffffff
SECURE Container Capabilities: CapEff: 00000000000004c1
The hexadecimal values represent enabled capabilities. Insecure container has all capabilities (ffffffffff). A secure container has only four specific capabilities (4c1). This reduction significantly limits attacker capabilities after compromise.
Step 4: Test Security Controls
./test-security.sh
Tests package installation, filesystem writes, and privilege escalation. Secure container blocks package installation and root filesystem writes while maintaining functionality.
Configuration Details
Insecure container command:
docker run -d --name insecure-nginx --privileged --cap-add ALL \
--security-opt apparmor=unconfined -p 8080:80 nginx:alpine
Secure container command:
docker run -d --name secure-nginx --read-only --cap-drop ALL \
--cap-add NET_BIND_SERVICE --cap-add CHOWN --cap-add SETUID --cap-add SETGID \
--security-opt=no-new-privileges:true \
--tmpfs /tmp:rw,noexec,nosuid,size=64M \
--tmpfs /var/cache/nginx:rw,noexec,nosuid,size=64M \
--tmpfs /var/run:rw,noexec,nosuid,size=64M \
-p 8081:8081 nginx:alpine
The read-only filesystem prevents malware installation, configuration tampering, and binary modifications. tmpfs provides memory-backed writable space where needed, with noexec and nosuid flags preventing binary execution.
Lab 03: Vulnerability Scanning and Policy Enforcement
Objectives
Scan container images for known vulnerabilities and enforce security policies before deployment.
Understanding Vulnerability Scanning
Container images contain OS packages and application dependencies. Each component can have CVE-tracked vulnerabilities. Base images often contain hundreds of vulnerabilities. Dependencies become outdated quickly. Some vulnerabilities have active exploits.
Scan during development, in CI/CD pipelines, before deployment, and regularly on running images.
Tools Used
Trivy: Open source vulnerability scanner. Scans OS packages, application dependencies, Infrastructure as Code files, and Kubernetes configurations. Fast scanning (under 1 minute) with a comprehensive vulnerability database.
Open Policy Agent (OPA): Policy engine for enforcing security rules. Checks container configurations, runtime settings, and compliance requirements.
Hands-On Exercise
cd labs/03-vulnerability-scanningStep 1: Install Trivy
macOS:
brew install trivyLinux:
wget https://github.com/aquasecurity/trivy/releases/latest/download/trivy_Linux-64bit.tar.gztar zxvf trivy_Linux-64bit.tar.gzsudo mv trivy /usr/local/bin/
Step 2: Scan Container Image
./scan-image.sh
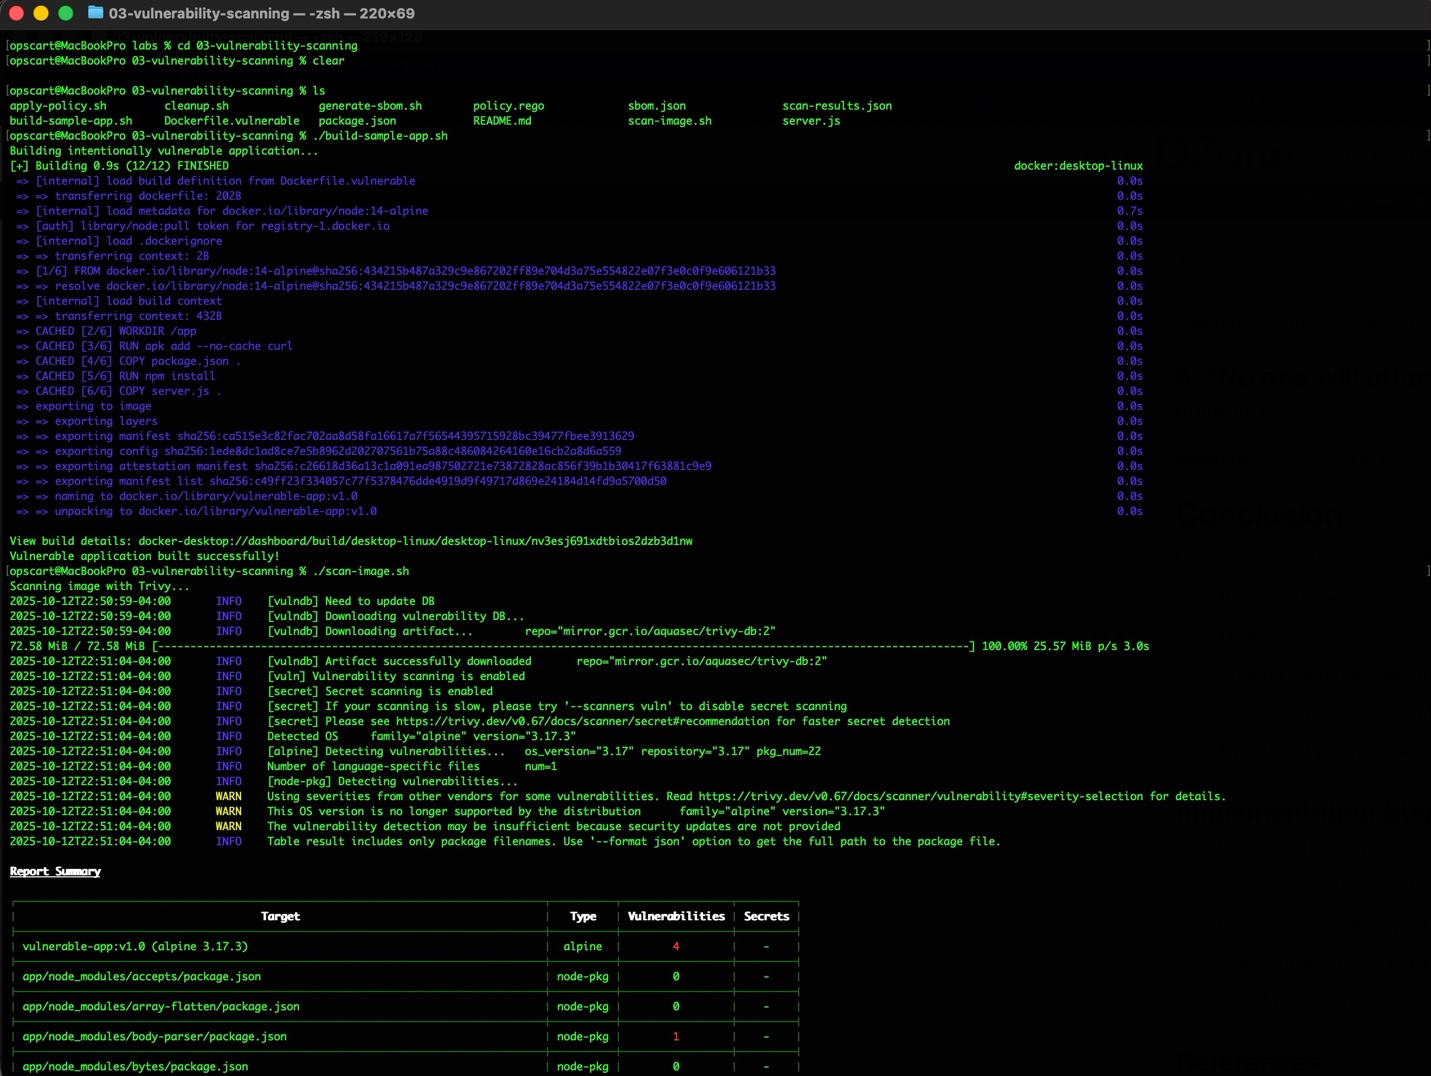
Output shows library name, CVE identifier, severity level (CRITICAL/HIGH/MEDIUM/LOW), and current versus fixed version.
Step 3: Apply Security Policies
Install OPA:
brew install opa # macOSApply policy:
./apply-policy.shOPA checks for privileged mode, root user, missing health checks, and excessive exposed ports. The policy.rego file defines deny rules (block deployment) and warn rules (flag issues).
Step 4: Test Policy Enforcement
Deploy privileged container:
docker run -d --name test-vulnerable --privileged nginx:alpine ./apply-policy.sh
Policy detects privileged mode violation. Clean up:
docker rm -f test-vulnerableCI/CD Integration
GitLab CI example:
scan:
  stage: test
  script:
    - trivy image --exit-code 1 --severity CRITICAL,HIGH $CI_REGISTRY_IMAGE:$CI_COMMIT_SHA
  allow_failure: false
Pipeline fails if critical or high vulnerabilities are found.
Remediation Process
When vulnerabilities are found:
- Focus on CRITICAL and HIGH severity first
- Check if fixes are available
- Update the base image to the latest patched version
- Update dependencies using the package manager
- Rebuild the image with updates
- Rescan to verify resolution
Example:
# Found: openssl 1.1.1t has CVE-2023-12345 (CRITICAL)
# Fixed in: 1.1.1u

# Update Dockerfile
FROM alpine:3.18  # instead of 3.17
RUN apk add --no-cache openssl

# Rebuild and verify
docker build -t myapp:fixed .
trivy image myapp:fixed
Lab 04: Image Signing and Verification
Why Image Signing Matters
Container images can be tampered with during transit, replaced by attackers in registries, or modified by compromised build systems. Image signing provides cryptographic proof of origin and detects unauthorized modifications.
Supply chain attacks targeting container registries have increased. Image signing is now a requirement for many compliance frameworks. Without signing, you cannot verify that the image running in production is exactly what your build system created.
Understanding Image Signing
Digital signatures use asymmetric cryptography:
- Private key signs the image
- Public key verifies the signature
- Any modification breaks the signature
- Only the key holder can sign
This lab uses Cosign from the Sigstore project. Cosign supports both traditional key-based signing and keyless signing with OIDC providers.
Hands-On Exercise
cd labs/04-image-signingStep 1: Install Cosign
macOS:
brew install cosignLinux:
wget https://github.com/sigstore/cosign/releases/latest/download/cosign-linux-amd64
chmod +x cosign-linux-amd64
sudo mv cosign-linux-amd64 /usr/local/bin/cosign
Step 2: Set Up Signing Infrastructure
./setup-signing.shStarts a local registry on port 5001 and generates signing keys (cosign.key and cosign.pub).
Step 3: Build and Sign Image
./sign-image.sh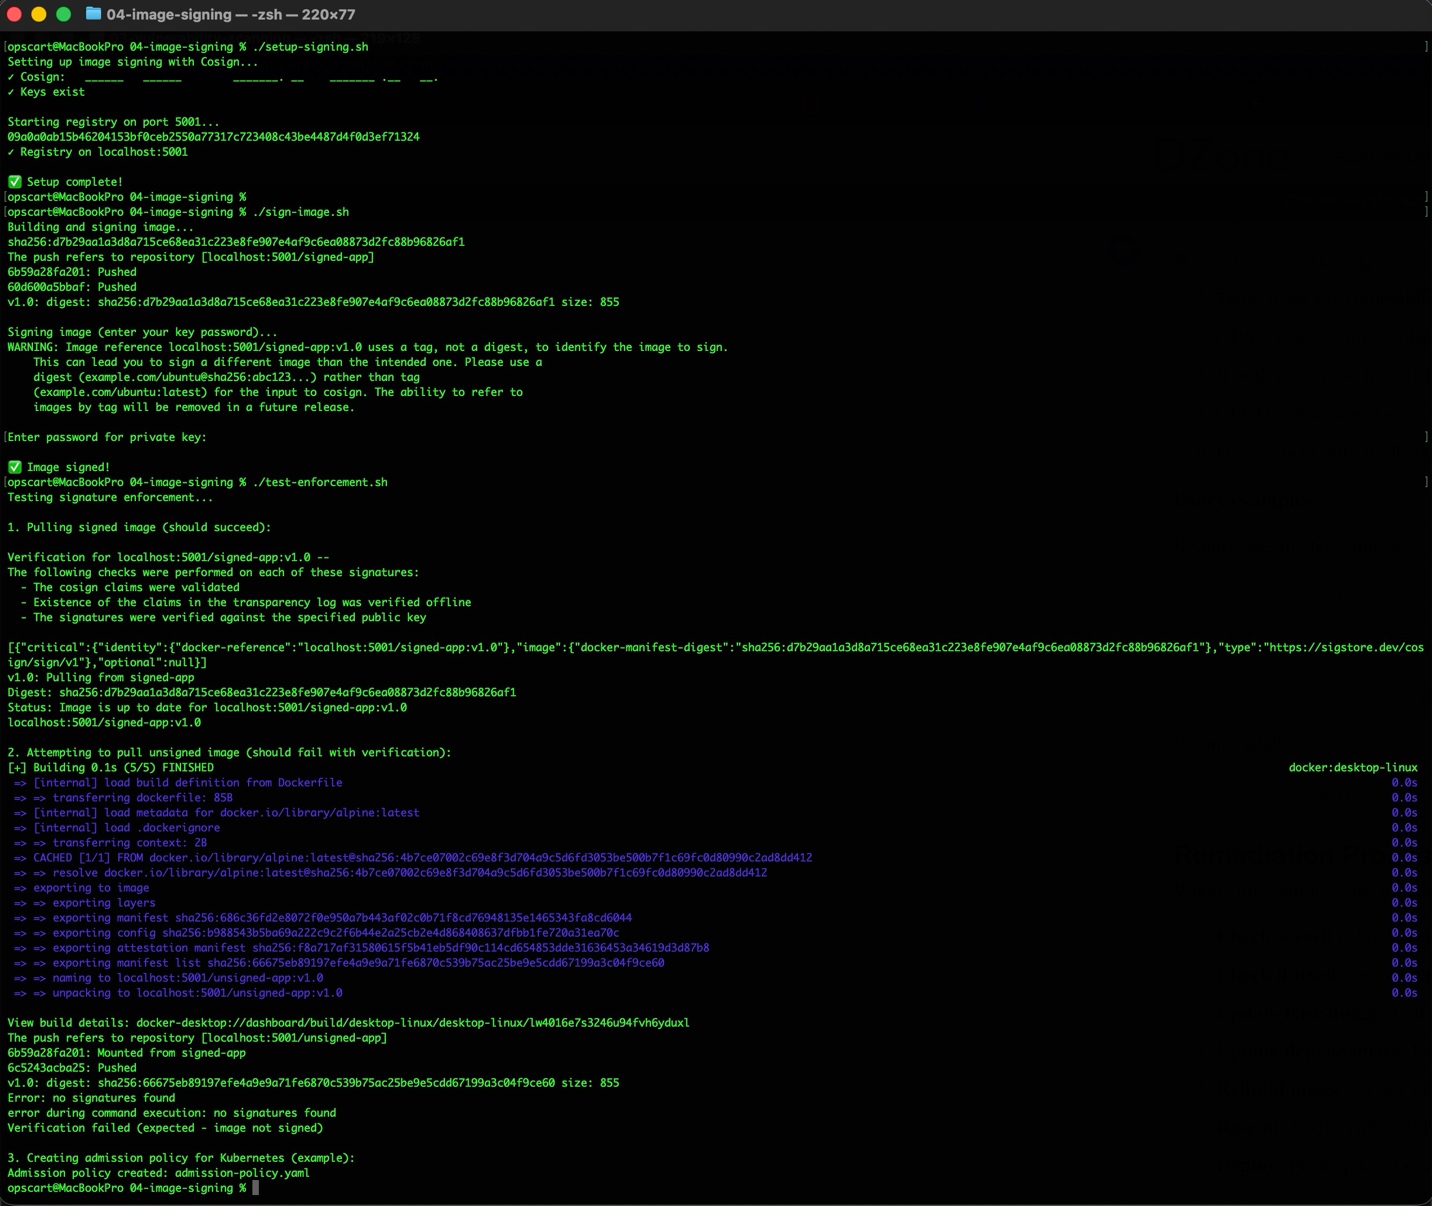
The script builds a sample image, pushes it to the local registry, and signs it with Cosign. You'll be prompted for a password to protect the private key.
Step 4: Verify Signature
./verify-image.sh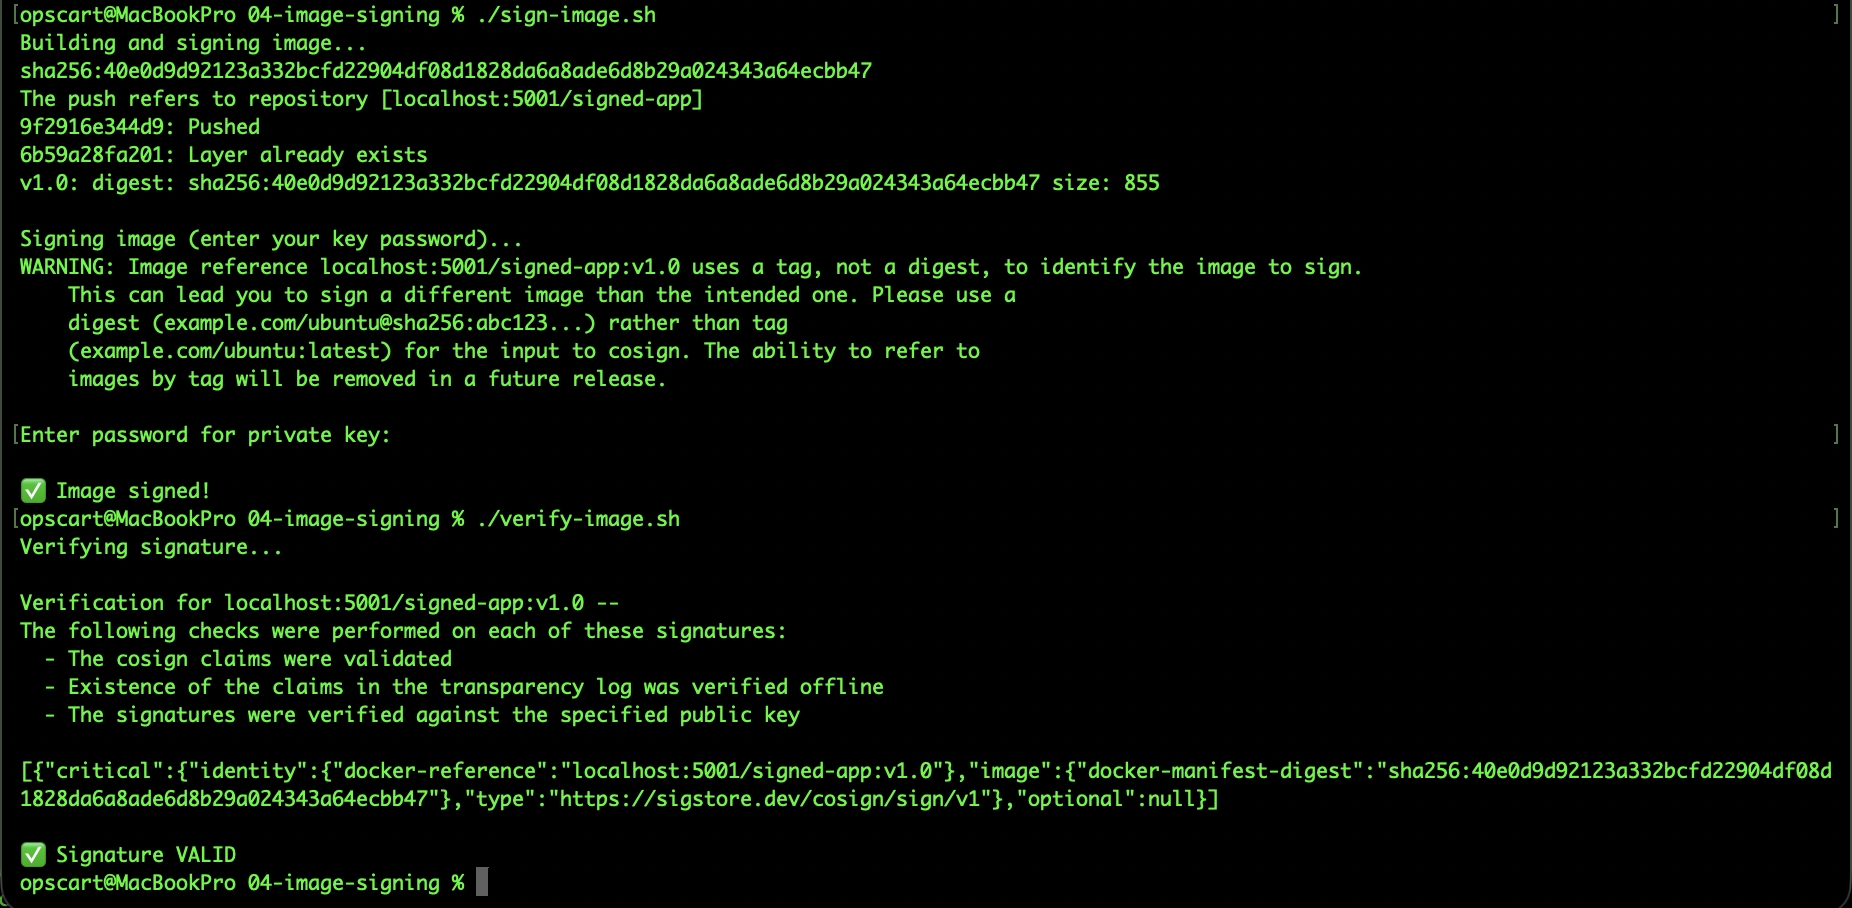
Verification confirms:
- Image came from the expected source
- No modifications since signing
- Signature matches the public key
Step 5: Test Unsigned Image
Try to verify an unsigned image:
docker pull nginx:latest cosign verify --key cosign.pub nginx:latestReturns "Error: no signatures found," preventing the use of untrusted images.
Policy Enforcement
In production, enforce signed images using Kubernetes admission controllers or registry policies. Unsigned images should be rejected before deployment.
Kubernetes example:
apiVersion: policy.sigstore.dev/v1beta1
kind: ClusterImagePolicy
metadata:
  name: require-signed-images
spec:
  images:
  - glob: "registry.company.com/**"
  authorities:
  - key:
      data: |
        -----BEGIN PUBLIC KEY-----
        [your public key]
        -----END PUBLIC KEY-----
Lab 05: Seccomp Profiles
Understanding Seccomp
Secure computing mode (seccomp) is a Linux kernel feature that filters system calls. Applications make system calls to request kernel services. Limiting which system calls a container can reduce the attack surface.
Linux has 300+ system calls. Most applications need fewer than 100. Blocking unnecessary system calls prevents entire classes of attacks.
How It Works
When a container attempts a system call:
- Kernel checks seccomp profile
- If allowed: call executes
- If blocked: operation fails or process terminates
Docker's default profile blocks ~44 dangerous system calls while allowing common operations.
Hands-On Exercise
cd labs/05-seccomp-profilesStep 1: Test Default Profile
./test-default-profile.sh
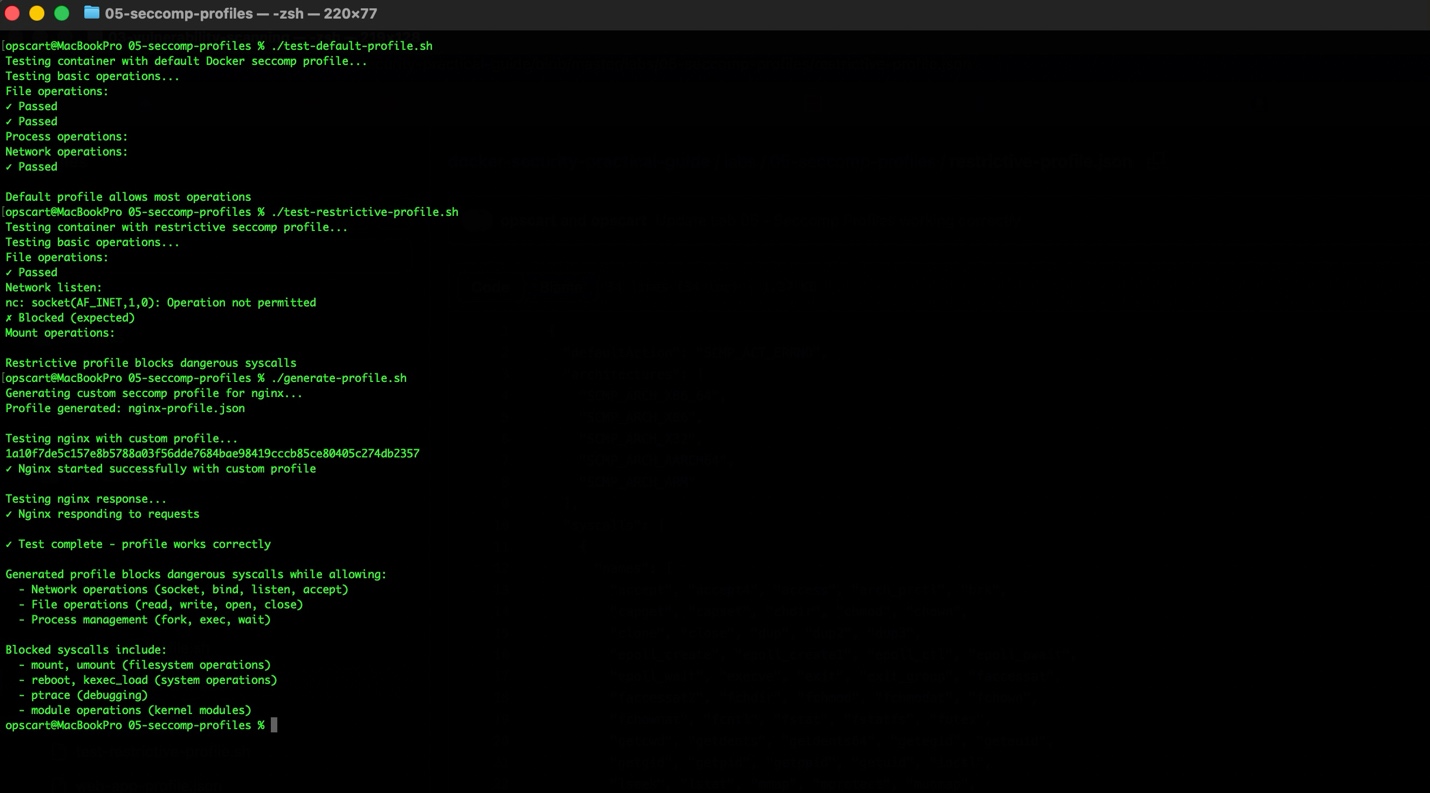
The default profile allows file operations, network operations, and basic process operations. It blocks reboot, mount, and system time modification.
Step 2: Test Restrictive Profile
./test-restrictive-profile.sh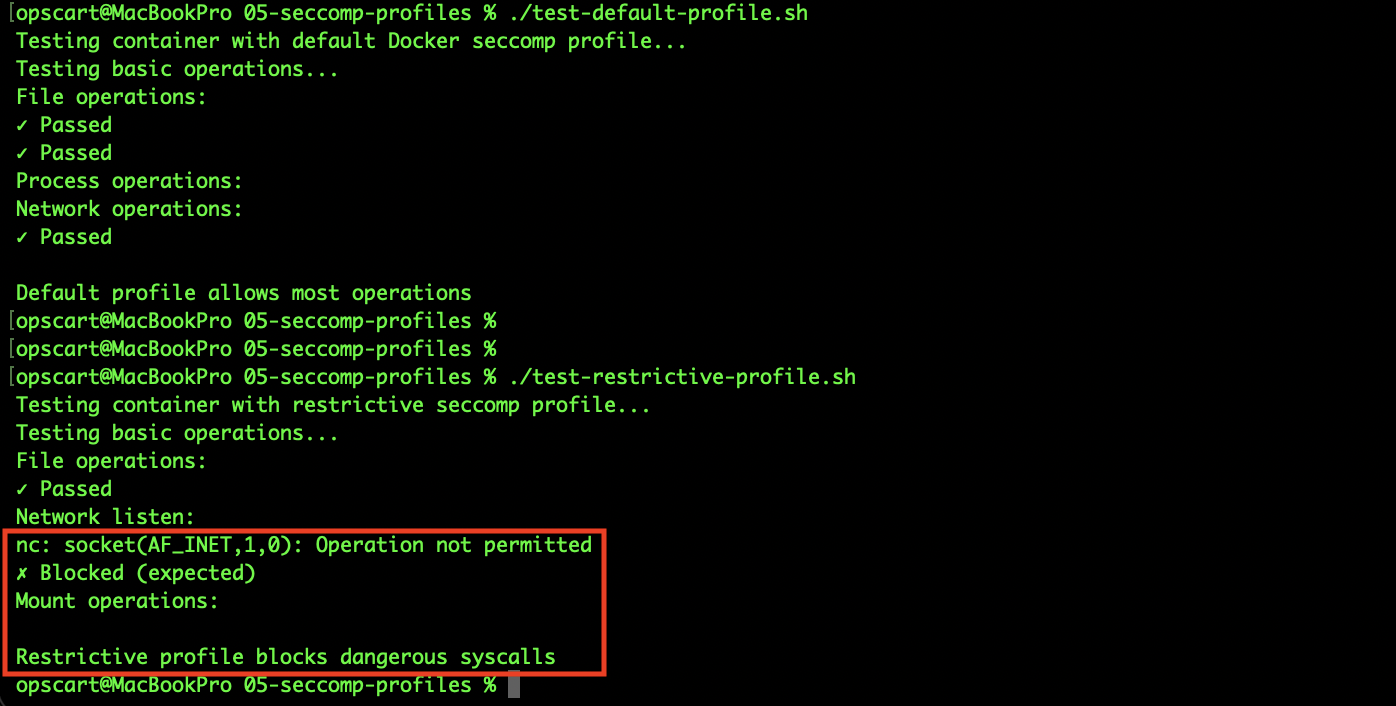
A restrictive profile only allows the minimum required system calls. It blocks socket creation, process forking, and file permission changes. This profile is suitable for very constrained environments.
Step 3: Generate Application-Specific Profile
./generate-profile.sh
Creates a profile for nginx with appropriate system calls. The profile blocks dangerous calls like mount and reboot while allowing network and file operations that nginx needs.
Profile Structure
Basic seccomp profile format:
{
  "defaultAction": "SCMP_ACT_ERRNO",
  "architectures": ["SCMP_ARCH_X86_64"],
  "syscalls": [
    {
      "names": ["read", "write", "open", "close"],
      "action": "SCMP_ACT_ALLOW"
    }
  ]
}
Key elements:
- defaultAction: What happens to unlisted system calls
- architectures: CPU architectures supported
- syscalls: Explicitly allowed system calls
- action: SCMP_ACT_ALLOW (allow) or SCMP_ACT_ERRNO (block)
Applying Profiles
Docker run:
docker run --security-opt seccomp=profile.json nginx:alpineDocker Compose:
services:
  web:
    image: nginx:alpine
    security_opt:
Attack Prevention
Example: Attacker gains shell access in a container.
Without seccomp:
attacker$ mount /dev/sda1 /mnt  # Success - accesses host disk
attacker$ reboot                # Success - reboots host
With seccomp:
attacker$ mount /dev/sda1 /mnt  # Blocked: Operation not permitted
attacker$ reboot                # Blocked: Operation not permitted
Even with shell access, the attacker cannot perform dangerous operations.
Lab 06: AI Model Security
Why AI Model Security Matters
Machine learning containers have unique security requirements. Models consume significant CPU/GPU/memory resources. Inference inputs may contain sensitive data. Model weights represent intellectual property. APIs expose an attack surface for adversarial inputs and model extraction.
AI-Specific Threats
- Model extraction: Attackers query the model repeatedly to recreate it without training data access.
- Adversarial attacks: Carefully crafted inputs cause incorrect predictions.
- Resource exhaustion: Large batch requests consume all available resources.
- Data poisoning: Malicious training data corrupts the model.
Hands-On Exercise
cd labs/06-ai-model-securityStep 1: Build ML Container
./build-ml-container.shBuilds a container with Python ML framework, inference server, and sample model. Uses multi-stage build, non-root user, and minimal dependencies.
Step 2: Deploy With Security Controls
./deploy-secure.sh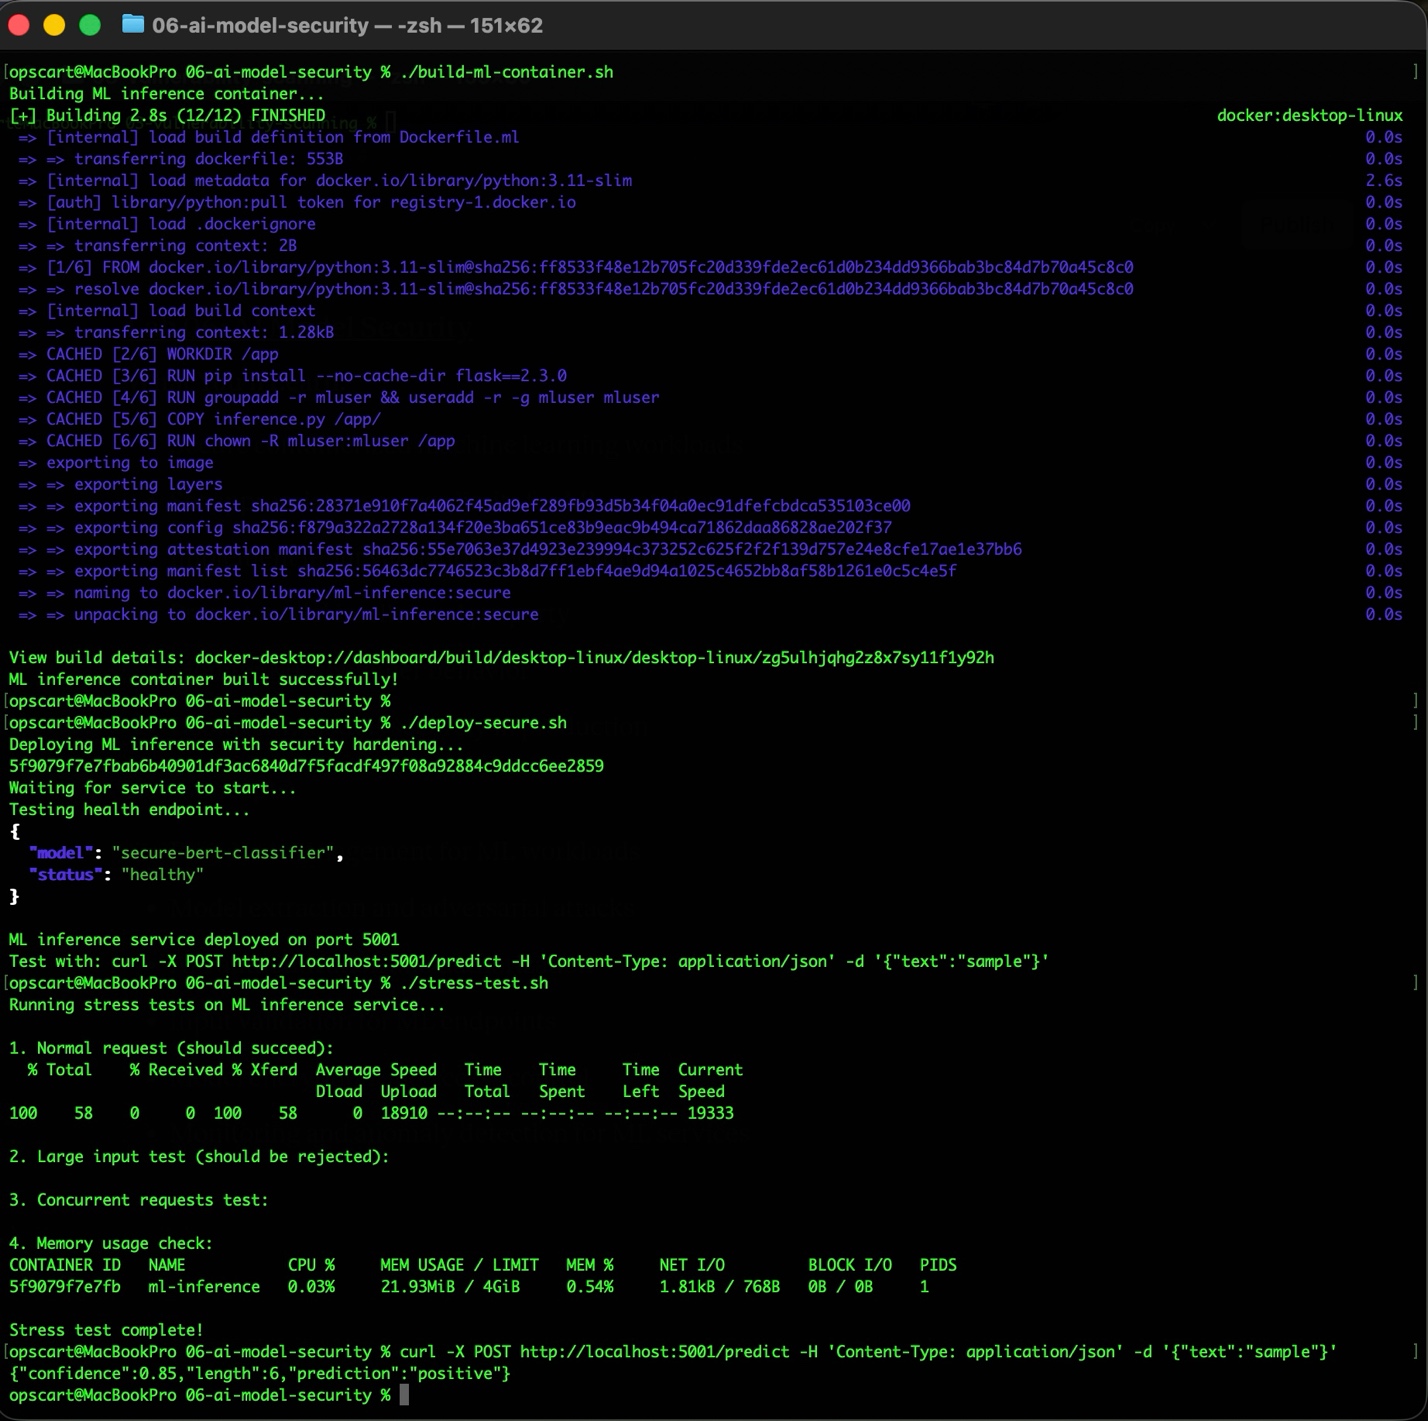
Deploys container with:
- Memory limit: 4GB
- CPU limit: 2 cores
- Read-only filesystem
- tmpfs for temporary files
- no-new-privileges enabled
Step 3: Test Model Inference
curl -X POST http://localhost:5001/predict \
  -H 'Content-Type: application/json' \
  -d '{"text":"sample text for prediction"}'
Returns JSON with prediction, confidence, and metadata.
Step 4: Stress Test
./stress-test.shSends concurrent requests to verify that resource limits work correctly. Container handles requests within defined limits without crashing.
Security Configuration
Deployment command:
docker run -d --name ml-inference \
  --read-only \
  --tmpfs /tmp:rw,noexec,nosuid,size=2g \
  --memory="4g" \
  --cpus="2" \
  --pids-limit="100" \
  --security-opt=no-new-privileges:true \
  --cap-drop=ALL \
  -p 5001:5000 \
  ml-inference:secure
Resource limits prevent exhaustion attacks. Read-only filesystem prevents tampering. Process limits prevent fork bombs.
Input Validation
Protect against malicious inputs:
from pydantic import BaseModel, validator

class PredictionRequest(BaseModel):
    features: List[float]

    @validator('features')
    def validate_features(cls, v):
        if len(v) > 100:
            raise ValueError('Too many features')
        if any(abs(x) > 1000 for x in v):
            raise ValueError('Feature values too large')
        return v
Validation prevents oversized inputs and extreme values that could cause problems.
Rate Limiting
Prevent model extraction and resource exhaustion:
from slowapi import Limiter

limiter = Limiter(key_func=get_remote_address)

@app.post("/predict")
@limiter.limit("10/minute")
def predict(request: Request, data: PredictionRequest):
    # Process request
    pass
Limits requests per client to prevent abuse.
Implementation Roadmap
Start implementing these practices in sequence:
Week 1-2: Run Docker Bench Security on all systems. Address WARN findings. Add to CI/CD pipeline.
Week 3-4: Implement container hardening. Drop capabilities. Enable read-only filesystems where possible.
Week 5-6: Set up vulnerability scanning. Integrate Trivy into the build process. Create OPA policies.
Week 7-8: Implement image signing. Set up Cosign in CI/CD. Configure verification at deployment.
Week 9-10: Create and test seccomp profiles. Start with the default profile. Create custom profiles for critical services.
Week 11-12: If running ML workloads, implement resource limits and input validation. Add monitoring and rate limiting.
Ongoing: Regular security audits. Update dependencies. Monitor for new vulnerabilities. Refine security policies.
Getting Started
Complete lab instructions and working code: https://github.com/opscart/docker-security-practical-guide
The repository includes:
- All six lab exercises with scripts
- Configuration examples (vulnerable and secure)
- Troubleshooting guides
- Additional security resources
Work through labs sequentially for a comprehensive understanding. Each lab builds on previous concepts. All labs work on Linux, macOS, and Windows.
Key Takeaways
- Lab 01: Run Docker Bench weekly. Address all WARN findings. Integrate into CI/CD.
- Lab 02: Drop all capabilities by default. Use read-only filesystems. Add tmpfs for required writes.
- Lab 03: Scan images before deployment. Enforce policies with OPA. Focus on CRITICAL and HIGH vulnerabilities.
- Lab 04: Sign all production images. Store keys securely. Enforce verification at deployment.
- Lab 05: Start with Docker's default seccomp profile. Create custom profiles for sensitive workloads. Test thoroughly.
- Lab 06: Set resource limits for ML containers. Validate inputs. Implement rate limiting and monitoring.
Conclusion
Docker security requires attention across multiple layers. This guide provides six practical labs covering configuration auditing, container hardening, vulnerability scanning, image signing, seccomp profiles, and AI model security.
Security is not a one-time implementation. Regular audits, updates, and monitoring are essential. The practices in this series provide a solid foundation for production Docker deployments.
Start implementing these techniques today: https://github.com/opscart/docker-security-practical-guide.
Opinions expressed by DZone contributors are their own.
Comments