Containerizing AI: Hands-On Guide to Deploying ML Models With Docker and Kubernetes
Containerize your ML model with Docker and deploy it on AWS EKS using Kubernetes in this hands-on guide. Learn to build, serve, and scale your models with ease.
Join the DZone community and get the full member experience.
Join For FreeContainerization packages applications into lightweight, portable units. For machine learning, this ensures reproducible environments and easy deployments. For example, containers bundle the ML model code with its exact dependencies, so results stay consistent across machines They can then be run on any Docker host or cloud, improving portability. Orchestration platforms like Kubernetes add scalability, automatically spinning up or down containers as needed. Containers also isolate the ML environment from other applications, preventing dependency conflicts. In short, packaging your ML model in a Docker container makes it much easier to move, run, and scale reliably in production.
- Reproducibility: Container images bundle the model, libraries and runtime (e.g. Python, scikit-learn), so the ML service behaves the same on any system.
- Portability: The same container runs on a developer’s laptop, CI pipeline, or cloud VM without changes.
- Scalability: Container platforms (Docker + Kubernetes) can replicate instances under load. Kubernetes can auto-scale pods running your ML service to meet demand.
- Isolation: Each container is sandboxed from others and the host OS, avoiding version conflicts or “works on my machine” problems.
With these benefits, let’s walk through a concrete example: training a simple model in Python, serving it via a Flask API, and then containerizing and deploying it on an AWS EKS Kubernetes cluster.
Building and Serving a Sample ML Model
First, create a simple Scikit-Learn model. We use the Iris dataset and train a decision tree, then save it with joblib. In code:
# train_model.py
from sklearn.datasets import load_iris
from sklearn.tree import DecisionTreeClassifier
import joblib

iris = load_iris()
X, y = iris.data, iris.target
model = DecisionTreeClassifier()
model.fit(X, y)
joblib.dump(model, 'model.pkl')
This produces model.pkl. Next, write a REST API to serve predictions. For example, use Flask to load the model and predict based on JSON input:
# app.py
from flask import Flask, request, jsonify
import joblib

app = Flask(__name__)
model = joblib.load('model.pkl')

@app.route('/predict', methods=['POST'])
def predict():
    data = request.get_json()
    features = data.get('features')
    prediction = model.predict([features])
    return jsonify({'prediction': int(prediction[0])})

if __name__ == '__main__':
    app.run(host='0.0.0.0', port=5000)
Here the client sends a JSON like {"features": [5.1, 3.5, 1.4, 0.2]}, and the server returns the predicted class.
Dockerizing the ML Service
To containerize, we write a Dockerfile. Docker uses a client-server architecture: the Docker CLI interacts with the Docker daemon to build images, fetch layers from a registry, and run containers. The diagram below illustrates this architecture:
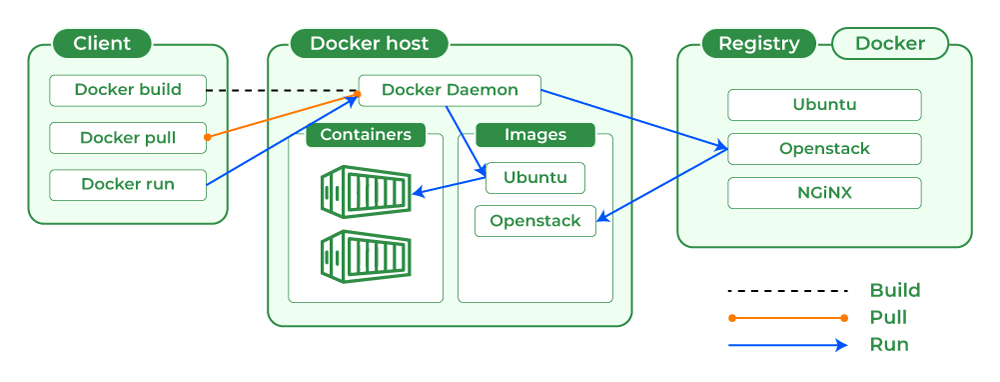
Docker uses a client-server model where the docker CLI talks to the Docker daemon, which manages images and containers. Each Docker image is a layered file system that includes your application code and dependencies. Here we will package our Flask API and model into an image.
Create a Dockerfile in the project directory:
# Dockerfile
FROM python:3.9-slim
WORKDIR /app
COPY requirements.txt ./
RUN pip install -r requirements.txt
COPY model.pkl app.py ./
EXPOSE 5000
CMD ["python", "app.py"]
Also include a requirements.txt listing our Python dependencies:
flask
scikit-learn
joblib
Build the Docker image locally:(bash)
docker build -t my-ml-app:latest
This creates an image my-ml-app:latest containing our model server. You can verify by running: (bash)
curl -X POST -H "Content-Type: application/json" \
-d '{"features": [5.1, 3.5, 1.4, 0.2]}' \ http://localhost:5000/predict
You should get a JSON response like:
{"prediction":0}With this, our model is containerized and can run anywhere Docker is available.
Kubernetes 101: Pods, Deployments, and Services
A Kubernetes cluster is made up of a control plane and multiple worker nodes. The control plane, sometimes called the master, manages essential components like etcd (used for storing state), the API server, the scheduler, and various controllers. Worker nodes run your containers inside Pods. The architecture looks like this:

Kubernetes cluster architecture with control plane and worker nodes. Kubernetes clusters follow a master-worker model. The control plane (left) holds cluster state (etcd, API server, scheduler, controller-manager). Worker nodes (right) run kubelet and proxy agents, and host Pods with your containers.
Key concepts:
Pod: The smallest deployable unit. APodwraps one or more containers that share network/storage.Podsrun on nodes and are treated as a single unit.Deployment: Deployment: A controller responsible for overseeing and maintaining a group ofPods, ensuring the desired number are running and up-to-date. You declare aDeploymentspecifying how many replicas you want, and Kubernetes makes sure that manyPodsare running.Service: An abstraction that groups a set ofPodsand establishes a consistent policy for accessing them, regardless of their individual IP addresses or lifecycle. AServiceprovides a stable network endpoint (ClusterIPorLoadBalancer) forPods, enabling load-balancing and discovery.
In practice, we’ll create a Deployment to keep, say, two copies of our model server running, and a Service to expose them.
Deploying to AWS EKS
Now we push the Docker image to a registry and deploy to Kubernetes on AWS EKS (Elastic Kubernetes Service). First, tag and push your image (using Docker Hub or ECR). For example, with Docker Hub: (bash)
docker tag my-ml-app:latest your_dockerhub_user/my-ml-app:latest docker push your_dockerhub_user/my-ml-app:latest
Replace your_dockerhub_user with your Docker Hub username.
Next, set up an EKS cluster (you need eksctl and AWS CLI configured). If you don’t have a cluster yet, AWS provides guides to create one. For example: (bash)
eksctl create cluster --name ml-model-cluster --region us-west-2 --nodes 2
This creates a basic EKS cluster with two worker nodes. Ensure your kubectl context is pointing to the new cluster (AWS docs explain how to connect).
Create a Kubernetes Deployment manifest (deployment.yaml) that uses your container image:
apiVersion: apps/v1
kind: Deployment
metadata:
  name: ml-model-deployment
spec:
  replicas: 2
  selector:
    matchLabels:
      app: ml-model
  template:
    metadata:
      labels:
        app: ml-model
    spec:
      containers:
      - name: ml-model
        image: your_dockerhub_user/my-ml-app:latest
        ports:
        - containerPort: 9000
And a Service (service.yaml) to expose it externally (using type LoadBalancer on EKS):
apiVersion: v1
kind: Service
metadata:
  name: ml-model-service
spec:
  type: LoadBalancer
  selector:
    app: ml-model
  ports:
  - protocol: TCP
    port: 80
    targetPort: 9000
Apply these to the cluster:(bash)
kubectl apply -f deployment.yaml
kubectl apply -f service.yaml
Check the status:
kubectl get deployments
kubectl get pods
kubectl get svc ml-model-service
The Service will get an external IP (or AWS DNS) when the LoadBalancer is provisioned. Once ready, you can send a request to that address on port 80, and it will forward to your pods on port 9000.
Conclusion
You’ve now containerized a scikit-learn model, served it with Flask, and deployed it on Kubernetes. For production readiness, consider the following best practices:
- Scaling: Use
kubectl scaleor Kubernetes autoscaling to adjust replicas based on CPU/memory or request rate. - Monitoring: Deploy monitoring to track pod health and model performance. Collect logs (e.g. with Fluentd/Elasticsearch) for troubleshooting.
- CI/CD: Automate the workflow with pipelines (e.g. GitHub Actions, Jenkins, or AWS CodePipeline) that rebuild images and update Deployments on new model versions.
- Security: Use Kubernetes RBAC and network policies to secure access. Consider scanning images for vulnerabilities and using private registries (AWS ECR) with IAM integration.
- Advanced ML Ops: Explore tools like Kubeflow or Seldon for specialized model serving, and MLflow or Neptune for model tracking. Use GPUs or multi-arch images if your model needs them.
By containerizing your model and leveraging Kubernetes, you gain portability, scalability, and consistency. You can now iterate on your ML service, confidently deploying updates across cloud environments. With further automation and monitoring in place, your containerized ML service will be ready for production workloads and growth.
Opinions expressed by DZone contributors are their own.
Comments