How to Send .NET Crash Dumps to Slack From an ECS Fargate Task
Get .NET crash dumps from AWS ECS Fargate automatically: leverage Amazon EFS, Amazon S3, AWS DataSync, and AWS Lambda to make debugging easier for your dev team.
Join the DZone community and get the full member experience.
Join For FreeSometimes .NET applications crash in production, and nobody knows why, because logs and metrics are ok. It's quite bothersome and makes debugging very unpleasant. In such cases, memory dumps might simplify debugging and reduce troubleshooting time from days to minutes.
This article explains how to configure dumps for .NET applications deployed to AWS ECS Fargate and then forward them to the development team in the most convenient and secure way.
In this article, we will create AWS resources, and I will refer to AWS documentation in particular situations. IAC won’t be in our focus. Nevertheless, if you enjoy Terraform as much as I do, you can use open-source AWS modules for each article section. From my side, I can recommend you take a look at two AWS Terraform module projects:
Solution Architecture
It’s time to take a look at our architecture. I'll start by presuming the dev team isn't considering pulling .NET dumps from storage like EBS or EFS due to its complexity. S3 is much simpler for developers to obtain any type of file, and it perfectly suits our expectations.
Aside from that, receiving proactive notifications when a new .NET dump is generated would be quite valuable. For example, I'll use Slack, but other options include Teams, Mattermost, WhatsApp, and so on. To send the notification message, we will use Lambda and S3 triggers.
And the last, but not least important notice. It’s quite complicated to attach an S3 bucket natively to ECS. For that reason, we’ll create a middleware layer built on top of EFS, DataSync, and a sidecar ECS container/Lambda function. EFS will be used as an intermediate file storage for all our ECS tasks, Datasync will transfer data from EFS to S3 automatically, and a sidecar container or Lambda will clean up old data from EFS.
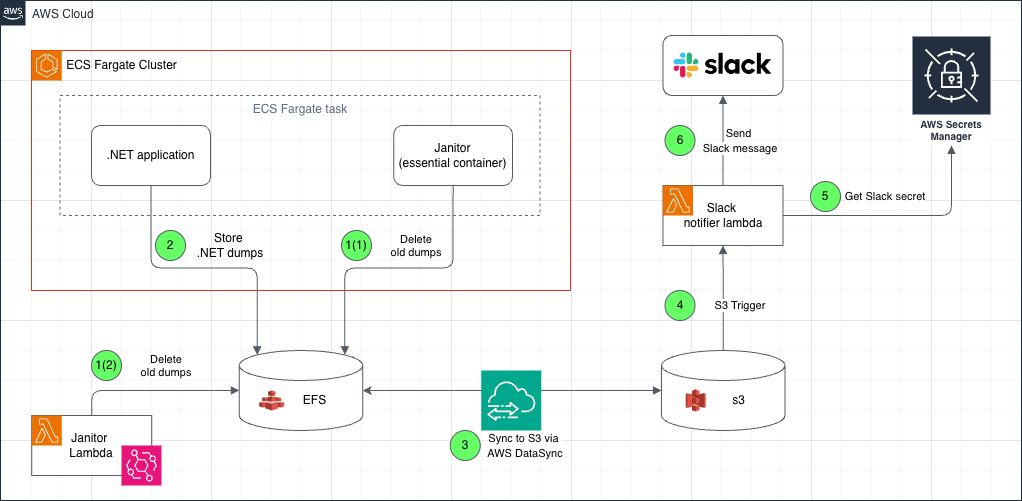
Let's quickly review the diagram:
- AWS Lambda deletes old EFS files according to the schedule configured in EventBridge. Alternatively, during the ECS Task bootstrap phase, the sidecar container janitor removes outdated dumps from EFS and quits.
- During a .NET application crash, a new dump is created at the EFS filesystem, and only after that is the process terminated.
- DataSync moves data to S3 after a new file is uploaded to EFS.
- When an S3 hook detects a newly uploaded file, AWS Lambda is triggered.
- AWS Lambda uses IAM to obtain the necessary secrets from AWS Secret Manager.
- AWS Lambda sends a message to Slack via API.
Step-by-Step Implementation
Create an ECS Fargate Task
In this section, we need to create an ECS Fargate Task using a sample .NET application.
Prerequisites
Before we proceed, there are a few steps that need to be completed:
- Set up an ECS cluster via AWS Console or Terraform. An official AWS guide: Creating an Amazon ECS cluster for Fargate workloads.
- Create an IAM execution role for the ECS task. To do it, you can follow this AWS guide. In the scope of this article, I will use
kvendingoldo-dotnet-crash-dump-demoname for IAM execution role.
This minimal Trust policy for the execution role will be enough:
{
  "Version": "2012-10-17",
  "Statement": [
    {
      "Effect": "Allow",
      "Principal": {
        "Service": "ecs-tasks.amazonaws.com"
      },
      "Action": "sts:AssumeRole"
    }
  ]
}
As well as a minimal permissions policy:
{
  "Version": "2012-10-17",
  "Statement": [
    {
      "Effect": "Allow",
      "Action": [
        "ecr:GetAuthorizationToken",
        "ecr:BatchCheckLayerAvailability",
        "ecr:GetDownloadUrlForLayer",
        "ecr:BatchGetImage",
        "logs:CreateLogStream",
        "logs:PutLogEvents"
      ],
      "Resource": "*"
    }
  ]
}
Create Task Definition
Once all prerequisites are ready, it’s time to create a minimal Fargate task with a sample .NET app. To do it, follow the official AWS guide, and use this task definition JSON file:
{
 "containerDefinitions": [
   {
     "cpu": 0,
     "essential": true,
     "image": "mcr.microsoft.com/dotnet/samples:aspnetapp",
     "mountPoints": [],
     "name": "app",
     "portMappings": [
       {
         "containerPort": 8000,
         "hostPort": 8000,
         "protocol": "tcp"
       }
     ],
     "systemControls": [],
     "volumesFrom": []
   }
 ],
 "cpu": "256",
 "executionRoleArn": "kvendingoldo-dotnet-crash-dump-demo",
 "family": "kvendingoldo-dotnet-crash-dump-demo",
 "memory": "512",
 "networkMode": "awsvpc",
 "placementConstraints": [],
 "requiresCompatibilities": ["FARGATE"],
 "volumes": [],
 "tags": []
}
Configure .NET Dumps
By default, .NET apps do not generate any dumps. To configure it, we must set the following environment variables:
# Forces the runtime to generate a stack dump on unhandled exceptions.
COMPlus_StackDumpOnUnhandledException=1

# Enable mini dump generation on crash
COMPlus_DbgEnableMiniDump=1

# Choose dump type:
# 1 = Mini,
# 2 = Full (use carefully)
# 4 = Triage (includes stack, threads, and some heap info — a good balance for debugging).
COMPlus_DbgMiniDumpType=2

# Target path for dump file (EFS is mounted here)
COMPlus_DbgMiniDumpName=/dumps/dump-%e-%p-%t.dmp
These variables can be added directly to the Dockerfile or defined as environment variables in the ECS Task Definition JSON.
In our example, let's inject them into the ECS task specification. To accomplish this, we'll add them to the containerDefinitions[0].environment, as shown below:
"environment": [
   {
       "name": "COMPlus_StackDumpOnUnhandledException",
       "value": "1"
   },
   {
       "name": "COMPlus_DbgMiniDumpType",
       "value": "4"
   },
   {
       "name": "COMPlus_DbgEnableMiniDump",
       "value": "1"
   },
   {
       "name": "COMPlus_DbgMiniDumpName",
       "value": "/dumps/%t-kvendingoldo-dotnet-demo-crash.dmp"
   }
]Tip:
As you can see, I use a few placeholders in COMPlus_DbgMiniDumpName. Dotnet automatically expands the following placeholders in the dump file name:
%e– executable name%p– process ID%t– timestamp
See these two links for further information on collecting and analyzing .NET crash dumps:
- Collect .NET Crash Dumps (Microsoft Learn)
- Debugging .NET Core memory issues (on Linux) with dotnet dump
Create EFS Storage and Mount it to the ECS Fargate Task
As I mentioned at the beginning of this article, attaching an S3 bucket to an ECS job is quite difficult; instead, we will use Amazon EFS (Elastic File System) as intermediate storage for .NET dump files, which can be easily mounted to a set of ECS tasks.
To create EFS storage, follow the official AWS guide: Amazon ECS Tutorial: Using Amazon EFS File Systems
There’s nothing special to add to the official documentation. Just make sure that:
- EFS and ECS clusters are in the same VPC
- EFS can be accessed by ECS tasks over NFS (port 2049/tcp). Allow inbound access to NFS ports in the EFS security group to do this.
To mount the EFS filesystem into the ECS task, we must grant the necessary permissions to the kvendingoldo-dotnet-crash-dump-demo IAM role (pay attention to placeholders):
{
  "Version": "2012-10-17",
  "Statement": [
    {
      "Sid": "AllowEFSAccess",
      "Effect": "Allow",
      "Action": [
        "elasticfilesystem:ClientMount",
        "elasticfilesystem:ClientWrite",
        "elasticfilesystem:ClientRootAccess"
      ],
      "Resource": "arn:aws:elasticfilesystem:<region>:<account-id>:file-system/<filesystem-id>"
    }
  ]
}
As a final step, define the EFS volumes and mount points in your ECS task definition (change fileSystemId fs-xxxxxx with your real File System Id after bootstrapping):
"volumes": [
  {
    "name": "dotnet-dumps",
    "efsVolumeConfiguration": {
      "fileSystemId": "fs-xxxxxx",
      "rootDirectory": "/"
    }
  }
]"mountPoints": [
{
"containerPath": "/dumps",
"readOnly": false,
"sourceVolume": "dotnet-dumps"
}
]
Configure AWS DataSync to Transfer EFS files to S3
DataSync is a standard AWS service for transferring data between various storage types. In our case, it will assist us in moving .NET dumps from EFS to S3.
To reach our goal, we have to:
- Create an S3 bucket to store our .NET dumps. Further in this article, I’ll use the S3 bucket name
kvendingoldo-dotnet-demo-crash- Use this official doc to create a bucket.
- Create DataSync.
- Use this official doc to create DataSync.
- Some service parameters I'll be using:
- Source: EFS
- Destination: S3 bucket (e.g.,
s3://kvendingoldo-dotnet-demo-crash/) - Include path filters like
/dumps/* - Schedule sync every minute
Create Slack Alerts Based on AWS Lambda
As was earlier said, alerts about new .NET dumps are extremely helpful for the development team.
From the architectural viewpoint, alerts can be built in a different way:
- A simple lambda function that sends messages to Slack via API and is triggered by S3 events.
- Messages are published to an SNS topic using configured S3 event notifications, which then trigger a Lambda function to send the events to Slack.
Since we don't expect a high load, the first option is better for us. In case you want to implement the second option, use these two links:
Tip:
We use Python to send messages to Slack. In this article, we’ll send only a link to the S3 file, but in some cases, it’s required to send the entire file. Slack API has changed some time ago, and file sending can be a little bit complicated. If you want to know more, please see the “Uploading files to Slack with Python” article.
Ok, let’s build the alerting step by step:
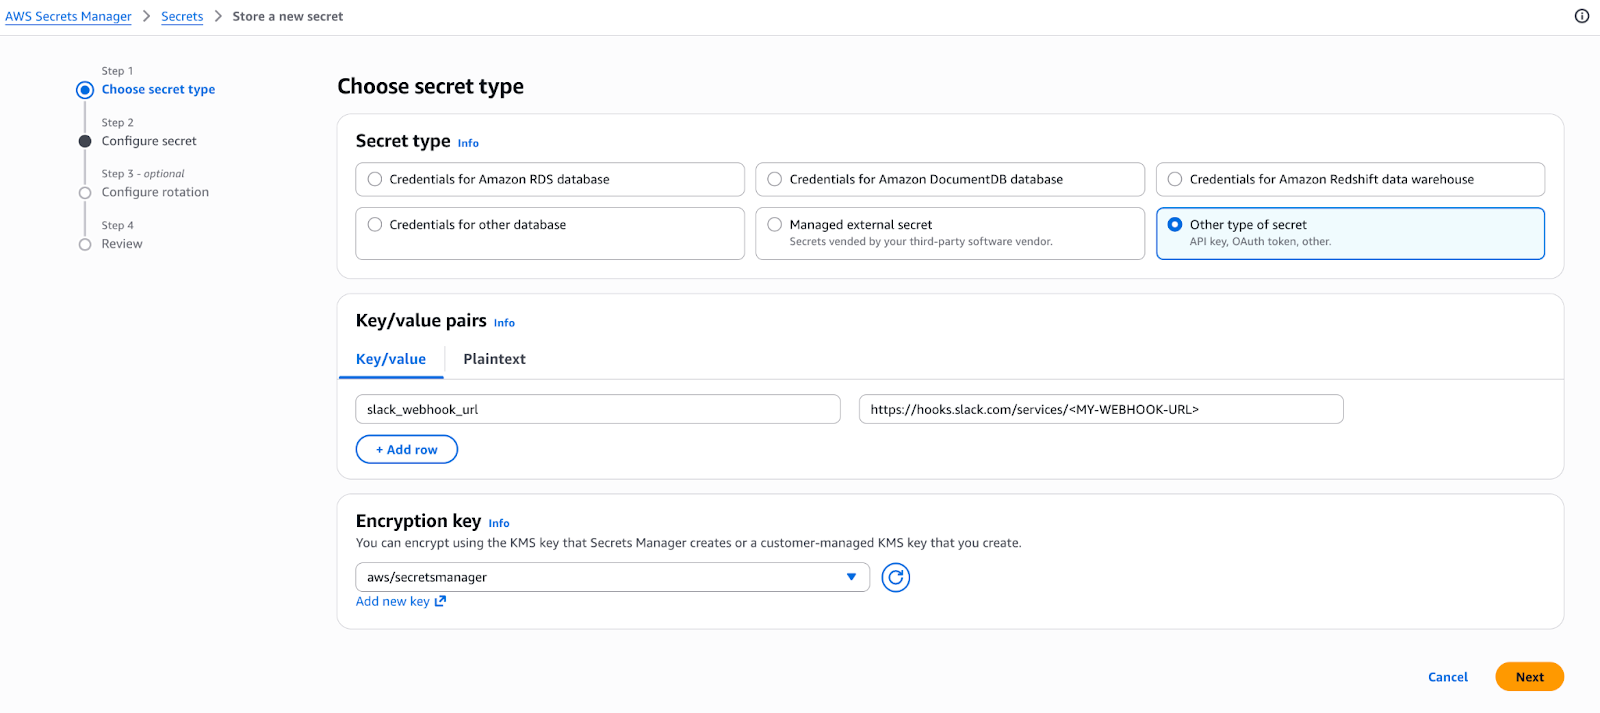
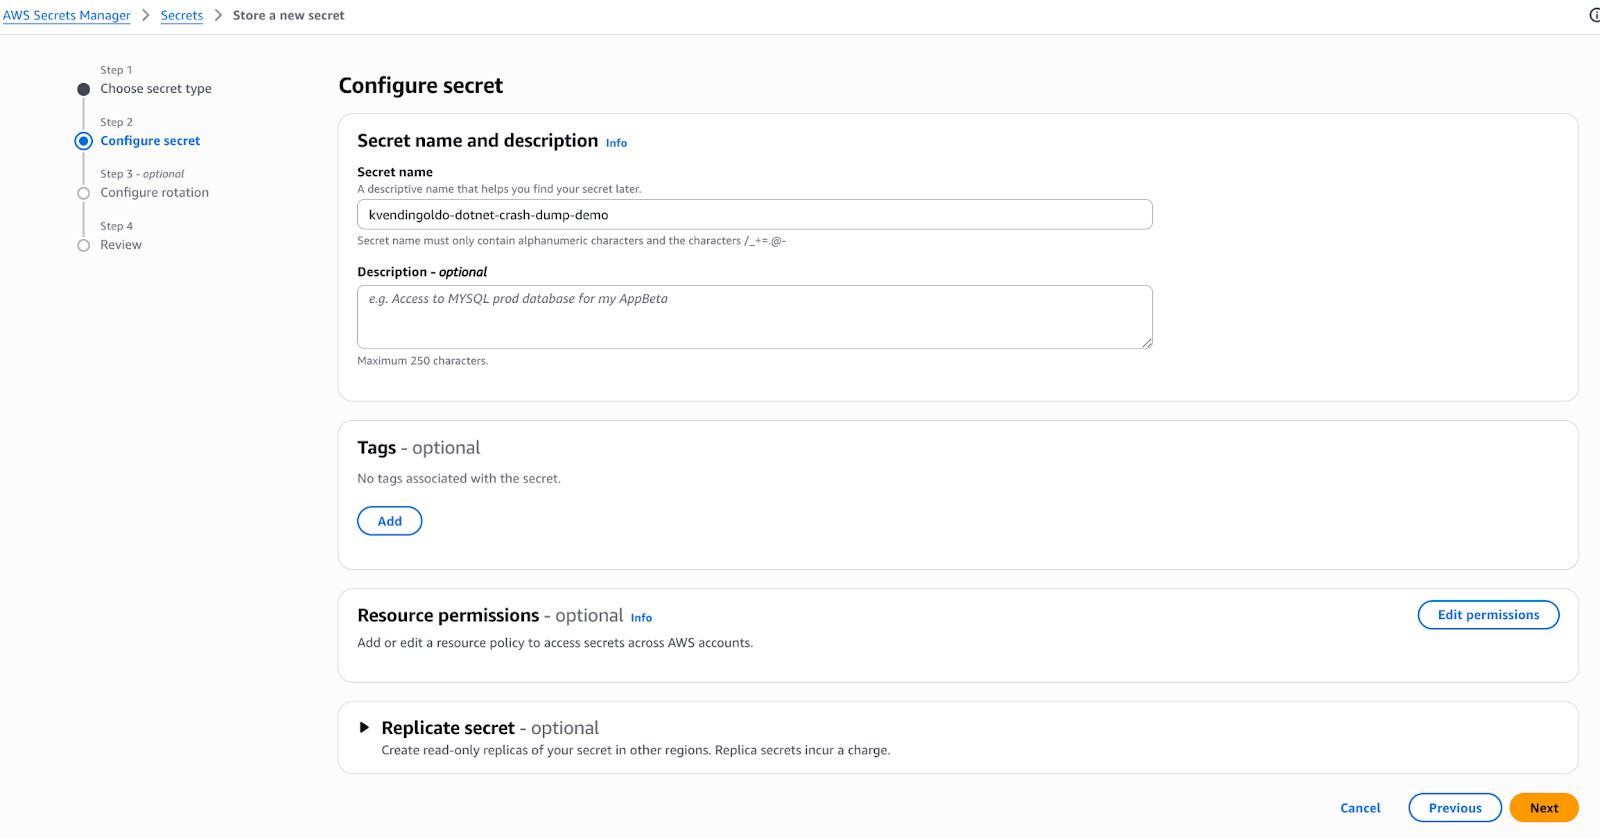
1. Create Slack Secret
Create an AWS Secret Manager secret kvendingoldo-dotnet-crash-dump-demo with one field: slack_webhook_url. This key should contain a link to your Slack webhook (To learn more about Slack webhooks, check the official guide).
2. Configure AWS Lambda
We won't go into depth about the creation of AWS Lambda, but we will highlight some key points. To get more fundamental information about AWS Lambda setup, see the official guide.
2.1. Make sure that the Lambda IAM role has permission to read from S3:
{
"Effect": "Allow",
"Action": "s3:GetObject",
"Resource": "arn:aws:s3:::kvendingoldo-dotnet-demo-crash/*"
}
2.2: To get data from AWS Secret Manager, we have to specify an environment variable in the AWS Lambda configuration: SECRET_NAME=kvendingoldo-dotnet-demo-crash.
2.3: Upload Python code to Lambda.
import json
import urllib3
import os
import boto3
def get_secret(secret_name):
client = boto3.client("secretsmanager")
try:
response = client.get_secret_value(SecretId=secret_name)
if "SecretString" in response:
secret = response["SecretString"]
try:
return json.loads(secret)
except json.JSONDecodeError:
return secret
else:
return response["SecretBinary"]
except Exception as e:
print(f"Error retrieving secret: {e}")
return None
def lambda_handler(event, context):
print("Event received:", json.dumps(event))
secret_name = os.environ.get('SECRET_NAME', '')
if secret_name == "":
return {
'statusCode': 500,
'body': json.dumps("SECRET_NAME env variable is empty")
}
secret = get_secret(secret_name)
slack_webhook_url = secret["slack_webhook_url"]
for record in event['Records']:
bucket_name = record['s3']['bucket']['name']
file_name = record['s3']['object']['key']
region = record['awsRegion']
if ".aws" in file_name:
print(f"Skipping internal file: {file_name}")
continue
message = (
f":package: *New .NET dump is uploaded!*\n\n"
f":cloud: Bucket: `{bucket_name}`\n"
f":floppy_disk: File: `{file_name}`\n"
f":link: Link: https://{bucket_name}.s3.{region}.amazonaws.com/{file_name}"
)
http = urllib3.PoolManager()
slack_resp = http.request(
"POST",
slack_webhook_url,
body=json.dumps({
"text": message
}),
headers={
"Content-Type": "application/json"
}
)
if slack_resp.status != 200:
raise Exception(
f"Slack webhook request failed with status {slack_resp.status}: {slack_resp.data.decode('utf-8')}")
return {
"statusCode": 200,
"body": json.dumps("Message has been sent successfully!")
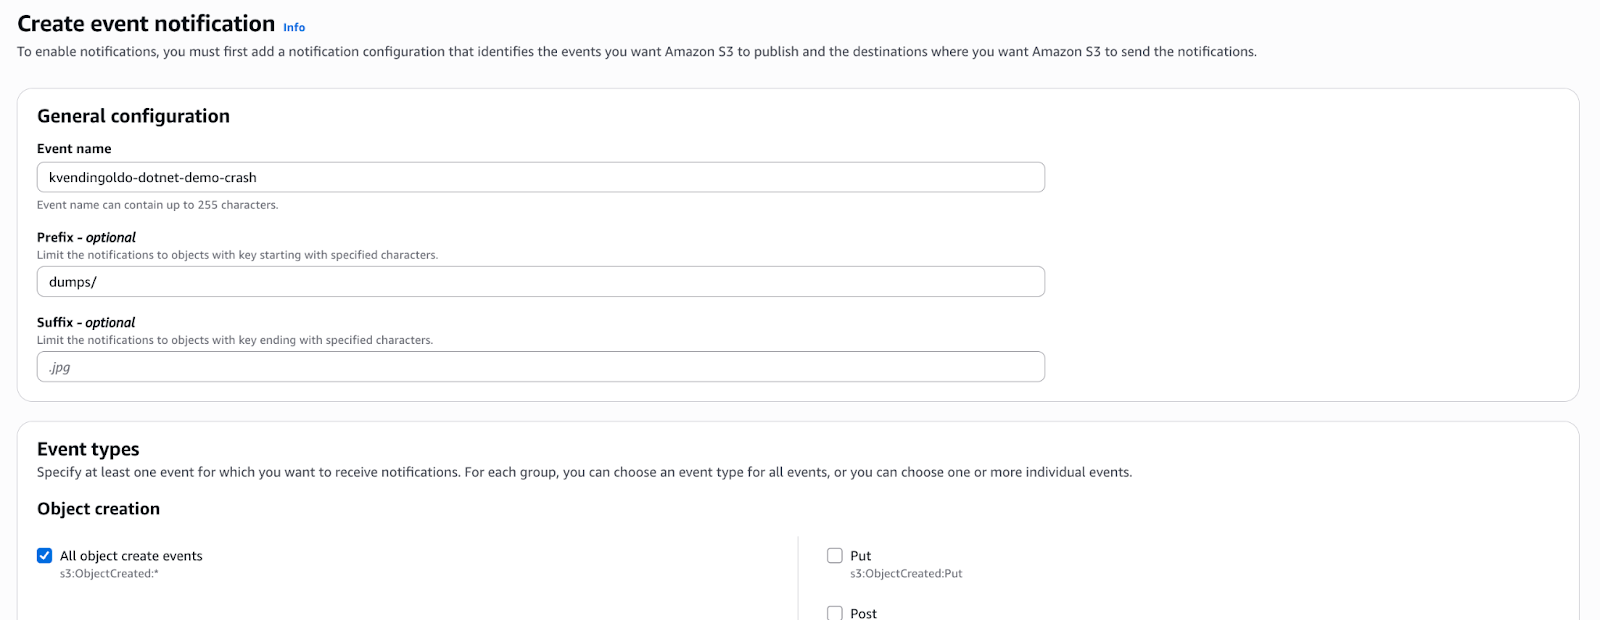
}2.4: Configure S3 Event Notifications for your S3 bucket. To do this, go to the bucket -> properties -> Event notifications and select "Create event notification." Configure the event using the following options:
- Event name:
kvendingoldo-dotnet-demo-crash - Prefix:
dumps/ - Event type:
s3:ObjectCreated:* - Target:
<Your Lambda function Name>
Configure EFS Storage Clean-Up
Perfect, the .NET dumps delivery chain is ready, but what about the old dump? EFS does not allow us to delete old files using lifecycle policies; we can only transfer them to Infrequent Access storage type which is not enough if we do not want to pay for unnecessary space.
To solve this issue, there are two options:
- Create an ECS sidecar container that will clean up old EFS files at the initialization phase
- Create a Lambda or ECS task that will mount EFS, and clean up old files by CRON.
Let’s check both of them.
Option 1: AWS Lambda
This is the best solution because it is unaffected by the lifecycle of ECS tasks and other factors. To implement this strategy, you need to create a Lambda function with a mounted EFS storage (learn more about mounting a filesystem to Lambda from the official doc) and the following Python code:
import os
import time
import json
def lambda_handler(event, context):
# Note: you can only mount the filesystem to the /mnt/ directory.
directory = '/mnt/dumps'
# File pattern to match
pattern = 'crash.dmp'
# Time in minutes (by default 1d)
minutes_old = 1440
# Convert minutes to seconds
age_seconds = minutes_old * 60
# Current time
now = time.time()
for root, dirs, files in os.walk(directory):
for file in files:
if pattern in file:
file_path = os.path.join(root, file)
file_mtime = os.path.getmtime(file_path)
if now - file_mtime > age_seconds:
print(f"Found a file that older than {minutes_old} minutes: {file_path}")
try:
os.remove(file_path)
except Exception as e:
print(f"Failed to delete {file_path}: {e}")
return {
"statusCode": 200,
"body": json.dumps("EFS clean-up completed successfully!")
}As you can see, this is a simple code that deletes files from mounted storage that are older than one day.
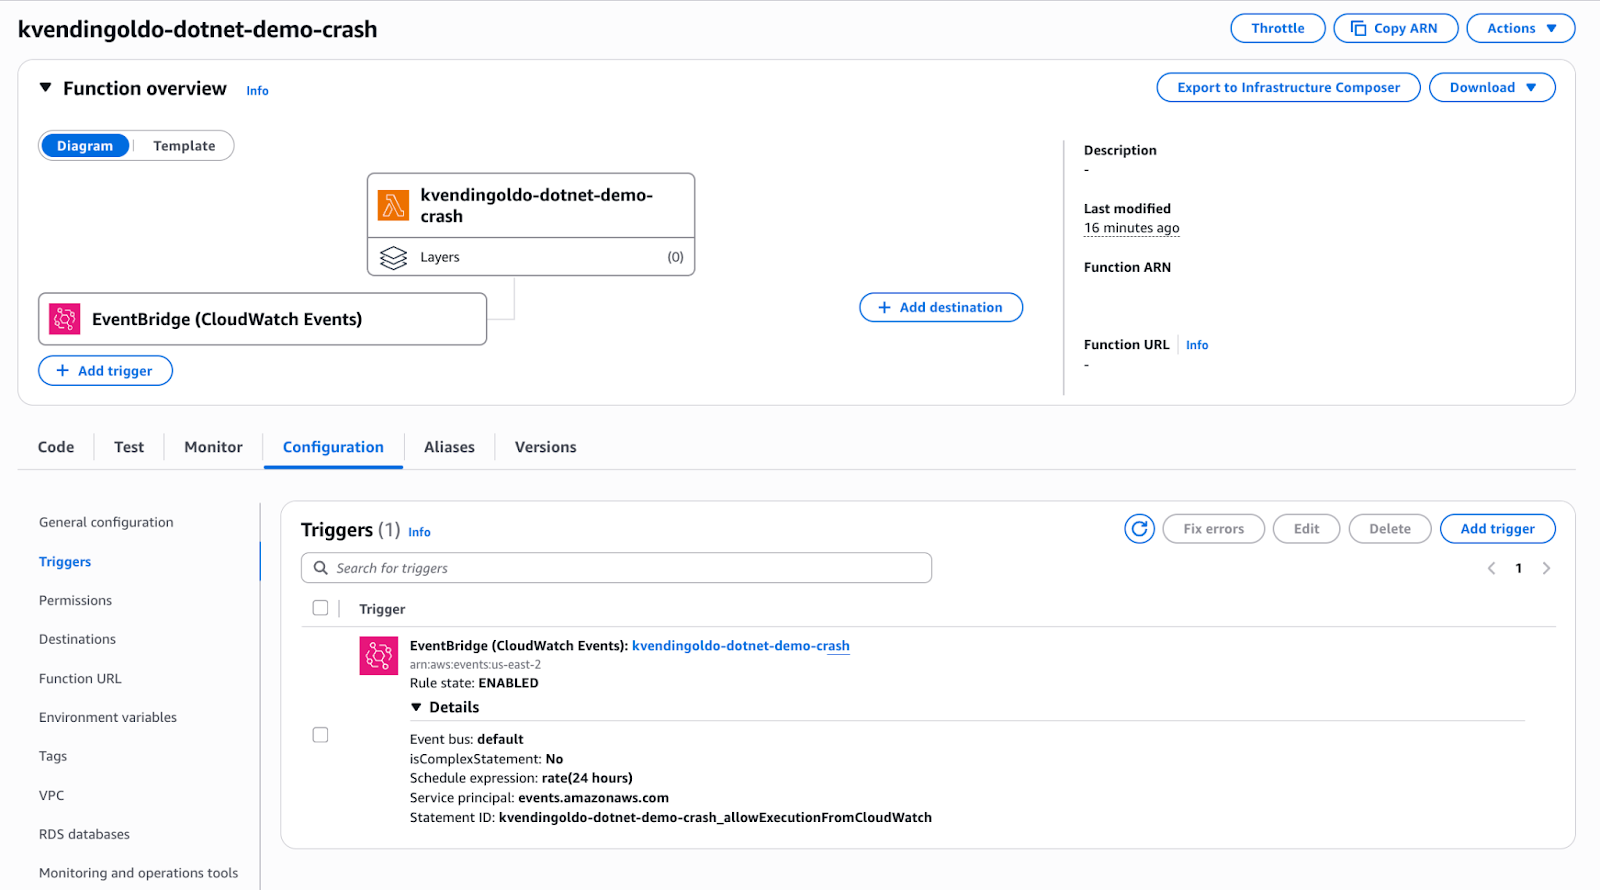
When your Lambda is ready, we also need to configure the CRON trigger to run the function periodically. It can be created using a CloudWatch event rule.
That’s it, after all of these steps, your EFS storage will be cleaned up automatically by your CRON schedule.
Option 2: ECS sidecar container.
To implement this option, we have to add a new container to our task definition:
{
"essential": false,
"name": "janitor",
"image": "public.ecr.aws/amazonlinux/amazonlinux:2",
"command": [
"bash",
"-lc",
"find /dumps -name '*crash.dmp*' -type f -mmin +10080 -print -delete"
],
"mountPoints": [
  {
    "containerPath": "/dumps",
    "readOnly": false,
    "sourceVolume": "dotnet-dumps"
  }
],
"linuxParameters": {
"initProcessEnabled": true
}
}
The logic behind this task:
- Initialize a new ECS task with two containers: app and janitor.
- Clean up outdated EFS files in the janitor container and exit. Regardless, the task will not be interrupted or stopped due to the ECS option
"essential": false.
As you can see, this technique is quite straightforward and relies on find command, which you can customize. In the example, it deletes files that are older than 10080 minutes (7 days). Of course, this strategy is less desirable than the first when dealing with long-lived ECS tasks, but it may be more convenient for short-lived ECS tasks or prototyping.
Testing Time
In this section, we won't do a deep dive into the.NET application build. For testing purposes, you can modify the sample ASP.NET app that we used in the beginning.
The simplest way to cause a crash of .NET is Environment.FailFast(). This method is commonly used to simulate hard crashes.
Let’s simulate the crash:
- Add
Environment.FailFast("kvendingoldo-dotnet-demo-crash .NET example crash");line todotnet-docker/samples/aspnetapp/aspnetapp/Program.csfile. - Build a new docker image, and re-create the ECS task.
- ECS Task will terminate, but first generate a.NET crash dump, which will be available on S3 in a few seconds.
- At the final phase, you'll receive a message on your Slack like this:
Plain Text
* New .NET dump is uploaded!

* Bucket: kvendingoldo-dotnet-demo-crash

* File: 1739104252-kvendingoldo-dotnet-demo-crash.dmp

* Link: https://kvendingoldo-dotnet-demo-crash.s3.us-east-2.amazonaws.com/1739104252-kvendingoldo-dotnet-demo-crash.dmp
Possible Improvements
Before wrapping up the article, I'd like to provide some comments on potential changes:
- It will be a good idea to generate pre-signed URLs for S3 objects.
- Set lifecycle policies for the S3 bucket to delete old dumps automatically from the bucket.
- Use SNS to send notifications about new S3 objects to multiple destinations.
Conclusion
In production environments, quick visibility into faults is critical. Automating dump delivery reduces MTTR (mean time to resolution) and improves incident response. As you can see, implementing this procedure is not as difficult as you might expect. Yes, we used many AWS services to accomplish these tasks, but when we look deeper, they are all important.
I hope this article helped you build a personal dump delivery chain and made your development team happier. Feel free to modify the proposed approach, and please contact me anytime if you have any questions.
Happy coding!
Published at DZone with permission of Alexander Sharov. See the original article here.
Opinions expressed by DZone contributors are their own.
Comments