A Guide to Microservices Deployment: Elastic Beanstalk vs Manual Setup
Learn how to deploy microservices with Elastic Beanstalk or EC2. Explore the pros, cons, and steps for both approaches to simplify or customize your setup.
Join the DZone community and get the full member experience.
Join For FreeThere are many ways to deploy your microservices, each offering different levels of control, simplicity, and scalability. One approach is using Elastic Beanstalk, a fully managed service that simplifies deployment, scaling, and management. Another option is to deploy manually, giving you full control over the infrastructure but requiring more setup and maintenance.
In this article, we will discuss both approaches, exploring their pros and cons to help you decide which is the best fit for your application.
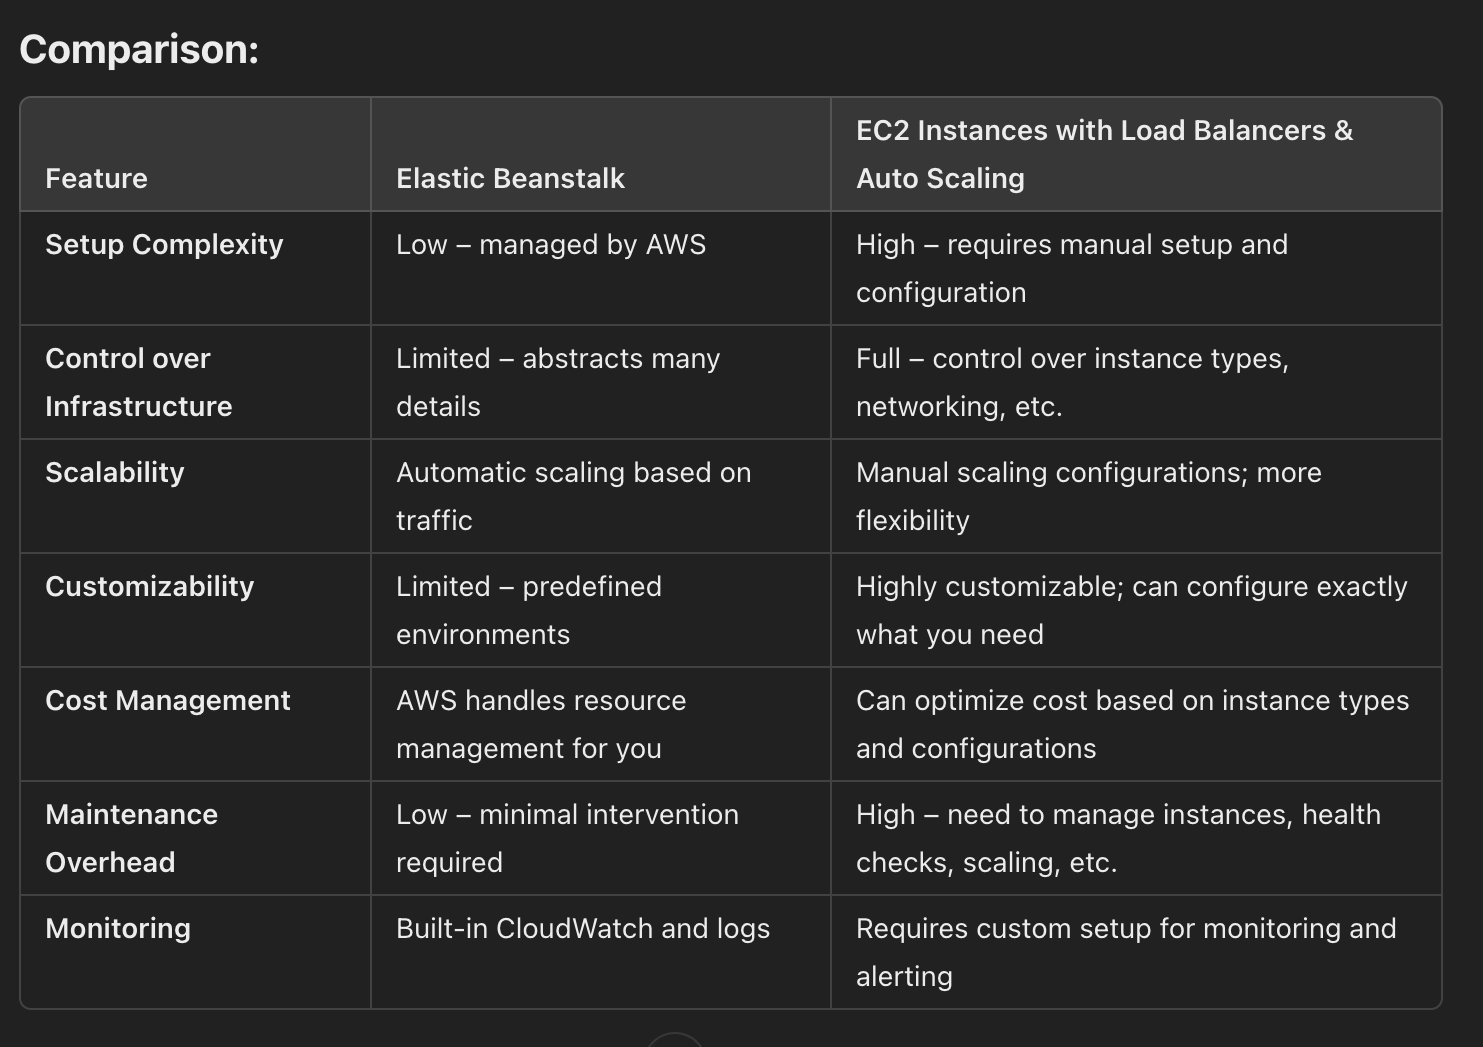
Elastic Beanstalk Deployment
Elastic Beanstalk is a Platform-as-a-Service (PaaS) offering from AWS that abstracts much of the infrastructure management. It handles the deployment, scaling, monitoring, and management of applications automatically.
Pros
- Simplified management: Elastic Beanstalk automatically handles the provisioning of resources (EC2, RDS, load balancing, etc.) for you. This can greatly reduce operational overhead.
- Automatic scaling: It automatically scales your application based on traffic, making it easier to handle varying workloads.
- Integrated monitoring and logging: Built-in support for Amazon CloudWatch and Elastic Load Balancing, so you can track application health and performance with minimal configuration.
- Quick deployment: With Docker support, you can quickly deploy Dockerized applications without worrying much about the underlying infrastructure.
- Environment management: Beanstalk makes it easy to manage different environments (e.g., dev, staging, production) with minimal setup.
Cons
- Less flexibility: Elastic Beanstalk abstracts away much of the control you have over the underlying infrastructure. If you need very specific configurations, you might find it limiting.
- Resource constraints: While scaling is automatic, the underlying EC2 instances may not always be the optimal configuration for your specific application needs (e.g., specific instance types).
- Learning curve: While it's easier than setting up everything manually, there may still be a learning curve if you're not familiar with AWS services.
Manual Deployment Using EC2 Instances With Load Balancers and Auto-Scaling Groups
This approach involves manually provisioning EC2 instances, setting up load balancers (ELB or ALB), and configuring auto-scaling groups to manage the scaling and availability of your application.
Pros
- Full control: You have complete control over the infrastructure, including instance types, networking, and load-balancing settings.
- Customization: You can configure the system exactly as you need, ensuring that your application’s requirements are met precisely.
- Optimized for specific needs: If you have specific performance or security needs, you can fine-tune the EC2 instances, networking configurations, and auto-scaling rules.
- Flexibility: You can use any tool or framework you want, not restricted by the Elastic Beanstalk environment.
- Cost control: You can optimize EC2 instances and load balancing costs based on your specific needs and usage patterns.
Cons
- Complex setup: Setting up EC2 instances, configuring load balancers, and creating auto-scaling groups require more manual effort and attention to detail. You have to handle scaling, failover, and health checks yourself.
- More maintenance: You’ll need to manage patching, monitoring, and health-checking of EC2 instances. Beanstalk does most of this for you.
- Scaling management: While auto-scaling is possible, configuring and fine-tuning it can be complex, especially when you need to adjust scaling policies for different traffic patterns.
Elastic Beanstalk Deployment Steps
Set Up and Configure Elastic Beanstalk Environment
Elastic Beanstalk automatically handles much of the infrastructure, including scaling and load balancing. Here's how you can deploy your Dockerized application to Elastic Beanstalk:
Step 1: Install AWS CLI
Install the AWS CLI and configure it with your AWS credentials.
aws cli
aws configure
Step 2: Create a Dockerfile for Your Application
Create dockerfiles for both the back-end (Spring Boot Maven) and front-end (React) apps.
Example Dockerfile for Spring Boot:
FROM openjdk:11-jre-slim
COPY target/my-spring-app.jar /app/my-spring-app.jar
ENTRYPOINT ["java", "-jar", "/app/my-spring-app.jar"]
Example Dockerfile for React:
FROM node:16-alpine
WORKDIR /app
COPY package.json /app/package.json
RUN npm install
COPY . /app
RUN npm run build
CMD ["npm", "start"]
Step 3: Initialize Elastic Beanstalk Environment
In your application’s directory, use Elastic Beanstalk CLI (eb) to initialize the environment:
eb cli
eb init -p docker my-app
This will configure your application with Elastic Beanstalk and link it to your AWS account.
Step 4: Create and Configure Elastic Beanstalk Environment
Create a new environment (e.g., web environment):
eb cli
eb create my-app-env
Elastic Beanstalk will automatically create necessary resources like EC2 instances, a load balancer, and auto-scaling.
Step 5: Deploy Your Dockerized Application
Deploy the application:
eb cli
eb deploy
This command will upload your Docker images to Elastic Beanstalk and deploy them.
Step 6: URL Exposure
Once the environment is deployed, Elastic Beanstalk provides a public URL (e.g., my-app-env.us-east-1.elasticbeanstalk.com).
Elastic Beanstalk URL
You can access your application by this URL and Elastic Beanstalk will manage the routing and scaling automatically.
Step 7: Set Instance Configuration
Configure settings like instance type, scaling, and health checks:
- In the AWS Console, go to Elastic Beanstalk > Environment > Configuration.
- Set the min and max instance counts based on your application’s load.
- Select instance types (e.g.,
t2.micro,t2.small). - Define the URL path for health checks (e.g.,
/healthfor Spring Boot).
EC2 Instances With Load Balancer and Auto Scaling Groups
Step 1: Launch EC2 Instances
Launch EC2 Instances
- Go to the EC2 Dashboard in AWS.
- Select Launch Instance and choose an AMI (e.g., Amazon Linux 2 or Ubuntu).
- Configure the instance details and create a Security Group to allow:
- SSH (port 22 for access).
- HTTP (port 80 for web traffic).
- HTTPS (port 443 for encrypted traffic).
Install Docker on EC2:
bash
sudo yum update -y
sudo amazon-linux-extras install docker
sudo service docker start
sudo usermod -a -G docker ec2-user
Step 2: Create Load Balancer and Target Groups
Create Target Groups
- Go to EC2 > Target Groups and click Create Target Group.
- Choose Instance as the target type and set the protocol as HTTP (port 80) for the target group.
- Set a health check path (e.g.,
/health) for the application to determine its health. - Register your EC2 instances with the target group.
Create Load Balancer (ALB)
- Go to EC2 > Load Balancers and click Create Load Balancer.
- Select Application Load Balancer (ALB) for handling HTTP/HTTPS traffic.
- Set up the listeners for HTTP (port 80) and HTTPS (port 443). For HTTPS, you’ll need to use an SSL certificate (configured later using Route 53 and AWS Certificate Manager).
- Select the appropriate security group to allow inbound traffic on ports 80 and 443.
- Attach your target group to the load balancer.
Step 3: Set Up Auto Scaling Group
- Go to EC2 > Auto Scaling Groups > Create Auto Scaling Group.
- Choose the EC2 instances that you want to scale and link them to the load balancer’s target group.
- Set minimum and maximum instances for scaling, and configure scaling policies to handle traffic spikes.
Step 4: Security Groups Configuration
Security Group for EC2 Instances
- Open SSH (port 22) for administrative access.
- Open HTTP (port 80) for public web access.
- Open HTTPS (port 443) for secure traffic if you're using SSL.
Security Group for Load Balancer
- Allow HTTP (port 80) and HTTPS (port 443) inbound.
- Allow outbound connections to your EC2 instances.
Step 5: Open Port 80 on EC2 Instances
By default, you open port 80 for HTTP traffic via the Security Group settings in AWS.
In the Security Group configuration, add an Inbound rule:
- Type: HTTP
- Port Range: 80
- Source: 0.0.0.0/0 (to allow all traffic) or specific IPs.
Step 6: Forward HTTPS Traffic (Port 443)
Using Route 53 and SSL
- Go to AWS Certificate Manager (ACM) and request an SSL certificate for your domain.
- Once the certificate is issued, go to EC2 > Load Balancers and attach the SSL certificate to the listener for port 443.
- In Route 53, create a Record Set for your domain pointing to the ALB.
Route 53 Setup
- Create an A record that points to your Load Balancer’s DNS name.
- Set the routing policy (e.g., Simple Routing).
- Ensure your domain is correctly mapped to the ALB.
ALB Listener Setup for SSL
- Add a listener for HTTPS on port 443.
- Use the SSL certificate from ACM and configure the load balancer to terminate SSL connections (i.e., decrypt HTTPS traffic at the ALB and forward HTTP traffic to EC2).
Step 7: Deploy Docker Containers to EC2 Instances
1. SSH into your EC2 instances and pull the Docker images from Amazon ECR (Elastic Container Registry).
bash
docker pull <aws_account_id>.dkr.ecr.<region>.amazonaws.com/my-spring-app:latest
docker pull <aws_account_id>.dkr.ecr.<region>.amazonaws.com/my-react-app:latest
2. Run the containers on the EC2 instances:
bash
docker run -d -p 8080:8080 my-spring-app
docker run -d -p 80:80 my-react-app
Step 8: Monitoring and Scaling
Monitor your application via CloudWatch metrics (e.g., CPU usage, memory usage) and adjust scaling policies for your Auto Scaling Group to ensure the application scales automatically based on load.
Summary
Elastic Beanstalk handles the creation of load balancers, target groups, security groups, IAM roles, and auto-scaling for your application automatically. It abstracts away much of the complexity involved in infrastructure management, making it easier to deploy applications without worrying about underlying services. However, you still have the option to customize these configurations through the AWS Management Console, CLI, or configuration files if you need more control over the infrastructure.
Opinions expressed by DZone contributors are their own.
Comments