Build Your First pip Package
If you're working in Python, you'll need to understand pip. In this post, we go through how to create and publish a pip package. Pip pip hooray!
Join the DZone community and get the full member experience.
Join For FreeIn this tutorial, we will learn how we can create a Python/pip package. If your requirements match any of these, this tutorial is for you.
- You want to make your script platform independent.
- You don't want to copy your executable script in every system you need.
- You want to make your Python scripts publicly available to everyone and want to help the community.
We are using pip to achieve the same. We will be able to install python script (bundled into pip package) easily on any system after following this tutorial. Code of this tutorial is available on GitHub here and pip package here.
Note: Verified with Python 2 and Python 3 on *nix and windows.
1. Register Yourself
The Python community maintains a repository similar to npm for open source packages. If you want to make your package publicly accessible you can upload it on PyPi. So, first of all, register yourself on PyPi: https://pypi.org/account/register/.
I am assuming you have a GitHub account where you will upload your package code. If you want to keep your package private you can skip this step. We will use README.md directly from your GitHub project for this tutorial and it will be used as documentation of your package.
2. Checking the Required Tools
Make sure you have Python and pip installed on your system. To check the installations:
python -V  # for python version (2/3)
python -m pip --version
The above commands should give you proper version outputs. If not, install Python and pip on your system.
Install the required packages:
- Setuptools: Setuptools is a package development process library designed for creating and distributing Python packages.
- Wheel: The Wheel package provides a
bdist_wheelcommand forsetuptools. It creates .whl file which is directly installable through thepip installcommand. We'll then upload the same file to pypi.org. - Twine: The Twine package provides a secure, authenticated, and verified connection between your system and PyPi over HTTPS.
- Tqdm: This is a smart progress meter used internally by Twine.
sudo python -m pip install --upgrade pip setuptools wheel
sudo python -m pip install tqdm
sudo python -m pip install --user --upgrade twine
3. Setup Your Project
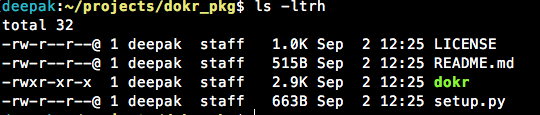
- Create a package say,
dokr_pkg.![Image title]()
- Create your executable file inside the package, say,
dokr. Create a script and without extensions (dokr).
#!/usr/bin/env python

echo "hey there, this is my first pip package"- Make your script executable.
chmod +x dokr
- Create a setup file setup.py in your package. This file will contain all your package metadata information.
import setuptools

with open("README.md", "r") as fh:
    long_description = fh.read()


setuptools.setup(
     name='dokr',
     version='0.1',
     scripts=['dokr'] ,
     author="Deepak Kumar",
     author_email="[email protected]",
     description="A Docker and AWS utility package",
     long_description=long_description,
   long_description_content_type="text/markdown",
     url="https://github.com/javatechy/dokr",
     packages=setuptools.find_packages(),
     classifiers=[
         "Programming Language :: Python :: 3",
         "License :: OSI Approved :: MIT License",
         "Operating System :: OS Independent",
     ],
 )
The following is metadata information:
Meta-Data |
Description |
name |
Name of your package. |
version |
Current version of your pip package. |
scripts |
List of executable files. It's recommended to keep them the same as your pip package name. Here we are using |
author and author_email |
Name and Email Id of the author. |
description |
A short description of the package. |
long_description |
A description of the package. |
long_description_content_type |
A longer description. Here it is markdown. We are picking README.md for the long description. |
packages |
Use for other package dependencies. |
classifiers |
Contains all the classifiers of your project. |
- Add a LICENSE to your project by creating a file called LICENSE. A sample license is available here.
4. Compiling Your Package
Go into your package folder and execute this command: python setup.py bdist_wheel. This will create a structure like this:

- build: build package information.
- dist: Contains your .whl file. A WHL file is a package saved in the Wheel format, which is the standard built-package format used for Python distributions. You can directly install a .whl file using
pip install some_package.whlon your system - project.egg.info: An egg package contains compiled bytecode, package information, dependency links, and captures the info used by the setup.py test command when running tests.
5. Install on Your Local Machine
If you want to test your application on your local machine, you can install the .whl file using pip:
python -m pip install dist/dokr-0.1-py3-none-any.whl6. Upload on pip
- Create pypirc: The Pypirc file stores the PyPi repository information. Create a file in the home directory
- for Windows :
C:\Users\UserName\.pypirc - for *nix :
~/.pypirc
- for Windows :
- And add the following content to it. Replace
javatechywith your username.
[distutils]
index-servers=pypi
[pypi]
repository = https://upload.pypi.org/legacy/
username =javatechy
3. To upload your dist/*.whl file on PyPi, use Twine:
python -m twine upload dist/*This command will upload your package on PyPi. This tutorial package is available here.
7. Conclusion
We learned how to install and to create a pip package and make it available to everyone. This package can be easily installed on any machine that has pip by using the following commands:
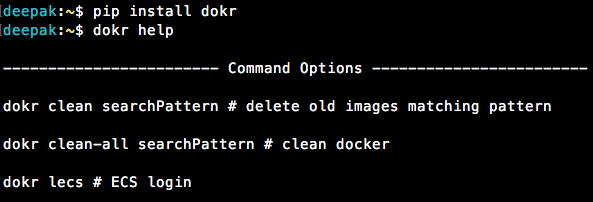
The source code can be found on GitHub and the pip package is on PyPi.
Opinions expressed by DZone contributors are their own.
Comments