Flask 101: Adding, Editing, and Displaying Data
Last time we learned how to add a search form to our music database application. Of course, we still haven't added any data to our database, so the search fo...
Join the DZone community and get the full member experience.
Join For Freelast time , we learned how to add a search form to our music database application. of course, we still haven't added any data to our database, so the search form doesn't actually do much of anything except tell us that it didn't find anything. in this tutorial, we will learn how to actually add data, display search results, and edit entries in the database.
let's get started!
adding data to the database
let's start by coding up our new album form. open up the
forms.py
file we created in the last tutorial and add the following class:
class albumform(form):
    media_types = [('digital', 'digital'),
                   ('cd', 'cd'),
                   ('cassette tape', 'cassette tape')
                   ]
    artist = stringfield('artist')
    title = stringfield('title')
    release_date = stringfield('release date')
    publisher = stringfield('publisher')
    media_type = selectfield('media', choices=media_types)
this defines all the fields we need to create a new
album
. now we need to open
main.py
and add a function to handle what happens when we want to create the new album.
# main.py

from app import app
from db_setup import init_db, db_session
from forms import musicsearchform, albumform
from flask import flash, render_template, request, redirect
from models import album

init_db()


@app.route('/', methods=['get', 'post'])
def index():
    search = musicsearchform(request.form)
    if request.method == 'post':
        return search_results(search)

    return render_template('index.html', form=search)


@app.route('/results')
def search_results(search):
    results = []
    search_string = search.data['search']

    if search.data['search'] == '':
        qry = db_session.query(album)
        results = qry.all()

    if not results:
        flash('no results found!')
        return redirect('/')
    else:
        # display results
        return render_template('results.html', table=table)


@app.route('/new_album', methods=['get', 'post'])
def new_album():
    """
    add a new album
    """
    form = albumform(request.form)
    return render_template('new_album.html', form=form)


if __name__ == '__main__':
    app.run()
here we add an import to import our new form at the top and then we create a new function called
new_album()
. then we create an instance of our new form and pass it to our
render_template()
function which will render a file called
new_album.html
. of course, this html file doesn't exist yet, so that will be the next thing we need to create. when you save this new html file, make sure you save it to the
templates
folder inside of your
musicdb
folder.
once you have
new_album.html
created, add the following html to it:
<doctype html>
<title>new album - flask music database</title>
<h2>new album</h2>

{% from "_formhelpers.html" import render_field %}
<form method=post>
    <dl>
        {{ render_field(form.artist) }}
        {{ render_field(form.title) }}
        {{ render_field(form.release_date) }}
        {{ render_field(form.publisher) }}
        {{ render_field(form.media_type) }}
    </dl>
    <p><input type=submit value=submit>
</form>
this code will render each field in the form and it also creates a
submit
button so we can save our changes. the last thing we need to do is update our
index.html
code so that it has a link that will load our new album page. basically, all we need to do is add the following:
<a href="{{ url_for('.new_album') }}"> new album </a>so the full change looks like this:
<doctype html>
<head>
    <title>flask music database</title>
</head>

<h2>flask music database</h2>

<p><p>
<a href="{{ url_for('.new_album') }}"> new album </a>

{% with messages = get_flashed_messages() %}
  {% if messages %}
    <ul class=flashes>
    {% for message in messages %}
      <li>{{ message }}</li>
    {% endfor %}
    </ul>
  {% endif %}
{% endwith %}

{% from "_formhelpers.html" import render_field %}
<form method=post>
  <dl>
    {{ render_field(form.select) }}
    <p>
    {{ render_field(form.search) }}
  </dl>
  <p><input type=submit value=search>
</form>
now if you load the main page of your web application, it should look like this:

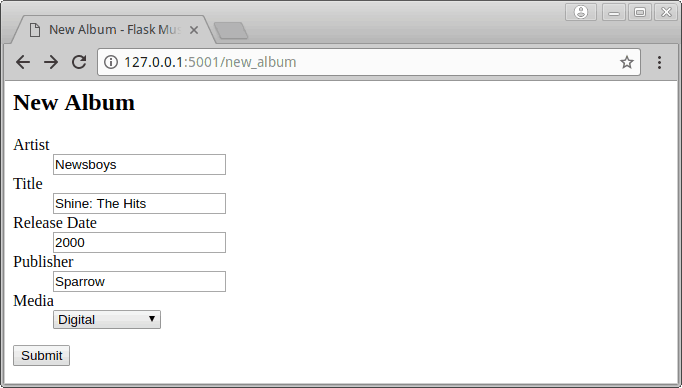
if you click on the new album link, then you should see something like this in your browser:

now we have an ugly but functional new album form, but we didn't actually make the submit button work. that is our next chore.
saving data
we need our new album form to save the data when the submit button is pushed. what happens when you press the
submit
button, though? if you go back to the
new_album.html
file, you will note that we set the
form method
to
post
. so we need to update the code in
main.py
so it does something on
post
.
to do the save, we need to update the
new_album()
function in
main.py
so it ends up like this:
@app.route('/new_album', methods=['get', 'post'])
def new_album():
    """
    add a new album
    """
    form = albumform(request.form)

    if request.method == 'post' and form.validate():
        # save the album
        album = album()
        save_changes(album, form, new=true)
        flash('album created successfully!')
        return redirect('/')

    return render_template('new_album.html', form=form)
now when we post, we create an album instance and pass it to a
save_changes()
function along with the form object. we also pass along a flag that indicates if the item is new or not. we will go over why i added that last one later on in the article. for now though, we need to create the
save_changes()
function. save the following code in the
main.py
script.
def save_changes(album, form, new=false):
    """
    save the changes to the database
    """
    # get data from form and assign it to the correct attributes
    # of the sqlalchemy table object
    artist = artist()
    artist.name = form.artist.data

    album.artist = artist
    album.title = form.title.data
    album.release_date = form.release_date.data
    album.publisher = form.publisher.data
    album.media_type = form.media_type.data

    if new:
        # add the new album to the database
        db_session.add(album)

    # commit the data to the database
    db_session.commit()
here, we extract the data from the form and assign it to the album object's attributes accordingly. you will also notice that we need to create an
artist
instance to actually add the artist to the album correctly. if you don't do this, you will get a sqlalchemy-related error. the new parameter is used here to add a new record to the database.
here is a session i did to test it out:
once the item saves, it should take you back to the homepage of the website. one thing to note is that i don't do any checking in the database to prevent the user from saving an entry multiple times. this is something you can add yourself if you feel like taking on the challenge. anyway, while i was testing this out, i submitted the same entry a few times, so when i do a search i should end up with multiple entries for the same item. if you try doing a search now, though, you will end up with an error because we haven't created the results page yet.
let's do that next!
displaying search results
i prefer having tabulated results, which requires using a table. rather than messing around with html table elements, you can download yet another flask extension called
flask table
. to install it, just use
pip
like this:
pip install flask_table
now that we have flask table installed, we need to create a table definition. let's create a file that we will call
tables.py
and save it in our
musicdb
folder. open that up in your editor and add the following code:
from flask_table import table, col

class results(table):
    id = col('id', show=false)
    artist = col('artist')
    title = col('title')
    release_date = col('release date')
    publisher = col('publisher')
    media_type = col('media')
when you define the table class, you will want to make the class attributes the same name as those in the object that will be passed to it. in this case, i used the attributes from the
album
class here. now, we just need to create a
results.html
file and save it to the
templates
folder. here is what should go in that file:
<doctype html>
<title>search results - flask music database</title>
{{ table }}
as you can see, all we needed to do was add a
title
element, which is actually optional, and add a table object in jinja. now when you run the search with an empty string, you should see something like this:

yes, it's pretty plain, but it works and you can now see everything in your database.
editing data in the database
the last item that we need to cover is how to edit the data in the database. one of the easiest ways to do this would be to search for an item and add a way for the user to edit the items that were found. open up the
tables.py
file and add on a
linkcol
:
from flask_table import table, col, linkcol

class results(table):
    id = col('id', show=false)
    artist = col('artist')
    title = col('title')
    release_date = col('release date')
    publisher = col('publisher')
    media_type = col('media')
    edit = linkcol('edit', 'edit', url_kwargs=dict(id='id'))
the
linkcol
takes the column name as a string along with what the endpoint should be. the endpoint is the function that will be called when the link is clicked. we also pass along the entry's id so we can look it up in the database (i.e. the
url_kwargs
argument). now, we need to update our
main.py
file with a function called
edit()
:
@app.route('/item/<int:id>', methods=['get', 'post'])
def edit(id):
qry = db_session.query(album).filter(
album.id==id)
album = qry.first()
if album:
form = albumform(formdata=request.form, obj=album)
if request.method == 'post' and form.validate():
# save edits
save_changes(album, form)
flash('album updated successfully!')
return redirect('/')
return render_template('edit_album.html', form=form)
else:
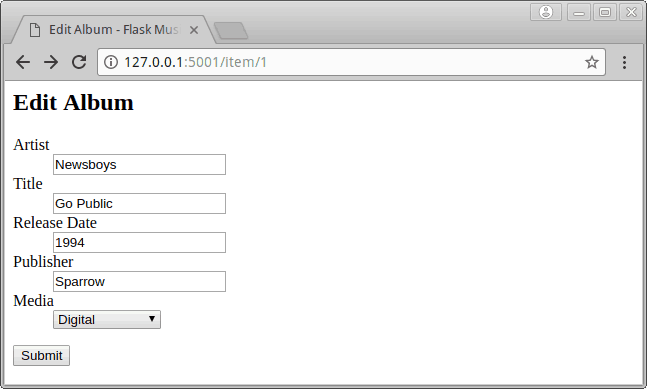
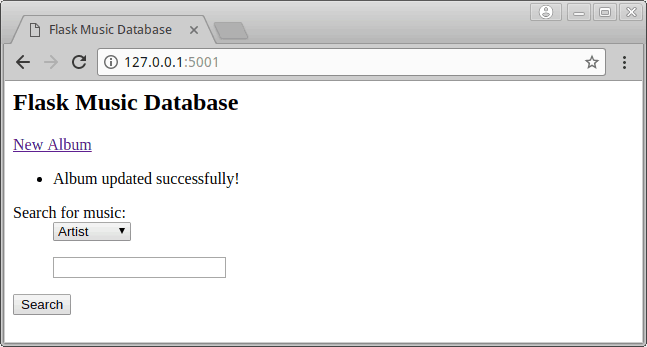
return 'error loading #{id}'.format(id=id)the first item to take note of here is that we have a custom route set up for the url that uses the id we pass to it to create a unique url. next, we do a database search for the id in question. if we find the id, then we can create our form using the same form we created earlier. however this time we pass it the album object so the form gets pre-filled with data so we have something to edit. if the user presses the submit button on this page, then it will save the entry to the database and flash a message to the user to that effect. if we pass in a bad id, then a message will be shown to the user.
now when we run the empty search from earlier you should see this:

let's click on the first row's edit link:
here, i edit most of the fields on the page. then i click submit and get this:
supposedly, the entry was updated with my changes. to verify, try running another empty search:
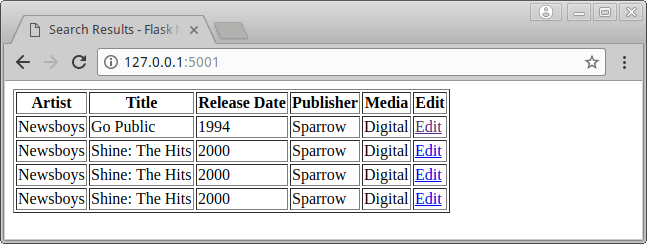
that looks right, so now we have the editing functionality complete!
wrapping up
at this point, you should be able to add entries to the database, display all the entries, and edit said entries. the main item missing is how to filter the search results so that it actually looks for the search term you want instead of always returning everything in the database. we should probably also add the ability to delete an item from the database. those are the topics we will look at in the next article. for now, have fun and happy coding!
download code
download a tarball of the code from this article .
Published at DZone with permission of Mike Driscoll. See the original article here.
Opinions expressed by DZone contributors are their own.
Comments