A Better Web3 Experience: Account Abstraction From Flow (Part 2)
Walletless dApps from Flow use account abstraction to improve the web3 user experience. In part two, we walk through how to build the front end for this dApp.
Join the DZone community and get the full member experience.
Join For FreeIn part one of this two-part series, we looked at how walletless dApps smooth the web3 user experience by abstracting away the complexities of blockchains and wallets. Thanks to account abstraction from Flow and the Flow Wallet API, we can easily build walletless dApps that enable users to sign up with credentials that they're accustomed to using (such as social logins or email accounts).
We began our walkthrough by building the backend of our walletless dApp. Here in part two, we'll wrap up our walkthrough by building the front end. Here we go!
Create a New Next.js Application
Let's use the Next.js framework, so we have the frontend and backend in one application.
On our local machine, we’ll use create-next-app to bootstrap our application. This will create a new folder for our Next.js application. Run the following command:
$ npx create-next-app flow_walletless_appSome options will appear; you can mark them as follows (or as to your preferences). Make sure to choose No for using Tailwind CSS and the App Router. This way, your folder structure and style references will match what we’ll demo in the rest of this tutorial.
✔ Would you like to use TypeScript with this project? ... Yes
✔ Would you like to use ESLint with this project? ... No
✔ Would you like to use Tailwind CSS with this project? ... No <-- IMPORTANT
✔ Would you like to use `src/` directory with this project? ... No
✔ Use App Router (recommended)? ... No <-- IMPORTANT
✔ Would you like to customize the default import alias? ... No
Navigate into the project with cd flow_walletless_app and start the development server with the following command:
$ npm run devThe application will run on port 3001 because the default port (3000) is occupied by our wallet API running through Docker.
Set Up Prisma for Backend User Management
We’ll use the Prisma library as an ORM to manage our database.
When a user logs in, we store their information in a database at a user entity. This contains the user's email, token, Flow address, and other information.
The first step is to install the Prisma dependencies in our Next.js project:
$ npm install prisma --save-devTo use Prisma, we need to initialize the Prisma Client. Run the following command:
$ npx prisma initThe above command will create two files:
prisma/schema.prisma: The main Prisma configuration file, which will host the database configuration..env: Will contain the database connection URL and other environment variables.
Configure the Database Used by Prisma
We will use SQLite as the database for our Next.js application. Open the schema.prisma file and change the data source db settings as follows:
datasource db {
  provider = "sqlite"
  url      = env("DATABASE_URL")
}
Then, in our .env file for the Next.js application, we’ll change the DATABASE_URL field. Because we’re using SQLite, we need to define the location (which is a file for SQLite) where the database will be stored in our application:
DATABASE_URL="file:./dev.db"Create a User Model
Models represent entities in our app. The model describes how the data should be stored in our database. Prisma takes care of creating tables and fields.
Let’s add the following User model in our schema.prisma file:
model User {
  id        Int      @id @default(autoincrement())
  email     String   @unique
  name      String?
  flowWalletJobId String?
  flowWalletAddress String?
  createdAt DateTime @default(now())
  updatedAt DateTime @updatedAt
}
With our model created, we need to synchronize with the database. For this, Prisma offers a command:
$ npx prisma db push

Environment variables loaded from .env
Prisma schema loaded from prisma/schema.prisma
Datasource "db": SQLite database "dev.db" at "file:./dev.db"

SQLite database dev.db created at file:./dev.db

-> Your database is now in sync with your Prisma schema. Done in 15ms
After successfully pushing our users table, we can use Prisma Studio to track our database data. Run the command:
$ npx prisma studioSet up the Prisma Client
That's it! Our entity and database configuration are complete. Now let's go to the client side. We need to install the Prisma client dependencies in our Next.js app. To do this, run the following command:
$ npm install @prisma/clientGenerate the client from the Prisma schema file:
$ npx prisma generateCreate a folder named lib in the root folder of your project. Within that folder, create a file entitled prisma.ts. This file will host the client connection. Paste the following code into that file:
// lib/prisma.ts

import { PrismaClient } from '@prisma/client';

let prisma: PrismaClient;

if (process.env.NODE_ENV === "production") {
  prisma = new PrismaClient();
} else {
  let globalWithPrisma = global as typeof globalThis & {
    prisma: PrismaClient;
  };
  if (!globalWithPrisma.prisma) {
    globalWithPrisma.prisma = new PrismaClient();
  }
  prisma = globalWithPrisma.prisma;
}

export default prisma;
Build the Next.js Application Frontend Functionality
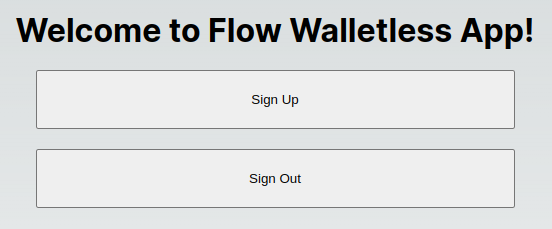
Now that we have our connection to the client, we can move on to the visual part of our app! Inside the pages/index.tsx file, delete all lines of code, and paste in the following:
# pages/index.tsx

import styles from "@/styles/Home.module.css";
import { Inter } from "next/font/google";
import Head from "next/head";

const inter = Inter({ subsets: ["latin"] });

export default function Home() {
  return (
    <>
      <Head>
        <title>Create Next App</title>
        <meta name="description" content="Generated by create next app" />
        <meta name="viewport" content="width=device-width, initial-scale=1" />
        <link rel="icon" href="/favicon.ico" />
      </Head>
      <main className={styles.main}>
        <div className={styles.card}>
          <h1 className={inter.className}>Welcome to Flow Walletless App!</h1>
          <div
            style={{
              display: "flex",
              flexDirection: "column",
              gap: "20px",
              margin: "20px",
            }}
          >
            <button style={{ padding: "20px", width: 'auto' }}>Sign Up</button>
            <button style={{ padding: "20px" }}>Sign Out</button>
          </div>
        </div>
      </main>
    </>
  );
}
Now we have what we need to show the creation of wallets and accounts! The next step is to configure the Google client to use the Google API to authenticate users.
Set up the Use of Google OAuth for Authentication
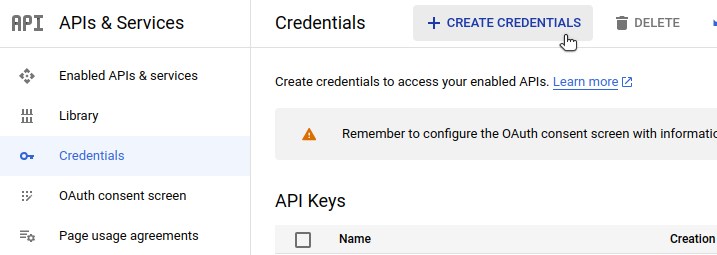
We will need Google credentials. For that, open your Google console.
Click Create Credentials and select the OAuth Client ID option. Before doing so, Google may prompt you to configure the OAuth consent screen. This simply displays information about your app and provides the user with your contact info.
Choose Web Application as the application type and give it a name. We will use the same name: flow_walletless_app. Add http://localhost:3001/api/auth/callback/google as the authorized redirect URI.
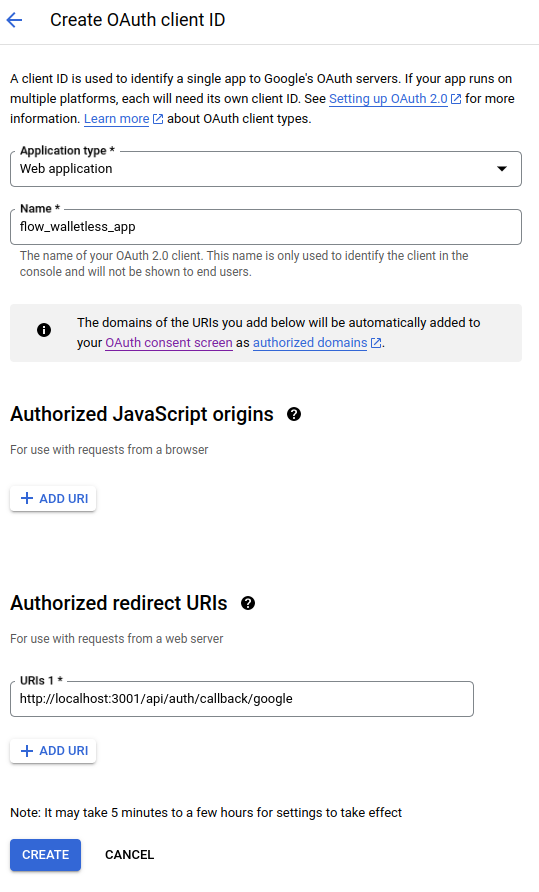
Click on the Create button. A modal should appear with the Google credentials.
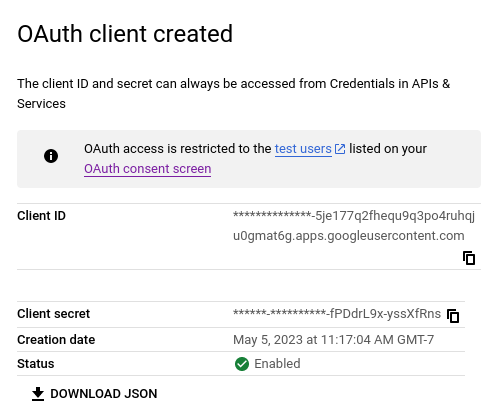
We will need the Client ID and Client secret to use in our .env file shortly.
Next, we’ll add the next-auth package. To do this, run the following command:
$ npm i next-authOpen the .env file and add the following new environment variables:
GOOGLE_CLIENT_ID= <GOOGLE CLIENT ID>
GOOGLE_CLIENT_SECRET=<GOOGLE CLIENT SECRET>
NEXTAUTH_URL=http://localhost:3001
NEXTAUTH_SECRET=<YOUR NEXTAUTH SECRET>
Paste in your copied Google Client ID and Client Secret.
The NextAuth secret can be generated via the terminal with the following command:
$ openssl rand -base64 32Copy the result, which should be a random string of letters, numbers, and symbols. Use this as your value for NEXTAUTH_SECRET in the .env file.
Configure NextAuth to Use Google
Next.js allows you to create serverless API routes without creating a full backend server. Each file under api is treated like an endpoint.
Inside the pages/api/ folder, create a new folder called auth. Then create a file in that folder called [...nextauth].ts, and add the following code:
// pages/api/auth/[...nextauth].ts

import NextAuth from "next-auth"
import GoogleProvider from "next-auth/providers/google";

export default NextAuth({
    providers: [
        GoogleProvider({
            clientId: process.env.GOOGLE_CLIENT_ID as string,
            clientSecret: process.env.GOOGLE_CLIENT_SECRET as string,
        })
    ],
})
Update _app.tsx file to use NextAuth SessionProvider
Modify the _app.tsx file found inside the pages folder by adding the SessionProvider from the NextAuth library. Your file should look like this:
// pages/_app.tsx

import "@/styles/globals.css";
import { SessionProvider } from "next-auth/react";
import type { AppProps } from "next/app";

export default function App({ Component, pageProps }: AppProps) {
  return (
    <SessionProvider session={pageProps.session}>
      <Component {...pageProps} />
    </SessionProvider>
  );
}
Update the Main Page To Use NextAuth Functions
Let us go back to our index.tsx file in the pages folder. We need to import the functions from the NextAuth library and use them to log users in and out. Our updated index.tsx file should look like this:
// pages/index.tsx

import styles from "@/styles/Home.module.css";
import { Inter } from "next/font/google";
import Head from "next/head";
import { useSession, signIn, signOut } from "next-auth/react";

const inter = Inter({ subsets: ["latin"] });

export default function Home() {
  const { data: session } = useSession();

  console.log("session data",session)

  const signInWithGoogle = () => {
    signIn();
  };

  const signOutWithGoogle = () => {
    signOut();
  };

  return (
    <>
      <Head>
        <title>Create Next App</title>
        <meta name="description" content="Generated by create next app" />
        <meta name="viewport" content="width=device-width, initial-scale=1" />
        <link rel="icon" href="/favicon.ico" />
      </Head>
      <main className={styles.main}>
        <div className={styles.card}>
          <h1 className={inter.className}>Welcome to Flow Walletless App!</h1>
          <div
            style={{
              display: "flex",
              flexDirection: "column",
              gap: "20px",
              margin: "20px",
            }}
          >
            <button onClick={signInWithGoogle} style={{ padding: "20px", width: "auto" }}>Sign Up</button>
            <button onClick={signOutWithGoogle} style={{ padding: "20px" }}>Sign Out</button>
          </div>
        </div>
      </main>
    </>
  );
}
Build the “Create User” Endpoint
Now create a users folder underneath pages/api. Inside this new folder, create a file called index.ts. This file is responsible for:
- Creating a user (first checks if this user already exists)
- Calling the Wallet API to create a wallet for this user
- Calling the Wallet API and retrieving the
jobIddata if the User entity does not yet have the address created
These actions are performed within the handle function, which calls the checkWallet function. Paste the following snippet into your index.ts file:
// pages/api/users/index.ts

import { User } from "@prisma/client";
import { BaseNextRequest, BaseNextResponse } from "next/dist/server/base-http";
import prisma from "../../../lib/prisma";

export default async function handle(
 req: BaseNextRequest,
 res: BaseNextResponse
) {
 const userEmail = JSON.parse(req.body).email;
 const userName = JSON.parse(req.body).name;

 try {
   const user = await prisma.user.findFirst({
     where: {
       email: userEmail,
     },
   });

   if (user == null) {
     await prisma.user.create({
       data: {
         email: userEmail,
         name: userName,
         flowWalletAddress: null,
         flowWalletJobId: null,
       },
     });
   } else {
     await checkWallet(user);
   }
 } catch (e) {
   console.log(e);
 }
}

const checkWallet = async (user: User) => {
 const jobId = user.flowWalletJobId;
 const address = user.flowWalletAddress;

 if (address != null) {
   return;
 }

 if (jobId != null) {
   const request: any = await fetch(`http://localhost:3000/v1/jobs/${jobId}`, {
     method: "GET",
   });

   const jsonData = await request.json();

   if (jsonData.state === "COMPLETE") {
     const address = await jsonData.result;
     await prisma.user.update({
       where: {
         id: user.id,
       },
       data: {
         flowWalletAddress: address,
       },
     });
     return;
   }

   if (request.data.state === "FAILED") {
     const request: any = await fetch("http://localhost:3000/v1/accounts", {
       method: "POST",
     });
     const jsonData = await request.json();
     await prisma.user.update({
       where: {
         id: user.id,
       },
       data: {
         flowWalletJobId: jsonData.jobId,
       },
     });
     return;
   }
 }

 if (jobId == null) {
   const request: any = await fetch("http://localhost:3000/v1/accounts", {
     method: "POST",
   });
   const jsonData = await request.json();
   await prisma.user.update({
     where: {
       id: user.id,
     },
     data: {
       flowWalletJobId: jsonData.jobId,
     },
   });
   return;
 }
};
POST requests to the api/users path will result in calling the handle function. We’ll get to that shortly, but first, we need to create another endpoint for retrieving existing user information.
Build the “Get User” Endpoint
We’ll create another file in the pages/api/users folder, called getUser.ts. This file is responsible for finding a user in our database based on their email. Copy the following snippet and paste it into getUser.ts:
// pages/api/users/getUser.ts

import prisma from "../../../lib/prisma";

export default async function handle(
  req: {
    query: {
      email: string;
    };
  },
  res: any
) {
  try {
    const { email } = req.query;
    const user = await prisma.user.findFirst({
      where: {
        email: email,
      },
    });

    return res.json(user);
  } catch (e) {
    console.log(e);
  }
}
And that's it! With these two files in the pages/api/users folder, we’re ready for our Next.js application frontend to make calls to our backend.
Add “Create User” and “Get User” Functions to Main Page
Now, let’s go back to the pages/index.tsx file to add the new functions that will make the requests to the backend. Replace the contents of index.tsx file with the following snippet:
// pages/index.tsx
import styles from "@/styles/Home.module.css";
import { Inter } from "next/font/google";
import Head from "next/head";
import { useSession, signIn, signOut } from "next-auth/react";
import { useEffect, useState } from "react";
import { User } from "@prisma/client";
const inter = Inter({ subsets: ["latin"] });
export default function Home() {
const { data: session } = useSession();
const [user, setUser] = useState<User | null>(null);
const signInWithGoogle = () => {
signIn();
};
const signOutWithGoogle = () => {
signOut();
};
const getUser = async () => {
const response = await fetch(
`/api/users/getUser?email=${session?.user?.email}`,
{
method: "GET",
}
);
const data = await response.json();
setUser(data);
return data?.flowWalletAddress != null ? true : false;
};
console.log(user)
const createUser = async () => {
await fetch("/api/users", {
method: "POST",
body: JSON.stringify({ email: session?.user?.email, name: session?.user?.name }),
});
};
useEffect(() => {
if (session) {
getUser();
createUser();
}
}, [session]);
return (
<>
<Head>
<title>Create Next App</title>
<meta name="description" content="Generated by create next app" />
<meta name="viewport" content="width=device-width, initial-scale=1" />
<link rel="icon" href="/favicon.ico" />
</Head>
<main className={styles.main}>
<div className={styles.card}>
<h1 className={inter.className}>Welcome to Flow Walletless App!</h1>
<div
style={{
display: "flex",
flexDirection: "column",
gap: "20px",
margin: "20px",
}}
>
{user ? (
<div>
<h5 className={inter.className}>User Name: {user.name}</h5>
<h5 className={inter.className}>User Email: {user.email}</h5>
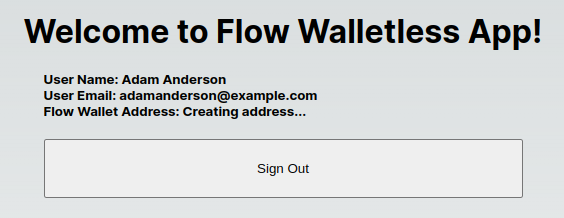
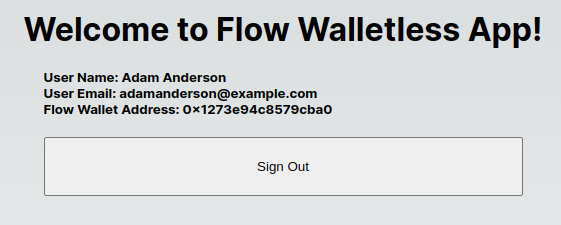
<h5 className={inter.className}>Flow Wallet Address: {user.flowWalletAddress ? <a href={`https://testnet.flowdiver.eo/account/${user.flowWalletAddress}`} style={{textDecoration: "underline"}} target="_blank">{user.flowWalletAddress}</a> : 'Creating address...'}</h5>
</div>
) : (
<button
onClick={signInWithGoogle}
style={{ padding: "20px", width: "auto" }}
>
Sign Up
</button>
)}
<button onClick={signOutWithGoogle} style={{ padding: "20px" }}>
Sign Out
</button>
</div>
</div>
</main>
</>
);
}We’ve added two functions:
getUsersearches the database for a user by emailcreateUsercreates a user or updates it if it does not have an address
We also added a useEffect that checks if the user is logged in with their Google account. If so, the getUser function is called, returning true if the user exists and has a registered email address.
If not, we call the createUser function, which makes the necessary checks and calls.
Test Our Next.js Application
Finally, we restart our Next.js application with the following command:
$ npm run devYou can now sign in with your Google account, and the app will make the necessary calls to our wallet API to create a Flow Testnet address! Be sure to run this address through the Flow Diver Testnet explorer as well to see the Flow Account model in action, such as the keys and tokens sections.
This is the first step in the walletless Flow process! By following these instructions, your app will create users and accounts in a way that is convenient for the end user.
But the wallet API does not stop there. You can do much more with it, such as execute and sign transactions, run scripts to fetch data from the blockchain, and more. Be sure to check out the completed front-end project as well as the altered API repo.
Conclusion
Account abstraction (AA) and walletless onboarding in Flow offer developers a unique solution. By being able to delegate control over accounts, Flow allows developers to create applications that provide users with a seamless onboarding experience. This will hopefully lead to greater adoption of dApps and a new wave of web3 users.
Opinions expressed by DZone contributors are their own.
Comments