Guide to Make Your Own Proxy for More IPs
In this article, you'll learn how to create your own proxy in order to set up a secure network and enhance your cybersecurity.
Join the DZone community and get the full member experience.
Join For FreeThere are lots of dedicated proxy providers which offer a paid proxy for your IP address, which can help you mask your real IP address online. With new IPs you can bypass blocked websites, anonymous surfing, and it's good for your online security.

I’m going to try and make this super simple to follow so that all of you can do it, and make some of your OWN proxies. These are entirely legit proxies and depending on your server can be very fast, but they are not residential. I’m hoping in about a week or so I can post how residential IPs are made. This also is meant for PC unless you can get Putty (see below about Putty) to work with Mac. With that being said, I am going to make a list of the steps to making an IP.
How to Set Up a Proxy by Yourself, Step-by-Step
1. Locate/choose the server you want to make your IPs on. The server needs to have CentOS version 7, 64 bit. Most server sites will have this option somewhere (Vultr is one example of this). Be sure to choose a server closest to where you trying to connect so that your proxies have top speed.
2. Now you have a server selected. Next, you need to head on over and download Putty from putty.org. This should not be downloaded on your server but on your own computer. This is the download that will allow you to connect to the CentOS server.
3. Once you have Putty downloaded, you're going to open it. In the “Hostname (or IP address)” box you're going to enter your server IP. The IP is commonly on the control panel on the site where you got your server. Sometimes it’s also emailed to you. Every server will have it in a slightly different spot so just look around for what looks like an IP.
4. After entering the IP, click “open” at the bottom (If a message comes up, click yes). Now you should be in the terminal box (looks black like a cmd box). It should say login and you want to type in the word root .

5. Next, you will be asked to enter a password. This also came with the server and should be somewhere around the IP. Once you see it, enter it into the terminal looking box like it asks (you may not see the password as your typing it, but it is still working). It may ask you to enter the password a second time which is no problem just do it; I find it better to type out then actually copy/paste.
6. Now, depending on your server, it may ask you for a new password. This can be whatever you like. If you don’t see anything related to making a new password then go to step 7.
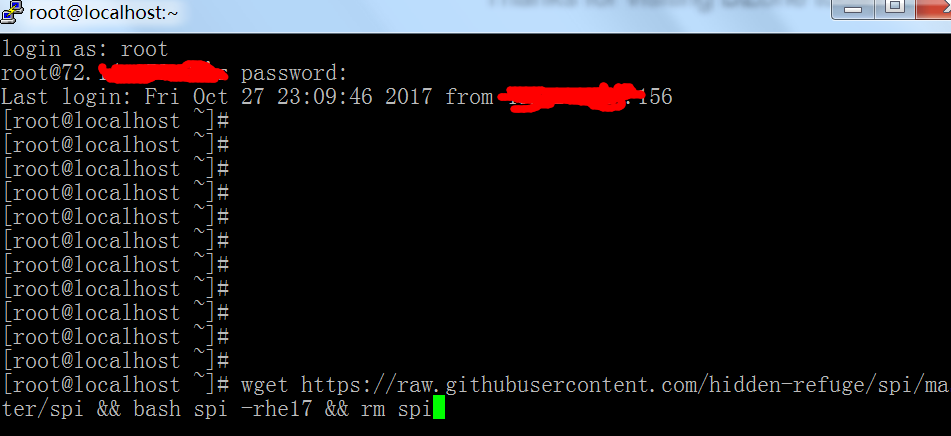
7. Once you have made your password, if needed, you will officially be on your server. In the server, you will want to type yum install wget.
8. Wait for it to install. Then type in wget https://raw.githubusercontent.com/hidden-refuge/spi/master/spi && bash spi -rhe17 && rm spi.
9. Steps 10 and 11 can vary between servers, just keep an eye out for a number that looks like an IP. If it doesn’t ask for the username/password then just use the IP and the port.
10. You may be creating Username/password authenticated proxies so you will have to make a username to remember and then a password to remember (when you type it may seem like nothing is there but it is! So remember what you're typing!).
11. Now you made one proxy which is the same as other dedicated proxy services which offer a private proxy! It will be in the IP:Port:username:password format when you enter it into the browser to use. The IP is whatever it tells you, the port is always 3128, and the username/password is what you made. You need the : to separate each part of the address also. So one random example that you enter into the browser for a proxy is 47.52.24.117:3128:username:expert10. The first being the IP, then the port, then the username, and finally the password.
12. Repeat process for more proxies!
Conclusion
Hopefully, this is a big help to everyone! Remember the server location is key for speed. Also, some very well known servers may give you IPs that are easily banned. VULTR is a good example since so many people made IPs on there before. I would stay away from VULTR and servers like these. Very soon I will release a big list of lower key server sites for all group members.
Opinions expressed by DZone contributors are their own.
Comments