Handling File Uploads With NestJS and MySQL
Many developers despise dealing with file uploads. In this blog, we will teach you how to build a file uploading functionality using NestJS and MySQL.
Join the DZone community and get the full member experience.
Join For FreeMany developers despise dealing with file uploads. This can be attributed to a lack of knowledge about the best approach to take or difficulties determining how to configure their NestJS application to handle file uploads. Many people may want to save their files directly to a MySQL database, or save image names and have the image saved on disk storage: it all depends on their preferences and the goals they want to achieve. This tutorial will teach you how to build a file uploading functionality using NestJS and MySQL.
Prerequisites
Before you begin following this tutorial, ensure your system meets the following requirements:
Setting Up NestJS
Once the above-mentioned requirements are met, proceed to install the NestJS CLI and create a new project by running the following commands:
$ npm i -g @nestjs/cli $ nest new file-uploadThese commands will install the NestJS CLI and create a new NestJS project with the folder structure below.

After the NestJS project has been created, move on to the next step - install the required dependencies for your application by running the following command:
npm install --save @nestjs/typeorm typeorm mysql2 In the above command, you've installed the TypeORM and mysql2 modules: they will enable you to connect your application to a MySQL database and perform operations on it.
Setup the MySQL Database
With the above dependencies installed, proceed to set up and connect to your MySQL database. To get started, add the code in the app.module.ts file with the code snippet below.
...
import { TypeOrmModule } from '@nestjs/typeorm';
import { Image } from './image.entity';

@Module({
  imports: [TypeOrmModule.forRoot({
    type: 'mysql',
    host: 'localhost',
    port: 3306,
    username: 'root',
    password: '1234',
    database: 'blog',
    entities: [Image],
    synchronize: true,
  }),
  TypeOrmModule.forFeature([Image])
  ],
  ...
})
...
In the above code snippet, we imported TypeOrmModule from the typeorm module we installed earlier. We used the forRoot method to connect the application to a MySQL database and pass in the database credentials. Another thing to point out here is that entities properties, which allowed us to specify the entities in our module and which will give us access to the Image entity you'll be creating shortly: we also have the synchronize property set to true to automatically migrate the database.
Create Image Entity
Next, let's create the Image entity we mentioned earlier. To get started, create an image.entity.ts file in the src directory and add the code snippet below.
import { Entity, Column, PrimaryGeneratedColumn, CreateDateColumn, UpdateDateColumn } from 'typeorm';

@Entity()
export class Image {
    @PrimaryGeneratedColumn()
    id: number;

    @Column()
    name: string;

    @CreateDateColumn()
    dateCreated: Date;

    @UpdateDateColumn()
    dateUpdated: Date;
}
In the above code snippet, we imported the decorators we need to create an entity. Using these decorators we defined the properties of the entity. We have the id field to generate random id's for each record in the database using the @PrimaryGeneratedColumn() decorator, the name field to store the names of the images that will be uploaded using the @Column decorator, the dateCreated and dateUpdate fields to save the date a record was created and updated using the @CreateDateColumn() and @UpdateDateColumn().
Creating the Upload Service
With the Image entity created, let's create a service to perform the CRUD operations to handle the file uploads. In the app.service.ts file, add the code snippet below.
import { Injectable } from '@nestjs/common';
import { InjectRepository } from '@nestjs/typeorm';
import { Repository } from 'typeorm';
import { Image } from './image.entity';

@Injectable()
export class AppService {
  constructor(
    @InjectRepository(Image)
    private readonly imageRepository: Repository<Image>,
  ) {}

  async getImages(): Promise<Image[]> {
    return this.imageRepository.find();
  }

  async createImage(image: Image): Promise<Image> {
    return this.imageRepository.save(image);
  }

  async getImage(id: number): Promise<Image> {
    return this.imageRepository.findOneBy({ id });
  }

  async deleteImage(id: number): Promise<void> {
    await this.imageRepository.delete(id);
  }
}
In the above code snippet, we have imported the injectRepository decorator to inject the imageRepository into AppService and the Repository which provides you with the methods required to perform some operations on your database. So for the createImage image service, we are saving the name of the image that is been uploaded which will be passed through the controller.
Creating the Upload Controller
Now let's create the controllers to use the services. In the app.controller.ts file and add the code snippet below.
import { Injectable } from '@nestjs/common';
import { InjectRepository } from '@nestjs/typeorm';
import { Repository } from 'typeorm';
import { Image } from './image.entity';

@Injectable()
export class AppService {
  constructor(
    @InjectRepository(Image)
    private readonly imageRepository: Repository<Image>,
  ) {}

  async getImages(): Promise<Image[]> {
    return this.imageRepository.find();
  }

  async createImage(image: Image): Promise<Image> {
    return this.imageRepository.save(image);
  }

  async getImage(id: number): Promise<Image> {
    return this.imageRepository.findOneBy({ id });
  }

  async deleteImage(id: number): Promise<void> {
    await this.imageRepository.delete(id);
  }
}
In the above code snippet, we imported a couple of decorators like FileInterceptor, UploadedFile, and UseInterceptors. The FileInterceptor() interceptor to the route handler extracts the file from the request using the @UploadedFile() decorator. The FileInterceptor() decorator is exported from the @nestjs/platform-express package. The @UploadedFile() decorator is exported from @nestjs/common. The FileInterceptor() decorator takes two arguments, fieldName which is the string that supplies the name of the field from the HTML form that holds a file, and the options which is an optional object of type MulterOptions. This is the same object used by the multer constructor.
Regarding the createImage function, we have used the aforementioned decorators to handle the file upload using the FileInterceptor() passing the field name for the image and we modified the FileInterceptor() function to upload the image to disk by specifying the storage property using the diskStorage function available in multer. Then we specified the location for the images and generated random names for the images. Also, we added a filter property to restrict the upload of certain image formats. Now we get the file extracted using the @UploadedFile() decorator and get the name and save it to the database. This way we can use the name of each image to get the image from the storage location.
For the above code to work, you need to install multer by running the command below in your terminal:
npm i -D @types/multer Then, you need to register the multer module in the array of imports in the app.module.ts file:
...
import { MulterModule } from '@nestjs/platform-express';


@Module({
  ...
  MulterModule.register({
    dest: './files',
  }),],
  ...
The above configuration tells multer to handle the file upload and the location to upload the file to. Last but not least, we should create a files folder in the src directory to actually store the files.
Serving Files
To actually serve the images uploaded on your application to the user, you need to install the serve-static module by running the command below.
npm install --save @nestjs/serve-static
Then, register the ServeStaticModule in the array of imports in the app.module.ts file with the code snippet below.
...
import { ServeStaticModule } from '@nestjs/serve-static';
import { join } from 'path';

@Module({
  ...
  ServeStaticModule.forRoot({
    rootPath: join(__dirname, '..', 'files')
  }),],
  ...
In the above code snippet, you've specified the location where the files are located and can be served from.
Testing the API
Now open Postman and test the application by sending a POST request to the endpoint localhost:4000/images, and pass in the payload in the request body as a form-data.
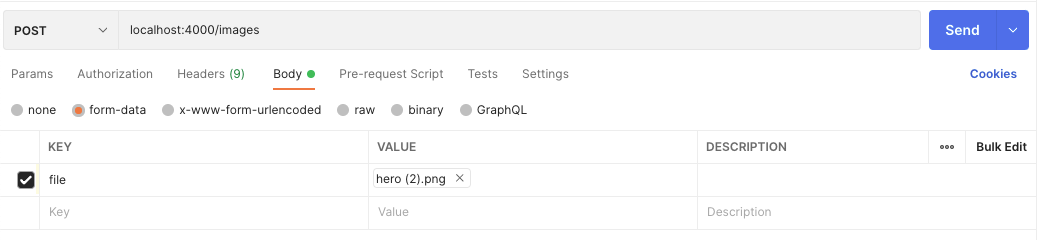
If you now look at the files folder, you should see the file you have uploaded. Feel free to go ahead: test and play around with other routes as well.
Conclusion
Through this tutorial, you've learned how to handle file upload with NestJS and MySQL. You've learned how to connect to a MySQL database using TypeORM and you have also created an entity and uploaded images to the NestJS application
For further reading, you can also read more about uploading files in NestJS. For an extra challenge, try extending the application by protecting the delete and update routes. What will you build next?
Published at DZone with permission of Clara Ekekenta. See the original article here.
Opinions expressed by DZone contributors are their own.
Comments