Hello Woo. Writing Your First Script Using the Woocommerce API
A step-by-step guide to your first “hello woo” implementation using the WooCommerceAPI.
Join the DZone community and get the full member experience.
Join For FreeA lot of folks know about the WooCommerce API but just haven’t gotten around to using it. Others are just learning about it. Still, other folks might have attempted to use it but got stuck somewhere along the way and went back to the good old ways of doing things.
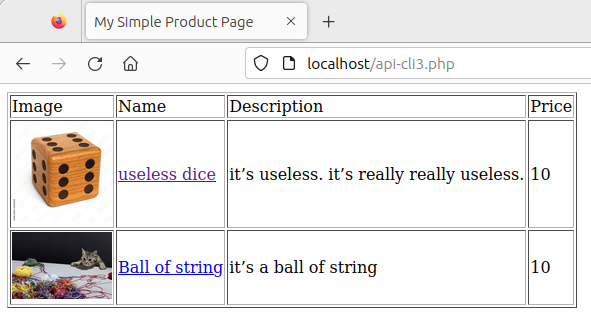
The truth is, the WooCommerce API isn’t especially complicated but – like any new technique or product feature – it does take a little getting used to. The best way to get up to speed on something like this is to find a nice, simple, easy-to-understand tutorial that takes you step by step through a process – even if it’s not the most real-world example. Nothing over-the-top – just a quick proof of concept script to see if, and how, you can get it working. Something that will let you render a page like this:
After a few minutes' search, you may have realized there’s a ton of good information on things like what the WooCommerce API is; a list of supported endpoints; how to generate an API key; and how to test the API in a tool like Postman or Insomnia.
What you won’t find are articles that explain how to take the next step: to go from a working GET request in an API testing tool to a functional (if basic) script that pulls information out of your WooCommerce installation and displays it somewhere that isn’t your WordPress site – whether that’s a separate web server or a mobile app or something else.
That’s what this post is going to show you: A step-by-step guide to your first “Hello Woo” implementation using the WooCommerce API.
The sample script I’m building today is intentionally simple and simplistic because I don’t want the details to get lost in a flashy bit of code. The example I’m building:
- is built using PHP (but it should be simple to take this and switch to Node, Python, or your whatever.
- pulls a list of products from an existing woocommerce site.
- displays the image, name, description, and price in a plain-and-simple HTML table.
Before You Start Coding
To keep this post short and readable, I’m presuming you’ve already done a few steps. But there are links – both earlier in this blog and the bullets below – to how to do those tasks.
- You have a working installation of WordPress and WooCommerce.
- You have at least one or two products published in the WooCommerce shop.
- You’ve created a read-only API key, and you have the consumer key and consumer secret handy.
- You’ve successfully gotten a response from the URL “http://YOUR_SERVER/wp-json/wc/v3/products” in a tool like Postman or Insomnia.
- “YOUR_SERVER” is, (hopefully) obviously, the URL of your actual WordPress installation.
- You have a separate system running a web server that’s capable of rendering PHP code.
Once that’s all in place, we’re ready to start coding!
Oauth for the Perplexed
It’s an undeniable fact that the thing that trips up new developers when they try their hand with the WooCommerce API is getting authentication to work.
This has nothing to do with WooCommerce and everything to do with the fact that OAuth is just… weird. And hard to wrap your head around. And infuriatingly under-documented – especially for new developers. For now, I’m going to explain just a few things about OAuth as it relates to WooCommerce to get you over that hump.
- A simple WooCommerce API operation uses OAuth version 1.0.
- Not Basic Auth, as some information out on the web might say.
- Oauth 2.0 is NOT backward compatible with OAuth 1.0. So if you have a system that supports 2.0, you might have to add some libraries to get this script working.
- Specific to PHP, there are a few different OAuth clients. For this example, I’m using the (kind of) native PHP oauth module. I’m using it because it’s simple, not because it’s the best. For a real-world implementation, you will almost certainly want to use something newer and more robust.
- Regardless of which client you use, you’ll need to make sure you can generate the following elements:
- A timestamp
- A “nonce” – a random number.
- an OAuth signature
It’s ok if you aren’t 100% sure what these items are because you’ll see them in place in the example below. But I wanted you to understand these required elements before we got too deep into the code.
But with all of that said…
Let’s Get Coding!
I’m going to build our script in phases so you can understand the key elements as they layer on top of each other.
Stage One: Get Authenticated, Get Data, Get Out.
<?php
# Set some initial variables
$url = 'http://localhost:8888/wp-json/wc/v3/products';
$consumerKey = '1234567890';
$consumerSecret = '09876564321';
$nonce = mt_rand();
$timestamp = time();

#set up oauth
$oauth = new OAuth($consumerKey,$consumerSecret);
$oauth->setTimestamp($timestamp);
$oauth->setNonce($nonce);
$sig = $oauth->generateSignature('GET',$url);

#create the CURL command
$curl = curl_init();
curl_setopt_array($curl, array(
  CURLOPT_URL => $url.'?oauth_consumer_key='.$consumerKey.'&oauth_signature_method=HMAC-SHA1&oauth_timestamp='.$timestamp.'&oauth_nonce='.$nonce.'&oauth_version=1.0&oauth_signature='.$sig,
  CURLOPT_RETURNTRANSFER => true,
));

# execute the curl command and return the data
$response = curl_exec($curl);
curl_close($curl);
echo $response;
?>
At this stage, most of the work happening is the OAuth connection. A few points to note:
- I split out the URL, consumer key, etc. into separate simple variables.
- The consumer key and consumer secret you see above are (obviously) fake. Please use your real ones.
- Equally obvious is that you should never hard-code your keys into your code. I’m doing it here for the sake of clarity only.
- There are more elegant ways to combine all those variables into the
CURLOPT_URL. Once again, I presented them in the way I did to make the code easy to follow, not because it’s the best way to do it.
If all goes well, you can run this script from the command line, and will get output that looks something like this:
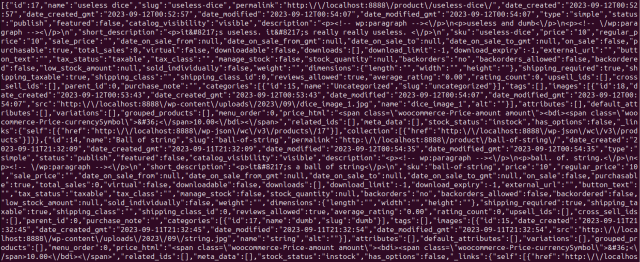
It’s not pretty, but you can see that we’re pulling data from the WooCommerce site, including the name, description, URLs, and a host of other information. And that’s good enough to let us move to the next step.
Stage Two: Extracting the Data We Need
<?php
# Set some initial variables

### CODE MISSING HERE ###

# execute the curl command and return the data
$curl_response = curl_exec($curl);
curl_close($curl);
$response_array = json_decode($curl_response,true);

foreach($response_array as $product) {
  $name = $product['name'];
  $permalink = $product['permalink'];
  $short_desc = $product['short_description'];
  $price = $product['price'];
  foreach($product['images'] as $image) {
    $image = $image['src'];
    break;
  }

echo $name.', '.$permalink.', '.$short_desc.', '.$price.', '.$image."\n";

}
?>
The key aspect of this version is that we’re using a for each loop to cycle through each of the products and extracting the data elements we want: The name, description, and price; along with the image link and a to product on the WooCommercce server itself.
A few details I’d like to call out:
- Everything from the line
# Set some initial variablesto# execute the curl command and return the datais the same as the previous stage, so I didn’t bother to include it. A full version of each of the scripts is available as a download at the end of this post. - The raw output of our API call is in string format, so I added
json_decode()it so PHP can process the elements as an array. - there is the possibility of multiple images for a single product. My code grabs the first image and exits.
- It’s 100% likely that the code will break if your product doesn’t have an image.
As before, you can run this script straight from the command line, with the output looking something like this:

You can see that we’ve got a much clearer picture of the data we’re extracting. The only point to notice is that the HTML formatting in the description is still present.
Having gotten to this point, our script is ready to achieve its third and final form.
Stage 3: Ready for Production!
<?php
# Set some initial variables

### CODE (still) MISSING HERE ###

# execute the curl command and return the data
$curl_response = curl_exec($curl);
curl_close($curl);
$response_array = json_decode($curl_response,true);

$productlist = '<tr><td>Image</td><td>Name</td><td>Description</td><td>Price</td></tr>'."\n";
foreach($response_array as $product) {
  $name = $product['name'];
  $permalink = $product['permalink'];
  $short_desc = $product['short_description'];
  $price = $product['price'];
  foreach($product['images'] as $image) {
    $image = $image['src'];
    break;
  }
  $productlist = $productlist.'<tr><td><IMG SRC="'.$image.'" width="100"></td><td><A HREF="'.$permalink.'"">'.$name.'</a></td><td>'.$short_desc.'</td><td>'.$price.'</td></tr>'."\n";
}
?>

<!DOCTYPE html>
<html>
  <head>
    <title>My Simple Product Page</title>
  </head>
  <body>
    <table border=1>
      <?php echo $productlist; ?>
    </table>
  </body>
</html>
In this iteration of the code, we’re just adding the elements that allow it to display as a web page. Those include:
- The
$productlistvariable, that wraps the data into an HTML table structure. - Displaying the product image rather than listing the URL.
- Combining the name with the product URL so that the name is clickable.
The result, as we saw earlier, should look like this:

The (Mostly) Unnecessary Summary
The key takeaway from all this is that setting up and using the WooCommerce API isn’t particularly difficult. Having seen a simple example, it’s likely you already have ideas on how to extend and enhance what you’ve learned here. And the best part is that now you have the knowledge to turn those ideas into reality!
Opinions expressed by DZone contributors are their own.
Comments