How Continuous Integration Can Help You to Make a Simple Deploy in Salesforce
Join the DZone community and get the full member experience.
Join For FreeOften, especially if you are new to Salesforce, you tend to take advantage of the changeset mechanism to deploy to Salesforce orgs. This works very well, but with this method, you don’t have a source control system to store and manage your development code. Here are some typical limitations:
- Missing version history;
- In case of problems, missing a simple way to rollback the target org;
- Team members can overwrite one another’s work with conflicting code or configuration changes;
- No easy way to clone or merge changes from multiple source orgs for deployment to the target org.
The objective of this short guide is to understand how Git can help you in the deployment process. To do this, we will use Gitlab and breakthrough its pipelines.
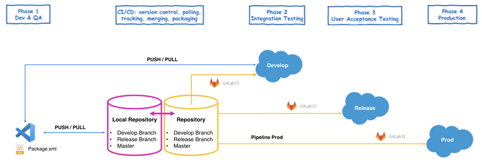
Here a big picture of our goal:
Configure Your IDE
To get started using VisualStudio Code for Salesforce development, you need to install a few tools, which are all free of charge:
- VS Code itself.
- Salesforce Extensions for VS Code (find installation instructions here)
- If you scroll down on the Marketplace Extensions site to the Documentation for Included Extensions section, you can dig into the different extensions and their documentation that are part of the extension bundle. You can also check out the GitHub repository of the extensions, as it is an open-sourced project.
- Salesforce CLI: If you’re new to the Salesforce CLI, make sure to check out the resources at the end of this post.
Here's official doc: https://developer.salesforce.com/blogs/2018/10/vs-code-for-salesforce-developers-your-questions-answered.html
Create Your Sandboxes
Starting from your Production Org, proceed with the creation of two new Sandboxes: Develop and Release. After that, you need to create a new project in Visual Studio Code.
Create Your Repository
To correctly manage the deployment in production sandboxes, it is necessary to create the repository as shown in the figure:
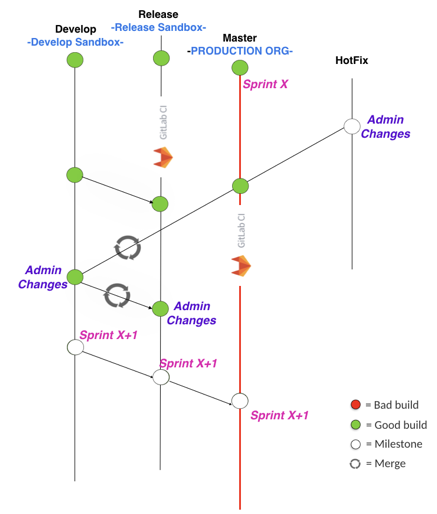
- Master = production branch.
- Release = branch of UAT; represents the candidate for production.
- Develop = development branch; represents the integration test line; to be mounted in Develop Sandbox.
- HotFix = hot fixes made directly in production.
Create Your project in Visual Studio
To start developing with this model:
- Create a project.
- Use the Org Picker to authorize Develop Org.
- Use Manifest or Org Browser to retrieve source from the default org.
- Deploy source to the default org.
Please, visit this link (https://developer.salesforce.com/tools/vscode/en/user-guide/development-models/) for details.
To create developing against non-source-tracked orgs:
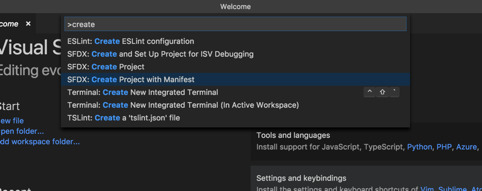
Open the VS Code editor, and from the Command Palette, run SFDX: Create Project with Manifest.
In the side bar of the code editor, click Org Picker. This opens the Command Palette, and you can select the command to authorize an org, Dev Hub, or create a scratch org. Or, you can select from the list of authorized orgs.
If this is the first time you are creating a project in VS Code and haven’t authorized an org, the display text for the Org Picker shows No Default Org Set.
Run SFDX: Authorize an Org and select a login URL, for example Sandbox.
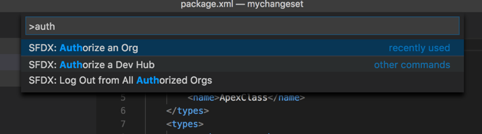
After you provide an org alias, a browser window opens. Allow access, log in to your org, and then return to the VS Code window. The Org Picker now shows the alias provided while authorizing the org.

The Manifest (package.xml) File
After connecting to a development sandbox, use the package.xml file to retrieve the metadata from your org. When you run SFDX: Create Project with the Manifest command, a package.xml file is created. Add the various metadata types you want to retrieve to this file. To understand how to work with different subsets of metadata in package.xml file, see Sample package.xml Manifest Files in the Metadata API Developer Guide.
A simple way to manage your package.xml is install this plugin for VS Code: https://marketplace.visualstudio.com/items?itemName=VignaeshRamA.sfdx-package-xml-generator
Retrieve Source
Org Development model doesn’t automatically track changes to your org, so be sure to keep track of the changes you retrieve. Retrieving source from an org overwrites the local versions of the source files. When you retrieve source from an org, you could enable conflict detection between the org and the local metadata. See Detect Conflicts.
You can retrieve source for a manifest, a source file, a directory, or a folder:
- Manifest
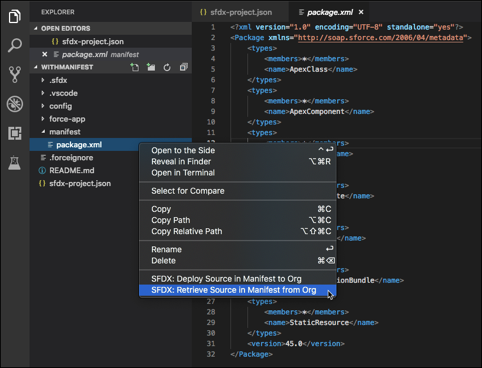
- In VS Code explorer or editor, right-click on the manifest file and select SFDX: Retrieve Source in Manifest from Org.
- With a manifest file open in the editor, open the Command Palette and run SFDX: Retrieve Source in Manifest from Org.
- Source File or Directory
- In VS Code explorer, right-click a source file or a directory and select SFDX: Retrieve Source from Org.
- With a source file open in the editor, right-click in the editing pane and select SFDX: Retrieve This Source from Org.
- With a source file open in the editor, open the Command Palette and run SFDX: Retrieve This Source from Org.
When you select an item to retrieve a source, only the existing nested items in the directory structure are retrieved. For example, if you retrieve the source for the classes folder, the Apex classes that currently exist in that directory are retrieved. The command doesn’t retrieve all the Apex classes in the org; it only updates the classes that already exist in the folder. If you want to retrieve a new Apex class, add that class (or all Apex classes) to a package.xml file, and retrieve source using the manifest file. You could also use a terminal to run sfdx force:source:retrieve --metadata ApexClass:YourApexClass.
I organized the structure of the project in the same way:
- Project folder
- salesforce folder
- src
- <<your code>>
- src
- asset folder
- <<your certificates>>
- salesforce folder
This could be useful to manage deploy in delta mode.
Configure Continuous Integration
To get your Salesforce Org to talk to GitLab automatically, we use the JWT-based authorization flow. Think of it like a way for two systems to agree on who is accessing the system and at what permission level. Take a look at this link (https://trailhead.salesforce.com/en/content/learn/projects/automate-cicd-with-gitlab/integrate-with-gitlab) to:
- Create Private Key and Digital Certificate.
- Add Digital Certificate to Your Connected App.
After that, you have a Connected APP in every sandbox that you want to connect.
In your repository, you have to create the environment variables. Go on your project, in settings -> CI/CD/Variables you have to add:
- SF_USERNAME_DEV = username of dev sandbox
- SF_USERNAME_PREPROD = username of release sandbox
- SF_CONSUMER_KEY_DEV = consumer key of DEV Connected APP
- SF_CONSUMER_KEY_PREPROD = consumer key of Release Connected APP
- SERVER_KEY_PASSWORD = password of certificate
In settings->CI/CD->General Pipelines, modify the value of the Custom CI configuration path with this value:
salesforce/src/.gitlab-ci.yml
and save.
Create and Run Your Pipeline
Working on the Develop Branch, create a .gitlab-ci.yml file in your repository in the folder root/salesforce/src.
The pipeline is composed by 4 main blocks:
- before script
- app-deploy-dev
- app-deploy-preprod
With “before-script” stage, the pipeline configure the environment in order to execute other stages; for example, it creates the folders, downloads the Salesforce Client, etc. This stage will always execute.
xxxxxxxxxx
#
# Download the Salesforce CLI and install it
#
before_script
# Set up environment variables
export CLIURL=https://developer.salesforce.com/media/salesforce-cli/sfdx-linux-amd64.tar.xz
export SFDX_AUTOUPDATE_DISABLE=false
export SFDX_USE_GENERIC_UNIX_KEYCHAIN=true
export SFDX_DOMAIN_RETRY=300
export SFDX_DISABLE_APP_HUB=true
export SFDX_LOG_LEVEL=DEBUG
export DEPLOYDIR=salesforce/Src/force-app
#Create sfdx directory
mkdir sfdx
#Install Salesforce CLI
wget -qO- $CLIURL | tar xJ -C sfdx --strip-components 1
"sudo ./sfdx/install"
# Output CLI version and plug-in information
/usr/local/bin/sfdx update
/usr/local/bin/sfdx --version
/usr/local/bin/sfdx plugins --core
# Create tmp folders
mkdir tmp-force-app
mkdir force-app
There are App-deploy-xxxx stages, one for every environment. The instructions are quite similar. For example, in the develop branch, after a push to the repository, the pipeline starts. It takes the git diff and deploys only that.
xxxxxxxxxx
####################################################
# DEPLOY DEVELOP
####################################################
app-deploy-dev
stageapp-deploy-dev
script
echo "start app-deploy-dev"
# Authorize target deployment org
/usr/local/bin/sfdx force:auth:jwt:grant --instanceurl https://test.salesforce.com --clientid $SF_CONSUMER_KEY_DEV --jwtkeyfile assets/server.key --username $SF_USERNAME_DEV --setalias DEVSPRINT
cp salesforce/src/sfdx-project-gitlab.json sfdx-project.json
cp salesforce/src/.forceignore .forceignore
git diff --name-only $CI_COMMIT_BEFORE_SHA...$CI_COMMIT_SHA $DEPLOYDIR > listfiles
tar -czvf deploy_files.tar.gz --files-from listfiles
tar -xzvf deploy_files.tar.gz -C tmp-force-app
(for f in $(find tmp-force-app/ -name "*.*" ! -name "*.js" ! -name "*.xml" ! -name "*.css" ! -name "*.svg" ! -name "*.design" ! -name "*.auradoc"); do length=$#f;strMeta='-meta.xml';filename=$f:14:$length$strMeta;cp --parents $filename tmp-force-app; done);
(for f in $(find tmp-force-app/salesforce/Src/force-app/main/default/aura/ -name "*.*"); do length=$#f;filename=$f:14:$length;filepath=$filename%/*;cp --parents $filepath/* tmp-force-app; done);
cp -r tmp-force-app/salesforce/src/force-app .
#add profiles
cp -r salesforce/Src/force-app/main/default/profiles force-app/main/default/profiles
# Deploy to target deployment org and run unit tests
/usr/local/bin/sfdx force:source:deploy --ignoreerrors --ignorewarnings --sourcepath force-app --targetusername DEVSPRINT
only
develop
To see the code, the steps are the same:
- Authorize the org.
- Identify the diff with the previous push.
- Copy only this in the tmp folder.
- Add also xml metadata (if required).
- Add profiles (to manage new custom fields)
- Deploy only the changes on your org
The output will be like this:

You can see the same thing from Salesforce -> Setup -> Deployment Status.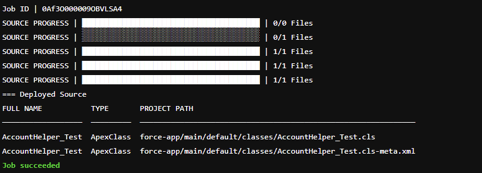
To bring the code in the release branch, you can make a merge or use a merge request. After a push of the merge, the App-deploy-preprod stage will start.
In release (pre-prod) branch, the pipeline is the same. I introduced a manual step to execute the unit test after the deployment. This is useful because if you want a very fast deploy, you can execute the deploy without the tests; but if you want to check the coverage and the test cases this stage could be very useful.
####################################################
# RUN TEST IN PREPROD
####################################################
code-testing-preprod
stagecode-testing-preprod
whenmanual
script
# Authenticate to the Dev Hub using the server key
/usr/local/bin/sfdx force:auth:jwt:grant --instanceurl https://test.salesforce.com --clientid $SF_CONSUMER_KEY_DEV --jwtkeyfile assets/server.key --username $SF_USERNAME_PREPROD --setalias PREPROD
# Unit Testing
/usr/local/bin/sfdx force:apex:test:run --wait 10 --resultformat human --codecoverage --testlevel RunLocalTests --targetusername $SF_USERNAME_PREPROD
only
release
Conclusion
In this article, I described only No-Production Orgs. In the next article, I will go deep on deploying to production. This is a simple way to create an incremental method to deploy directly in No-Production environment with continuous integration.
Opinions expressed by DZone contributors are their own.
Comments