How I Built My Own Insomnia Plugin
Insomnia helps with building, testing, and debugging APIs. Plugins extend functionality. Build your own and add new functionality with just a few lines of code!
Join the DZone community and get the full member experience.
Join For FreeInsomnia is an open-source API client that helps you test and debug GraphQL, gRPC, and REST API endpoints. As powerful as Insomnia is, sometimes you want to extend its functionality even further, which you can do with plugins.
There are many great plugins available on the Insomnia Plugin Hub, all contributed by the open-source community. Even more exciting, if you’d like to contribute, you can build your own plugin!
In this article, we’ll explore a plugin I built and then show you how you can build an Insomnia plugin of your own.
Plugin Demo
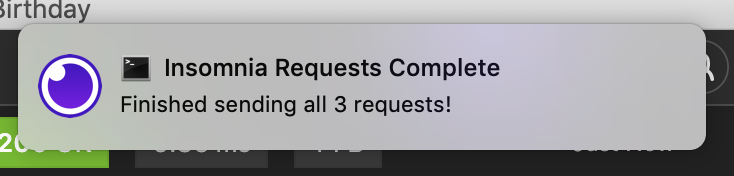
My plugin is a simple addition that allows you to initiate all the requests in a folder and then displays a desktop notification once all the requests have been completed.

If you’re a habitual multitasker like myself, you probably rapidly cycle through several apps at a time while you’re working. Your IDE, your terminal, your browser, and Insomnia may be a few of them. In the event that you have a large number of requests in your folder and don’t want to wait for them to all finish, you can move on to something else while you wait and then be notified once the job is complete.

You can find my plugin’s package on npm or view the GitHub repo here.
Plugin Installation
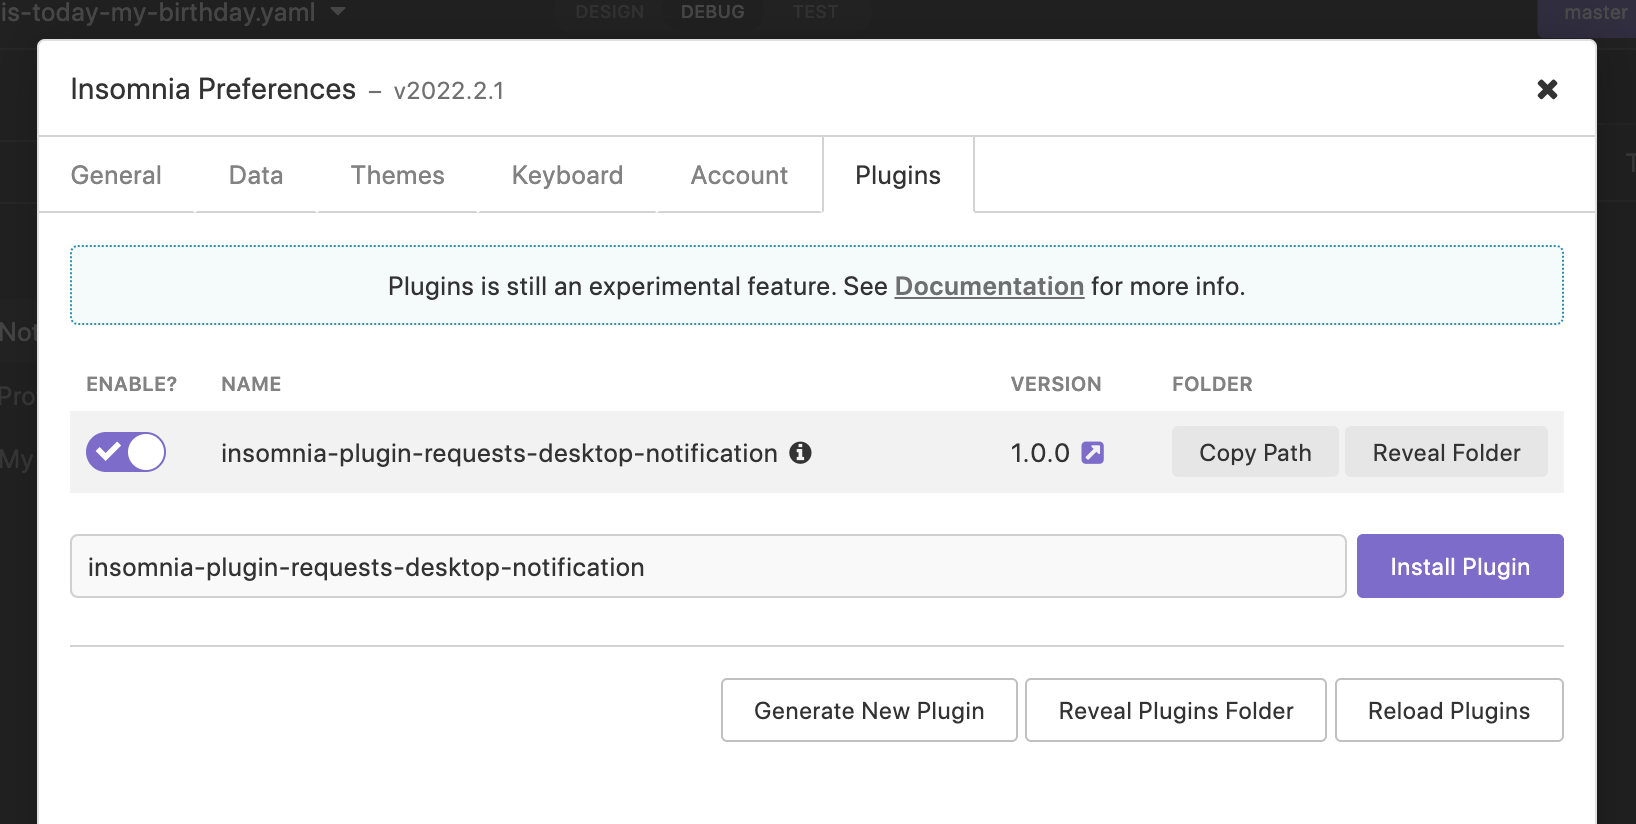
You can install Insomnia plugins through the settings page in your Insomnia desktop app. Simply click the gear icon in the top-right corner of the app, then choose the “Plugins” tab. Search for any plugin name in the text input, and then click the “Install Plugin” button to add the plugin to your app.
In the case of my plugin, the name is insomnia-plugin-requests-desktop-notification.

Plugin Usage
Once you have the plugin installed, you’re ready to start using it — no need to restart your Insomnia app. There are several variations of plugins. Some add behavior to various hooks, like request hooks or response hooks. Others add new items to dropdown menus in the app. You can even install a custom theme via a plugin.
My plugin adds a new item to the dropdown menu for a request folder. To see it in action, you can navigate to the “Debug” area of your Insomnia app. Then, create a new folder and add some requests to it (or use an existing folder if you already have one).
Next, click the dropdown trigger button to the right of the folder name to open the dropdown menu. Among the default menu items, you’ll also now see a custom menu item that my plugin adds: “Send All Requests.”
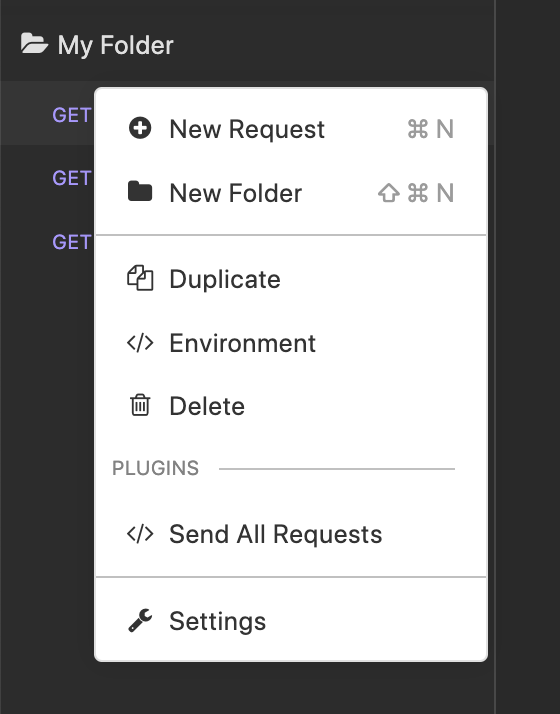
Select that menu item to send all the requests in your folder. Once all the requests have been completed, a desktop notification will appear on your machine. Ta-da!
How to Build an Insomnia Plugin
So, how did I build this? Well, it’s actually quite simple! The plugin is a small JavaScript app that consists of a main.js file and a package.json file. For the desktop notification functionality, I used the node-notifier npm package.
When creating a new Insomnia plugin, you can bootstrap your plugin by navigating to the settings screen in your Insomnia app, clicking the “Plugins” tab, and then click the “Generate New Plugin” button.
This will create a new directory for your plugin and place it in a folder in which Insomnia keeps all of its plugins locally. It also creates the main.js and package.json files for you automatically.
From there, I wrote the following code in my main.js file. Look how short it is!
const notifier = require('node-notifier');
const path = require('path');

module.exports.requestGroupActions = [
  {
    label: 'Send All Requests',
    action: async (context, data) => {
      const { requests } = data;

      for (const request of requests) {
        await context.network.sendRequest(request);
      }

      notifier.notify({
        title: 'Insomnia Requests Complete',
        message: `Finished sending all ${requests.length} requests!`,
        icon: path.join(__dirname, 'insomnia-logo.png'),
        sound: true,
      });
    },
  },
];path and node-notifier. path is a built-in module, but I needed to install node-notifier by running yarn add node-notifier in my terminal.
The main part of the code adds a new entry to the requestGroupActions array. This is what creates the new menu item in the dropdown menu for our request folder. The label is the menu item’s text, and the action is what code we want to run when someone selects that menu item.
In the action function, we do the following:
- Gather all the requests in the folder.
- Send them.
- Call
notifier.notifyonce all the requests have been completed. Thetitle,message,icon, andsoundproperties all configure our desktop notification.
That’s it! The plugin really is that simple.
Once I wrote this code, I was able to navigate to the settings page of my Insomnia app, then the “Plugins” tab, then click the “Reload Plugins” button to reload the latest changes. After that, the menu item appeared in my request folder’s dropdown menu.
Publishing to npm
After writing my plugin, I had everything working nicely locally. But I also wanted to share this plugin with the broader community. In order to do that, I needed to publish it to npm. To do so, I pushed the latest code to my GitHub repo, logged into my npm account with npm login, and then published my package using npm publish.
After publishing the initial version of the package, I was able to make a few updates to the code, generate a new package version with npm version <major|minor|patch>, push the tags to GitHub with git push --tags, push the code to GitHub with git push, and then publish the new package version to npm with npm publish.
Once my package was published in the npm registry, it was automatically added to the Insomnia Plugin Hub within the next 24 hours.
Conclusion
There you have it: how I built my very own Insomnia plugin and how you can too. To recap, Insomnia is great for building, testing, and debugging APIs. Plugins let you extend Insomnia’s functionality. Building your own custom plugin is easy: you can add new functionality with just a few lines of code!
Published at DZone with permission of Tyler Hawkins. See the original article here.
Opinions expressed by DZone contributors are their own.
Comments