How Spring Boot Starters Integrate With Your Project
The article provides an overview of Spring Boot starters, which are pre-packaged sets of dependencies that simplify adding functionality to Spring Boot applications.
Join the DZone community and get the full member experience.
Join For FreeWhen developers set up and integrate services, they often face challenges that can take up a lot of time. Starters help simplify this process by organizing code and making it easier to manage. Let's take a look at creating two starters, configuring their settings automatically, and using them in a service.
So, what are Spring Boot Starters, exactly? What benefits do they provide?

Spring Boot Starters are like packages that streamline the process of incorporating libraries and components into Spring projects, making it simpler and more efficient to manage dependencies while cutting down development time significantly.
Benefits of Using Spring Boot Starter
Integration of Libraries
- Starters include all the dependencies needed for technologies. For example
spring-boot-starter-webprovides everything for building web applications, whilespring-boot-starter-data-jpahelps with JPA database work. - By adding these starters to a project, developers can start working with the desired technology without worrying about compatibility issues or version differences.
Focus on Business Logic
- Developers can concentrate on creating business logic for dealing with infrastructure code.
- This approach speeds up development and feature deployment, ultimately boosting team productivity.
Using Configurations
- Using predefined setups helps ensure consistency in setting up and organizing projects, making it easier to maintain and advance code. Moreover, it aids in onboarding team members to the project by offering a code structure and setup.
Project Enhancements
- Furthermore, using starters that include known libraries simplifies updating dependencies and integrating Spring Boot versions.
- The support from the Spring team community linked with these starters also guarantees to resolve any questions or obstacles that might come up during development.
Task Description
In this article, we will address the issue of consolidating data from sources such as REST and GraphQL services. This problem is often encountered in projects with microservice architecture, where it is necessary to combine data coming from different services.
When it comes to solutions in a microservices setup, it’s possible to establish microservices for each integration. This approach is justifiable when the integration is extensive, and there are resources for its maintenance. However, in scenarios like working with a monolith or lacking the resources for multiple microservices support, opting for starters could be more practical.
The rationale behind selecting a library starter includes:
- Business logic segmentation. Starters facilitate the separation of business logic and integration configuration.
- Following the SOLID principles. Breaking down functionality into modules aligns with principles enhancing code maintainability and scalability.
- Simplified setup. Starters streamline the process of configuring services by minimizing the required amount of configuration code.
- Ease of use. Integrating a service becomes more straightforward by adding a dependency and configuring essential parameters.
Our Scenario
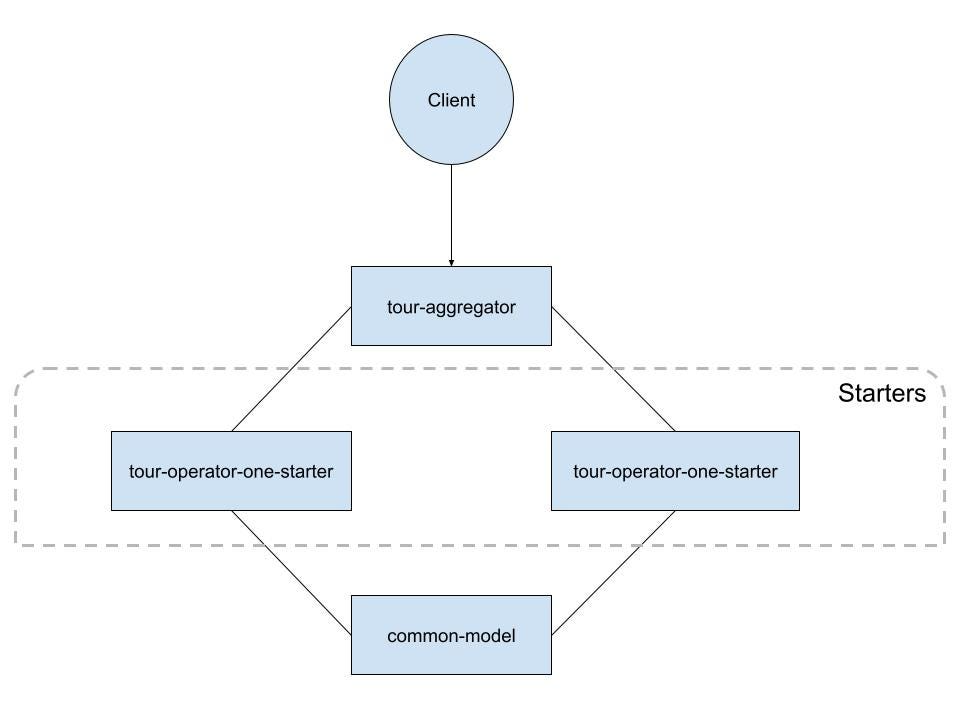
Let's illustrate the solution with an example involving a tour aggregator that gathers data from tour operators and merges them. To start off, we will develop two starters (tour-operator-one-starter and tour-operator-two-starter) both of which will use a shared module (common-model) containing fundamental models and interfaces. These starter libraries will connect to the aggregator service (tour-aggregator).
Creating tour-operator-one-starter
Starter is designed to integrate with the tour operator and fetch data via the REST API.
All official starters use the naming scheme spring-boot-starter-*, where * denotes a specific type of application. Third-party starters should not start with spring-boot as it is reserved for official starters from the Spring team.
Typically, third-party starters begin with the project name. For example, my starter will be named tour-operator-one-spring-boot-starter.
1. Create pom.xml
Add dependencies.
<dependencies>
        <dependency>
            <groupId>org.springframework.boot</groupId>
            <artifactId>spring-boot-starter-web</artifactId>
        </dependency>
        <dependency>
            <groupId>org.springframework.boot</groupId>
            <artifactId>spring-boot-configuration-processor</artifactId>
            <optional>true</optional>
        </dependency>
        <dependency>
            <groupId>com.common.model</groupId>
            <artifactId>common-model</artifactId>
            <version>0.0.1-SNAPSHOT</version>
        </dependency>
        <dependency>
            <groupId>org.springframework.boot</groupId>
            <artifactId>spring-boot-starter-test</artifactId>
            <scope>test</scope>
        </dependency>
    </dependencies>
2. Create TourOperatorOneProperties
These are the properties we will set in tour-aggregator to configure our starter.
@ConfigurationProperties(prefix = "tour-operator.one.service")
public class TourOperatorOneProperties {

    private final Boolean enabled;
    private final String url;
    private final Credentials credentials;

    public TourOperatorOneProperties(
            Boolean enabled,
            String url,
            Credentials credentials) {
        this.enabled = enabled;
        this.url = url;
        this.credentials = credentials;
    }

    //getters

    public static class Credentials {
        private final String username;
        private final String password;

        public Credentials(String username, String password) {
            this.username = username;
            this.password = password;
        }

        //getters
    }
}
3. Create TourOperatorOneAutoConfiguration
@AutoConfiguration– indicates that this class is a configuration class for Spring Boot auto-configuration.@ConditionalOnProperty– activates the configuration if the propertytour-operator.one.service.enabledis set totrue. If the property is missing, the configuration is also activated due tomatchIfMissing = true.@EnableConfigurationProperties(TourOperatorOneProperties.class)– enables support for@ConfigurationPropertiesannotations for theTourOperatorOnePropertiesclass.
@AutoConfiguration
@ConditionalOnProperty(prefix = "tour-operator.one.service", name = "enabled", havingValue = "true", matchIfMissing = true)
@EnableConfigurationProperties(TourOperatorOneProperties.class)
public class TourOperatorOneAutoconfiguration {

    private static final Logger log = LoggerFactory.getLogger(TourOperatorOneAutoconfiguration.class);
    private final TourOperatorOneProperties properties;

    public TourOperatorOneAutoconfiguration(TourOperatorOneProperties properties) {
        this.properties = properties;
    }

    @Bean("operatorOneRestClient")
    public RestClient restClient(RestClient.Builder builder) {
        log.info("Configuration operatorRestClient: {}", properties);
        return builder
                .baseUrl(properties.getUrl())
                .defaultHeaders(httpHeaders -> {
                    if (null != properties.getCredentials()) {
                        httpHeaders.setBasicAuth(
                                properties.getCredentials().getUsername(),
                                properties.getCredentials().getPassword());
                    }
                })
                .build();
    }

    @Bean("tourOperatorOneService")
    public TourOperatorOneServiceImpl tourOperatorService(TourOperatorOneProperties properties,
                                                          @Qualifier("operatorOneRestClient") RestClient restClient) {
        log.info("Configuration tourOperatorService: {} and restClient: {}", properties, restClient);
        return new TourOperatorOneServiceImpl(restClient);
    }
}
In this example, I use @ConditionalOnProperty, but there are many other conditional annotations:
@ConditionalOnBean– generates a bean when a specified bean exists in theBeanFactory@ConditionalOnMissingBean– facilitates creating a bean if a particular bean is not found in theBeanFactory@ConditionalOnClass– produces a bean when a specific class is present, in the classpath@ConditionalOnMissingClass– acts oppositely to@ConditionalOnClass
You should choose what suits your needs best. You can learn more about conditional annotations here.
4. Create TourOperatorOneServiceImpl
In this class, we implement the base interface and lay down the main business logic for retrieving data from the first tour operator and standardizing it according to the common interface.
public class TourOperatorOneServiceImpl implements TourOperatorService {

    private final RestClient restClient;

    public TourOperatorOneServiceImpl(@Qualifier("operatorOneRestClient") RestClient restClient) {
        this.restClient = restClient;
    }

    @Override
    public TourOperatorResponse makeRequest(TourOperatorRequest request) {
        var tourRequest = mapToOperatorRequest(request); // transformation of our request into the one that the tour operator will understand

        var responseList = restClient
                .post()
                .body(tourRequest)
                .retrieve()
                .toEntity(new ParameterizedTypeReference<List<TourProposition>>() {
                });

        return TourOperatorResponse.builder()
                .deals(responseList
                        .getBody()
                        .stream()
                        .map(ModelUtils::mapToCommonModel)
                        .toList())
                .build();
    }
}
5. Create Auto-Configuration File
To register auto-configurations, we create the file resources/META-INF/spring/org.springframework.boot.autoconfigure.AutoConfiguration.imports .
com.tour.operator.one.autoconfiguration.TourOperatorOneAutoConfigurationThis file contains a collection of configurations. In my scenario, one configuration is listed. If you have multiple configurations, make sure that each configuration is listed on a separate line.
By creating this file, you are informing Spring Boot that it should load and utilize the TourOperatorOneAutoConfiguration class for setup when certain conditions specified by the @ConditionalOnProperty annotation are satisfied.
Thus, we have established the setup for collaborating with the tour operator by developing configuration classes and beans and leveraging properties.
Creating tour-operator-two-starter
Up is creating tour-operator-two-starter a kit designed to integrate with the second tour operator and retrieve data from a GraphQL server through a straightforward HTTP request.
Let's proceed with the process used for tour-operator-one-starter.
1. Create pom.xml
Add dependencies.
<dependencies>
        <dependency>
            <groupId>org.springframework.boot</groupId>
            <artifactId>spring-boot-starter-web</artifactId>
        </dependency>
        <dependency>
            <groupId>org.springframework.boot</groupId>
            <artifactId>spring-boot-configuration-processor</artifactId>
            <optional>true</optional>
        </dependency>
        <dependency>
            <groupId>com.common.model</groupId>
            <artifactId>common-model</artifactId>
            <version>0.0.1-SNAPSHOT</version>
        </dependency>
        <dependency>
            <groupId>org.springframework.boot</groupId>
            <artifactId>spring-boot-starter-test</artifactId>
            <scope>test</scope>
        </dependency>
    </dependencies>
2. Create TourOperatorTwoProperties
These are the properties we will set in tour-aggregator to configure our starter.
@ConfigurationProperties(prefix = "tour-operator.two.service")
public class TourOperatorTwoProperties {

    private final Boolean enabled;
    private final String url;
    private final String apiKey;

    public TourOperatorTwoProperties(
            Boolean enabled,
            String url,
            String apiKey) {
        this.enabled = enabled;
        this.url = url;
        this.apiKey = apiKey;
    }

    //getters
}
2. Create TourOperatorOneAutoConfiguration
@AutoConfiguration
@ConditionalOnProperty(prefix = "tour-operator.two.service", name = "enabled", havingValue = "true", matchIfMissing = true)
@EnableConfigurationProperties(TourOperatorTwoProperties.class)
public class TourOperatorTwoAutoconfiguration {

    private static final Logger log = LoggerFactory.getLogger(TourOperatorTwoAutoconfiguration.class);
    private final TourOperatorTwoProperties properties;

    public TourOperatorTwoAutoconfiguration(TourOperatorTwoProperties properties) {
        log.info("Configuration with: {}", properties);
        this.properties = properties;
    }

    @Bean("operatorTwoRestClient")
    public RestClient restClient(RestClient.Builder builder) {
        log.info("Configuration operatorRestClient: {}", properties);
        return builder
                .baseUrl(properties.getUrl())
                .defaultHeaders(httpHeaders -> {
                    httpHeaders.set("X-Api-Key", properties.getApiKey());
                })
                .build();
    }

    @Bean("tourOperatorTwoService")
    public TourOperatorTwoServiceImpl tourOperatorService(TourOperatorTwoProperties properties,
                                                          @Qualifier("operatorTwoRestClient") RestClient restClient) {
        log.info("Configuration tourOperatorService: {} and restClient: {}", properties, restClient);
        return new TourOperatorTwoServiceImpl(restClient);
    }
}
3. Create TourOperatorOneServiceImpl
Receiving data from the second tour operator.
public class TourOperatorTwoServiceImpl implements TourOperatorService {

    private static final String QUERY =
            """
                    query makeTourRequest($request: TourOperatorRequest) {
                                      makeTourRequest(request: $request) {
                                        id
                                        startDate
                                        endDate
                                        price
                                        currency
                                        days
                                        hotel {
                                          hotelName
                                          hotelRating
                                          countryCode
                                        }
                                      }
                                    }
                    """;

    private final RestClient restClient;

    public TourOperatorTwoServiceImpl(@Qualifier("operatorTwoRestClient") RestClient restClient) {
        this.restClient = restClient;
    }

    @Override
    public TourOperatorResponse makeRequest(TourOperatorRequest request) {
        var tourRequest = mapToOperatorRequest(request);
        var variables = Map.ofEntries(Map.entry("request", tourRequest));
        var requestBody = Map.ofEntries(
                Map.entry("query", QUERY),
                Map.entry("variables", variables));

        var response = restClient
                .post()
                .body(requestBody)
                .retrieve()
                .toEntity(QueryResponse.class);

        return TourOperatorResponse.builder()
                .deals(response.getBody()
                        .data()
                        .makeTourRequest()
                        .stream()
                        .map(ModelUtils::mapToCommonModel).toList())
                .build();
    }
}
Create Auto-Configuration File
Create the file resources/META-INF/spring/org.springframework.boot. autoconfigure.AutoConfiguration.imports.
com.tour.operator.two.autoconfiguration.TourOperatorTwoAutoconfigurationCreating and Using the Aggregator Service
An aggregator service is designed to gather data from tour operators. This involves linking starters, configuring parameters, and using beans with a shared interface.
1. Connect Starter Libraries
Include dependencies for the two libraries in the pom.xml.
<dependencies>
    ...
        <dependency>
            <groupId>com.tour.operator</groupId>
            <artifactId>tour-operator-one-spring-boot-starter</artifactId>
            <version>0.0.2-SNAPSHOT</version>
        </dependency>
        <dependency>
            <groupId>com.tour.operator</groupId>
            <artifactId>tour-operator-two-spring-boot-starter</artifactId>
            <version>0.0.1-SNAPSHOT</version>
        </dependency>
       ...
    </dependencies>
Configure Parameters in application.yaml
Specify the necessary data, such as URLs and connection parameters, in the application.yaml.
spring:
  application:
    name: tour-aggregator
tour-operator:
  one:
    service:
      enabled: true
      url: http://localhost:8090/api/tours
      credentials:
        username: user123
        password: pass123
  two:
    service:
      enabled: true
      url: http://localhost:8091/graphql
      api-key: 11d1de45-5743-4b58-9e08-f6038fe05c8f
Use Services
We use the established beans, which implement the TourOperatorService interface within the TourServiceImpl class. This class outlines the process of retrieving and aggregating data from various tour operators.
@Service
public class TourServiceImpl implements TourService {

    private static final Logger log = LoggerFactory.getLogger(TourServiceImpl.class);
    private final List<TourOperatorService> tourOperatorServices;
    private final Executor tourOperatorExecutor;
    private final Integer responseTimeout;

    public TourServiceImpl(List<TourOperatorService> tourOperatorServices,
                           @Qualifier("tourOperatorTaskExecutor") Executor tourOperatorExecutor,
                           @Value("${app.response-timeout:5}") Integer responseTimeout) {
        this.tourOperatorServices = tourOperatorServices;
        this.tourOperatorExecutor = tourOperatorExecutor;
        this.responseTimeout = responseTimeout;

    }


    public List<TourOffer> getTourOffers(@RequestBody TourOperatorRequest request) {
        log.info("Send request: {}", request);

        var futures = tourOperatorServices.stream()
                .map(tourOperator -> CompletableFuture.supplyAsync(() -> tourOperator.makeRequest(request), tourOperatorExecutor)
                        .orTimeout(responseTimeout, TimeUnit.SECONDS)
                        .exceptionally(ex -> TourOperatorResponse.builder().deals(List.of()).build())
                )
                .toList();

        var response = futures.stream()
                .map(CompletableFuture::join)
                .map(TourOperatorResponse::getDeals)
                .filter(Objects::nonNull)
                .flatMap(List::stream)
                .toList();

        return response;
    }
}
Allocating Resources for Calls
It’s good practice to allocate separate resources for calls, allowing better thread management and performance optimization.
@Configuration
public class ThreadPoolConfig {

    private final Integer threadCount;

    public ThreadPoolConfig(@Value("${app.thread-count:5}") Integer threadCount) {
        this.threadCount = threadCount;
    }

    @Bean(name = "tourOperatorTaskExecutor")
    public Executor tourOperatorTaskExecutor() {
        return Executors.newFixedThreadPool(threadCount);
    }
}
This code ensures efficient management of asynchronous tasks and helps avoid blocking the main thread, thereby improving overall system performance.
Conclusion
In this article, we’ve created two starters for reaching out to tour operators through REST and GraphQL technology interfaces. These steps include all the configurations and elements to simplify their usage. Afterward, we merged them into a system that communicates with them in an asynchronous manner and aggregates data.
This approach solved several problems:
- Simplified integration and setup. By using auto-configuration and properties of coding, we saved time during development.
- Improved flexibility and usability. Separating functions into starters improved code structure and simplified maintenance.
- System flexibility. We can easily add new integrations without breaking the existing logic.
Now, our system is better equipped to adapt and scale effortlessly while being easier to manage, leading to enhancements in its architecture and performance.
I appreciate you reading this article. I look forward to hearing your thoughts and feedback!
Opinions expressed by DZone contributors are their own.
Comments